This tutorial will set you on your way to learning Excel macros. You will find how to record a macro and insert VBA code in Excel, copy macros from one workbook to another, enable and disable them, view the code, make changes, and a lot more.
For Excel newbies, the concept of macros often looks insurmountable. Indeed, it may take months or even years of training to master VBA. However, this does not mean you cannot take advantage of the automation power of Excel macros right away. Even if you are a complete novice in VBA programming, you can easily record a macro to automate some of your repetitive tasks.
This article your entry point to the fascinating world of Excel macros. It covers the essential basics that you need to know to get started and provides links to the related in-depth tutorials.
What are macros in Excel?
Excel macro is a set of commands or instructions stored in a workbook in the form of VBA code. You can think of it as a small program to perform a predefined sequence of actions. Once created, macros can be re-used anytime. Running a macro executes the commands it contains.
Typically, macros are used to automate repetitive tasks and daily routines. Skilled VBA developers can write really sophisticated macros that go well beyond reducing the number of keystrokes.
Quite often, you may hear people referring to a "macro" as "VBA". Technically, there is a distinction: a macro is a piece of code while Visual Basic for Applications (VBA) is the programming language created by Microsoft to write macros.
Why use Excel macros?
The main purpose of macros is to have more work done in less time. Like you use formulas to crunch numbers and manipulate text strings, you can use macros to perform frequent tasks automatically.
Let's say, you are to create a weekly report for your supervisor. For this, you import various analytics data from a couple or more external resources. The problem is that those data are messy, superfluous, or not in the format that Excel can understand. That means you need to reformat dates and numbers, trim extra spaces and delete blanks, copy and paste information into appropriate columns, build charts to visualize trends, and do a lot more different things to make your report clear and user-friendly. Now, imaging that all these operations can be performed for you instantly in a mouse click!
Of course, building a complex macro takes time. Sometimes, it can take even more time than performing the same manipulations manually. But creating a macro is a one time set-up. Once written, debugged and tested, VBA code will do the job quickly and flawlessly, minimizing human errors and costly mistakes.
How to create a macro in Excel
There are two ways to create macros in Excel - by using the Macro Recorder and Visual Basic Editor.
Tip. Within Excel, most operations with macros are done via the Developer tab, so be sure to add Developer tab to your Excel ribbon.
Recording a macro
Even if you don't know anything about programing in general and VBA in particular, you can easily automate some of your work just by letting Excel record your actions as a macro. While you are performing the steps, Excel closely watches and writes down your mouse clicks and keystrokes in the VBA language.
The Macro Recorder captures nearly everything that you do and produces a very detailed (often redundant) code. After you've stopped the recording and saved the macro, you can view its code in the Visual Basic Editor and make small changes. When you run the macro, Excel goes back to the recorded VBA code and executes the exact same moves.
To start recording, click the Record Macro button on either the Developer tab or the Status bar.

For the detailed information, please see How to record macro in Excel.
Writing a macro in Visual Basic Editor
The Visual Basic for Applications (VBA) Editor is the place where Microsoft Excel keeps the code of all macros, both recorded and written manually.
In the VBA Editor, you can not only program a sequence of actions, but also create custom functions, display your own dialog boxes, evaluate various conditions, and most importantly code the logic! Naturally, creating your own macro requires some knowledge of the structure and syntax of the VBA language, which is beyond the scope of this tutorial for beginners. But there is nothing that would prevent you from reusing someone else's code (say, the one you've found on our blog :) and even a complete novice in Excel VBA should have no difficulties with that!
First, press Alt + F11 to open the Visual Basic Editor. And then, insert the code in these two quick steps:
- In the Project Explorer on the left, right-click the target workbook, and then click Insert > Module.
- In the Code window on the right, paste the VBA code.
When done, press F5 to run the macro.

For the detailed steps, please see How to insert VBA code in Excel.
How to run macros in Excel
There are several ways to start a macro in Excel:
- To run a macro from a worksheet, click the Macros button on the Developer tab or press the Alt + F8 shortcut.
- To run a macro from the VBA Editor, press either:
- F5 to run the entire code.
- F8 to go through the code line-by-line. This is very useful for testing and troubleshooting.
Additionally, you can launch a macro by clicking a custom button or pressing the assigned shortcut. For full details, please see How to run macros in Excel.
How to enable macros in Excel
Because of security reasons, all macros in Excel are disabled by default. So, to use the magic of VBA codes to your advantage, you need to know how to enable them.
The easiest way to turn on macros for a specific workbook is to click the Enable Content button in the yellow security warning bar that appears at the top of the sheet when you first open a workbook with macros.

To learn more about macro security, please see How to enable and disable macros in Excel.
How to change macro settings
Microsoft Excel determines whether to allow or disallow VBA codes to be executed in your workbooks based on the macro setting selected in the Trust Center.
Here are the steps to access the Excel macro settings and change them if needed:
- Go to the File tab and select Options.
- On the left-side pane, select Trust Center, and then click Trust Center Settings… .
- In the Trust Center dialog box, click Macro Settings on the left, select the desired option, and click OK.
In the screenshot below, the default macro setting is selected:

For more information, please see Excel macro settings explained.
How to view, edit and debug VBA codes in Excel
Any changes to the code of a macro, whether it's generated automatically by the Excel macro recorder or written by you, are made in the Visual Basic Editor.
To open the VB Editor, either press Alt + F11 or click the Visual Basic button on the Developer tab.

To view and edit the code of a specific macro, in the Project Explorer on the left, double-click the module that contains it, or right-click the module and pick View Code. This open the Code window where you can edit the code.
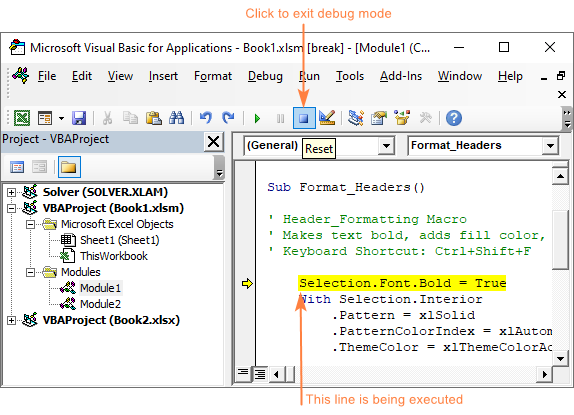
To test and debug a macro, use the F8 key. This will take you through the macro code line-by-line letting you see the effect that each line has on your worksheet. The line currently being executed is highlighted in yellow. To exit debug mode, click the Reset button on the toolbar (blue square).
How to copy a macro to another workbook
You created a macro in one workbook and now want to reuse it in other files too? There are two ways to copy a macro in Excel:
Copy the module containing a macro
In case the target macro resides in a separate module or all the macros in the module are useful for you, then it makes sense to copy the whole module from one workbook to another:
- Open both workbooks - the one that contains the macro and the one where you wish to copy it.
- Open the Visual Basic Editor.
- In the Project Explorer pane, find the module containing the macro and drag it to the destination workbook.
In the screenshot below, we are copying Module1 from Book1 to Book2:

Copy the source code of a macro
If the module contains many different macros while you need just one, then copy only the code of that specific macro. Here's how:
- Open both workbooks.
- Open the Visual Basic Editor.
- In the Project Explorer pane, double-click the module containing the macro that you'd like to copy to open its Code window.
- In the Code window, find the target macro, select its code (beginning with Sub and ending with End Sub) and press Ctrl + C to copy it.
- In the Project Explorer, find the destination workbook, and then either insert a new module into it (right-click the workbook and click Insert > Module) or double-click an existing module to open its Code window.
- In the Code window of the destination module, press Ctrl + V to paste the code. If the module already contains some code, scroll down to the last code line, and then paste the copied macro.

How to delete macros in Excel
If you no longer need a certain VBA code, you can delete it by using the Macro dialog box or the Visual Basic Editor.
Deleting a macro from a workbook
To delete a macro directly from your Excel workbook, carry out these steps:
- On the Developer tab, in the Code group, click the Macros button or press the Alt + F8 shortcut.
- In the Macro dialog box, select the macro you want to remove and click Delete.

Tips:
- To view all the macros in all open files, select All Open Workbooks from the Macros in drop-down list.
- To be able delete a macro in the Personal Macro Workbook, you need to unhide Personal.xlsb first.
Deleting a macro via Visual Basic Editor
A benefit of using the VBA Editor is that it enables you to delete an entire module with all the macros it contains in one go. Also, the VBA Editor allows deleting macros in the Personal Macro Workbook without unhiding it.
To permanently delete a module, perform these steps:
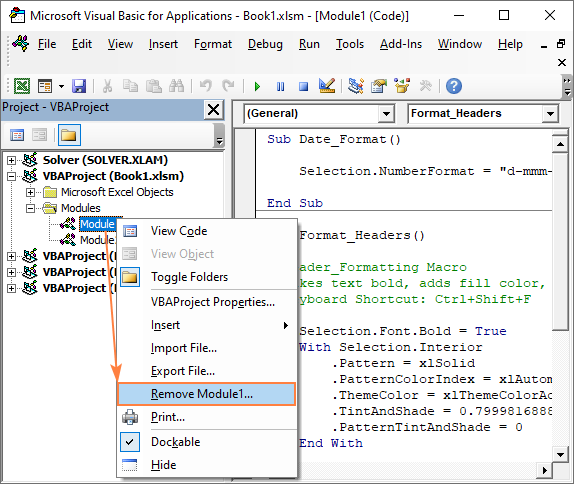
- In the Project Explorer, right-click on the module and choose Remove from the context menu.
- When asked whether you want to export the module before removing it, click No.
To remove a specific macro, simply delete its source code directly in the Code window. Or, you can delete a macro by using the Tools menu of the VBA Editor:
- From the Tools menu, choose Macros. The Macros dialog box will appear.
- In the Macros In drop-down list, select the project containing the unwanted macro.
- In the Macro Name box, select the macro.
- Click the Delete button.

How to save macros in Excel
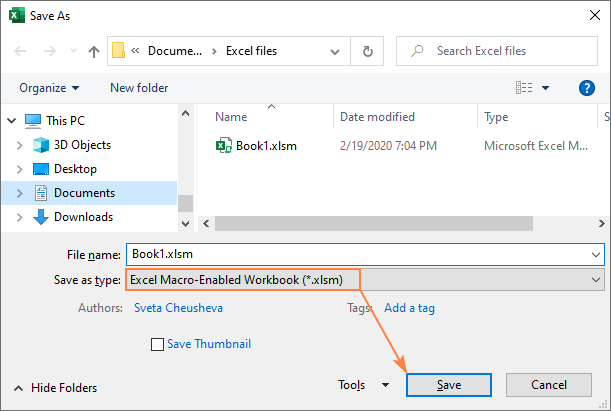
To save a macro in Excel, either recorded or written manually, just save the workbook as macro enabled (*.xlms). Here's how:
- In the file containing the macro, click the Save button or press Ctrl + S.
- The Save As dialog box will appear. Choose Excel Macro-Enabled Workbook (*.xlsm) from the Save as type drop-down list and click Save:
How to export and import macros in Excel
If you'd like to share your VBA codes with someone or move them to another computer, the fastest way is to export the entire module as a .bas file.
Exporting macros
To export your VBA codes, this is what you need to do:
- Open the workbook containing the macros.
- Press Alt + F11 to open the Visual Basic Editor.
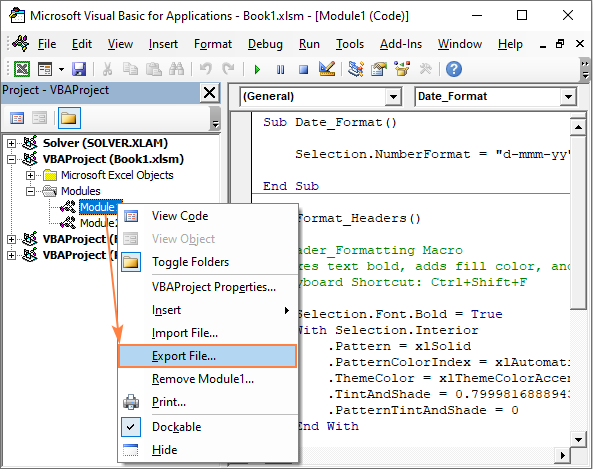
- In the Project Explorer, right-click the Module containing the macros and select Export File.
- Navigate to the folder where you want to save the exported file, name the file, and click Save.
Importing macros
To import a .bas file with VBA codes into your Excel, please follow these steps:
- Open the workbook into which you want to import macros.
- Open the Visual Basic Editor.
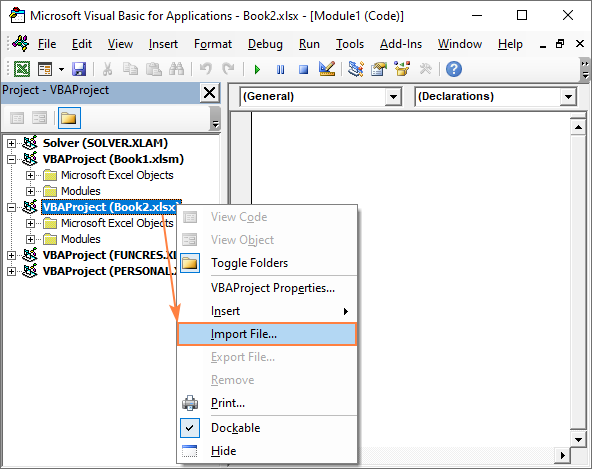
- In the Project Explorer, right-click the project name and select Import File.
- Navigate to the .bas file and click Open.
Excel macro examples
One of the best ways to learn Excel VBA is by exploring code samples. Below you will find examples of very simple VBA codes that automate some basic operations. Of course, these examples won't teach you coding, for this there exist hundreds of professional-grade VBA tutorials. We just aim to illustrate a few common features of VBA that will hopefully make its philosophy a little more familiar to you.
Unhide all sheets in a workbook
In this example, we use the ActiveWorkbook object to return the currently active workbook and the For Each loop to go through all the sheets in the workbook one-by-one. For each found sheet, we set the Visible property to xlSheetVisible.
Hide active worksheet or make it very hidden
To manipulate the currently active sheet, use the ActiveSheet object. This sample macro changes the Visible property of the active sheet to xlSheetHidden to hide it. To make the sheet very hidden, set the Visible property to xlSheetVeryHidden.
Unmerge all merged cells in selected range
If you want to perform certain operations on a range rather than the entire worksheet, use the Selection object. For example, the below code will unmerge all the merged cells in a selected range at one fell swoop.
Show a message box
To show some message to your users, use the MsgBox function. Here's an example of such a macro in its simplest form:
In real-life macros, a message box is typically used for information or confirmation purposes. For instance, before performing a action (unmerging cells in our case), you display a Yes/No message box. If the user clicks "Yes", the selected cells are unmerged.
To test the code, select one or more range containing merged cells and run the macro. The following message will appear:

Below are the links to more complex macros that automate challenging and time-consuming tasks:
- Macro to copy sheets from multiple workbooks into one
- Macros to duplicate sheets in Excel
- Macros to alphabetize tabs in Excel
- Macro to unprotect sheet without password
- Macro to count and sum conditionally colored cells
- Macro to convert numbers to words
- Macro to hide all worksheets but active sheet
- Macros to unhide sheets
- Macro to unhide all columns
- Macros to make sheets very hidden
- Macro to remove all line breaks in an active sheet
- Macros to delete blank rows
- Macro to delete every other row
- Macro to remove blank columns
- Macro to insert every other column
- Macros to spell check in Excel
- Macro to transpose columns to rows
- Macro to flip columns in Excel
- Macros to set print area
- Macros to insert page breaks
How to protect Excel macros
If you'd like to prevent your macro from being viewed, modified or executed by others, you can protect it with password.
Lock macro for viewing
To protect your VBA codes from unauthorized viewing and editing, do the following:
- Open the VBA Editor.
- In the Project Explorer, right-click the project you'd like to lock, and choose VBAProject Properties…
- In the Project Properties dialog box, on the Protection tab, check the Lock project for viewing box, enter the password twice, and click OK.
- Save, close and reopen your Excel file.

When you try to view the code in the Visual Basic editor, the following dialog box will appear. Type the password and click OK.

To unlock macros, just open the Project Properties dialog box again and remove a tick from the Lock project for viewing box.
Note. This method protects the code from viewing and editing but does not prevent it from being executed.
Password-protect macro from running
To protect your macro from being executed so that only the users who know the password could run it, add the following code, replacing the word "password" with your real password:
The macro uses the InputBox function to prompt the user to enter password:

If the user's input matches the hardcoded password, your code is executed. If the password does not match, the "Incorrect Password" message box is displayed. To prevent the user from peeping the password in the Visual Basic Editor, remember to lock the macro for viewing as explained above.
Note. Given the numbers of various password crackers available on the web, it is important to realize that this protection is not absolute. You can regard it rather as a protection against accidental use.
Excel macro tips
Excel VBA pros have devised tons of ingenious tricks to make their macros more effective. Below I will share a couple of my favorite ones.
If your VBA code actively manipulates the cell contents, you can speed up its execution by turning off screen refreshing and formula recalculating. After executing your code, turn this on again.
The following lines are to be added to the beginning of your code (after the lines that start with Dim or after the Sub line):
The following lines are to be added to the end of your code (before End Sub):
How to break VBA code into multiple lines
When writing code in the VBA editor, at times you may create very lengthy statements, so you have to scroll horizontally to view the end of the line. This does not affect the code execution but makes it difficult to examine the code.
To split a long statement into several lines, type a space followed by an underscore (_) at the point at which you want to break the line. In VBA, this is called the line-continuation character.
To continue the code on the next line correctly, please follow these rules:
- Do not split the code in the middle of argument names.
- Do not use an underscore to break comments. For multiple-line comments, type an apostrophe (') at the beginning of each line.
- An underscore must be the last character on a line, not followed by anything else.
The following code example shows how to break the statement into two lines:
How to make a macro accessible from any workbook
When you write or record a macro in Excel, usually it can only be accessed from that specific workbook. If you'd like to reuse the same code in other workbooks, save it to the Personal Macro Workbook. This will make the macro available to you whenever you open Excel.
The only obstacle is that the Personal Macro Workbook does not exist in Excel by default. To create it, you will need to record at least one macro. The following tutorial provides all the details: Personal Macro Workbook in Excel
How to undo a macro action
After executing a macro, its action cannot be reverted by pressing Ctrl + Z nor by clicking the Undo button.
Experienced VBA programmers can, of course, validate the input values and/or starting conditions before allowing the macro to make any changes to a worksheet, but in most cases that is quite complicated.
An easier way is to save the active workbook from within the macro's code. For this, simply add the below line before letting your macro do anything else:
Optionally, you can also show a message box informing the user that the current workbook was saved right before executing the main code of the macro.
This way, if you (or your users) are not happy with the results, you can simply close, and then reopen the workbook.
Stop Excel from showing a security warning when there are no macros in a workbook
Have you ever found yourself in a situation where Excel continuously asks if you want to enable macros while you definitely know that there are no macros in this particular workbook?
The most likely reason is that some VBA code was added and then removed, leaving an empty module, which triggers the security alert. To get rid of it, simply delete the module, save the workbook, close and reopen it. If this does not help, do the following:
- For ThisWorkbook and for each individual sheet, open the Code window, press Ctrl + A to select all the code and delete it (even if the Code window looks empty).
- Delete any UserForms and Class Modules that the workbook contains.
That's how you create and use VBA macros in Excel. I thank you for reading and hope to see you again on our blog next week!
 by
by