In this tutorial, we'll cover many different ways to run a macro in Excel - from the ribbon and VB Editor, with a custom keyboard shortcut, and by creating your own macro button.
Though running an Excel macro is a simple thing for experienced users, it might not be immediately obvious to beginners. In this article, you will learn several methods to run macros, some of which may completely change your way of interacting with Excel workbooks.
How to run a macro from Excel ribbon
One of the fastest ways to execute VBA in Excel is to run a macro from the Developer tab. If you have never dealt with VBA code before, you may need to activate the Developer tab first. And then, do the following:
- On the Developer tab, in the Code group, click Macros. Or press the Alt + F8 shortcut.

- In the dialog box that shows up, select the macro of interest, and then click Run.
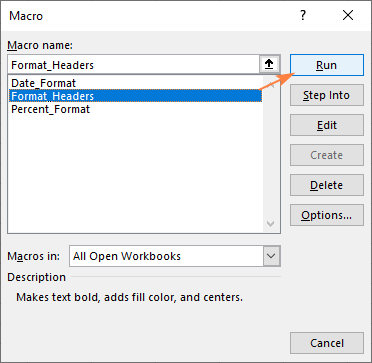
Tip. If the Developer tab is not added to your Excel ribbon, press Alt + F8 to open the Macro dialog.
Run a macro with custom keyboard shortcut
If you execute a certain macro on a regular basis, you can assign a shortcut key to it. A shortcut can be added while recording a new macro and to an existing one. For this, carry out these steps:
- On the Developer tab, in the Code group, click Macros.
- In the Macro dialog box, click Options.
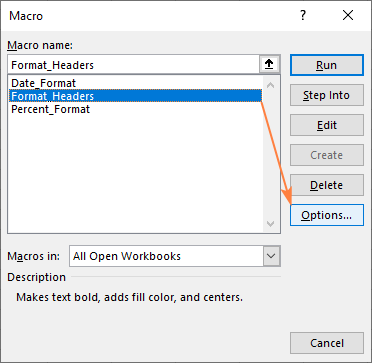
- The Macro Options dialog box will appear. In the Shortcut key box, type any uppercase or lowercase letter that you want to use for the shortcut, and then click OK to save the changes.
- For lowercase letters, the shortcut is Ctrl + letter.
- For uppercase letters, the shortcut is Ctrl + Shift + letter.

- Close the Macro dialog box.
Tip. It is recommended to always use uppercase key combinations for macros (Ctrl + Shift + letter) not to override the default Excel shortcuts. For example, if you assign Ctrl + f to a macro, you will lose the ability to call the Find and Replace dialog.
Once the shortcut is assigned, simply press that key combination to run your macro.
How to run macro from VBA Editor
If you aim to become an Excel pro, then you should definitely know how to start a macro not only from Excel, but also from the Visual Basic Editor. The good news is that it's a lot easier than you might expect :)
- Press Alt + F11 to launch the Visual Basic Editor.
- In the Project Explorer window on the left, double-click the module containing your macro to open it.
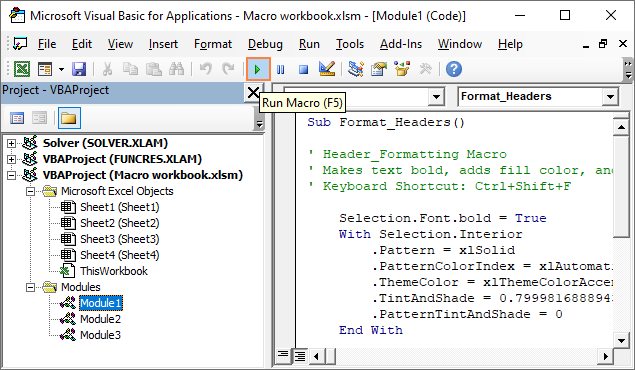
- In the Code window on the right, you will see all the macros listed in the module. Place the cursor anywhere within the macro you want to execute and do one of the following:
- On the menu bar, click Run > Run Sub/UserForm.
- On the toolbar, click the Run Macro button (green triangle).
Alternatively, you can use one of the following shortcuts:
- Press F5 to run the entire code.
- Press F8 to run each code line separately. This is very useful when testing and debugging macros.
Tip. If you like operating Excel from you keyboard, this tutorial may come in handy: 30 most useful Excel keyboard shortcuts.
How to create a macro button in Excel
The traditional ways of running macros are not hard, but still might present a problem if you are sharing a workbook with someone who has no experience with VBA - they simply won't know where to look! To make running a macro really easy and intuitive for anyone, create your own macro button.
- On the Developer tab, in the Controls group, click Insert, and select Button under From Controls.

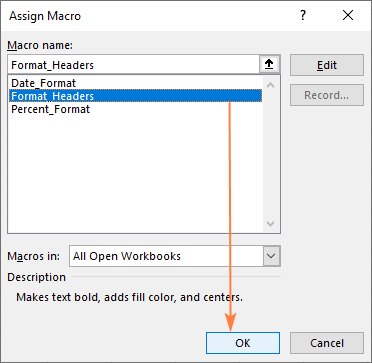
- Click anywhere in the worksheet. This will open the Assign Macro dialogue box.
- Select the macro you'd like to assign to the button and click on OK.
- A button gets inserted in the worksheet. To change the button text, right-click the button and select Edit Text from the context menu.

- Delete the default text such as Button 1 and type your own one. Optionally, you can format the text bold or italic.

- If the text does not fit in the button, make the button control bigger or smaller by dragging the sizing handles. When finished, click anywhere on the sheet to exit the edit mode.
And now, you can run the macro by clicking its button. The macro we've assigned, formats the selected cells like shown in the screenshot below:

Tip. You can also assign a macro to an existing button or other Form controls such as spin buttons or scrollbars. For this, right-click the control inserted in your worksheet and choose Assign Macro from the pop-up menu.
Create a macro button from a graphic object
Regrettably, it is not possible to customize the appearance of button controls, because of which the button we created a moment ago does not look very nice. To make a really beautiful Excel macro button, you can use shapes, icons, images, WordArt and other objects.
As an example, I'll show you how you can run a macro by clicking a shape:
- On the Insert tab, in the Illustrations group, click Shapes and select the desired shape type, e.g. rectangle with rounded corners:

- In your worksheet, click where you want to insert the shape object.
- Format your shape-button the way you want. For example, you can change the fill and outline colors or use one of the predefined styles on the Shape Format tab. To add some text to the shape, simply double-click it and start typing.
- To link a macro to the shape, right-click the shape object, choose Assign Macro…, then select the desired macro and click OK.

Now you have a shape that looks like a button and runs the assigned macro whenever you click on it:

How to add a macro button to Quick Access Toolbar
The macro button inserted in a worksheet looks good, but adding a button to each and every sheet is time-consuming. To make your favorite macro accessible from anywhere, add it to the Quick Access Toolbar. Here's how:
- Right-click the Quick Access Toolbar and choose More Commands… from the context menu.
- In the Choose commands from list, select Macros.
- In the list of macros, choose the one you want to assign to the button, and click Add. This will move the selected macro to the list of the Quick Access Toolbar buttons on the right.

At this point, you can click OK to save the changes or do a couple more customizations described below.
- If you find that the icon added by Microsoft is not suitable for your macro, click Modify to replace the default icon with another one.
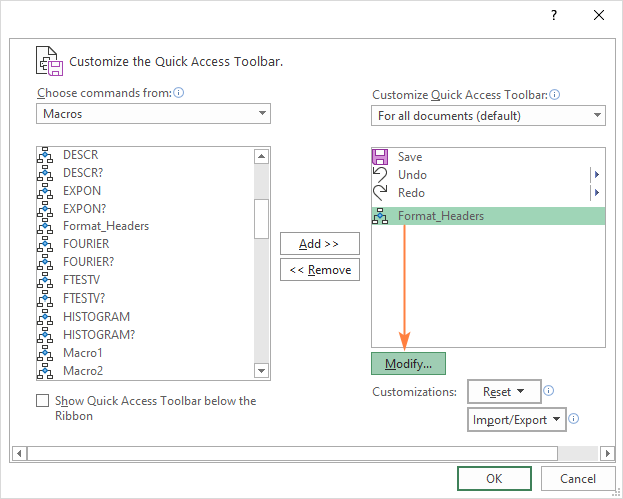
- In the Modify button dialog box that appears, select an icon for your macro button. Optionally, you can also change the Display name to make it more user-friendly. Unlike the macro name, the button name can contain spaces.

- Click OK twice to close both dialog windows.
Done! Now you have your own Excel button to run macro:

How to put a macro button on Excel ribbon
In case you have a few frequently used macros in your Excel toolbox, you may find it convenient to have a custom ribbon group, say My Macros, and add all popular macros to that group as buttons.
First, add a custom group to an existing tab or your own tab. For the detailed instructions, please see:
And then, add a macro button to your custom group by performing these steps:
- Right-click the ribbon, and then click Customize the Ribbon.
- In the dialog box that appears, do the following:
- In the list tabs on the right, select your custom group.
- In the Choose commands from list on the left, select Macros.
- In the list of macros, choose the one you wish to add to the group.
- Click the Add button.
For this example, I've created a new tab named Macros and a custom group named Formatting Macros. In the screenshot below, we are adding the Format_Headers macro to that group.

- The macro is now added to the custom ribbon group. To give your macro button a friendlier name, select it and click Rename:

- In the Rename dialog box, type any name you want in the Display name box (spaces are allowed in button names) and choose an icon for your macro button. When done, click OK.

- Click OK to save your changes and close the main dialog box.
As an example, I've put three macro buttons to my Excel ribbon and can now run any of them with a button click:

How to run a macro on opening a workbook
Sometimes you may want to run a macro automatically on opening a workbook, for example, to display some message, run script or clear a certain range. This can be done in two ways.
Run macro automatically by using Workbook_Open event
Below are the steps to create a macro that automatically runs whenever you open a specific workbook:
- Open the workbook in which you want the macro to be executed.
- Press Alt + F11 to open the Visual Basic Editor.
- In the Project Explorer, double click ThisWorkbook to open its Code window.
- In the Object list above the Code window, select Workbook. This creates an empty procedure for the Open event to which you can add your own code like shown in the screenshot below.
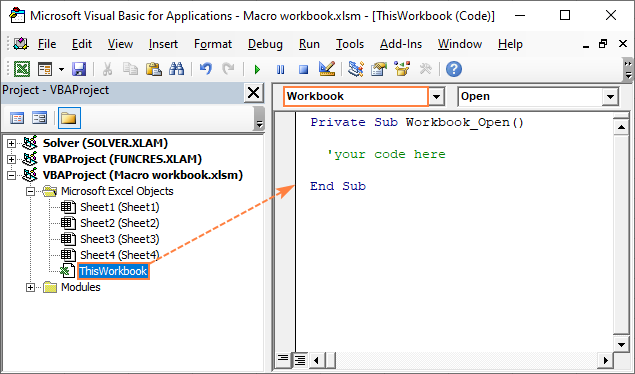
For example, the following code will display a welcome message each time the workbook is opened:
Trigger macro on workbook opening with Auto_Open event
Another way to run a macro automatically on workbook opening is by using the Auto_Open event. Unlike the Workbook_Open event, Auto_Open() should sit in a standard code module, not in ThisWorkbook.
Here are the steps to create such a macro:
- In the Project Explorer, right-click Modules, and then click Insert > Module.
- In the Code window, write the following code:
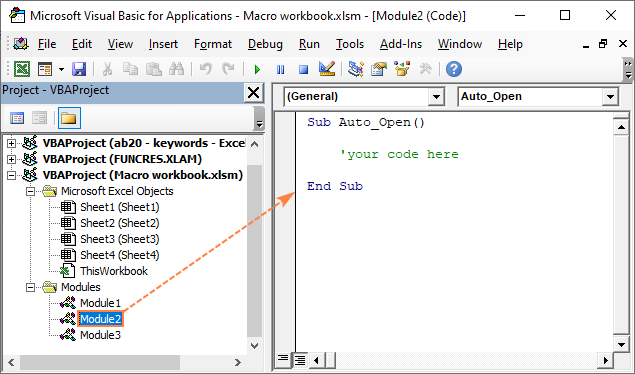
Here's an example of the real-life code that displays a message box on workbook opening:
Note! The Auto_Open event is deprecated and available for backwards compatibility. In most cases, it can be replaced with the Workbook_Open event. For more information, please see Workbook_Open vs. Auto_Open.
Whichever event you use, your macro will run automatically every time you open the Excel file containing the code. In our case, the following message box is displayed:

Now that you know lots of ways to run a macro in Excel, you just need to choose the one best suited for your needs. I thank you for reading and hope to see you on our blog next week!
 by
by
17 comments
I have created a "click here to submit" button, but when the users open the document and fill out the form, once they hit submit and it transfers the document in to an email back to me, the document comes over blank. I'm not sure how to fix this as I've redone the document entirely and the same thing happens.
Hi! We do not do VBA code creation or customization on request. In addition, I am not able to see the code that is in your workbook.
I need my Macro to do several things, use an Ablebits feature, and then do several more things. But I can't seem to get it to record the Ablebits step.
Is there a way with VBA to include the Ablebits steps? Or, even better, a way to turn on recording them?
Hello! Unfortunately, you can't use Ablebits feature in VBA code.
I have created some macro buttons on Excel Quick access toolbar. But if I move my Macro.xlam to other folder (change path), although I have already loaded Macro.xlam (by Developer/Excel Add-in), the macro buttons could not run.
How could I do that only load the Macro.xlam and run the macro buttons, not depend on the file location?
Thank you.
Hi! In order for Excel to find and automatically load your XLAM file, you must tell Excel where the file is located. If you have moved the file to another location, load it again by using the Developer menu.
I wrote a macro to hide certain rows and columns, print a specific selection and then unhide the pertinent columns and save the workbook. All this is attached to a button.
When it prints I get blank pages
Range("b1:F117").Select
Selection.PrintOut Copies:=1, Collate:=True
Any suggestion regarding what I am doing wrong?
Your request goes beyond the advice we provide on this blog. If you have a specific question about the operation of a function or formula, I will try to answer it.
Is it possible to assign a macro button to a toolbar that can then be opened on any pc? It seems that when I forward my document with the macro buttons added to the toolbar, they disappear when the new user opens the document however the functions are still seen as listed macros in the document.
Please help
Hi! With a usual Excel file, you cannot transfer your toolbar settings to another user.
I need to run a macro to export a document to PDF, but I need to save to a different location each time I run it. Is this a possibility? I would ideally like to link this macro to a button.
Hello! To store the macros you use frequently, I recommend the Personal Macro Workbook. For more information, please visit: Personal Macro Workbook in Excel - make macros available in all workbooks.
How do I format the TEXT in a macro button, say BOLD, or FONT 14,,,etc
Right click/ edit text/ then just make the changes you want
Hi Svetlana!
Thank you for this useful post. I created a macro spreadsheet with keyboard shortcuts. I would like to ask if it is possible to convert those shortcuts into buttons in ribbon? And then have those shortcuts removed? ( I want to share the sheet with others, but don't want them to accidentally press those keys)
thanks!
Victor
Yes, I found :)
Good Afternoon Svetlana,
I am trying to write two separate if statements with a nested LOOKUP so the responses in the relating cells don't return with a column heading nor an #N/A reply.
The first LOOKUP statement is as follows:
=LOOKUP(2,1/($O$6:$O$19=Q2),$M$6:$M$19)
If the response is an amount, it lists the last amount, but if there isn't an amount -or the range is blank, I want it to reply with 0.00
The second LOOKUP statement is as follows:
=LOOKUP(2,1/(K:K""),K:K)
The response is a date, but if there has not been a payment in the affecting range, I want it to reply with "No Payment Received"
Please help.
Regards,
Roger