The tutorial shows how to protect Excel sheet with or without passwords. It also explains how to unlock Excel spreadsheet without password if you forgot or misplaced it.
When sharing your worksheets with other people or sending your Excel files outside of your organization, you may want to prevent other users from changing cells that shouldn't be changed, and also from moving or deleting important data in your worksheet or workbook.
Luckily, Excel provides a quick and easy way to lock a sheet or password protect an entire workbook to prevent accidental or deliberate changes in their contents.
What you need to know about Excel worksheet protection
Worksheet protection in Excel is not a security feature. It's is not actually intended to prevent people from accessing data in a password-protected worksheet. Why? Because Microsoft Excel uses a very simple encryption algorithm for worksheet protection. Even when you protect your Excel worksheet with a password, that password is very easy to break.
In older versions (below Microsoft Excel 2010), it doesn't even matter how long and complex your password is. Anyone who has at least some basic knowledge of VBA can crack it in minutes (here's an example of the VBA code that easily cracks passwords in Excel 2010 and lower).
The recent versions of Excel use more sophisticated methods of sheet protection, but they are also vulnerable and can be unlocked without knowing a password. In other words, if someone really wants to get access to a protected sheet, they will.
So, does this mean that Excel worksheet protection is absolutely pointless? Not at all! It makes sense to lock Excel sheets to avoid accidental changes in the sheet contents. A common example is Locking formula cells to prevent inadvertent erasure or modification of formulas.
The bottom line is - lock an Excel spreadsheet to prevent other users from accidentally tampering with your data, but never store sensitive information in your Excel sheets.
If you strive to ensure the maximum security protection for your Excel files, be sure to do all of the following:
- Use the modern versions of Excel with enhanced data encryption mechanisms.
- Protect your sheets with strong passwords that include different types of alpha numeric characters and special symbols. At that, try to make passwords as random as possible, for example by using our password generating tool.
- Protect the workbook structure to prevent other people from adding, moving, renaming, deleting or unhiding your sheets.
- For workbook-level security, encrypt the workbook with different passwords from opening and modifying.
- If possible, store your Excel files with sensitive information in a secure location, e.g. on an encrypted hard drive.
How to protect Excel sheet
To protect a sheet in Excel, perform the following steps.
- Right click a worksheet tab at the bottom of your screen and select Protect Sheet… from the context menu.
Or, click the Protect Sheet button on the Review tab, in the Changes group.

- In the Protect Sheet dialog window, do the following:
- To password protect your Excel sheet, type a password in the corresponding field. Be sure to remember the password or store it in a safe location because you will need it later to unprotect the sheet.
- If the worksheet protection is nothing more than a precaution against accidental modification of the sheet contents by yourself or by the members of your local team, you may not want to bother about memorizing the password and leave the password field empty. In this case, unprotecting the sheet takes just a single click on the Unprotect Sheet button on the ribbon or in the sheet tab's right-click menu.
- Select the actions you allow the users to perform.
- By default, the following 2 options are selected: Select locked cells and Select unlocked cells. If you leave only these two options selected, the users of your sheet, including yourself, will be able only to select cells (both locked and unlocked).
- To allow some other actions such as sorting, filtering, formatting cells, deleting or inserting rows and columns, check the corresponding boxes.
- If you don't check any action, users will only be able to view the contents of your Excel sheet.
- Click the OK button.
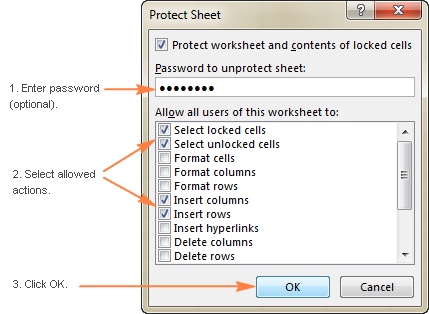
- The Confirm Password dialog box will pop-up prompting you to retype the password so that an accidental misprint won't lock your Excel sheet forever. Retype the password and click OK. Done!
How to unprotect Excel sheet
As you have just seen, it's very easy to password protect a sheet in Excel. Unprotecting a spreadsheet is even easier, provided that you know the password. Though, unlocking an Excel spreadsheet without password is no big deal either :)
How to unprotect Excel sheet with password
If you know the password for the protected sheet, removing protection is a matter of seconds. Just do any of the following:
- Right-click the sheet tab, and select Unprotect Sheet… from the context menu.
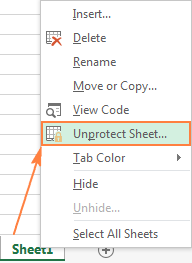
- On the Review tab, in the Changes group, click Unprotect Sheet.

- On the Home tab, in the Cells group, click Format, and select Unprotect Sheet from the drop-down menu.
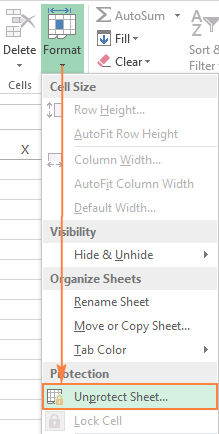
If you are dealing with a password-protected worksheet, Excel will ask you to enter the password. Type the password and click OK.
If the worksheet was not protected with password, clicking the Unprotect Sheet button is all it takes to unlock the sheet.
How to unprotect Excel sheet without password
As mentioned in the beginning of this tutorial, Excel worksheet protection is quite weak even in the recent versions of Excel. If you need to edit a password protected sheet but you cannot remember the password, try to unlock that Excel spreadsheet by using one of the following methods.
Unlock Excel spreadsheet with VBA code (for Excel 2010 and lower)
If you are using Excel 2010 or older, you can unlock a password-protected sheet with the following macro.
- Open your Excel document and switch to the password-protected sheet (it should be active when you run the macro).
- Press Alt + F11 to open the Visual Basic Editor.
- Right-click the workbook name on the left pane (Project-VBAProject pane) and select Insert > Module from the context menu.
- In the window that appears, paste in the following code:
Sub PasswordBreaker() 'Breaks worksheet password protection. Dim i As Integer, j As Integer, k As Integer Dim l As Integer, m As Integer, n As Integer Dim i1 As Integer, i2 As Integer, i3 As Integer Dim i4 As Integer, i5 As Integer, i6 As Integer On Error Resume Next For i = 65 To 66: For j = 65 To 66: For k = 65 To 66 For l = 65 To 66: For m = 65 To 66: For i1 = 65 To 66 For i2 = 65 To 66: For i3 = 65 To 66: For i4 = 65 To 66 For i5 = 65 To 66: For i6 = 65 To 66: For n = 32 To 126 ActiveSheet.Unprotect Chr(i) & Chr(j) & Chr(k) & _ Chr(l) & Chr(m) & Chr(i1) & Chr(i2) & Chr(i3) & _ Chr(i4) & Chr(i5) & Chr(i6) & Chr(n) If ActiveSheet.ProtectContents = False Then MsgBox "Password is " & Chr(i) & Chr(j) & _ Chr(k) & Chr(l) & Chr(m) & Chr(i1) & Chr(i2) & _ Chr(i3) & Chr(i4) & Chr(i5) & Chr(i6) & Chr(n) Exit Sub End If Next: Next: Next: Next: Next: Next Next: Next: Next: Next: Next: Next End Sub
- Press F5 or click the Run button on the toolbar and wait a couple of minutes.
- The macro will report a cracked password, which is not the original one (always some combination of A's and B's), but nevertheless it works. You do not need to remember this fake password or enter it anywhere. Simply click OK and the sheet is unprotected!
Tips and notes:
- If your Excel file contains more than one protected sheet, run the macro for each sheet individually to unprotect it.
- To unprotect a sheet without password in Excel 365 - 2013, you can save the document as Excel 97-2003 workbook (*.xls) first. Then, close Excel and reopen the workbook - it will be opened in compatibility mode. Run the macro to unprotect the worksheet, and then save the workbook back as an .xlsx file. Alternatively, you can use one of free tools, for example Password Protection Remover add-in for Excel. Or you can upload the protected Excel worksheet to your Google Drive, and then open it with Google Sheets.
- In case you are not very comfortable with VBA, you can find the detailed guidance in the following tutorial: How to insert and run VBA code in Excel.
Copy the protected sheet contents to another worksheet
Another way (or rather a workaround) to unlock an Excel sheet that was protected with password is to copy its entire contents to a new sheet. Here's how:
- Open the password-protected sheet.
- With the cursor positioned in cell A1, press Shift + Ctrl + End to select all used cells in the worksheet.
- Press Ctrl + C to copy the selected cells.
- Create a new sheet in the current workbook or in a different workbook (to create a new Excel file, simply press Ctrl + N).
- In the new blank worksheet, place the cursor in A1 and press Ctrl + V to paste the contents of the password-protected sheet.
Notes:
- This method works only if the Select locked cells and Select unlocked cells actions are allowed in the protected spreadsheet.
- If the password-protected worksheet has external links to other sheets or workbooks, you may need to re-create those links manually.
- You can use Paste Special to copy / paste the column widths so you won't need to adjust them in the new sheet manually.
How to protect a workbook in Excel
Apart from protecting the sheet contents, you may also want lock the entire workbook to prevent users from adding, moving, renaming or deleting worksheets, and viewing hidden sheets.
To protect the workbook, perform the following steps:
- On the Review tab, in the Changes group, click the Protect Workbook button.

- Under Protect workbook for, select one of the two options, or both:
- Check the Structure box to protect the structure of a workbook. This will prevent the following actions:
- Viewing hidden worksheets.
- Renaming, moving, hiding or deleting sheets.
- Inserting new sheets and chart sheets. However, users will be able to insert a chart in an existing worksheet.
- Moving or copying sheets to another workbook.
- Check the Windows box to retain the size and position of workbook windows. This will prevent users from moving, resizing, minimizing, or closing the workbook windows.

Note. The Windows option is not available (greyed out) in Excel 2013 and higher, as shown in the screenshot above. It is because Microsoft introduced the Single Document Interface in Excel 2013, where each workbook has its own top-level window that can be minimized, restored, and closed.
- Check the Structure box to protect the structure of a workbook. This will prevent the following actions:
- In the Password box, type a password, and click the OK button.
As indicated on the dialog window, a password is optional. However, if you do not enter a password, then anybody will be able to unlock your workbook with a button click. - Retype the password in the Confirm Password window and click OK. That's it!
How to unlock a protected workbook in Excel
To remove the workbook protection, do the following:
- Click the Protect Workbook button again (in a locked workbook, it is highlighted in green like in the screenshot below):

- Type the password if prompted.
- Save the workbook.
Important note! Protecting the workbook structure should not be confused with workbook-level password encryption that can prevent other users from opening or/and modifying your workbook. If you are interested in this level of workbook protection, check out the next sections of this tutorial.
Password protect Excel workbook from opening
If you store your workbooks in a shared location such as a company local network, and you want to prevent other users from viewing your Excel files, you can encrypt your workbook with password that won't even let other people open it.
- In the workbook you want to encrypt, click File > Info, click the Protect Workbook button, and select Encrypt with Password in the drop-down menu.
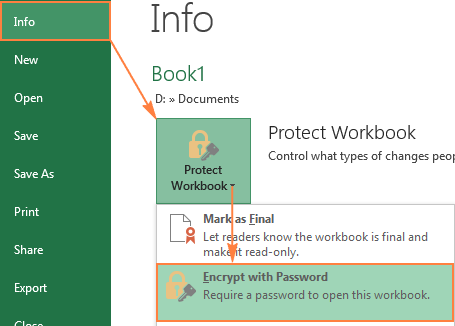
- The Encrypt Document window will appear, you enter a password in the Password box, and click OK.
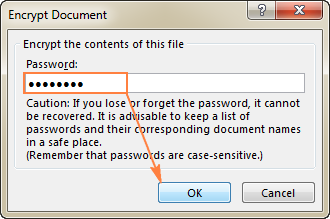
By default, Microsoft Excel uses AES 128-bit advanced encryption, and you can supply a password up to 255 characters.
- Retype the password in the Reenter password box, and click OK.
- Save your workbook.
To remove the workbook encryption, repeat the above steps, delete the password from the Password box, click OK, and then save your workbook.
Tip. In addition to password-protection, you can secure your Excel files further by using the BitLocker Drive Encryption, which is available in the Ultimate and Enterprise editions of Windows Vista and Windows.
Password protect Excel workbook from modifying
If you don't mind other users opening your Excel file but you want to prevent them from making any changes to your workbook, perform the following steps.
- In your Excel workbook, click the Save As button, and then click the Tools button at the bottom of the window.
- In the Tools drop-down menu, select General Options.
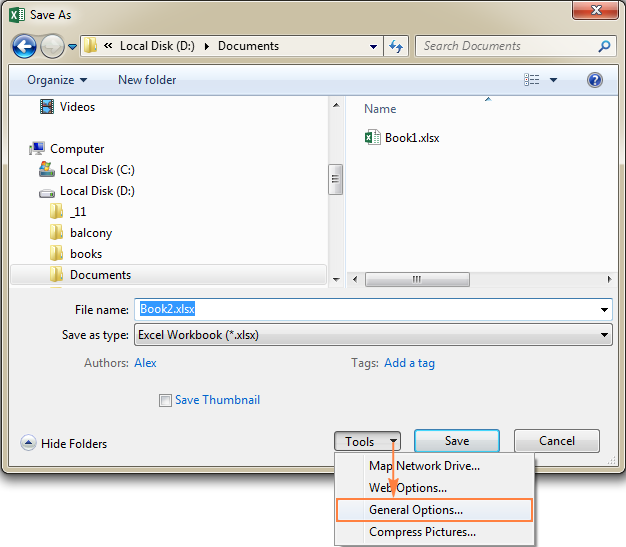
- In the General Options dialog window, type a password in the Password to modify box. Additionally, you can select the Read-only option, which is recommended.
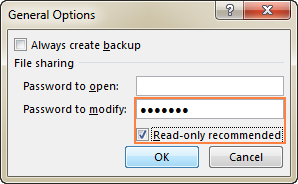
Tip. If you want to protect your Excel file both from modifying and opening, type the passwords in the Password to open and Password to modify boxes. It can be the same password of two different ones.
- Retype the password in the Confirm Password dialog, and click OK. If you've entered 2 passwords in the previous step, you will be asked to confirm both.
- Finally, click the Save button in the Save As dialog.
To remove the password protection, repeat the above steps, and delete the password(s) from the Password to open and Password to modify boxes. Then click the Save button to save your workbook.
This is how you can protect an Excel sheet and lock the entire workbook from changing or opening. You can also protect a worksheet from changing by making it very hidden. Sometimes you may not want to go that far and rather lock only certain cells in your sheet. And this is exactly what we are going to discuss in the next article.
I thank you for reading and hope to see you on our blog next week.
 by
by
391 comments
Hi, Englisch
Is it possible for several users to enter data but not to see the data of other users and for each user to have their own login.
I think so. I know there are custom viewing options so you don't see what other people are doing while they are accessing a workbook. It can allow you to work in peace if there is someone else in there and the aggressive autosave function cannot merge the two into one save file for awhile.
From the Microsoft website:
Create a custom view
On a worksheet, change the display and print settings that you want to save in a custom view.
Go to View > Workbook Views > Custom Views > Add.
In the Name box, type a name for the view.
Thank you for the corrected (non-syntax error) code. It worked. You saved me a lot of time.
it tooked a bit of time but it worked thankyou
i tried the VBa code - My excel is not responding after I ran the below code :
Sub PasswordBreaker()
'Breaks worksheet password protection.
Dim i As Integer, j As Integer, k As Integer
Dim l As Integer, m As Integer, n As Integer
Dim i1 As Integer, i2 As Integer, i3 As Integer
Dim i4 As Integer, i5 As Integer, i6 As Integer
On Error Resume Next
For i = 65 To 66: For j = 65 To 66: For k = 65 To 66
For l = 65 To 66: For m = 65 To 66: For i1 = 65 To 66
For i2 = 65 To 66: For i3 = 65 To 66: For i4 = 65 To 66
For i5 = 65 To 66: For i6 = 65 To 66: For n = 32 To 126
ActiveSheet.Unprotect Chr(i) & Chr(j) & Chr(k) & _
Chr(l) & Chr(m) & Chr(i1) & Chr(i2) & Chr(i3) & _
Chr(i4) & Chr(i5) & Chr(i6) & Chr(n)
If ActiveSheet.ProtectContents = False Then
MsgBox "Password is " & Chr(i) & Chr(j) & _
Chr(k) & Chr(l) & Chr(m) & Chr(i1) & Chr(i2) & _
Chr(i3) & Chr(i4) & Chr(i5) & Chr(i6) & Chr(n)
Exit Sub
End If
Next: Next: Next: Next: Next: Next
Next: Next: Next: Next: Next: Next
End Sub
Please help !!!!
Hi! You're asking beyond the advice this blog can provide. We don't help with creating VBA code.
please help me my excel sheet product not working my forget password
Hello,
I need to make a cell for filterizing with protect and unprotect with password please help
wow that is great! I had a workbook from 2023 office 365, converted it to a 97-2004 .xls, then copy the code in the macro and the file was UNLOCKED!! Great job guys! Really WELL DONE! BIG THANK YOU
I have an Excel worksheet where I'm using the Group function to compress rows of data so that only the summary row are visible to the reviewer unless they click the "+" to see the details. I want to protect (lock) the summary rows so the data and formulas cannot be accidentally modified. However, I have tried to lock only these rows but when I do so, the Group option is also locked and the viewer (including myself) cannot access the compressed rows. Is there a way to lock only the desired rows but allow the Group option to still function?
Yesss, it worked for me with removing the "&" and replace with "&"
Thanks
Thank you very much, I have been relieved of a big burden,once again, thank you so much
I forgot the password put on entire workbook for opening and modifying. Please help me how can I open my file.
my excel not responding when vba code running, please help
have tried torun the code and I get the error: compile error invalid outside procedure
I must be doing something wrong but can't figure out what
Thx
guy
please guide, how can we prevent accidental deletion of a sheet/
You always see a warning before deleting a sheet.
Why is the compile error appearing in the VBA code
replace the "&" with "&" in the code
With newer versions of excel, is it possible to save them as older and still break the password with vba using the program shown? If not, what version/s does this become impossible?
Helo my problem is .. I use a password in excel file before 6 months.. but now not remember password... It's very important file .. plz help me... How I can Brock the lock this file...
using excel 2010 unable to unlock the file because the protected workbook option are hiding
Hi , thanks for your useful information , i script part : ActiveSheet.Unprotect
it said Syntax Error ?!
Butchering this. Haven't played with html. Ok, replace & with &
you mean replace all "&" with just "&" ??
Yes & with &
Sub PasswordBreaker()
'Breaks worksheet password protection.
Dim i As Integer, j As Integer, k As Integer
Dim l As Integer, m As Integer, n As Integer
Dim i1 As Integer, i2 As Integer, i3 As Integer
Dim i4 As Integer, i5 As Integer, i6 As Integer
On Error Resume Next
For i = 65 To 66: For j = 65 To 66: For k = 65 To 66
For l = 65 To 66: For m = 65 To 66: For i1 = 65 To 66
For i2 = 65 To 66: For i3 = 65 To 66: For i4 = 65 To 66
For i5 = 65 To 66: For i6 = 65 To 66: For n = 32 To 126
ActiveSheet.Unprotect Chr(i) & Chr(j) & Chr(k) & _
Chr(l) & Chr(m) & Chr(i1) & Chr(i2) & Chr(i3) & _
Chr(i4) & Chr(i5) & Chr(i6) & Chr(n)
If ActiveSheet.ProtectContents = False Then
MsgBox "Password is " & Chr(i) & Chr(j) & _
Chr(k) & Chr(l) & Chr(m) & Chr(i1) & Chr(i2) & _
Chr(i3) & Chr(i4) & Chr(i5) & Chr(i6) & Chr(n)
Exit Sub
End If
Next: Next: Next: Next: Next: Next
Next: Next: Next: Next: Next: Next
End Sub
Thank you so much, it worked.
It worked. thank you very much.
Thank you so much!
It was amazing.
This was exactly was I was going to post until I saw someone notice that for web, the & is really "and" operator... Good call, good work, it worked like a charm!
replace "&" with just "&"
& with just & no need (;)
did this: replaced & with just & no need (;)
still get error
Replace & with & and it works
Same problem, syntax error in both the downgraded version and the 2013 version.
HI
I have office 365 and I wanted to remove protection from xlsx file. I converted it to xls (97-2003 file format) and run the macro. Macro run successfully and it generated a password however the protection was still not removed and i am still unable to copy the data. Appreciate if you can help.
Just to add I am using Microsoft® Excel® for Microsoft 365 MSO (Version 2206 Build 16.0.15330.20246) 64-bit