This short tutorial will teach you how to get Developer tab in Excel 2010, Excel 2013, Excel 2016, and Excel 2019.
You want to access one of advanced Excel features but are stuck at the very first step: where's the Developer tab they are all talking about? The good news is that the Developer tab is available in every version of Excel 2007 through 365, though it is not enabled by default. This article shows how to quickly activate it.
Excel Developer tab
The Developer tab is a useful addition to the Excel ribbon that allows you to access some of advanced features such as:
- Macros - Write new macros using the Visual Basic editor and run macros you have previously written or recorded.
- Add-ins - Manage your Excel add-ins and COM add-ins.
- Controls - Insert ActiveX and Form controls into your worksheets.
- XML - Use XML commands, import XML data files, manage XML maps, etc.

Most often, the Developer tab is used for writing VBA macros. But it also provides access to a handful of other features that do not require any programming skills! For example, even an Excel novice can use the Developer tab to insert a check box, scroll bar, spin button, and other controls.
Where is the Developer tab in Excel?
The Developer tab is available in all versions of Excel 2007, Excel 2010, Excel 2013, Excel 2016, Excel 2019, Excel 2021, and Office 365. The problem is that by default it stays behind the scenes, and you need to show it first by using a corresponding setting.
Luckily for us, it's one-time setup. Once you activate Developer tab, it will stay visible when you open your workbooks next time. When you reinstall Excel, you will have to show the Developer tab again.
How to add the Developer tab in Excel
Though the Developer tab is hidden in every fresh installation of Excel, it is very easy to enable it. This is what you need to do:
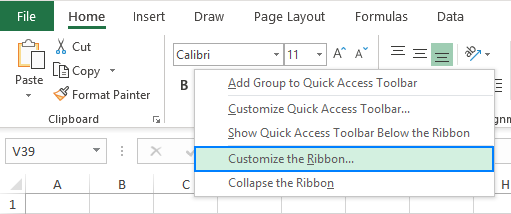
- Right-click anywhere on the ribbon and choose Customize the Ribbon… in the pop-up menu of options:

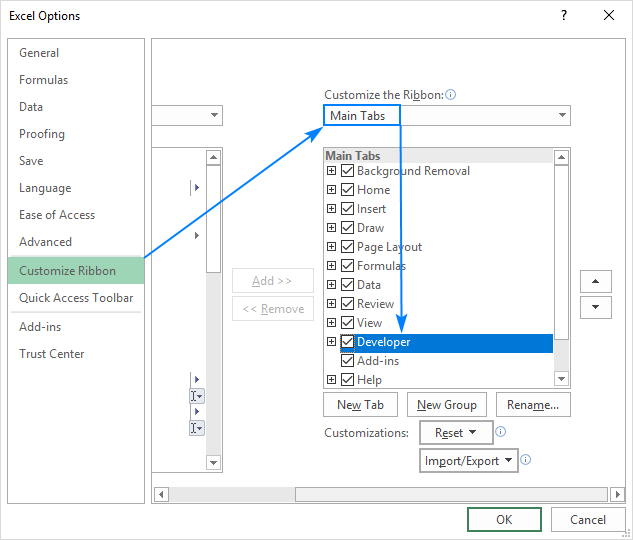
- The Excel Options dialog window will show up with the Customize Ribbon option on the left selected.
- Under the list of Main Tabs on the right, select the Developer check box and click OK.

That's it! the Developer tab is added to your Excel ribbon. Next time you open Excel, it will be displayed for you.
Tip. Another way to get the Developer tab in Excel is to go to the File tab, click Options > Customize Ribbon and check the Developer box.
Reposition the Developer tab on the ribbon
When you enable Developer tab in Excel, it is automatically placed after the View tab. However, you can easily move it wherever you want. For this, do the following:
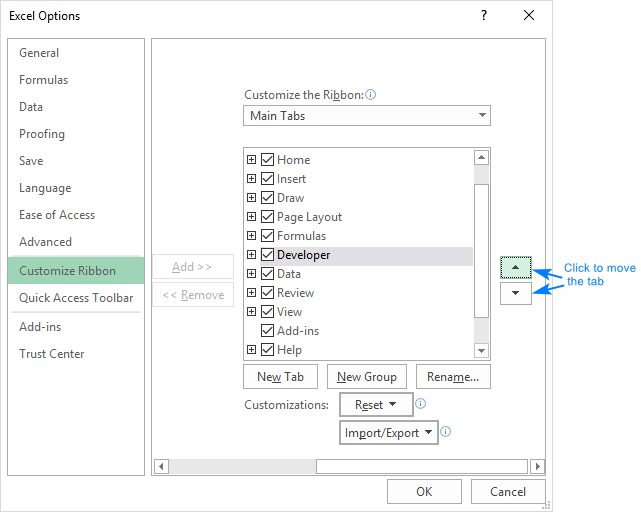
- Click on the Developer tab under Customize the Ribbon in the Excel Options dialog window.
- Click on the upward or downward arrow on the right. Each click moves the tab one position to the right or left on the ribbon.
- Once the tab is positioned properly, click OK to save the changes.

How to remove the Developer tab in Excel
If at some point you decide that you do not need the Developer tab on your Excel ribbon, simply right-click on any tab on the ribbon, pick Customize the Ribbon, and clear the Developer box.
On the next start of Excel, the tab will remain hidden until you select its checkbox again.
That's how to show the Developer tab in Excel. I thank you for reading and hope to see you on our blog next week!
 by
by
8 comments
Thank you so much - fantastic post. May I ask, if I wanted to only enbale multi-select for a specific dropdown, how would i do that?
Hi! You can make multiple selections in a drop-down list in only one cell using these instructions: Multi-select dropdown for specific columns, rows, cells and ranges
I have activated the Developer but the insert checkbox is not showing after clicking the developer tab.
to insert a checkbox, click on the developer tab, and then look for 'insert'. you should see a checkbox icon that you can click on and place anywhere on your excel sheet
How to add developer tab in Microsoft 2007?
Is it possible?
Click the Microsoft Office button (the round button at top left). Then, click on Excel Options. And then, click Popular, click on Show Developer tab in the Ribbon and click OK.
This tutorial does not work. I am in Excel365 and when I go to Datei (i.e. „File”) and select Optionen then the only thing I can choose are the regional formatting options. I have chosen Germany. But there is no way to configure the ribbon. I am looking at this with Firefox on Ubuntu.
Hi! I assume you are using Microfoft 365 online with Firefox on Ubuntu. This article describes Microfoft 365 for PC.