This article lists several ways to delete rows in Excel based on a cell value. In this post you'll find hotkeys as well as Excel VBA. Delete rows automatically or use the standard Find option in combination with helpful shortcuts.
Excel is a perfect tool to store data that change every now and then. However, updating your table after some changes may need really much time. The task can be as simple as removing all blank rows in Excel. Or you may need to find and delete the duplicated data. One thing we know for sure is that whenever details come or go, you search for the best solution to help you save time on the current work.
For example, you have a marketplace where different vendors sell their products. For some reason one of the vendors closed their business and now you need to delete all rows that contain the vendor's name, even if they are in different columns.
In this post you'll find Excel VBA and shortcuts to delete rows based on certain text or value. You'll see how to easily find and select the necessary information before removing. If your task is not about deleting but adding rows, you can find how to do it in Fastest ways to insert multiple rows in Excel.
The fastest Excel shortcut to delete rows in your table
If you want to use the fastest method of deleting multiple rows according to the cell value they contain, you need to correctly select these rows first.
To select the rows, you can either highlight the adjacent cells with the needed values and click Shift + Space or pick the needed non-adjacent cells keeping the Ctrl key pressed.
You can also select entire lines using the row number buttons. You'll see the number of the highlighted rows next to the last button.
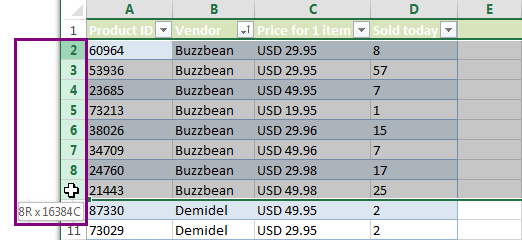
After you select the necessary rows, you can quickly remove them using an Excel "delete row" shortcut. Below you'll find how to get rid of the selected lines whether you have a standard data table, or a table that has data to the right.
Remove rows from the entire table
If you have a simple Excel list that has no additional information to the right, you can use the delete row shortcut to remove rows in 2 easy steps:
- Select the rows you want to delete.
- Press the Ctrl + - (minus on the main keyboard) hotkey.
You'll see the unused rows disappear in a snap.
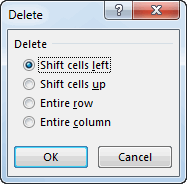
Tip. You can highlight only the range that contains the values you want to remove. Then use the shortcut Ctrl + - (minus on the main keyboard) to get the standard Excel Delete dialog box allowing you to select the Entire row radio button, or any other deleting option you may need.
Delete rows if there is data to the right of your table
Ctrl + - (minus on the main keyboard) Excel shortcut is the fastest means to delete rows. However, if there is any data to the right of your main table like on the screenshot below, it may remove rows along with the details you need to keep.

If that's your case, you need to format your data as Excel Table first.
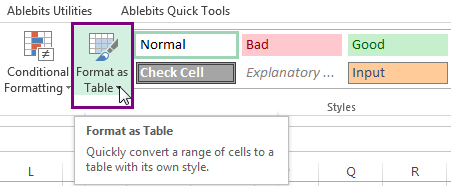
- Press Ctrl + T, or go to the Home tab -> Format as Table and pick the style that suites you best.
You will see the Create Table dialog box that you can use to highlight the necessary range.
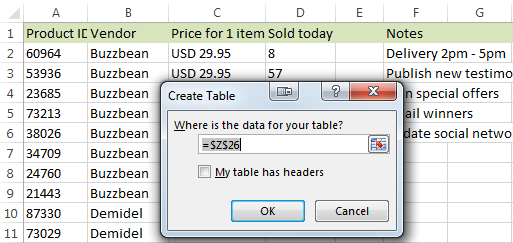
- Now that your list is formatted, select the range with the values or rows you want to delete within your table.
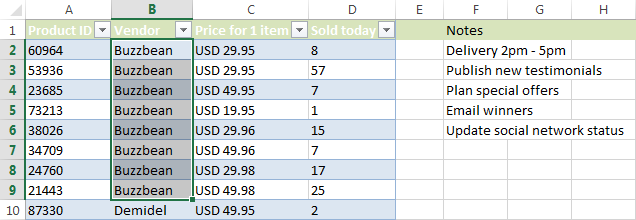
Note. Please make sure you don't use the row buttons to select the entire rows.
- Press Ctrl + - (minus on main keyboard) to see the unwanted data removed only from your table. The additional information to the right will be left intact.
Hope you've found this "remove row" shortcut helpful. Continue reading to find Excel VBA for deleting rows and learn how to eliminate data based on certain cell text.
Delete rows that contain certain text in a single column
If the items in the rows you want to remove appear only in one column, the following steps will guide you through the process of deleting the rows with such values.
- First you need to apply Filter to your table. To do this, navigate to the Data tab in Excel and click on the Filter icon.

- Filter the column that contains the values for deleting by the needed text. Click on the arrow icon next to the column that contains the needed items. Then uncheck the Select All option and tick the checkboxes next to the correct values. If the list is long, just enter the necessary text in the Search field. Then click OK to confirm.
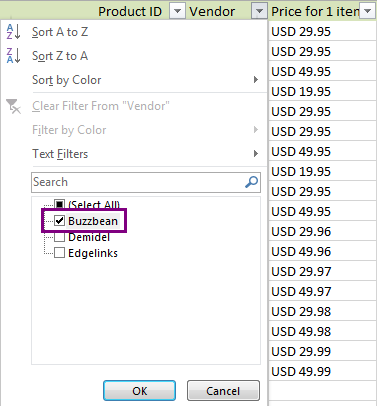
- Select the filtered cells in the rows you want to delete. It's not necessary to select entire rows.
- Right-click on the highlighted range and and pick the Delete row option from the menu list.
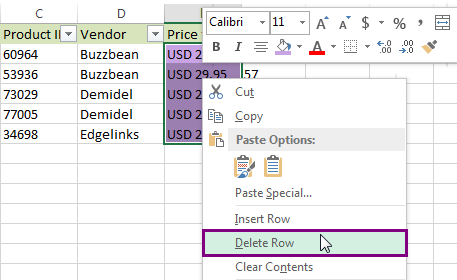
Finally click on the Filter icon again to clear it and see that the rows with the values disappeared from your table.
How to remove rows in Excel by cell color
The filter option allows sorting your data based on the color of cells. You can use it to delete all rows that contain certain background color.
- Apply Filter to your table. Go to the Data tab in Excel and click on the Filter icon.

- Click on the small arrow next to the needed column name, go to Filter by Color and pick the correct cell color. Click OK and see all highlighted cells on top.
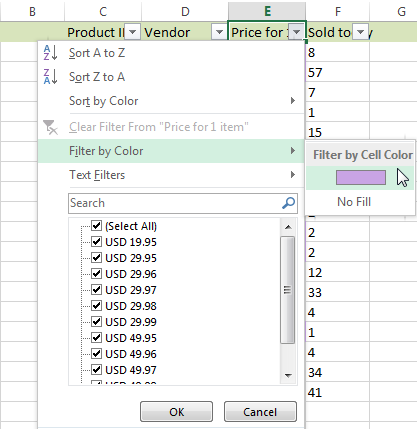
- Select the filtered colored cells, right-click on them and pick the Delete Row option from the menu.

That's it! The rows with identically colored cells are removed in an instant.
Delete rows that contain certain text in different columns
If the values you want to remove are scattered around different columns, sorting may complicate the task. Below you'll find a helpful tip to remove rows based on the cells that contain certain values or text. From my table below, I want to remove all rows that contain January which appears in 2 columns.
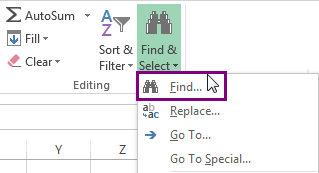
- Start by searching and selecting the cells with the needed value using the Find and Replace dialog. Click Ctrl + F to run it.
Tip. You can find the same dialog box if you go to the Home tab -> Find & Select and pick the Find option from the drop-down list.
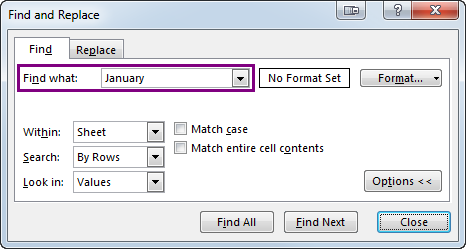
- Enter the needed value in the Find what field and select any additional options if necessary. Then press Find All to see the result.
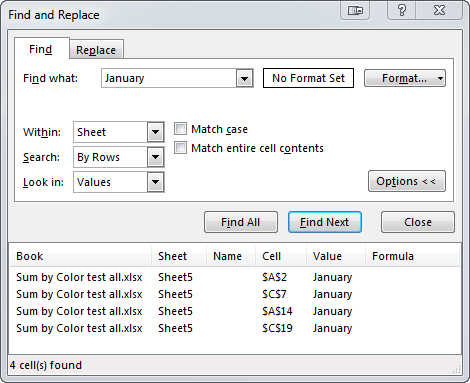
- The results will appear in the Find and Replace window.
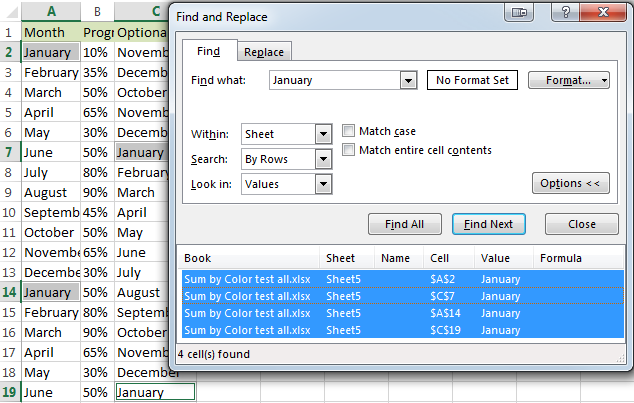
Select the found values in the window keeping the Ctrl key pressed. You will get the found values automatically highlighted in your table.
- Now navigate to the Home tab -> Delete -> Delete Sheet Rows.
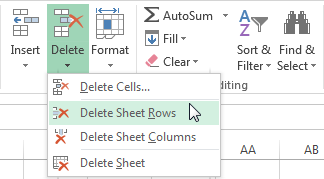
Tip. You can delete the rows with the selected values if you press Ctrl + - (minus on the main board) and select the radio button Entire rows.
Voila! The unwanted rows are deleted.
Excel VBA macro to delete rows or remove every other row
If you always search for a solution to automate this or that Excel routine, grab the macros below to streamline your delete-rows task. In this part you'll find 2 VBA macros that will help you remove rows with the selected cells or delete every other row in Excel.
The macro RemoveRowsWithSelectedCells will eliminate all lines that contain at least one highlighted cell.
The macro RemoveEveryOtherRow as its name suggests, will help you get rid of every second/third, etc., row according to your settings. It will remove rows beginning with the current mouse cursor location and till the end of your table.
If you don't know how to insert macros, feel free to look at How to insert and run VBA code in Excel.
Tip. If your task is to color every second/third, etc., row with a different color, you will find the steps in Alternating row color and column shading in Excel (banded rows and columns).
In this article I described how to delete rows in Excel. Now you have several useful VBA macros to delete the selected rows, you know how to remove every other row and how to use Find & Replace to help you search and select all the lines with the same values before eliminating them. Hope the tips above will simplify your work in Excel and let you get more free time for enjoying these last summer days. Be happy and excel in Excel!
 by
by
25 comments
I have tested your Sub RemoveRowsWithSelectedCells(). It seems to only work when I select adjacent cells in Column A of the table, or if I select entire rows that are adjacent. If I select adjacent cells in column C, it produces an error. Also, if I select non-adjacent cells, even in column A, or non-adjacent entire rows, it still produces an error. Is there a way to tweak the code to make it work as I think it was intended? Thank you! My current solution is simply to provide instructions in the Error Handler to the user on how the code requires selection. Thanks! Dominique
Hello Dominique!
I was not able to reproduce your problem. In all the actions you describe, the macro works correctly and without error.
HHIM1801344 PKG
HHIM1801344 PKG
HHIM1801344 PKG
HHIM1801344 PKG
HHIM1801344 PKG
How to delete starting 4 rows in this case and keep only the last row.(How to delete other rows)
Hi! To determine the last value of the duplicate values, try using the COUNTIF function. You can then select and delete all rows that have a FALSE value in that column. Try to enter the following formula in cell B1 and then copy it down along the column:
=COUNTIF($A$1:A1,A1) = COUNTIF($A$1:$A$1000,A1)
Hello, I was wondering how I can write a code for a function or VBA that deletes rows that do not satisfy the conditional formatting or in other words, are not colored. Normally I would do this manually but my data set is over 50k entries. also if I wanted to go the extra step as in write a code that says that if the row has 2 colored cells or less than delete the whole row.
I have a large spreadsheet, 35000 entries. One column has multiple duplicates. I would like to get rid of the rows those duplicates are in but keep one instance. How, if at all, do I find all the duplicates and keep one instance of each and then delete the rows the remaining duplicates are in? For the most part ALL of the cells in each row are the same except for a few. Example... one column lists 5 instances of RED KIDS STOCKINGS in the TITLE column with different sizes in a different cell named SIZE. I want to keep one of those rows and delete the other 4 that list RED KIDS STOCKINGS in the TITLE cell. Highlighting and clicking on each row I want to delete is very tedious with this many entries.
Hope this makes sense.
Hello!
To extract the first occurrence of a string and remove duplicate rows, you can use one of the instructions:
How to remove duplicate rows in Excel by filtering or
How to delete duplicates in Excel.
The easiest way to remove duplicates is using the Remove Duplicates tool. It is available as a part of our Ultimate Suite for Excel that you can install in a trial mode and check how it works for free.
Hi
I have VB based excel file with auto filter and formatting cells,. I want to delete old data. When I tried to put new data I got error message " 1004 application defined" Please advised me.
Thanks
Chan
Hi!
When you use VBA code to select a range that is not on the active worksheet, VBA will show you a runtime error 1004.
Hi
Can you please tell me how to delete my old data for my VB based excel file with auto filter and conditional formatting?
Thanks
Chan
Hi!
I can't see your data and your code. I'm really sorry, we cannot help you with this.
Hi
Thanks for your reply I am totally new with VB code please help me how to delete my old data?
I have a spreadsheet having a specific color in column. I want to identify that cell & delete that column using VBA code. How can I do it ?
Is there a way to use a Macro to delete all rows that have a non-colored cell? I need to leave only the row not changed by the conditional formatting in one particular column. Ay help is appreciated.
I have a spreadsheet from an app that transferred all my cell # and added name, phone # address etc.
I would like to:
clean this up big time to make a mailing list.
some contacts have -- home address,
Is there a way to remove the entire row if there is no address in a certain cell?
example
a first name
b second name
cell H is primary street no address no further information
I want to weed all of these people out of this excel
am I crazy for wanting this? #55&annoyed
Hello Gina Ann!
You can apply a filter to your table to display only those rows that contain empty cells in a certain column. Please see here how to create and use Excel Advanced Filter.
Then select all the rows you need to delete at once, right-click and choose the Delete option from the context menu.
I also recommend looking through carefully the "Delete rows that contain certain text in a single column" paragraph above on this page.
2016 Excel spreadsheet that has random cells with red font. Those cells are highlighted. Need to preserve the rows if they have a single cell highlighted. If the row does not have any highlighted cell, delete that row. Is that possible?
RemoveRowsWithSelectedCells - like this except RemoveRowsWithoutSelectedCell
This was awesome! saved me a lot of time! thanks!
Hello Maria,
I have a excel sheet, I have been able to filter the data and get some cells into red (to be deleted) and green (to be used) using macro. I am looking for a macro by which I can delete the complete row if a cell is red.
The red and green colors are same which we get using conditional formatting in excel 2013.
i have 300 column in sheet1,but i need only 3 column from that to sheet2.out of that 3 column i need to filter for some values and the filtered values only need to display other values are not need …that are must hide or delete.. anybody help me………………
Thank you. very helpful!
Hello,
I have a master file with data of various stores which needs to be split into various sheets store wise. I have managed to split it, but I don't have a code to delete the blank rows in between the data.
Hi JOHN,
Please look at the following video, it should help:
https://www.youtube.com/watch?v=tmA3oI0LhPg
I need to fetch data of a single coloum from a web page,but I am getting the complete page.Please tell me how do I fix it so that i will get only a single data which will update while refreshing.
Hello, Benudhar,
For me to be able to assist you better, please send me a sample table with your data in Excel and the result you want to get. Thank you.