In this tutorial, you will learn how to activate a built-in input form in Excel and how to add a special button to your worksheet to open the form.
When it comes to inputting information in Excel spreadsheets, most people do it the traditional way - cell by cell, row by row. To make the process more use-friendly and less time-consuming, you can use a special data entry form. It will help you focus on individual records, one at a time, without having to scroll horizontally between columns.
Excel data entry form
You may not know it, but Excel has a special form for entering data in a spreadsheet that makes the input process faster, more user-friendly and less error-prone, especially in large worksheets.
How do users normally populate Excel tables? By typing data directly into cells. Sometimes, you scroll up to see the column headings and sometimes scroll to the right and then come back to the beginning of the table. With large data sets, there is a possibility to mix up something and enter information in a wrong cell.
To facilitate input, you can ask Excel to display one row of information in a handy dialog box. Here, you can accurately add new records as well as update and edit the existing ones. You can also set up Data Validation to ensure that only the entries meeting certain criteria are accepted.
Data entry forms are supported in Excel 365, Excel 2019, Excel 2016, Excel 2010 and Excel 2007, but not available in Excel Online (Excel for the web).
Here's how Excel's Data Entry Form works:
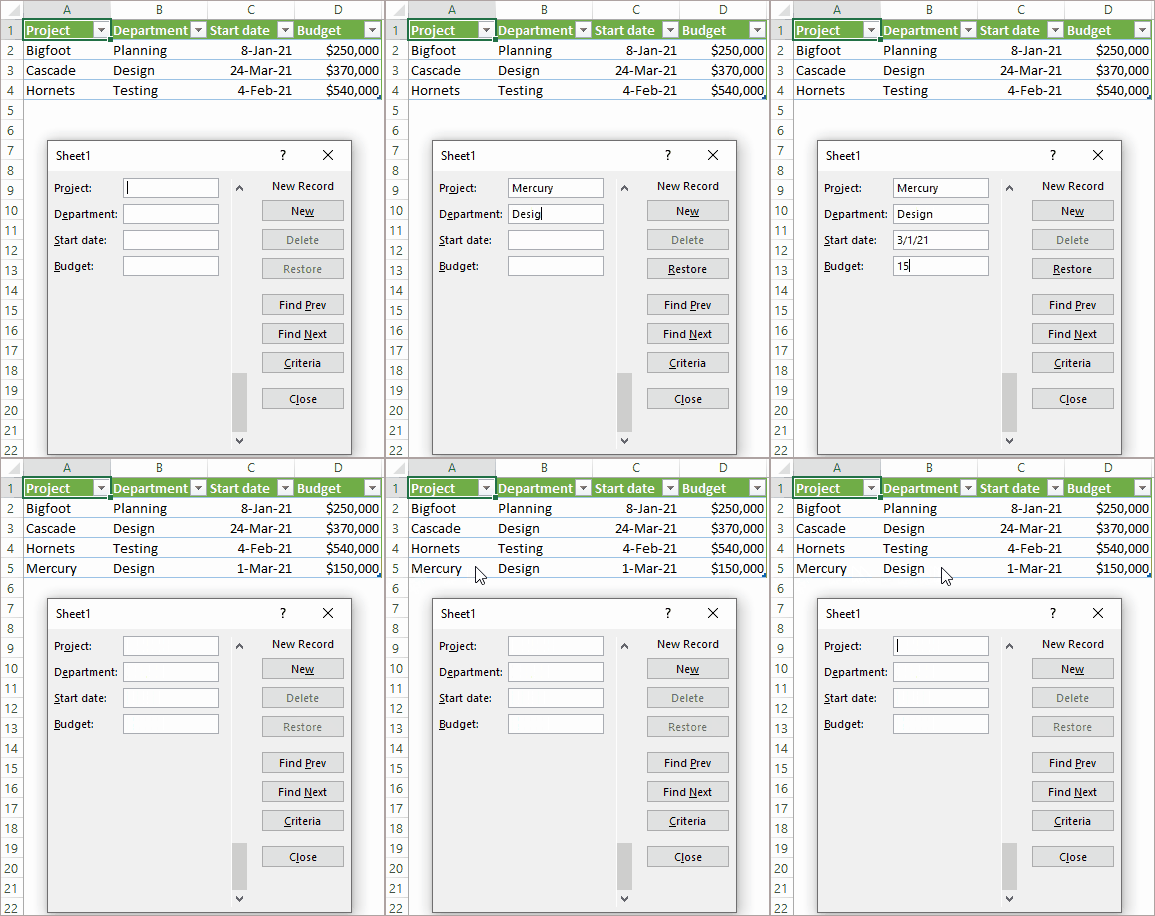
Notes:
- A data form is limited to a maximum of 32 columns / fields.
- Since a data form is a modal dialog window, it cannot be printed. Moreover, you cannot print a worksheet until you close the data form.
How to add the Form tool to Excel
Although the Form tool exists in all versions of Excel 2007 through Excel 365, it is hidden by default. So, first you need to make it visible by adding the From button to the ribbon or the Quick Access Toolbar, or both.
To add the Form tool to the Quick Access Toolbar (QAT), these are the steps to perform:
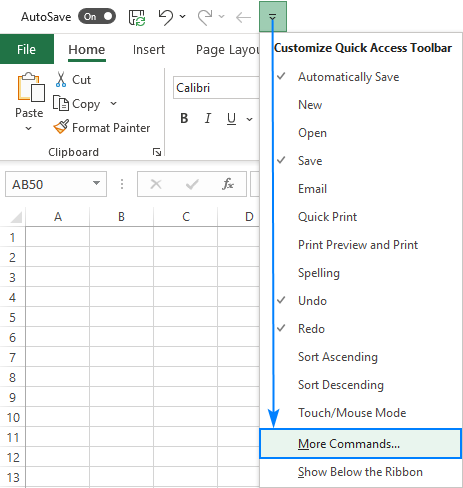
- Click the small down arrow at the far-right of the QAT, and then choose More Commands in the pop-up menu.
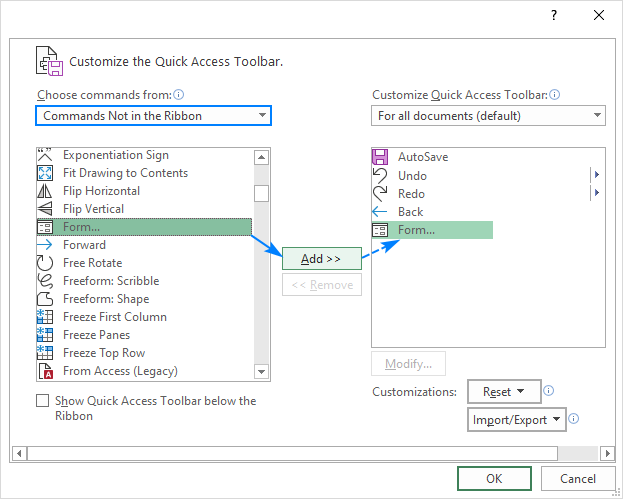
- In the Excel Options dialog box that opens, under Choose commands from, select All Commands or Commands Not in the Ribbon.
- Scroll down the list of command on the left until you see Form… and click on it.
- Click the Add button in the middle to move the Form to the list of QAT commands on the right.
- Click OK to save the changes and close the dialog.
The Form icon will immediately appear in your Quick Access Tollbar and will be available in all your workbooks.

Believe it or not, you've successfully coped with the main challenge. Once the Form tool is in your Excel, creating a data entry form for any table (a new or existing one) takes just a single button click.
Tip. In a similar fashion, you can place the Form tool on the ribbon. For the detailed instructions, please see How to add a button to Excel ribbon.
How to make data entry form in Excel
A data entry form is only available for a fully functional Excel table. To get the form, you just need to put your data in a table and the click the Form button. The detailed steps follow below:
- In your worksheet, type the column headings in the topmost row as usual. If you want an input form for an existing data set, skip this step.
- Select any cell in your dataset and click the Ctrl + T keys simultaneously. This will select all the data and convert it to a table.
- Place the cursor anywhere within the table and click the Form button. Done!
To keep things simple, let's make this small table as an example:

Clicking the Form button automatically creates a data entry form for your table with fields corresponding to the column headings:
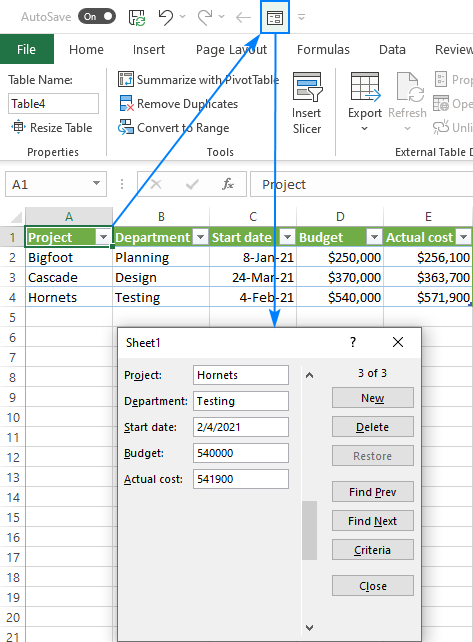
As you can see, the Excel input form has a handful of different buttons. Here's a brief explanation of what each button does:
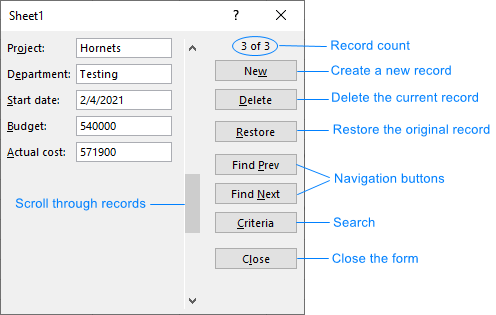
Aside from the buttons, you can use the following keys for navigation:
- Tab - get to the next field.
- Shift + Tab - get to the previous field.
- Enter - save the current record and start a new one.
How to add a new record
To add a new record to your table using the data entry form, perform these steps:
- Select any cell in your table.
- Click on the Form button on the Quick Access Toolbar or on the ribbon.
- In the input form, click the New button.
- Type the information in the appropriate fields.
- When done, hit the Enter key or click the New button again. This will add the record to the table and get a blank form for the next record.
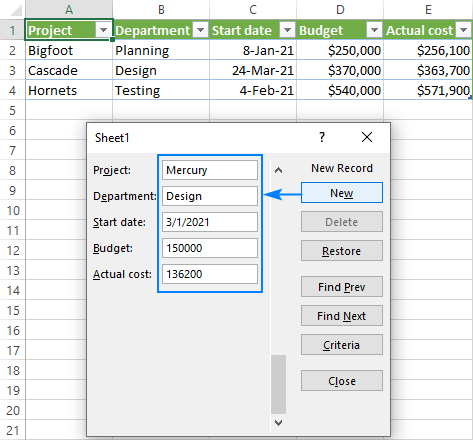
Tip. To quickly enter specific information, you can use the same shortcuts that you use in your worksheets. For example:
- Press Ctrl + ; to insert today's date.
- Press Ctrl + Shift + ; to enter the current time.
How to search for records
To go through the records one by one, you can use the Find Prev and Find Next buttons or the vertical scroll bar. To find records that meet certain conditions, use the Criteria button.
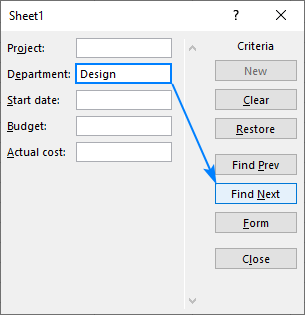
For example, to locate all the projects assigned to the Design dept., type Design in the Department field, and press Find Next:
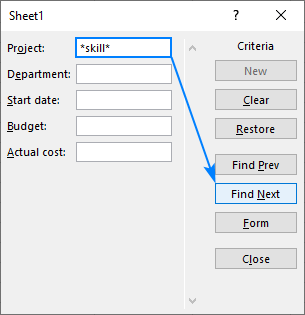
The wildcard characters can help you broaden the search. For instance, to discover the projects that contain "skill" anywhere in the project name, type *skill* in the Project field.
When dealing with numbers and dates, the logical operators such as greater than (>), less than (<), equal to (=), not equal to (<>) and others come in handy. For example, to view the records where the start date is prior to 1-Mar-2021, use "<1-Mar-2021" or "<3/1/2021" for the criteria:
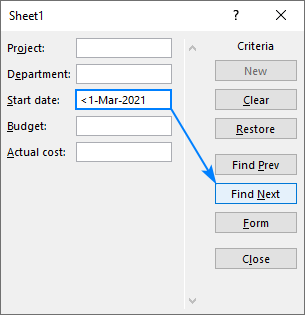
Note. Criteria on a data form are not case sensitive. Say, when searching for the Design dept., "DESIGN" and "design" will also be found.
How to update and restore records
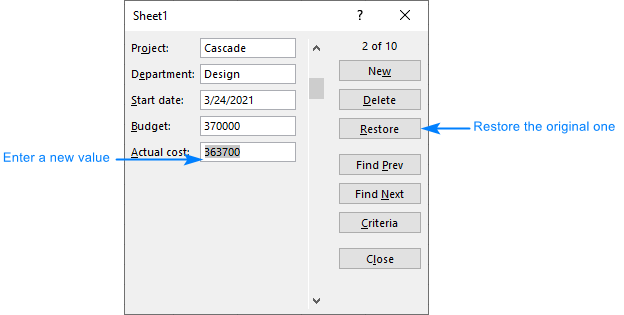
If some entry is outdated or contains wrong information, you can use the Criteria or navigation buttons to get to the record, update the incorrect field, and press Enter to commit the updated data to the table.
If you made some accidental changes but have not pressed the Enter key yet, you can revert to the original record by clicking the Restore button. If you've already hit Enter and the changes were passed over to the table, press Ctrl + Z to undo.
How to use Data Validation with data entry form
To restrict user input to a specific data type, you can set up a data validation rule for one or more columns in your table, and your rules will be automatically carried over to the data entry form.
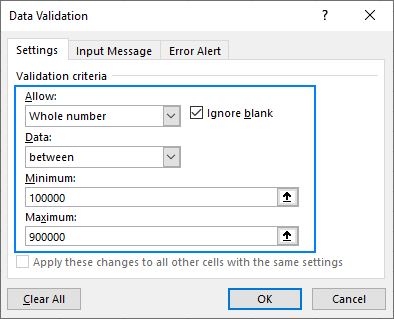
For example, to limit the Budget to numbers in a given range, we create this rule:
If someone tries to enter a value that does not conform to the rule you've set, an error alert will be displayed (either the standard or your custom one):
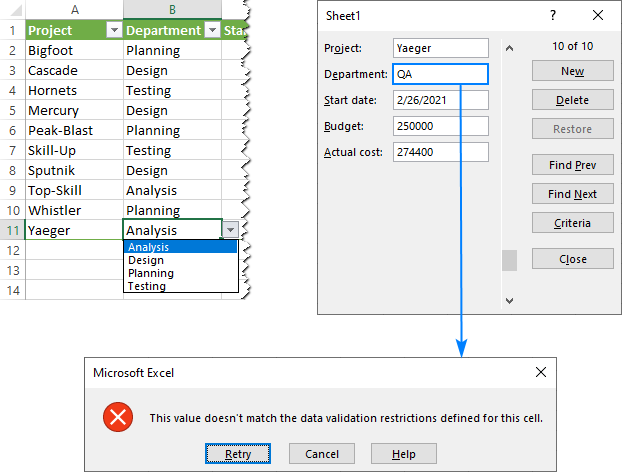
The use of data validation with input forms has one limitation - drop down lists do not appear in data entry fields. But even though a drop-down list does not show up inside the form, its restrictions are still in effect. If you enter a value that is not in the list, the form will reject it just as Data Validation normally would.

Limitation: drop down lists are unavailable on a form
Formulas in data entry forms
In case one or more columns in your table are calculated by formulas, you won't be able to alter those formulas using the form because the formula result appears as text, not as an editable field. Although that may sound like another limitation, in fact it is done for a reason. When you change a table formula in one cell, the formulas in all other cells in the same column change automatically. To avoid messing up your data, formula editing on the input form is blocked.
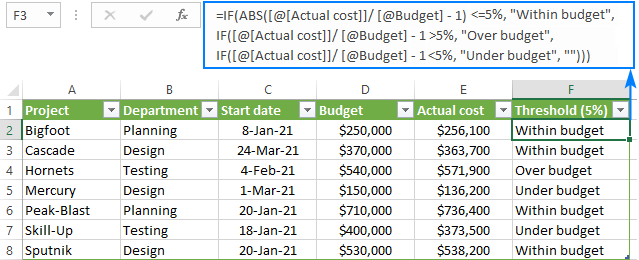
For example, you could use the following formula to find out if the actual cost is under, over or within the budget based on the 5% threshold:
=IF(ABS([@[Actual cost]]/ [@Budget] - 1)<=5%, "Within budget", IF([@[Actual cost]]/ [@Budget]- 1>5%, "Over budget", IF([@[Actual cost]]/ [@Budget]- 1<5%, "Under budget", "")))
If you are using a Microsoft 365 subscription, then you could wrap the above formula in the LET function like shown below. This will make your formula more compact, easier-to-understand and faster-to-calculate:
=LET(dif, E2/D2-1, IF(ABS(dif)<=5%, "Within budget", IF(dif>5%, "Over budget", IF(dif<5%, "Under budget", ""))))
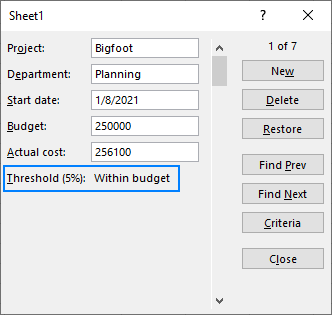
On the data entry form, you will only see a non-editable calculated result, not the formula:
How to open data entry form with VBA
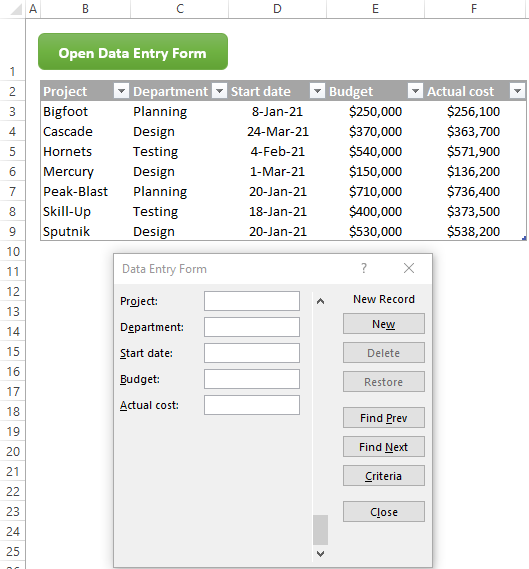
If you are setting up a table for someone else, your users may not know where to look for the Form button. Moreover, they may not know that such a thing even exists :) To bring it to focus, you can open the input form using a macro. And to run that macro, place a special button directly in the worksheet.
Assuming the current sheet has a table, you need just a single code line to open the form:
However, there is a crucial caveat - the above code only works if either:
- Your table begins in A1, or
- There is a name "Database" referring to your table (a defined name, not a table name!).
To overcome these limitations, you can use the advanced version of the code that specifies the cell where your table begins (B2 in our case), gives the name "database" to the current region, opens the form, and then deletes the name:
Note. If you don't delete the name "database" in the code, you won't be able to open the form (even manually) for any other table in that particular workbook.
To open a data entry form for a table in another sheet, activate the target worksheet (Sheet1 in the below example) before executing the main code:
After inserting the code, you can place a button form control onto your worksheet and assign a macro to it. Or you can create a button from a shape or another object. The detailed instructions are here: How to create a macro button in Excel.
And now, you users can comfortably open the input data form by clicking a colorful vivid button. They do not even have to bother about putting the cursor within the table - the form will open no matter which cell is active at the moment.
If you have little experience with VBA, a couple of end-to-end tutorials may prove helpful:
Excel data entry form not working
If a data form does not launch in your Excel, the following troubleshooting tips may help determine the reason.
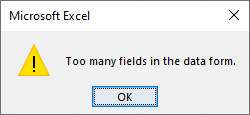
Too many fields in the data form
When attempting to create a data form for a table containing more than 32 columns, you will get this error message:
In this case, you will have to either reduce the number of columns in the source table or insert one or more empty columns breaking your big table into a few smaller ones. And then, you can create a separate data form for each smaller table.
Cannot extend list or database
If you are trying to add a new row of data, but Excel says that it cannot extend a list or database, that means there is some other data below your table and adding a new record would overwrite that existing data.
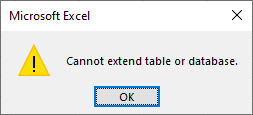
To resolve this error, remove any data below your table, so it can extend downward. If you do not see anything underneath the last row, the problem is most likely in spaces, empty strings or non-printing characters. In this case, use the Clear All command to clear the workspace.
The cursor is outside the table
When clicking the Form button results in the below error message, most likely the cursor is not within the table. Simply click any cell in the table, and then try to open the form again.

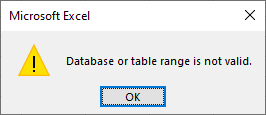
There is a named range "Database"
In case there is a range named "database" in your workbook, the form will always refer to that range, even when you open it for a table. Weird! If the "database" range is on another sheet, the following error will occur. To fix it, just give some other name to the range.
That is how to create and use a data entry form in Excel. I thank you for reading and hope to see you on our blog next week!
Practice workbook for download
Excel Data Entry Form (.xlsm file)
 by
by
2 comments
I have a database of 900+ line of employee details (eg. emp no., name, dept, position.. etc).
and an excel form template which need to key in user's information data.
may i know except VLOOKUP and key in emp no. 1 by 1, is there any other easier way to fill in the data automatically?
Hi! As an alternative to VLOOKUP you can use the INDEX+MATCH or XLOOKUP functions.