See how to customize Excel ribbon with your own tabs and commands, hide and show tabs, rename and rearrange groups, restore the ribbon to the default settings, back up and share your custom ribbon with other users.
Introduced in Excel 2007, the ribbon allows you to access most of the commands and features. In Excel 2010, the ribbon became customizable. Why would you want to personalize the ribbon? Perhaps you will find it convenient to have your own tab with your favorite and most used commands at your fingertips. Or you will want to hide tabs you use less often. Whatever the reason, this tutorial will teach you how to quickly customize the ribbon to your liking.
Excel ribbon: what can and cannot be customized
Before you start doing something, it's always good to know what can and what cannot be done.
What you can customize
To save your time and efforts when working on different tasks in Excel, you can personalize the ribbon with things like:
- Show, hide, and rename tabs.
- Rearrange tabs, groups and custom commands in the order you want.
- Create a new tab with your own commands.
- Add and remove groups on existing tabs.
- Export or import your personalized ribbon.
What you can't customize
Though a lot of ribbon customizations are allowed in Excel, certain things cannot be changed:
- You can neither change nor remove the built-in commands, including their names, icons and order.
- You cannot resize the ribbon, nor can you change the size of the text or the default icons. However, you can hide the ribbon completely or collapse it to show only the tab names.
- You cannot change the color of the ribbon in Excel, but you can change the color scheme of the entire Office.
How to customize ribbon in Excel
Most customizations to the Excel ribbon are done in the Customize the Ribbon window, which is part of Excel Options. So, to start customizing the ribbon, do one of the following:
- Go to File > Options > Customize Ribbon.
- Right-click on the ribbon and select Customize the Ribbon… from the context menu:
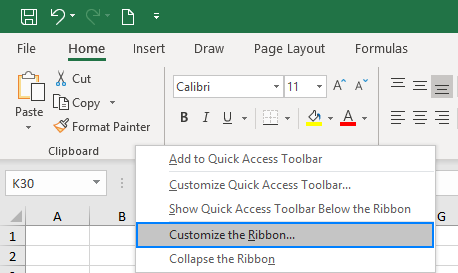
Either way, the Excel Options dialog window will open enabling you to do all the customizations described below. The instructions are the same for Excel 2019, Excel 2016, Excel 2013 and Excel 2010.
How to create a new tab for the ribbon
To make your favorite commands easily accessible, you can add your own tab to the Excel ribbon. Here's how:
- In the Customize the Ribbon window, under the list of tabs, click the New Tab button.
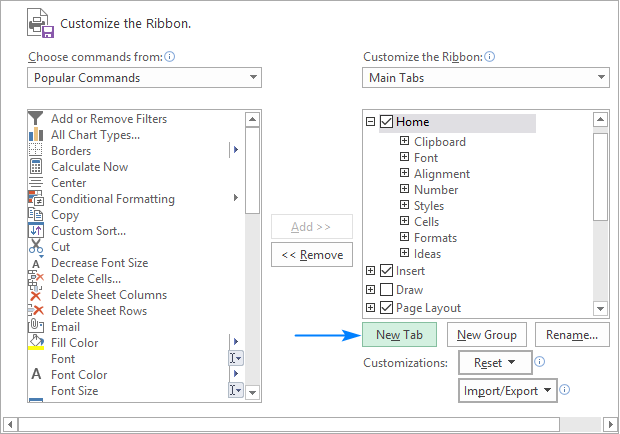
This adds a custom tab with a custom group because commands can only be added to custom groups.
- Select the newly created tab, named New Tab (Custom), and click the Rename… button to give your tab an appropriate name. In the same manner, change the default name given by Excel to a custom group. For the detailed guidelines, please see how to rename ribbon items.
- When done, click OK to save the changes.
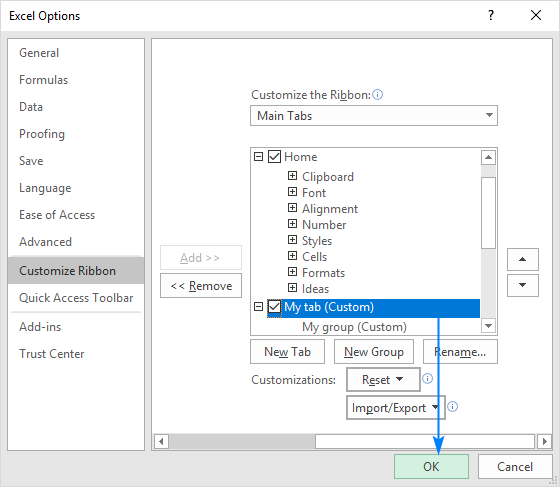
As shown in the screenshot below, our custom tab is added to the Excel ribbon immediately, though the custom group is not displayed because it is empty. For the group to show up, it must contain at least one command. We will add commands to our custom tab in a moment but, to be consistent, we will first look at how to create a custom group.

Tips and notes:
- By default, a custom tab is placed after the currently selected tab (after the Home tab in our case), but you are free to move it anywhere on the ribbon.
- Each tab and group that you create have the word Custom after their names, which is added automatically to distinguish between built-in and custom items. The word (Custom) only appears in the Customize Ribbon window, not on the ribbon.
How to add a custom group to a ribbon tab
To add a new group to either a default or custom tab, this is what you need to do:
- In the right part of the Customize the Ribbon window, select the tab to which you'd like to add a new group.
- Click the New Group button. This adds a custom group, named New Group (Custom), at the bottom of the list of groups, meaning the group displays on the far-right end of the tab. To create a new group in a specific location, select the group after which the new group is to appear.
In this example, we're going to add a custom group to the end of the Home tab, so we select it, and click New Group:
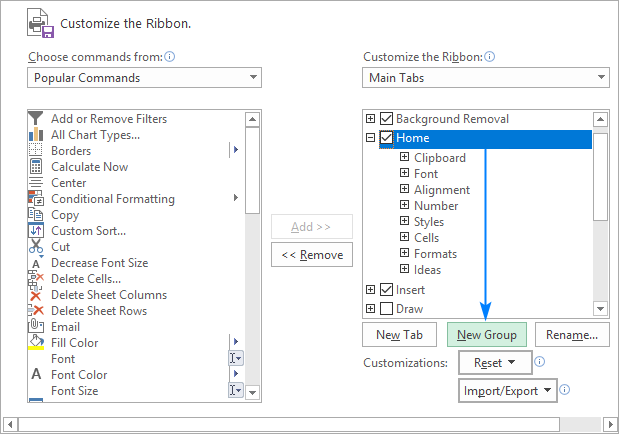
- To rename your custom group, select it, click the Rename… button, type the desired name, and click OK.
Optionally, from the Symbol box, select the icon to represent your custom group. This icon will appear on the ribbon when the Excel window is too narrow to show the commands, so only the group names and icons are displayed. Please see how to rename items on the ribbon for full details.
- Click OK to save and view your changes.
Tip. To save some room on the ribbon, you can remove text from the commands in your custom group and show only the icons.
How to add a command button to Excel ribbon
Commands can only be added to custom groups. So, before adding a command, be sure to create a custom group on an inbuilt or custom tab first, and then perform the below steps.
- In the list under Customize the Ribbon, select the target custom group.
- In the Choose commands from drop-down list on the left, select the list from which you want to add commands, for example, Popular Commands or Commands Not in the Ribbon.
- In the list of commands on the left, click the command you want to add.
- Click the Add button.
- Click OK to save the changes.
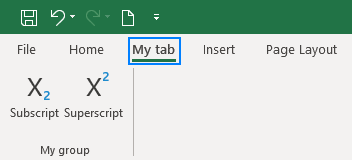
As an example, we are adding add the Subscript and Superscript buttons to the custom tab that we created:
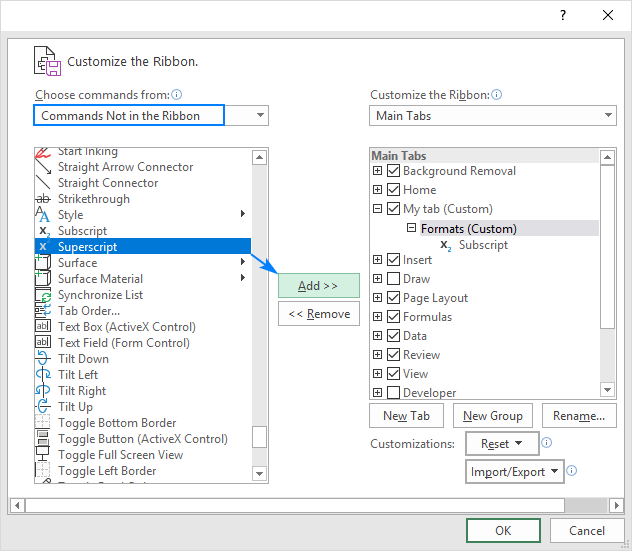
As the result, we now have a custom ribbon tab with two buttons:
Show icons instead of text labels on the ribbon
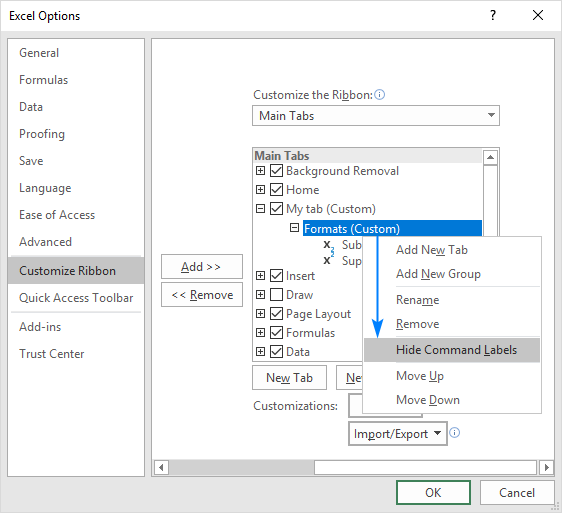
If you're using a small monitor or a laptop with a small screen, every inch of screen space matters. To save some room on the Excel ribbon, you can remove text labels from your custom commands to show only icons. Here's how:
- In the right part of the Customize the Ribbon window, right-click on a target custom group and select Hide Command Labels from the context menu.
- Click OK to save the changes.
Notes:
- You can only hide text labels for all the commands in a given custom group, not just for some of them.
- You cannot hide text labels in built-in commands.
Rename ribbon tabs, groups and commands
In addition to giving your own names to custom tabs and groups that you create, Excel allows you to rename the built-in tabs and groups. However, you cannot change names of the inbuilt commands, only commands added to custom groups can be renamed.
To rename a tab, group or custom command, carry out these steps:
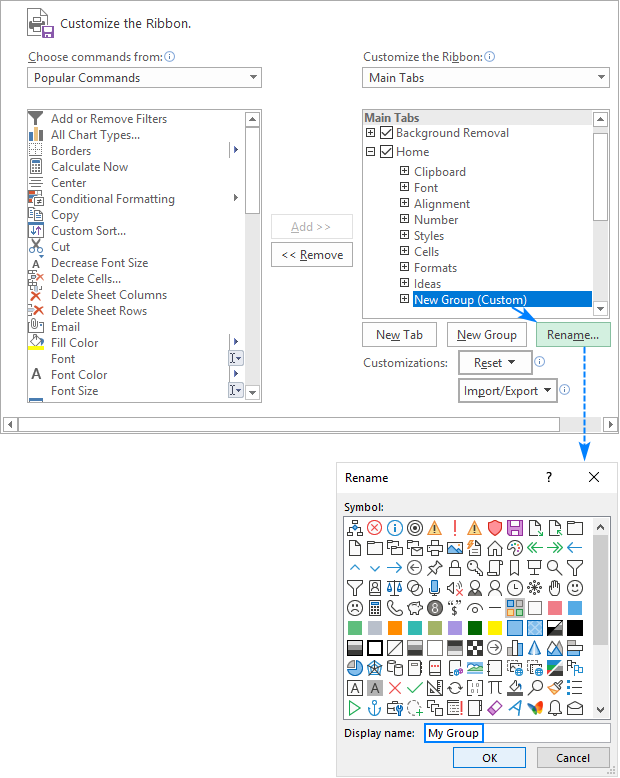
- On the right side of the Customize the Ribbon window, click on the item you want to rename.
- Click the Rename button below the list if tabs.
- In the Display name box, type the name you want, and click OK.
- Click OK to close the Excel Options window and view your changes.
For groups and commands, you can also select an icon from the Symbol box, like shown in the screenshot below:
Note. You can change the name of any custom and build-in tab, except the File tab that cannot be renamed.
Move tabs, groups and commands on the ribbon
To know exactly where everything is located on your Excel ribbon, you can put tabs and groups in the most convenient places. However, the build-in commands cannot be moved, you can only change order of commands in custom groups.
To rearrange items on the ribbon, this is what you need to do:
- In the list under Customize the Ribbon, click on the tab, group, or command in a custom group that you wish to move.
- Click the Up or Down arrow to move the selected item left or right on the ribbon, respectively.
- When the desired order is set, click OK to save the changes.
The screenshot below shows how to move a custom tab to the left end of the ribbon.
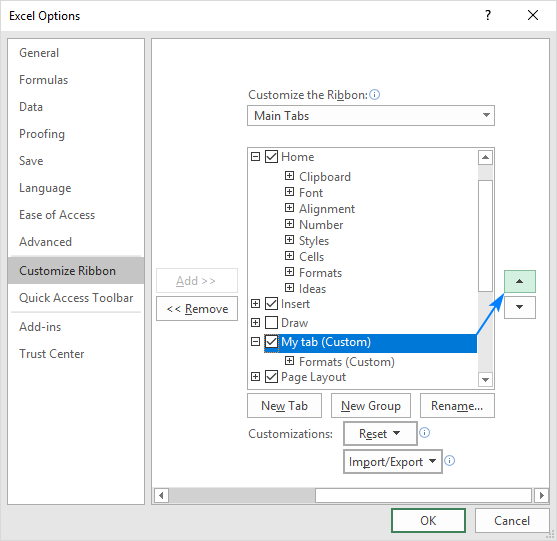
Note. You can change the placement of any build-in tab such as Home, Insert, Formulas, Data, and others, except the File tab that cannot be moved.
Remove groups, custom tabs and commands
While you can remove both default and custom groups, only custom tabs and custom commands can be removed. The build-in tabs can be hidden; built-in commands can nether be removed nor hidden.
To remove a group, a custom tab or command, do the following:
- In the list under Customize the Ribbon, select the item to be removed.
- Click the Remove button.
- Click OK to save the changes.
For example, this is how we remove a custom command from the ribbon:
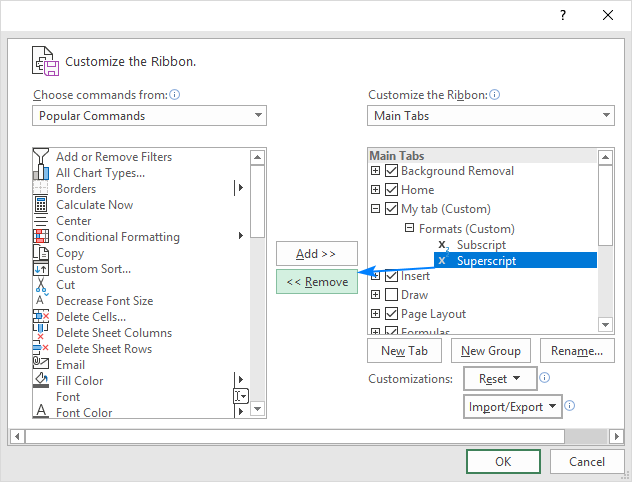
Tip. It is not possible to remove a command from a built-in group. However, you can make a custom group with the commands you need, and then remove the entire built-in group.
Hide and show tabs on the ribbon
If you feel the ribbon contains a couple of extra tabs that you never use, you can easily hide them from view.
- To hide a ribbon tab, simply uncheck its box in the list of tabs under Customize the Ribbon, and then click OK.
- To show a ribbon tab, select the box next to it, and click OK.
For instance, that's how you can show the Developer tab, which is not visible in Excel by default:
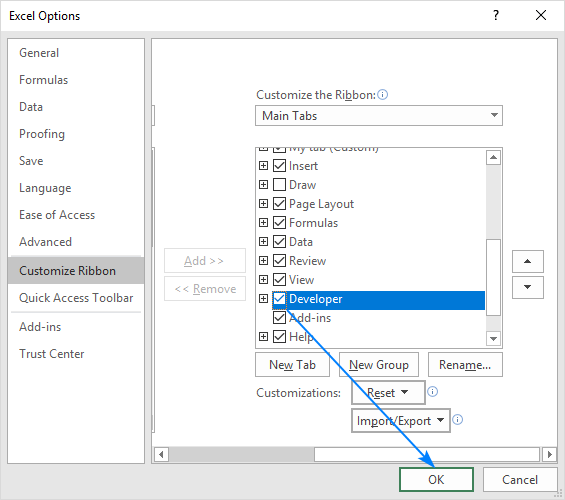
Note. You can hide both custom and built-in tabs, except the File tab that cannot be hidden.
Customize contextual tabs on Excel ribbon
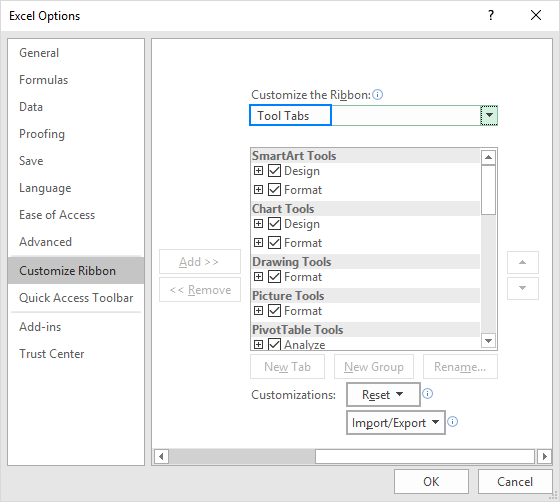
To personalize the contextual ribbon tabs that appear when you select a certain item such as a table, chart, graphic or shape, select Tool Tabs from the Customize the Ribbon drop-down list. This will display the full list of context-sensitive tabs available in Excel letting you hide, show, rename, and rearrange these tabs as well as add your own buttons to them.
How to reset Excel ribbon to default settings
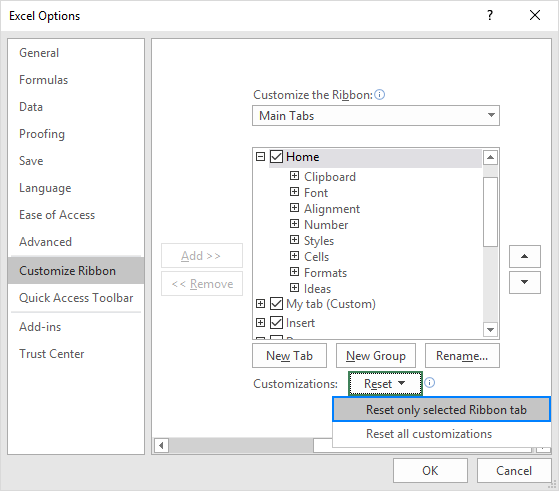
If you've made some ribbon customizations, and then want to revert to the original setup, you can reset the ribbon in the following way.
To reset the entire ribbon:
- In the Customize the Ribbonwindow, click Reset, and then choose Reset all customizations.
To reset a specific tab:
- In the Customize the Ribbonwindow, click Reset, and then click Reset only selected Ribbon tab.
Notes:
- When you choose to reset all tabs on the ribbon, this also reverts the Quick Access Toolbar to the default state.
- You can only reset the built-in tabs to their default settings. When you reset the ribbon, all custom tabs are removed.
How to export and import a custom ribbon
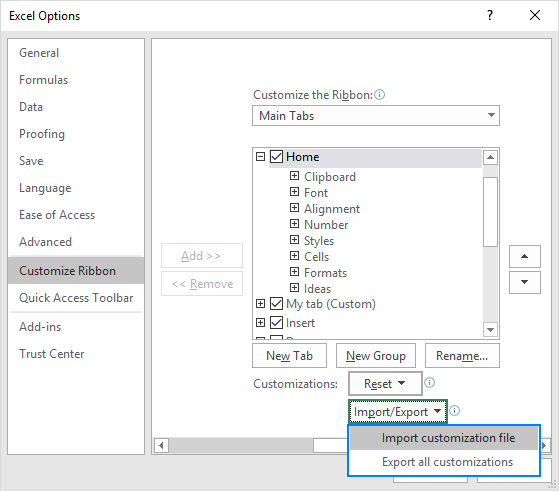
If you invested quite a lot of time in customizing the ribbon, you may want to export your settings to another PC or share your ribbon customizations with someone else. It's also a good idea to save your current ribbon configuration before migrating to a new machine. To have it done, please follow these steps.
- Export a custom ribbon:
On the computer where you customized the ribbon, open the Customize the Ribbon window, click Import/Export, then click Export all customizations, and save the Excel Customizations.exportedUI file to some folder.
- Import a custom ribbon:
On another computer, open the Customize the Ribbon window, click Import/Export, select Import customization file, and browse for the customizations file that you saved.
Tips and notes:
- The ribbon customization file that you export and import also includes the Quick Access Toolbar customizations.
- When you import a customized ribbon to a specific PC, all prior ribbon customizations on that PC are lost. If you think you might want to restore your current customization at a later point, please be sure to export your current ribbon before importing any new customizations.
That's how you personalize the ribbon in Excel. I thank you for reading and hope to see you on our blog next week!
 by
by
5 comments
hii
I would like to add one custom Main Tab (Macro) in the customize ribbon just for a certain excel work book not for all the files.
when i did this it was applied for all of them !!
is there a way to apply this custom tab to a single excel workbook only??
Thanks in advance.
Any solution for this?
It should be included in the guide.....
I am also facing the same issue, please letme know in case you have found any solution to that.
It starts at the top with go to File Options
But I do not have an options item in the File drop down menu, so not a lot of use to me. Is this just out of date?
Hi Neil,
In Excel 2010 and later versions, there is no File drop down menu. When you click the File tab on the ribbon, you'll jump into Excels' backstage view. The Options button is at the very bottom of the left pane.
Alternatively you can right-click anywhere on the ribbon and select "Customize the Ribbon…" from the context menu. This will open the same Excel Options dialog window.