 by
by In this quick tip I will explain why deleting Excel rows via select blank cells -> delete row is not a good idea and show you 3 quick and correct ways to remove blank rows without destroying your data. All solutions work in Excel 2021, 2019, 2016, and lower.

If you are reading this article, then you, like me, are constantly working with large tables in Excel. You know that every so often blank rows appear in your worksheets, which prevents most built-in Excel table tools (sort, remove duplicates, subtotals etc.) from recognizing your data range correctly. So, every time you have to specify the boundaries of your table manually, otherwise you will get a wrong result and it would take hours and hours of your time to detect and correct those errors.
There may be various reasons why blank rows penetrate into your sheets - you've got an Excel workbook from another person, or as a result of exporting data from the corporate database, or because you removed data in unwanted rows manually. Anyway, if your goal is to remove all those empty lines to get a nice and clean table, follow the simple steps below.
Never remove blank rows by selecting blank cells
All over the Internet you can see the following tip to remove blank lines:
- Highlight your data from the 1st to the last cell.
- Press F5 to bring the "Go to" dialog.
- In the dialog box click the Special… button.
- In the "Go to special" dialog, choose "Blanks" radio button and click OK.
- Right-click on any selected cell and select "Delete…".
- In the "Delete" dialog box, choose "Entire row" and click Entire row.
This is a very bad way, use it only for simple tables with a couple of dozens of rows that fit within one screen, or better yet - do not use it at all. The main reason is that if a row with important data contains just one blank cell, the entire row will be deleted.
For example, we have a table of customers, 6 rows altogether. We want to remove rows 3 and 5 because they are empty.

Do as suggested above and you get the following:
 is also gone because cell D4 in the \"Traffic source\" column is empty")
Row 4 (Roger) is also gone because cell D4 in the "Traffic source" column is empty: (
If you have a small table, you will notice a loss of data, but in real tables with thousands of rows you can unconsciously delete dozens of good rows. If you are lucky, you will discover the loss in a few hours, restore your workbook from a backup, and will do the job again. What if you are not so lucky or you do not have a backup copy?
Further in this article I will show you 3 fast and reliable ways to remove empty rows from your Excel worksheets. If you want to save your time - go straight to the 3rd way.
Remove blank rows using a key column
This method works if there is a column in your table which helps to determine if it is an empty row or not (a key column). For example, it can be a customer ID or order number or something similar.
It is important to save the rows order, so we can't just sort the table by that column to move the blank rows to the bottom.
- Select the whole table, from the 1st to the last row (press Ctrl + Home, then press Ctrl + Shift + End).

- Add AutoFilter to the table: go to the Data tab and click the Filter button.

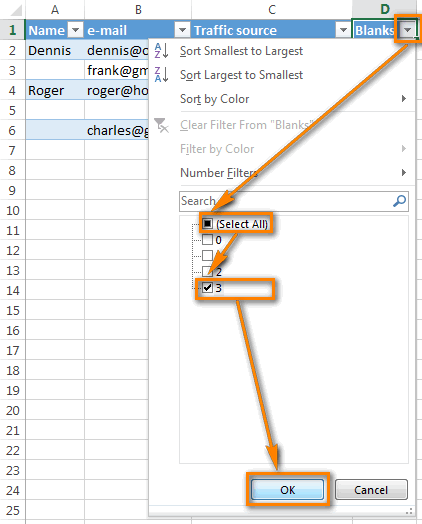
- Apply the filter to the "Cust #" column: click the arrow
 in the column header, uncheck the (Select All) checkbox, scroll down to the end of the list (in reality, the list is quite long) and check the checkbox (Blanks) at the very bottom of the list. Click OK.

- Select all the filtered rows: Press Ctrl + Home, then press the down-arrow key to go to the first data row, then press Ctrl + Shift + End.

- Right-click on any selected cell and choose "Delete row" from the context menu or just press Ctrl + - (minus sign).

- Click OK in the "Delete entire sheet row?" dialog box.

- Clear the applied filter: go to the Data tab and press the Clear button.

- Well done! All the blank rows are completely removed, and line 3 (Roger) is still there (compare with the previous version).

Delete blank rows if your table does not have a key column
Use this method if you have a table with numerous empty cells scattered across different columns, and you need to delete only those rows that do not have a single cell with data in any column.

In this case we do not have a key column that could help us to determine if the row is empty or not. So we add the helper column to the table:
- Add the "Blanks" column to the end of the table and insert the following formula in first cell of the column:
=COUNTBLANK(A2:C2).This formula, as its name suggests, counts blank cells in the specified range, A2 and C2 is the first and last cell of the current row, respectively.

- Copy the formula throughout the entire column. For step-by-tep instructions please see how to enter the same formula into all selected cells at a time.

- Now we have the key column in our table :). Apply the filter to the "Blanks" column (see the step-by-step instructions above) to show only rows with the max value (3). Number 3 means that all the cells in a certain row are empty.
- Then select all the filtered rows and remove whole rows as described above.
As a result, the empty row (row 5) is deleted, all the other rows (with and without blank cells) remain in place.
 is deleted")
- Now you can remove the helper column. Or you can apply a new filter to the column to show only those rows that have one or more blank cells.
To do this, uncheck the "0" checkbox and click OK.


The fastest way to remove all empty rows - Delete Blanks tool
The quickest and impeccable way to remove blank lines is to the Delete Blanks tool included with our Ultimate Suite for Excel.
Among other useful features, it contains a handful of one-click utilities to move columns by drag-n-dropping; delete all empty cells, rows and columns; filter by the selected value, calculate percentage, apply any basic math operation to a range; copy cells' addresses to clipboard, and much more.
How to remove empty rows in 4 easy steps
With the Ultimate Suite added to your Excel ribbon, here's what you do:
- Click on any cell in your table.
- Go to the Ablebits Tools tab > Transform group.
- Click Delete Blanks > Empty Rows.

- Click OK to confirm that you really want to remove empty rows.

That's it! Just a few clicks and you've got a clean table, all empty rows are gone and the rows order is not distorted!

Tip. More ways to remove empty rows in Excel can be found in this tutorial: Delete blank lines with VBA, formulas and Power Query
Video: How to remove blank rows in Excel
129 comments
Thank you very much, you saved my time.
Very helpful and save lots of work! Thank you very much!
Awesome. This is exactly what I needed. Every time I used the "Go To Special" and highlighted my blank rows, then deleted, it deleted my blank columns, which I didn't want, since there was some info. Thank you!
Thank you; the section "Delete blank rows if your table does not have a key column" was great, and the result was exactly what I wanted.
Really this article is help to solve my problem. Thanks
this is excellent and it worked just great.. this saved a whole lot of my time
That second way of removing entire blank lines is so good. I will be doing a macro to do it. You are right about how there are so many wrong instructions on the internet, that remove every record that contains even just a single blank cell.
Just what the doctor ordered! Thanks so much!
great
Wow! this what i want men . Thanks it helped me a lot! thanks a lot
error
Flat No column having different value at row number 3
BLOCK TYPE FLAT/BUNGLOW/OFFICE USAGE CARPET AREA AREA OF EXCLUSIVE BALCONY STATUS UNIT AMOUNT RECEIVED AMOUNT
A A-101 Residential 103.92 9.16 BOOKED 3700000 111111
A A-103 Residential 103.92 9.16 BOOKED 5000000 500000
A A-104 Residential 103.92 9.16 BOOKED 3700000 420000
How to clear above error
Sir, Your really Increase my knowledge :)
the post is really very helpful for people who are searching for a quick resolution to empty data row issue....
Again, only in case I'm not the only one. Here's what works for me:
1) Save a copy because the following process will delete the header row and you'll need it back.
2) Click in Cell A1.
3) Click Cmd+Shift+End to select to the end of used cells.
4) Go to Data and click on Filter
5) There's now a drop down arrow in every column. Click on the one at A1.
6) Everything you do in this dialog box kind of only happens to the items you can see, believe it or not. So go to the lower right of the dialog box and stretch it down as far as you can.
7) Uncheck "Select All." This may or may not actually deselect all. Scroll down to see if any other items are still selected. If so, try clicking on it. It selects that one and probably deselects many other items but not necessarily all of them. The taller the dialog box, the better your chances of getting most of them. Repeat this process until you truly have nothing selected.
8) Scroll down to the bottom and check "(Blanks)". Close the dialog box by clicking outside it anywhere.
9) Go to Edit. What used to say "Delete" now says "Delete Row". Click it. This is such a big deal to Microsoft that there'll be a warning box. Click that, too. At this point, you may notice that your header row is gone.
10) Click to the left of Row 1 and on the Home tab, click Insert to make a blank header row.
11) Open the copy you made in Step 1 and copy Row 1 to the clipboard.
12) Paste that into your new Row 1. Save.
I'm only posting this so others won't think they're crazy. I've seen the Filter/ (Blanks) method other places online and I'm sorry but it doesn't work for me since there's no "OK" button to click. I follow along up to that point and the only button in that dialog box is "Clear Fllter." If that's what you're seeing too, poor beleaguered Excel user, you're not alone. I guess I'll have to remove hundreds of blank lines manually. Probably won't kill me.
Thanks for your helpful tutorial here. Saved me a lot of time!
Very good !!!!
what a great! thank you so much for your helppppppppppppppp
Thanks a lot
THANK YOU! You're a lifesaver. Makes sanitizing listings as an auditor a breeze now.
Actually, I just found a great, super quick way to get rid of extra rows...
1) save the original Excel file as "tab-delimited" text file, then...
2) open that file in notepad or TextEdit (Mac), then
3) in the text app select the whole empty row (triple click on Mac)
4) do a "find" in the text app, paste the empty-row and click "replace" with empty field (nothing)
5) then just click "replace all" and boom! all those damn empty rows gone!
Then just copy-paste back into Excel :)
At any rate, I tried this on my Mac, and it worked like a charm, I'm not sure if Notepad on the PC has the same find-replace as the Mac's TextEdit, I assume it does, but if it doesnt then maybe you can try another basic word-processing app that allows simple find-and-replace
Good luck!
I have a list of names with 2 empty rows between after every second name on the list (i.e. 2 rowns with names and two blank rows). I want to delete only 1 empty row and leave the second empty row as it is. Any ideas?
i my excel sheet there are 1600 rows.when i apply filter( by text or number).it is not applying to the entire sheet.it is applying only upto range of 50 or 100 rows.its becoming difficult to filter function apply again and again. ** my sheet has blank CELLS also**
Thanks a lot for the tutorial.
'Remove blank rows using a key column' was helpful.
This has saved my life!!!! I was sent tons of spreadsheets with awful structure and now I won't have to spend this entire century trying to manipulate them... Thank you so much !
Thanks that was perfect bro
Perfect. I was one of the people trying the F5 method and pulling my hair out. This worked exactly as you said it would.
Thanks a bunch for the help.
thanks. worked perfectly. saved me some time
Hi,
the first two worked but I downloaded your quick tools add in but it is not recognizing the empty rows and once the tool runs, it shows 0 empty rows.
can you help me in this.
regards,
rajeev
Hi,
the first two worked but I downloaded your quick tools add in but it is not recogniszing the empty rows and once the tool runs, it shows 0 empty rows.
can you help me in this.
regards,
rajeev
it worked perfectly, thank so much
Brilliant!
The 3rd option is what I tried and it works up to the point that I clear the filter and the screen seems to freeze. The data is still there but you can't seem to click on anything. I say "seems" because I found out that the program is still working like it should it's just that the screen doesn't refresh. I just click the X and save the work. When you return to the program it works correctly without the blank rows.
Hello, Stan,
could you, please, specify what method did you use exactly?
Thanks!
Elegant! Thank you!
Fantastic short cut and saves much time...thanks a lot and appreciated..
Thanks
Thank u great work
very helpful.thanks a lot.
Excellent post. Thanks a lot.
Thank you. Very detailed explanation.
Nice trustworthy tutorial over other faulty tricks shown on internet
Didnt work for me. Tried it twice
Thank you very much keep up the good work
Very Helpful. Thank you.
Oh my..this is so helpful. Thanks a lot!!!!
Thanks A lot, it worked.
You've just saved me an hour of dull work and taught me something new. Thanks again
Option 3 works easy.Thankyou
The only solution that works!Thank u man!
Thank you :) Very Helpful
Thank you :)