Discover effective techniques, shortcuts and VBA macros for selecting multiple cells in Excel, including non-adjacent cells, current range, visible cells, and cells with data.
Whichever task you undertake in Excel, be it data analysis, modeling, or report generation, the first step is always selecting cells. Excel offers a myriad of features to help you work with multiple cells simultaneously, target specific areas, or exclude certain data points. Understanding the different methods of cell selection empowers you to accomplish your tasks with ease and accuracy, reduce manual effort, and enhance the overall quality of your work.
How to select multiple cells (contiguous range) in Excel
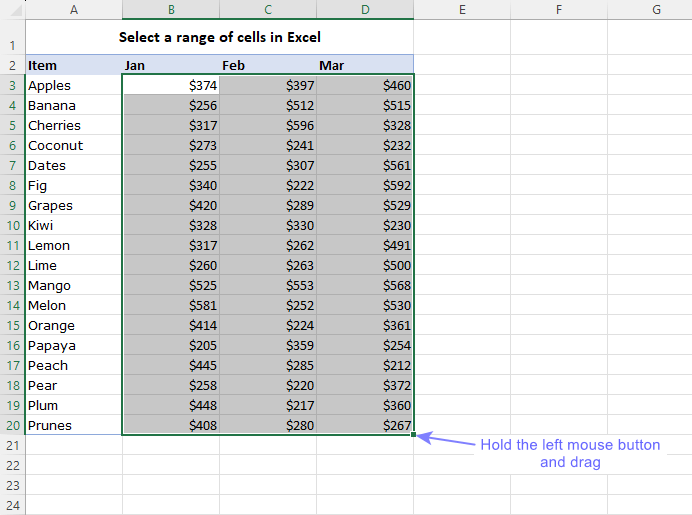
The most common way to select multiple cells in Excel is by using a mouse. To select a contiguous range of cells, this is what you need to do:
- Click on the cell from where you want to start the selection.
- With the left mouse button pressed, drag the cursor to the cell where you want to end the selection.
The selected cells are highlighted as you drag the mouse.
Tip. To print selected cells in Excel, click File > Print and then choose the Print Selection option under Settings. For more information, see How to print selection, worksheet or workbook.
Select multiple cells using the Shift key
To quickly select a group of cells that are adjacent to each other, you can utilize the Shift key. Here's how:
- Click on the cell from where you want to start the selection.
- Hold down the Shift key.
- Click on the cell where you want the selection to end.
By following these steps, Excel will automatically select all the cells between the starting and ending points.
Alternatively, you can extend the selection in the desired direction by pressing the arrow keys while holding the Shift key.
The Shift key method is especially useful when dealing with large datasets as it enables you to quickly select multiple cells without the need for manual dragging.
Select non-adjacent cells in Excel
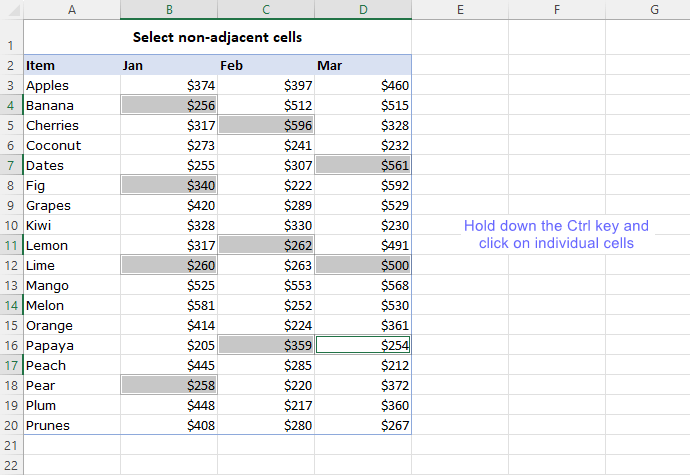
If you need to select non-adjacent cells that are not in a contiguous range, you can do so using the Ctrl key:
- Click on the first cell you want to select.
- Hold down the Ctrl key (or Command key on Mac).
- Click on each individual cell to be selected.
- When done, release the Ctrl key.
This method is useful for selecting specific cells scattered throughout the worksheet.
Select non-adjacent ranges
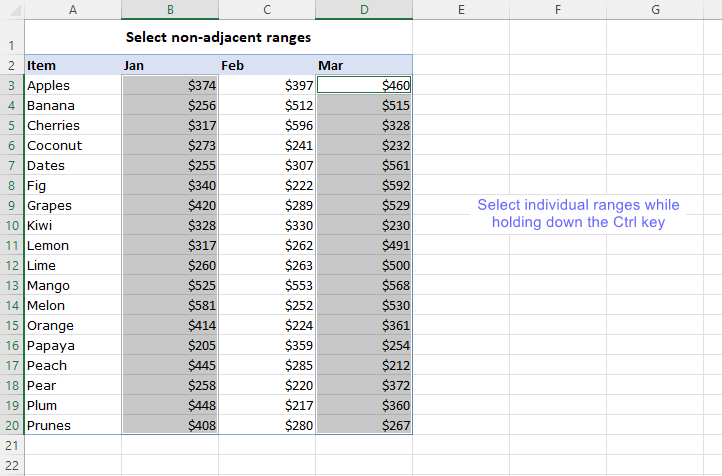
In Excel, you can select nonadjacent ranges by holding down the Ctrl key (or Command key on a Mac) while selecting individual ranges using the mouse. This method allows you to highlight multiple separate areas within a worksheet.
Select multiple cells and ranges using Shift + F8
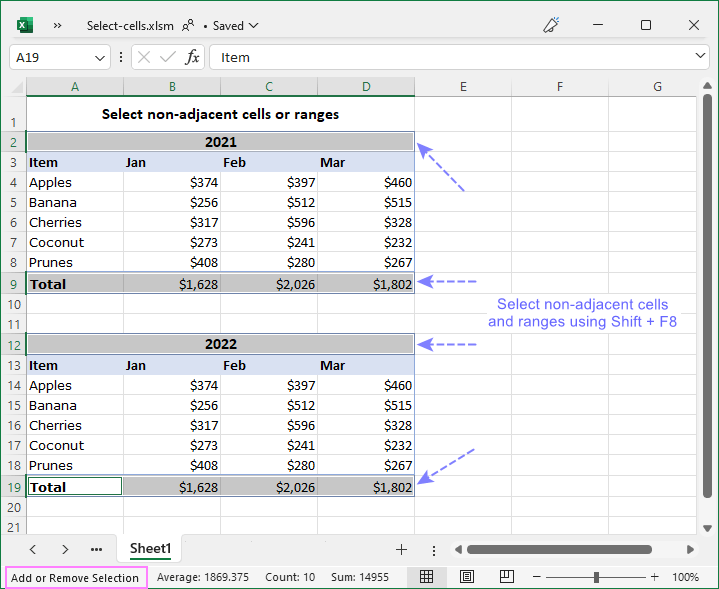
To select multiple cells or ranges that are not adjacent to each other, you can utilize a helpful feature known as the Shift + F8 keyboard shortcut. This method enables you to build a selection of non-contiguous cells or ranges without relying on the mouse.
- Start by selecting the first cell or range.
- Press the Shift + F8 keys on your keyboard. Upon doing so, you will notice that the Excel status bar displays Add or Remove Selection, indicating that you can now add more cells or ranges to your selection using only the keyboard. This means you won't need to switch to your mouse to select additional cells.
- Use the arrow keys on your keyboard to navigate to the next target cell or range.
- Hold down the Shift key while using the arrow keys to select the second cell or range.
- Repeat steps 2 to 5 as necessary to select additional cells and ranges.
This technique is particularly useful when you have scattered data or when selecting specific cells or ranges throughout the worksheet.
Selecting multiple cells using Name Box
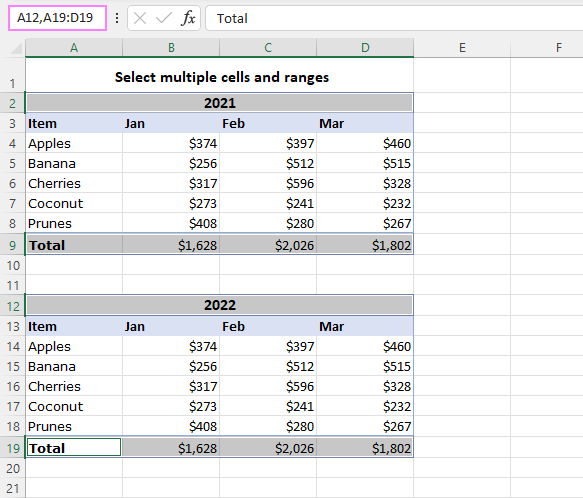
While the Name Box in Excel is primarily purposed for displaying cell addresses or range names, it can also be used to select multiple cells simultaneously. To use the Name Box for cell selection this is what you need to do:
- Click on the Name Box to activate it.
- Enter the cell or range references separated by comma. For example: A2, A9:D9, A12, A19:D19.
- Press the Enter key.
Excel will automatically select all the cells and/or ranges you specified in the Name box.
Select current range in Excel
To select the current range in a worksheet, you can use key combinations or VBA code. Let's explore these methods.
Keyboard shortcuts to select the current range
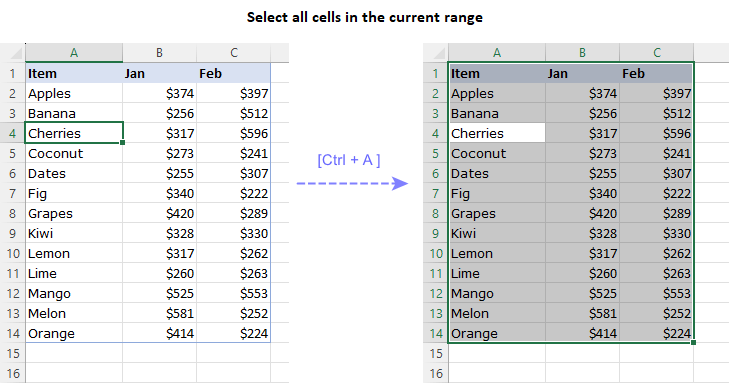
The most common way to select the current range in Excel is by using the Ctrl + A shortcut. Here's how to do it:
- Select any cell within the target range.
- Press and hold the Ctrl key (or Command key on Mac), and then press the A key.
Excel will automatically select all the cells within what it considers the current data set. The selection will continue until it encounters a blank row or column, indicating the end of the data set. Cells beyond the blank row or column will not be included in the selection.
Alternatively, you can use the Ctrl + Shift + * shortcut to select the current range around the active cell. Note that the asterisk sign (*) should be pressed on the main keyboard, not on a numpad.
This method is incredibly useful when you want to highlight an entire dataset without scrolling through large spreadsheets.
Select the current range using VBA
In addition to key combinations, you can use VBA code to select the current range in Excel. Here's a simple code snippet to accomplish this:
This VBA code defines a macro named SelectCurrentRegion that highlights the current range based on the active cell. When you run this code, the range (grid) surrounding the current cell will be selected, including all the adjacent cells with data.
To add the code you your workbook, follow the steps described in this guide: How to insert VBA code in Excel.
Using VBA provides more flexibility for selecting the current range. For example, you can incorporate this code into larger macros or automate repetitive tasks that require selecting specific ranges.
Select all cells with data in Excel using VBA
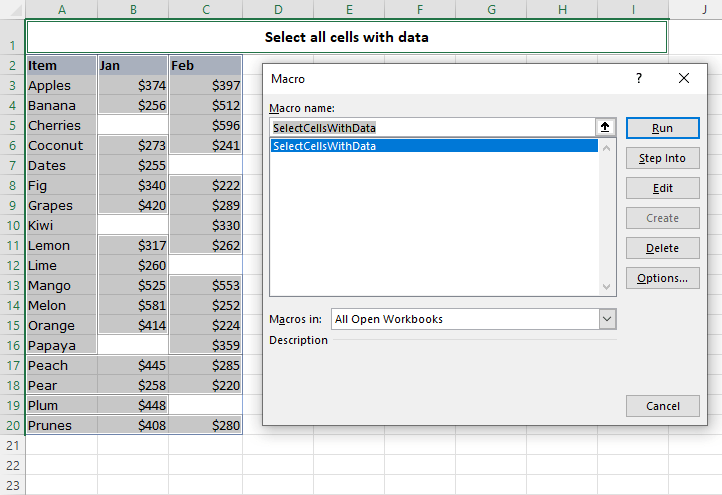
To quickly select all the cells with data on a sheet, you can use the following VBA macros.
VBA to select cells with values (constants)
This VBA macro named SelectCellsWithValues selects all the cells containing constants in the active sheet. It excludes any empty cells and cells with formulas.
VBA to select all cells with data
This VBA code allows you to select all cells with data on a sheet, including both cells with values (constants) and cells with formulas.
Select a named range
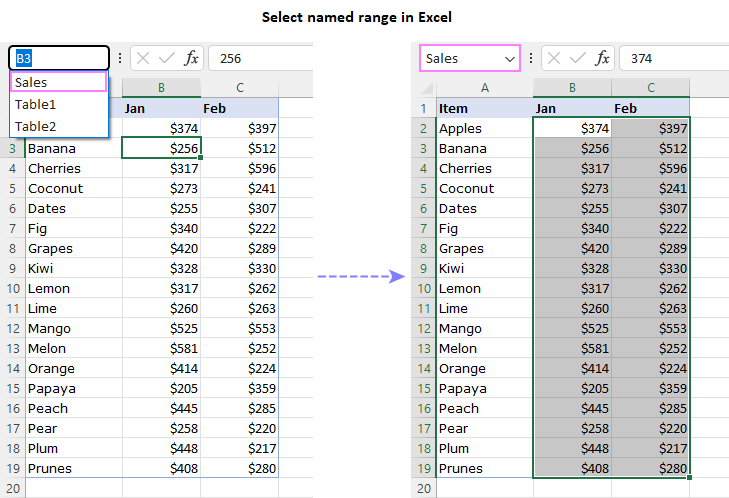
Selecting a named range provides a convenient way to work with defined ranges in Excel. Here's how you can quickly select a named range in your worksheet:
- Click on any cell within the target named range.
- In the Name Box, located to the left of the formula bar, click on the drop-down arrow.
- From the drop-down list, select the name of the range.
To help you visualize this process, take a look at the screenshot below, which demonstrates the selection of the range named Sales (B2:C19):
Select cells in Excel table
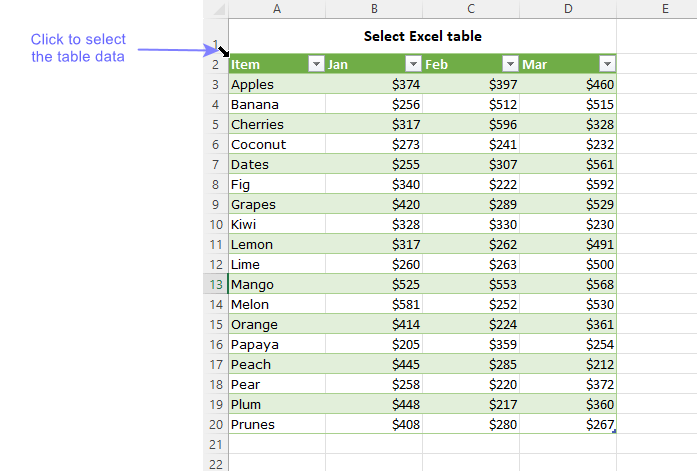
When working with a formatted table in Excel, selecting the table data can be done swiftly using the following two methods.
Method 1: Using the mouse
To select data within an Excel table, carry out these steps:
- Position the cursor over the upper-left corner of the table, so the small black arrow will appear. Click to select the table data within the whole table excluding column headers.
- To select the entire table, including the table headers and total row, click the selection arrow twice.
Method 2: Keyboard shortcut
Another efficient way to select the table data is by using the keyboard shortcut:
- Click anywhere within the table to activate it.
- Press the Ctrl + A keys together to select the table data without column headers.
- Press Ctrl + A twice to select the entire table, including the headers and the total row.
How to select all cells below in Excel
When working with a large dataset in Excel, you may need to select all cells below a specific cell. Here is a straightforward way to accomplish this task:
- Click on a cell where you want to begin the selection.
- Press the Ctrl + Shift + Down Arrow keys together.
All cells with data below a given cell will get highlighted.
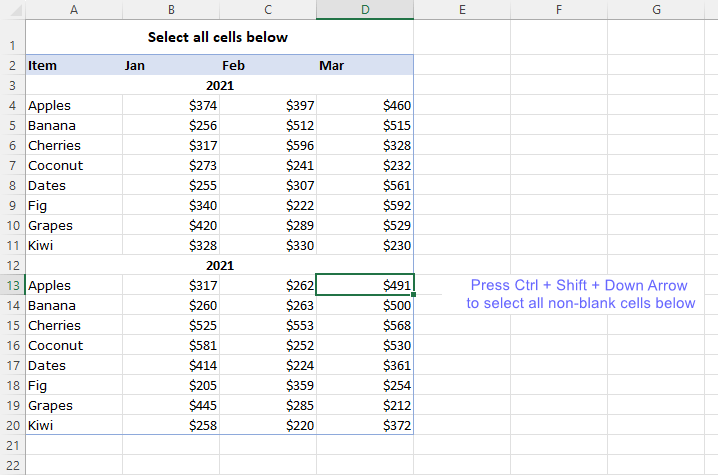
It's important to note that this method selects all cells in the column below a particular cell until it encounters an empty cell.
Tips:
- In a similar way, you can select all cells above, to the right or to the left of a given cell. To accomplish this, use the Up, Right or Left arrow together with the Ctrl + Shift keys.
- If your dataset has more than one column, you can use this technique to select all rows below.
Select all cells in a worksheet
The fastest way to select all cells in a sheet is by clicking the Select All button (a small inverted triangle) at the top left corner of the worksheet:
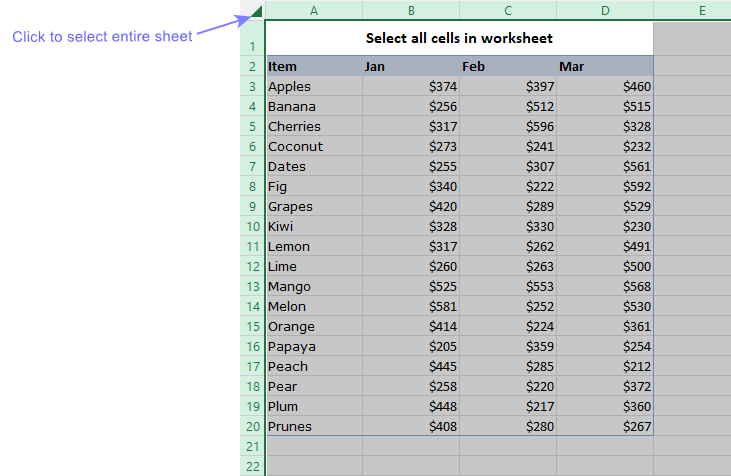
Alternatively, you can use the following shortcuts to select the entire sheet:
- Ctrl + Shift + Spacebar
- Ctrl + A
If the active cell contains data, the first Ctrl + A selects the current region, and the second one selects the whole worksheet.
How to select visible cells in Excel
When you need to copy a range of cells in Excel and paste it elsewhere, you typically use the copy (Ctrl + C) and paste (Ctrl + V) shortcuts. However, if the range contains hidden rows or hidden columns, the standard copy and paste method will include both visible and hidden cells. To ensure that only the visible cells are selected, there are two methods you can use: a keyboard shortcut and the Go To Special feature.
Selecting visible cells using keyboard shortcut
To select only visible cells, you can use the ALT + ; on Windows and Command + Shift + Z on Mac.
For Windows users:
- Select the range of cells that includes both visible and hidden cells.
- Press and hold the ALT key on your keyboard.
- While holding the ALT key, press the semicolon key (;).
For Mac users:
- Select the target range of cells.
- Press and hold the Command and Shift keys simultaneously.
- While holding these keys, press the Z key.
Selecting visible cells using Go To Special
If the keyboard shortcut is not your preferred way or you don't remember it, there's an alternative method to select visible cells in Excel:
- Select the target range of cells.
- On the Home tab, in the Editing group, click Find & Select, and then select Go To Special from the drop-down menu. Alternatively, you can press the keyboard shortcut Ctrl + G, and then click on the Special… button.
- In the Go To Special dialog box, choose the Visible cells only option.
- Click OK.
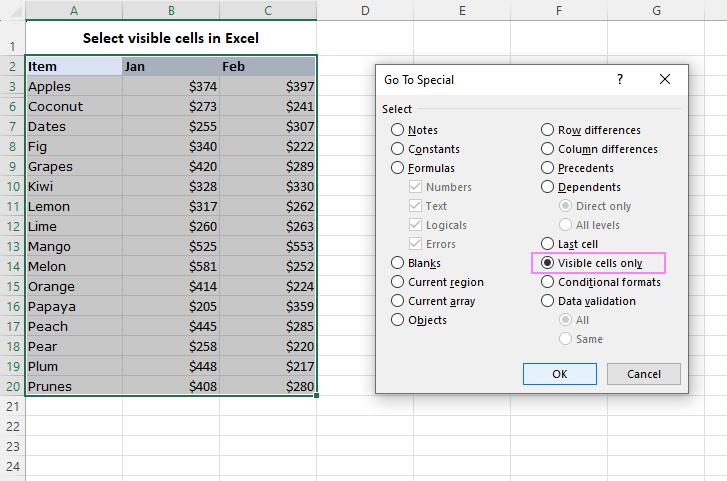
By employing these methods, you can ensure that Excel selects only visible cells in a range, excluding any hidden cells. This enables you to work with the data you see on the screen disregarding any hidden information.
Excel cell selection shortcuts
In the previous parts of the article, we showed you some useful shortcuts to select cells in Excel. This section provides a summary of the most valuable cell selection shortcuts to make your Excel tasks faster and more convenient.
| Keyboard shortcut | Description |
|---|---|
| Ctrl + A | Selects the entire worksheet.
If the worksheet contains data, it selects the current region. Pressing it twice selects the entire worksheet. If the cursor is within a formatted table, this shortcut selects the table data. Pressing it twice selects the entire table including headers and the total row. Pressing it a third time selects all cells in a worksheet. |
| Ctrl + Shift + Spacebar | Selects the entire worksheet.
If any object is selected, it selects all objects on the worksheet. |
| Shift + Arrow key | Extends the current selection by one cell in the direction of the arrow. |
| Ctrl + Shift + Arrow key | Extends the selection to the last non-empty cell in the same column or row as the active cell. If the next cell is blank, it extends the selection to the next nonblank cell. |
| Shift + F8 | Use this shortcut to add non-adjacent cells or ranges to a selection. It functions similarly to selecting multiple non-adjacent cells with the mouse while holding the Ctrl key. |
| Ctrl + Shift + Home | Extends the selection to the beginning of the worksheet. |
| Ctrl + Shift + End | Extends the selection to the last used cell on the worksheet. |
This is how you can select specific cells or ranges using keyboard shortcuts and other methods outlines in this article. Excel's vast capabilities await your command, and with the right cell selection techniques at your fingertips, you can conquer any task that comes your way. Happy Excel-ing!
Practice workbook for download
VBA to select cells in Excel (.xlsm file)
 by
by