In this article you will learn how to delete or combine duplicate contacts in Outlook and how to keep your contact list clean and up-to date.
Microsoft Outlook provides a variety of handy tools that we use and love and even more features that we are unaware of. But regrettably, the option to dedupe the address book and combine duplicate contacts into one is not on board.
Luckily, we are not limited to using only the tools provided explicitly by Outlook. With a bit of ingenuity, you can figure out a way to solve any, or nearly any, challenge that comes your way. This tutorial will teach you how to check Outlook contacts for duplicates and merge them without using any third-party software.
Why duplicate contacts appear in Outlook
Duplicate contacts can be frustrating and confusing to deal with, but they are a common issue in Outlook. Here are some of the most common reasons why they appear:
- Dragging messages to Contacts folder. One of the fastest ways to create a new contact in Outlook is by dragging an email message directly to the Contacts folder. However, if you also create contacts manually or import contacts from other sources, you may end up with duplicates. This can happen if you misspell a contact's name or enter it in a different way.
- Emailing from multiple accounts. If a person emails you from different email accounts, such as a corporate email address and a personal one, Outlook may create separate contacts for each email address. This can happen regardless of how you create a new contact, whether by dragging a message to the Contacts folder or by clicking the New Contact button on the ribbon.
- Synchronization with other devices and platforms. If you sync your Outlook contacts with a laptop, mobile device, or social platforms like LinkedIn, Facebook, or Twitter, duplicate contacts may appear if the same person is listed under different names in different address books. For example, Robert Smith, Bob Smith, and Robert B. Smith may all be different entries in different sources referring to the same person.
- Corporate address books. In a corporate environment, multiple address books may be maintained on Exchange servers, which can also result in duplicate contacts.
Regardless of the reason, duplicate contacts can be a real hassle in Outlook, making it difficult to keep track of important information and leading to confusion and errors. Understanding the reasons for contact duplication can help you take steps to prevent it from happening in the future. Below, you will find a number of solutions to resolve any existing issues.
How to remove duplicate contacts in Outlook
To delete duplicate contacts one at a time, this is what you need to do:
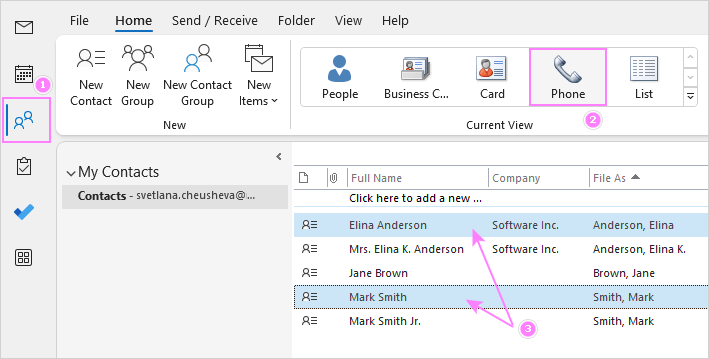
- On the Outlook navigation bar, click People.
- On the Home tab of the ribbon, in the Current View group, choose Phone, which is the fastest way to scan contacts for similar or identical entries.
- In the contacts list, hold down the Ctrl key and select the contacts you want to remove.
- When all the duplicates are selected, press the Delete key or Ctrl + D shortcut to remove them.

How to merge duplicate contacts in Outlook
In most cases Outlook is smart enough to prevent duplication when you are trying to create a contact that already exists. However, if you have a number of duplicates in your address book, you need to apply a special technique to clean up the mess. The detailed steps follow below.
For this example, we will use Outlook 365, given its popularity in recent times. However, the options are essentially the same in all modern versions of Outlook 2021 to 2013, so you should encounter no difficulties following along.
Note. To permanent accidental loss of data, we strongly recommend that you make a backup copy first, for example by exporting your Outlook contacts to Excel.
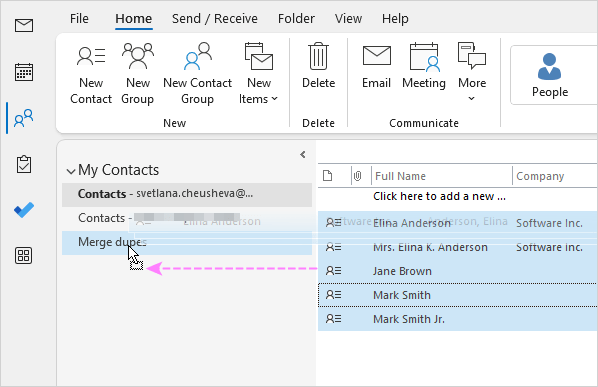
- Create a new Contacts folder. In Outlook Contacts, right click on your main Contacts folder and select New Folder… from the context menu. Give any name to this folder, say Merge dupes.

- Move all Outlook contacts to the newly created folder. Switch back to your current contacts folder and press Ctrl + A to select all the items. And then, drag and drop the contacts to the new folder you've just created. Alternatively, you can press the Ctrl + Shift + V keys together to open the Move to Folder dialog box, where you select the Merge dupes folder.

- Export contacts to a .csv file. This can be done using Outlook's Import and Export wizard.
In Outlook 365 - 2010, go to File > Open & Export > Import/Export.
In Outlook 2007 and 2003, you will find this wizard under File > Import and Export…

The wizard will walk you through the export process, where you choose the following options:
- Step 1. Export to a file.
- Step 2. Comma Separated Values.
- Step 3. Select the Merge dupes folder to which you've moved the contacts.
- Step 4. Choose the destination folder to save the .csv file.
- Step 5. Click Finish to complete the export process.
For more information, see How to export Outlook contacts to CSV.
Tip. When you have multiple contact cards for the same person, their details can be scattered across these duplicates, such as a business phone number on one card and a private phone number on another. In such cases, the Merge Duplicates tool can be very useful. This Excel add-in can easily merge all information from duplicate rows into a single row.
To get a better understanding of how this works, take a look at the original .csv file, which shows how the data is typically spread across multiple rows:

By using the Merge Duplicates add-in, you can have all the details combined into a single, unified row:

If you are interested to try this tool on your own data, you can download a fully-functional trial version here.
- Import contacts from CSV file to main Contacts folder.
Start the Import/Export wizard again as described in the previous step and select the following options:
- Step 1. Import from another program or file.
- Step 2. Comma Separated Values.
- Step 3. Browse for the exported .csv file and select Do not import duplicate items. This is the key option that does the trick!

- Step 4. Select your main Contacts folder, which is currently empty, as the destination folder to import the contacts to.
- Step 6. Click Finish to complete the import process.
For more details, see How to import contacts to Outlook from CSV file.
- Merge deduped contacts with the original ones.
Finally, you need to merge the deduplicated contacts that you've imported to your main Contacts folder with the original contacts that are currently in the Merge dupes folder, so that no contact details will get lost.
- Open the Merge dupes folder and press CTRL + A to select all the contacts.
- Drag the selected contacts to your main Contacts folder or press Ctrl + Shift + V and use the Move to Folder dialog box.
- Every time a duplicate is detected, a pop-up message will appear with two choices:
- Add new contact – the option to choose if the contact is a unique one.
- Update information of selected contact – choose this option if the contact is a duplicate.
After making your choice, click Update (or Add if you've chosen the first option). If you wish to apply the same choice to all duplicated contacts, click Update All.
If you prefer to review a particular contact later, click Skip. In this case, the original contact will remain in the Merge dupes folder.

After processing all the contacts, you can safely delete the Merge dupes folder.
Tips and notes:
- When Outlook detects a duplicate contact with a different email address and you choose to update a contact, the current email address of the contact will be moved to the "E-mail 2" field.
- If your Outlook does not show this dialog when you are adding duplicate contacts, then most likely the duplicate contact detector is off. See how to enable Check for Duplicate Contacts feature.
- If you used the Merge Duplicates tool to combine duplicated rows in the CSV file, there's no need to perform this step as all the contact details have already been merged in the CSV file.
Clean up Outlook duplicate contacts using Gmail
If you have a Gmail email account (which is quite common these days), you can use it to fix duplicate contacts in Outlook.
Here's a quick overview of the process:
- Export your Outlook contacts to a CSV file.
- Log into your Gmail account and import contacts from the CSV file as described in How to import Outlook contacts to Gmail.
- On the sidebar on the left, click Merge & fix.

- A list of duplicate contacts that Google has identified will appear on the right side of the page. From there, you can choose to either click Merge to combine the duplicate entries for a specific contact or click Merge all to combine all of the identified duplicates at once.

- After you've eliminated duplicates, the next step is to export Gmail contacts to Outlook. Here are a couple of things to keep in mind during this process:
- Choose whether to export all of your contacts or just a specific group. If you only want to export the contacts that you imported from Outlook, it makes sense to select the corresponding Imported group.
- To ensure that the contacts import smoothly into Outlook, select the Outlook CSV format.
When done, click the Export button to complete the export process.

- Finally, import the merged contacts back into Outlook. To get rid of duplicate contacts, remember to select the Do not import duplicate items option.
Tip. Before importing the cleaned contacts from Gmail back into Outlook, consider moving all contacts from your main Outlook folder to a backup folder. This can help you avoid creating more duplicates during the import process.
Combine information from duplicate contacts by linking
Starting from version 2013, Outlook has an inbuilt feature that links all the contacts of a person and displays the combined information from all the linked contacts in a single contact card. The source of the data is also listed, making it easy to keep track of the information. Outlook usually does a decent job of matching contacts, but sometimes it messes up and links the wrong ones or doesn't link them at all. Fortunately, you can easily correct these links for individual contacts. Here's how:
- On Outlook's Navigation Bar, click People.
- In the Current View group, on the ribbon, click People.
- Select the duplicate contact.

- Click the three dots at the top-right corner under the contact's name, then choose Link Contacts from the drop-down list.

- In the dialog box that pops up, you'll see a list of contacts that are already linked. If a contact is mistakenly linked, simply click on it to unlink it. The unlinked contact will be moved to the lower section of the dialog box.

- To link more contacts, type the person's name in the Find a contact to link box and hit Enter. Outlook will show you all the names that match your search. In the search results, click on the contact you want to link. The linked contact will immediately appear in the upper part of the dialog box.

- When all the duplicate contacts are linked, click OK to close the dialog box.
Though the Link Contacts feature is not the ideal solution for cleaning up a large address book that is cluttered with duplicates, it can be a useful tool for quickly merging a few identical contacts into one.
How to prevent duplicate contacts in your Outlook
Now that you've successfully eliminated duplicate contacts in your Outlook, it's worth taking a few extra minutes to learn how to maintain a clean address book going forward. Fortunately, this can be achieved easily by enabling Outlook's automatic duplicate contact detector. Here are the steps to do so:
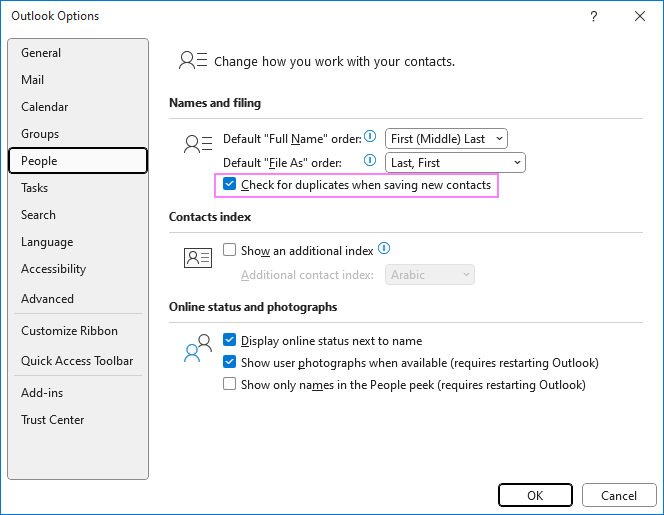
- Go to the File tab > Options > People.
- Under Names and filing, select the Check for duplicate contacts when saving new contacts box and click OK.

Congratulations! You've successfully enabled the automatic duplicate contact detector in Outlook. From now on, every time you add a new contact with a similar name or identical email address, Outlook will suggest merging contacts to prevent the creation of duplicates. This simple step will help you keep your contact list clean and organized in the future.
That's how to get rid of duplicate contacts in Outlook. Remember to periodically review and update your contacts as needed to ensure that your list stays organized and up-to-date. Thank you for reading, and happy emailing!
 by
by
2 comments
A common problem I have always had with importing/exporting CSV files: names in foreign languages that use diacritical marks (García, Álvarez, Raúl, Buñuelos, etc.) often do not translate into the new version. Worse than being simply eliminated, however, they show up as the WRONG diacritical marks. For example, "José Luís Ávila" recently came out as "José LuÃs à vila," which is effectively useless. Sometimes it works, but often it does not. Is there any solution for this?
Greg:
This is a known problem with Excel and as such has a number of different solutions depending on which version of Excel you are using.
The easiest answer is to suggest you do a search on Excel and UTF-8 characters and see the various solutions.