This tutorial talks about two ways to import contacts into Outlook desktop, from .csv and .pst file, and shows how to transfer contacts to Outlook Online.
There may be different reasons why you may want to transfer contacts into your Outlook address book. For example, you inherited an external database with a list of contacts, or you are migrating from another mail server, or perhaps you are setting up a new account. Whatever the reason, Outlook provides a straightforward way to import all your contacts in one go.
Tip. If your contacts are stored in Excel, the following tutorial will be useful: How to import contacts to Outlook from Excel.
Prepare contacts for importing into Outlook
Microsoft Outlook allows importing contacts from two file types, PST and CSV.
PST (Personal Storage Table). It's a special file format for storing data in Outlook, Exchange Client and other Microsoft software. In a .pst file, contacts are already in the right format and require no further amendments.
For more information, please see How to export Outlook contacts to PST file.
CSV (Comma Separated Values). If you keep your contact information in Excel or another spreadsheet program or have exported your contacts from another email provider, such as Gmail or Yahoo Mail, they will typically be in a .csv file, which can be imported into Outlook with a few adjustments:
- If contact details contain some characters that do not exist in the English alphabet, e.g. Arabic, Cyrillic, Chinese or Japanese, such contacts may not be imported correctly. To prevent possible issues, export contacts into a CSV UTF-8 file if such an option is available to you, or convert CSV to UTF-8 with Excel.
- Make sure the values in your CSV file are separated by commas. Depending on your locale, a different list separator is set by default. For example, in many European countries, the default list separator is the semicolon. But Outlook only supports the comma as a field separator, so you need to replace semicolons or any other delimiters with commas before importing your CSV file into Outlook.
In the below linked tutorials, will find the detailed guidance on exporting contacts to a CSV file:
- How to export contacts from Outlook desktop
- How to export contacts from Outlook Online
- How to export contacts from Excel
- How to export contacts from Gmail
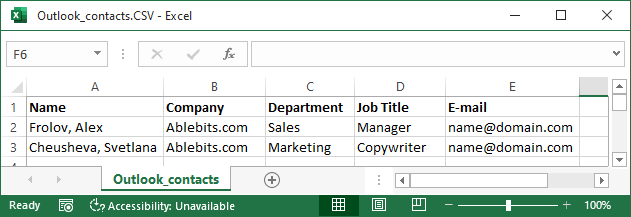
In its simplest form, your .csv file may look as follows:
How to import contacts to Outlook from CSV file
To import contacts from a CSV file into Outlook 2019, Outlook 2016 or Outlook 2013, carry out these steps:
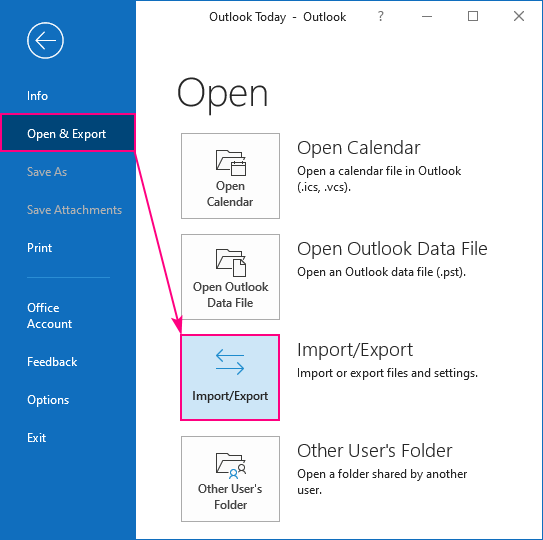
- In Microsoft Outlook, click File > Open & Export > Import/Export.
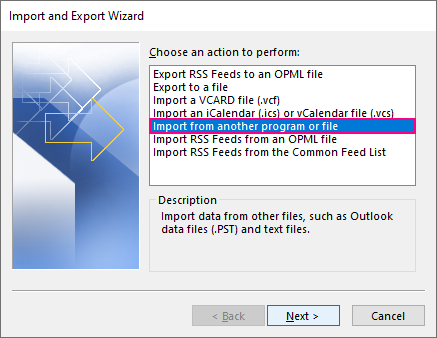
- The Import and Export wizard starts. You choose Import from another program or file and click Next.
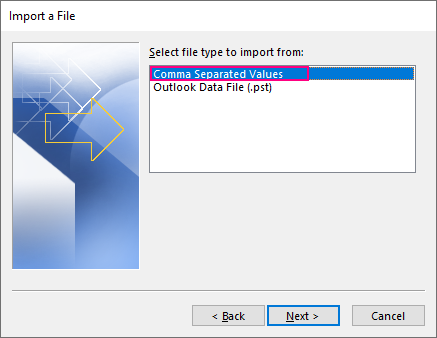
- To import CSV contacts to Outlook, choose Comma Separated Values and click Next.
- In this step, you need to make a couple of choices:
- Click the Browse button, find and double-click your .csv file to select it.
- Choose how to handle duplicate contact items.
When done, click Next.
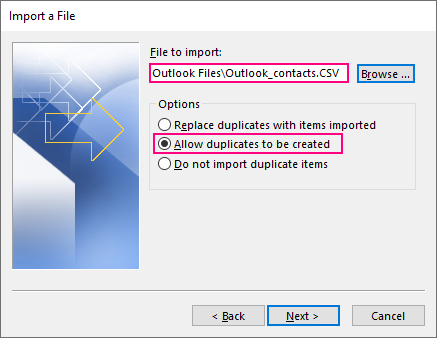
How to handle duplicate contacts:
- Replace duplicates with items imported. Choose this option if the information in the .csv file is more complete or more up to date than the information in your Outlook.
- Allow duplicates to be created (default). If you do not want to lose a single bit of info, allow Outlook to create duplicate items, review them, and combine the details for the same person into a single item.
- Do not import duplicate items. This is the option to choose if you only want to import new contacts and leave all existing contacts intact.
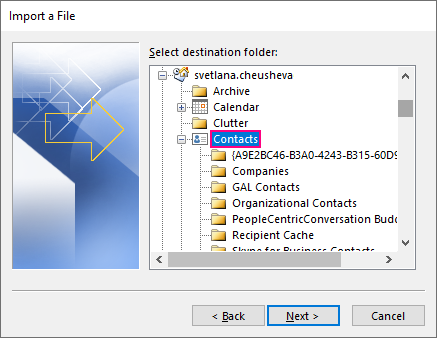
- Under the target email account, select the Contacts folder and click Next.
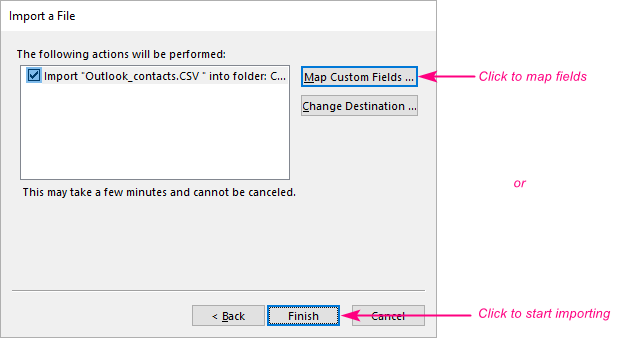
- If you are importing CSV contacts that you have previously exported from Outlook, the contact list is in the required format, so you can click Finish to start importing the contacts immediately.
If you are importing contacts from Excel or from a mail app other than Outlook, you may need to map some columns in your CSV file to the Outlook contact fields. In this case, click Map Custom Fields and continue with the next step.
- If you clicked the Map Custom Fields button in the previous step, the corresponding dialog box will appear:
- In the left pane, under From, you will see the column names from your CSV file.
- In the right pane, under To, you will see the standard Outlook contacts fields.
If a column name in the CSV file exactly matches an Outlook field, the column is mapped automatically and appears under Mapped from.
If a column name does not match any Outlook field, you'll have to do manual mapping. For this, drag the column from the left pane, and drop it next to the corresponding field in the right pane. For example, in our imported CSV file, there is a column named Position and we are mapping it to the Job Title field. To find a match, click the plus sign next to a suitable field in the right pane to expand it.
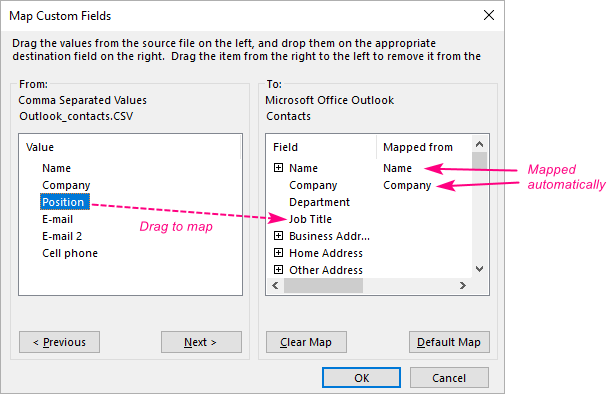
When all the columns are mapped, click OK, and back in the Import a File dialog box, click Finish.
- Outlook shows a progress box to let you know that it has begun importing your contacts. When the progress box closes, the process is finished. When importing a very small contact list, the progress box may not show up.
To make sure all your CSV contacts have been imported into Outlook, click the People icon on the Navigation bar to view your contact list.
How to import contacts to Outlook from PST file
In some situations, you may want to import contacts from a PST file rather than CSV. It is especially useful when:
- You are transferring contacts from one Outlook account to another.
- You are moving contacts from one computer to another.
- You wish to transfer all Outlook items including emails, contacts, appointments and tasks.
In this case, you first need to export contacts into a PST file, and then import them to your new account or PC by using the Import & Export wizard discussed in the previous section.
Here are the steps to import contacts into Outlook from a .pst file:
- In Outlook, click File > Open & Export > Import/Export.
- Choose Import from another program or file and click Next.
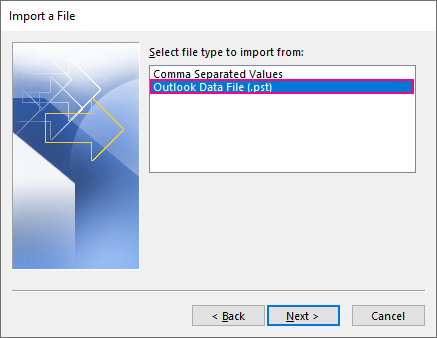
- Choose Outlook Data File (.pst) and click Next.
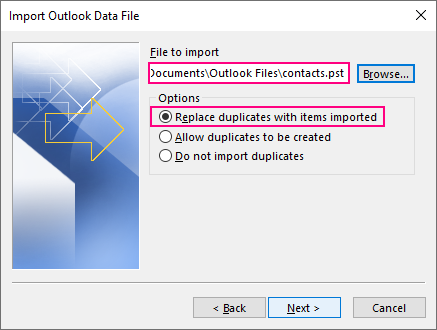
- Click the Browse button and choose the .pst file that you want to import.
Under Options, choose how to deal with duplicate items, and then click Next. Please pay attention that when importing from PST, the default is Replace duplicates with items imported.
- If your .pst file is protected with a password, you will be asked to provide it.
- This is the key step for the contacts to be imported correctly, so please be sure to do it right:
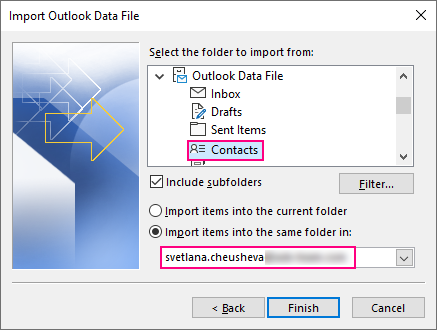
- Under Select the folder to import from, select Outlook Data File if you want to import the PST in full. Or expand it and choose only a particular subfolder to import, Contacts in our case.
- If the target account/mailbox is currently selected in the Navigation pane, you can choose the Import items into the current folder option. Otherwise, check Import items into the same folder in and choose the mailbox or Outlook Data File into which the contacts should be imported.
- When done, click Finish.
Outlook will start importing the contacts right off. When the progress box disappears, the import is completed.
How to import contacts to Outlook Online
As with Outlook desktop, to import contacts to Outlook Online, you will need a CSV file. For best results, the file should have UTF-8 encoding that works correctly for all languages.
To import contacts into Outlook Online, perform these steps:
- Sign into your Outlook on the web or Outlook.com account.
- At the lower-left corner of the page, click the People icon:

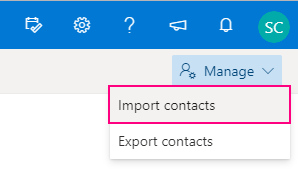
- At the upper-right corner of the page, click Manage> Import contacts.
- Click the Browse button, select your CSV file and click Open.
- With the CSV file in the box, click Import.
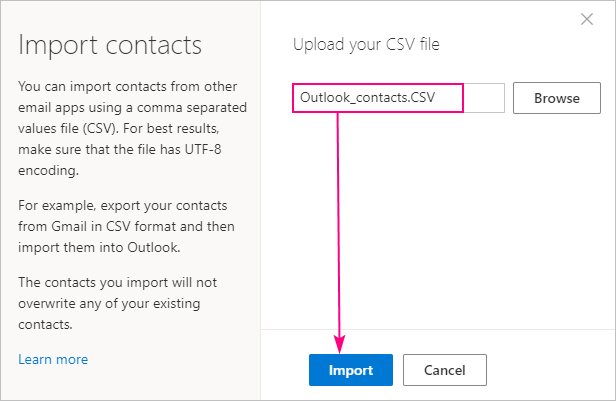
If the .csv file contains any contacts that already exist in your Outlook account, duplicate items will be created, but none of your existing contacts will be replaced or deleted.
That's how to import contacts into Outlook desktop and online. I thank you for reading and hope to see you on our blog next week!
 by
by
14 comments
I will tell you the simplest way to convert contacts into Outlook OST from CSV and PST file professional method I have Use
MigrateEmails OST to PST Converter Tool is the tool that experts recommended for use.
Due to the recent Google directive that it would no longer allow access to GMail accounts from less secure mail applications such as Outlook 2010 and the indication that Outlook 2019 is acceptable I puchased and installed Outlook 2019. Before installing Outlook 2019 I did not export any files such as the .pst files that Outlook 2010 had been creating over the years. After the install I was able to associate my mail account with Outlook 2019 using the "File - Account Settings - Email Accounts - EMail - New" process. I was also able to import a Data File that I have been using as a file cabinet for years using the similar route "File - Account Settings - Data Files - Add" process. I expected that this data file would contain my contacts list that would populate the address book. It did not. I have been looking for solutions and considered uninstalling Outlook 2019 but I am not sure Outlook 2010 would still run after all the system changes. I was therefore very happy to see your process of importing contacts using both .csv and .pst files. I followed the instructions exactly until I expanded the data file; there was no contacts folder. With the recent position taken by Google regarding account security it can be expected that many will be going through the same process as I am. I would really appreciate any advice you could give me on how to find and import my list of contacts.
When I try to import my CSV file to my Outlook (desktop version) the instructions say to select the "contacts" folder as the destination folder. There is no "contacts" destination folder. Where should I place them?
Thanks
There is no MANAGE>IMPORT CONTACTS on the upper right corner of my page? How do I do this then?
I get the following error - This outlook data file (.pst) is already in use in the current profile. Can you please help me to get this file to be available for dissemination to listed members so I can do bulk emails to members. Thank you. L
I have three .pst files that I need to load into Outlook 2019 for disseminating group emails. Please how do I do this step by step please. Thank you. Liz
What Nina Said on 09/25/2020. Without that this post is useless
Hi Edward,
My apologies for not responding to Nina's questions earlier.
I've posted a screenshot of a sample .csv file in the 'Prepare contacts for importing into Outlook" section. That file was exported from desktop Outlook with manual field mapping to include only the basic information. If you proceed with the default map, then your .csv file will have a total of 92 columns. For more details, please see How to export contacts from Outlook.
If the contacts are exported from Outlook Online or Gmail, the columns might be slightly different, and you may need to do manual mapping as described in step 7 of "Importing contacts to Outlook from CSV file".
This is the error I get when trying to import a csv to outlook...
A file error has occurred in the translator while trying to establish a field map.
The file "C:\Users\chmoe\AppData\Roaming\Comma Separated Values.ADR" is locked. This could be because the disk is locked, the file is read-only, in use by another program, or because you do not have permission to use a network path.
How do you unlock or change the network path?
Thanks.
I kept getting that message as well for my .csv file. In a last ditch effort I used the Outlook online version and it worked! I was also able to choose the folder I created in my Contacts. We'll see how the rest of the process goes! Just glad to be past that error!
Using Outlook via a browser (365) worked for me too after I got the same error message as you. Thanks
I've imported a PST into my outlook PC app, and the contact list is updated, but when I compose an email, the contacts don't autofill in the recipient line.
Could you please post an example of the csv. format compatible with uploading to Outlook? And also when I try to export contacts to see what that csv. looks like, it doesn't show me where the file was saved. Thanks!
Hi Nina,
I've posted a screenshot of a .csv file containing the very basic contact details in the 'Prepare contacts for importing into Outlook" section. In practice, your .csv file is likely to contain a lot more columns - that depends on which columns you choose while exporting your contacts.
When exporting contacts from Outlook desktop, you select the folder to save your .csv file to. When exporting contacts from Outlook Online, you will find the contacts.csv file at the button of the page or will be prompted to open it in Excel.