In this article, I'll show you how to import contacts from Excel to Outlook. You'll find three easy steps for getting your contacts exported. Convert your data to .csv format, import them to Outlook with a special wizard and match Excel headers to the corresponding fields.
Excel is a convenient place for storing your contact details. You can process your data in many different ways: merge several files with emails, delete duplicates, update fields in all items simultaneously, combine several contacts into one, benefit from using formulas and sorting options. After your data are shaped the way you need, you can export contacts from Excel to Outlook. There are three main steps you need to follow:
Tip. More ways to import contacts are described in Importing contacts into Outlook from CSV or PST file.
Prepare your Excel contact data for being imported to Outlook
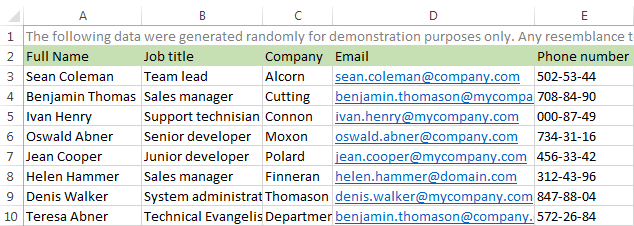
The easiest way to get your contacts ready for adding from Excel to Outlook is to save the workbook in CSV format. This approach works for any version of Office and lets you forget about some issues like named ranges or blank contacts.
- In your workbook, open the worksheet with the contact details you want to import to Outlook.
- Click File and select the Save As option.
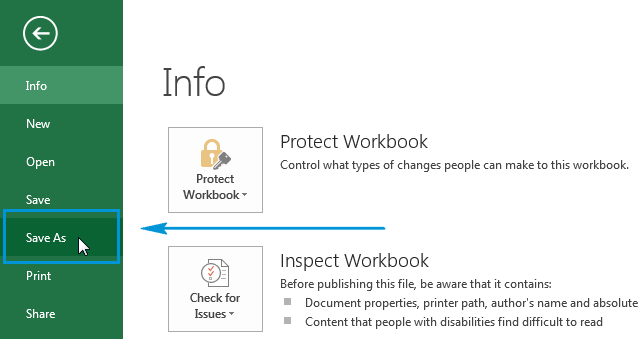
- Pick a location for saving your file.
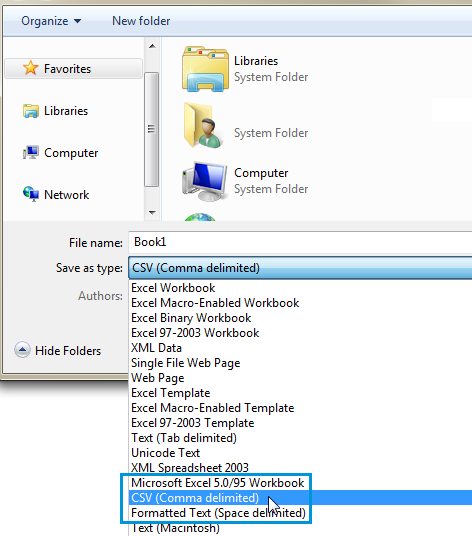
- You will see the Save As dialog box. Choose the option CSV (Comma delimited) from the Save as type drop-down list and press Save.
- You will see the following message from Excel: The selected file type does not contain workbooks that contain multiple sheets.

This message tells you about the limitation of the CSV file. Please don't worry, your original workbook will stay as is. Just click OK.
- After clicking OK, you are likely to see another message saying: Some features in your workbook might be lost if you save it as CSV (Comma delimited).

This info-notification can be ignored. Thus, you can click Yes to get your current worksheet saved in the CSV format. The original workbook (the .xlsx file) will be closed and you may also notice that the name of your current sheet will change.
- Close your new CSV file.
Now you are ready to add contacts to Outlook.
Import contacts from Excel to Outlook
On this step you'll see how to import contacts from Outlook to Excel using the Import and Export Wizard.
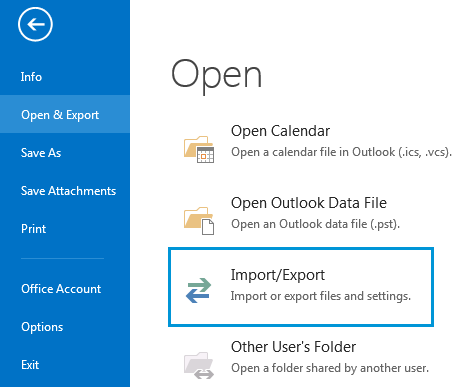
- Open Outlook, go to File > Open & Export and click the option Import/Export.
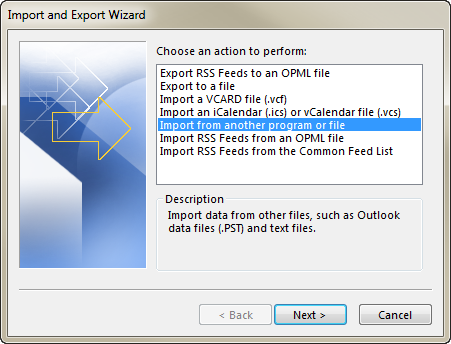
- You'll get Import and Export Wizard. Select the option Import from another program or file and then click the Next button.
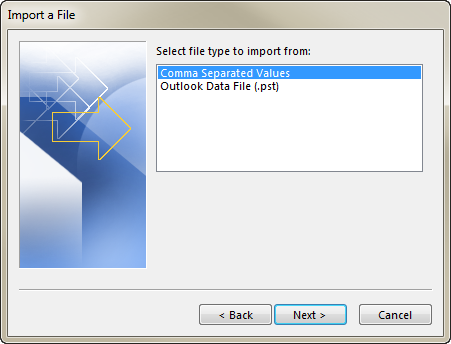
- On the Import a File step of the wizard, pick Comma Separated Values and click Next.
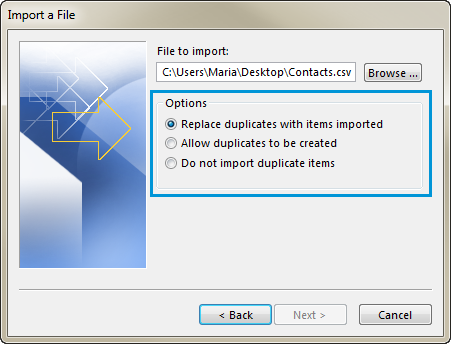
- Click on the Browse button and find the .csv file you want to import.
On this step you will also see radio buttons under Options allowing you to not import duplicates, replace existing contacts or create the duplicated items. If you happened to export your contact information to Excel and want to import them back to
Outlook, please make sure to select the very first radio button.
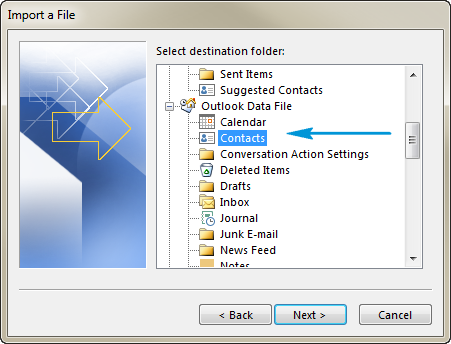
- Click the Next button to pick the destination for your emails. The Contacts folder should be selected by default. If it's not, you can scroll up or down to locate the file. It's also possible to choose a different folder.
- After clicking Next, you'll see the checkbox Import "Your File Name.csv" into folder: Contacts. Please make sure to select it.
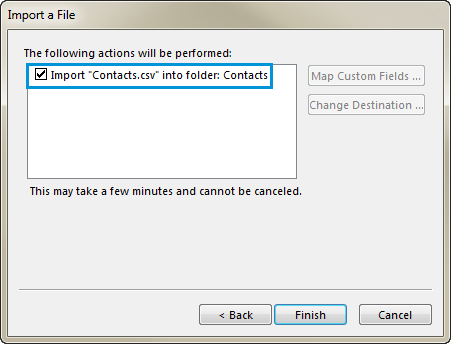
Please don't click Finish yet. You'll need to associate some of the columns in your CSV file to the contact fields in Outlook. This will import your contacts from Excel to Outlook exactly as you want. Keep reading to get the steps.
Match Excel columns to the corresponding Outlook fields
To make sure that the details from your imported contacts appear in the corresponding fields in Outlook, use the Map Custom Fields dialog box on the last step of Import and Export Wizard.
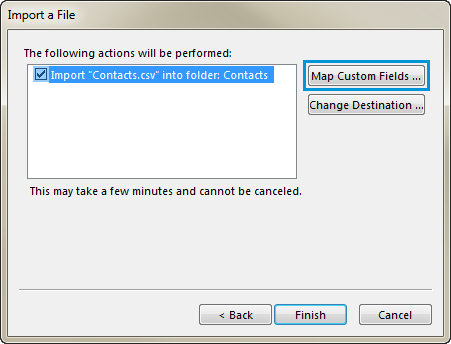
- Select Import "Your File Name.csv" into folder: Contacts to activate the button Map Custom Fields.... Click on this button to see the corresponding dialog box appear.
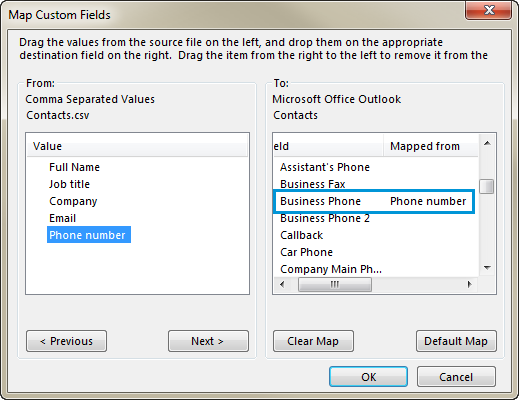
- You'll see the From: and To: panes on the Map Custom Fields dialog. From: contains the column headers from your CSV file. Under To, you'll see the standard Outlook fields for contacts. If a field matches a column in the CSV file, you'll see your column under Mapped from.
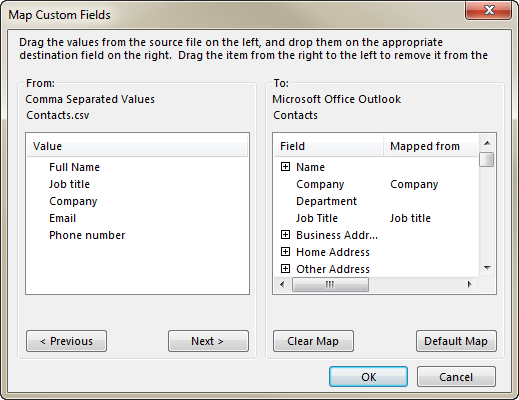
- The fields Name, First Name, and Last Name are standard Outlook fields, so if the contact details in your file have any of those contact names, you can proceed.
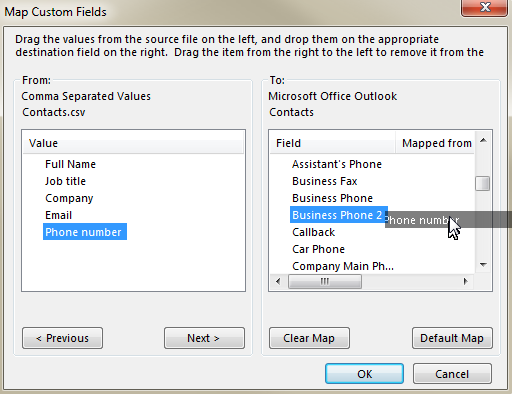
- You'll probably also need to do some manual mapping. For example, in your file the contact's phone is in the column Phone number. Outlook has numerous fields for phone numbers, such as Business, Home, Car and so on. So you can find a suitable match by scrolling within the To: pane.
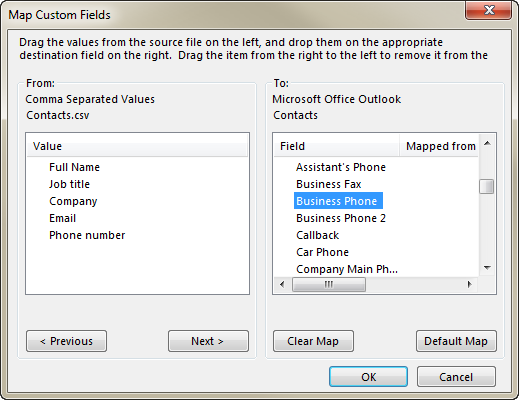
- When you find the correct option, for example, Business Phone, just select Phone number under From. Then drag and drop it to Business Phone in the To: pane.
Now you can see the Phone number column header next to the Business Phone field.
- Drag the other items from the left pane to the suitable Outlook fields and click Finish.
Your contacts are successfully added into Outlook from Excel.
Now you know how to export Excel contacts to Outlook 2010-2013. You just need to create a .csv file with the emails, import it to Outlook and map the corresponding fields. If you come across any difficulty when adding the contacts, feel free to post your question below. That's all for today. Be happy and excel in Excel.
 by
by
54 comments
I transferred my contacts from Thunderbird to Outlook. Here are the field-name mappings I used (above, this is Step 5 of "Match Excel columns to the corresponding Outlook fields"):
First Name ==> First Name
Last Name ==> Last Name
Display Name ==> E-mail Display Name
Nickname ==> User 2
Primary Email ==> E-mail Address
Secondary Email ==> E-mail 2 Address
Screen Name ==> User 1
Work Phone ==> Business Phone
Home Phone ==> Home Phone
Fax Number ==> Business Fax
Pager Number ==> Pager
Mobile Number ==> Mobile Phone
Home Address ==> Home Street
Home Address 2 ==> Home Street 2
Home City ==> Home City
Home State ==> Home State
Home ZipCode ==> Home Postal Code
Home Country ==> Home Country/Region
Work Address ==> Business Street
Work Address 2 ==> Business Street 2
Work City ==> Business City
Work State ==> Business State
Work ZipCode ==> Business Postal Code
Work Country ==> Business Country/Region
Job Title ==> Job Title
Department ==> Department
Organization ==> Company
Web Page 1 ==> Web Page
Web Page 2 ==> User 3
Birth Year ==>
Birth Month ==> User 4
Birth Day ==> Birthday
Custom 1 ==>
Custom 2 ==>
Custom 3 ==>
Custom 4 ==>
Notes ==> Notes
Note: Birthday information is a problem. Thunderbird stores it in three fields, namely "Birth Year", "Birth Month", and "Birth Day" (i.e., day of the month), while Outlook stores it as a single field, "Birthday". The mapping shown above moves the day of the month into Outlook's "Birthday" field and the month into the "User 4" field; this at least preserves some of the information, but it's hardly a good solution, since you have to know how to interpret the numbers that are now in those fields. I don't see a good solution here if you have a lot of birthday information you want to transfer manually. If you have only a few birthdays you care about, you can add those birthdays manually to Outlook once the automatic transfer is complete. If you have a lot, you're probably better off getting one of the free transfer apps available on the web. (But with free apps, I always worry about malware....)
When I went through this process , and selected the destination folder "Contacts", and completed the mapping, I am unable to find or see the contact that i just imported in my Outlook . where is it? the excel file used to create the outlook contact is named Current customers csv 01212020. I don't see it.
Same here, seems a waste of time this section of the page if no one gives an answer. Fine for people to post saying how wonderful it is but really these forums should be about helping each other not blowing smoke up the backside of the page author
Thank you!
This was a great help to me. Thank you so very much.
When I go to file, Open, I do not get import/export they are on separate and I do not get the import/export wizard to try to import contacts. Don't know??
I clicked finish before mapping can I change or undo
Thank you very much for your help on transfer from excel to outlook. It was excellent instructions on a problem that I had spent a couple of hours of frustration trying to resolve
Richard
This is not working. I only get """""""" in the "FROM" values. All info appears in the "Full Nmae" field in the Contact. Even the headings are created as a contact.
Thank you! Your instructions were quite precise and extremely thorough. I was able to successfully import contacts.
Can you set this up so that it can refresh with newly added contacts and emails or will you have to re done this every time?
Thanks!!! I tried a dozen of suggested ways but only yours worked!
Hi,
In my excel sheet I have several columns I put into the 'notes' section when I add a contact manually. Is there a way to do this using this importing feature?
Thanks,D
Hi,
your explanations are good and clear. I have problems with point 2. Outlook does not recognises the different fields/columns of the csv file. It only recognises all 4 columns (first name, last name, organisaiton, mail address) as only one field and thus puts all the information in the title of the contact card in outlook.
What can I change on my csv file to make it recognisable to outlook?
Thanks, S.
thank you for making our life easy and happy! keep on helping spreading good knowledge! God Bless
Need recognised headers for all columns if it's to be a recognised file structure!!!
Is it possible to have the destination be a specific group in the contacts?
I GIVE UP. I will have to just copy and paste I have been working on this for days, researching and researching still nothing works.
Me too followed your step by step and still doesn't import my email address to Outlook
Very clear instructions - easy to follow. Worked a treat saving me hours of copy and paste xx
how did you get it to work I have tried every step and can't get my values to change at all.
can we change the field name?