The tutorial explains how to hyperlink in Excel by using 3 different methods. You will learn how to insert, change and remove hyperlinks in your worksheets and now to fix non-working links.
Hyperlinks are widely used on the Internet to navigate between web-sites. In your Excel worksheets, you can easily create such links too. In addition, you can insert a hyperlink to go to another cell, sheet or workbook, to open a new Excel file or create an email message. This tutorial provides the detailed guidance on how to do this in Excel 2016, 2013, 2010 and earlier versions.
What is hyperlink in Excel
An Excel hyperlink is a reference to a specific location, document or web-page that the user can jump to by clicking the link.
Microsoft Excel enables you to create hyperlinks for many different purposes including:
- Going to a certain location within the current workbook
- Opening another document or getting to a specific place in that document, e.g. a sheet in an Excel file or bookmark in a Word document.
- Navigating to a web-page on the Internet or Intranet
- Creating a new Excel file
- Sending an email to a specified address
Hyperlinks in Excel are easily recognizable - generally this is text highlighted in underlined blue like shown in the screenshot below.

Absolute and relative hyperlinks in Excel
Microsoft Excel supports two types of links: absolute and relative, depending on whether you specify a full or partial address.
An absolute hyperlink contains a full address, including the protocol and domain name for URLs, and the entire path and file name for documents. For example:
Absolute URL: https://www.ablebits.com/excel-lookup-tables/index.php
Absolute link to an Excel file: C:\Excel files\Source Data\Book1.xlsx
A relative hyperlink contains a partial address. For example:
Relative URL: excel-lookup-tables/index.php
Relative link to an Excel file: Source data\Book3.xlsx
On the web, it's a common practice to use relative URLs. In your Excel hyperlinks, you should always supply full URLs for web-pages. Though, Microsoft Excel can understand URLs without a protocol. For example, if you type "www.ablebits.com" in a cell, Excel will automatically add the default "http" protocol and convert it into a hyperlink you can follow.
When creating links to Excel files or other documents stored on your computer, you can use either absolute or relative addresses. In a relative hyperlink, a missing part of the file path is relative to the location of the active workbook. The main advantage of this approach is that you don't have to edit the link address when the files are moved to another location. For example, if your active workbook and target workbook reside on drive C, and then you move them to drive D, relative hyperlinks will continue working as long as the relative path to the target file remains unchanged. In case of an absolute hyperlink, the path should be updated every time the file is moved to another place.
How to create a hyperlink in Excel
In Microsoft Excel, the same task can often be accomplished in a few different ways, and it is also true for creating hyperlinks. To insert a hyperlink in Excel, you can use any of the following:
How to insert a hyperlink using the Excel Hyperlink feature
The most common way to put a hyperlink directly into a cell is by using the Insert Hyperlink dialog, which can be accessed in 3 different ways. Just select the cell where you want to insert a link and do one of the following:
- On the Insert tab, in the Links group, click the Hyperlink or Link button, depending on your Excel version.

- Right click the cell, and select Hyperlink… (Link in recent versions) from the context menu.

- Press the Ctrl + K shortcut.
And now, depending on what sort of link you want to create, proceed with one of the following examples:
- Hyperlink to another document
- Hyperlink to web-page (URL)
- Hyperlink to a specific pace in the current workbook
- Hyperlink to a new workbook
- Hyperlink to an email address
Create hyperlink to another document
To insert a hyperlink to another document such as a different Excel file, Word document or PowerPoint presentation, open the Insert Hyperlink dialog, and perform the steps below:
- On the left-hand panel, under Link to, click the Existing File or Web Page
- In the Look in list, browse to the location of the target file, and then select the file.
- In the Text to display box, type the text you want to appear in the cell ("Book3" in this example).
- Optionally, click the ScreenTip… button in the upper-right corner, and enter the text to be displayed when the user hovers the mouse over the hyperlink. In this example, it's "Goto Book3 in My Documents".
- Click OK.
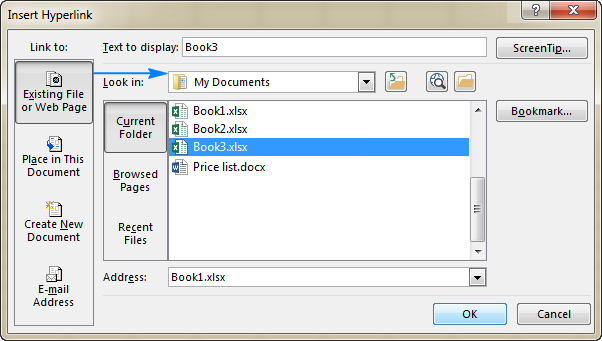
The hyperlink is inserted in the selected cell and looks exactly as you've configured it:

To link to a specific sheet or cell, click the Bookmark… button in the right-hand part of the Insert Hyperlink dialog box, select the sheet and type the target cell address in the Type in the cell reference box, and click OK.

To link to a named range, select it under Defined names like shown below:

Add a hyperlink to a web address (URL)
To create a link to a web page, open the Insert Hyperlink dialog, and proceed with the following steps:
- Under Link to, select Existing File or Web Page.
- Click the Browse the Web button, open the web page you want to link to, and switch back to Excel without closing your web browser.
Excel will insert the web site Address and Text to display for you automatically. You can change the text to display the way you want, enter a screen tip if needed, and click OK to add the hyperlink.
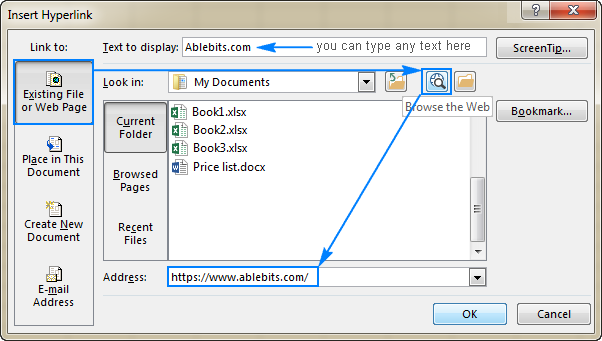
Alternatively, you can copy the web page URL before opening the Insert Hyperlink dialog, and then simply paste the URL in the Address box.
Hyperlink to a sheet or cell in the current workbook
To create a hyperlink to a specific sheet in the active workbook, click the Place in this Document icon. Under Cell Reference, select the target worksheet, and click OK.
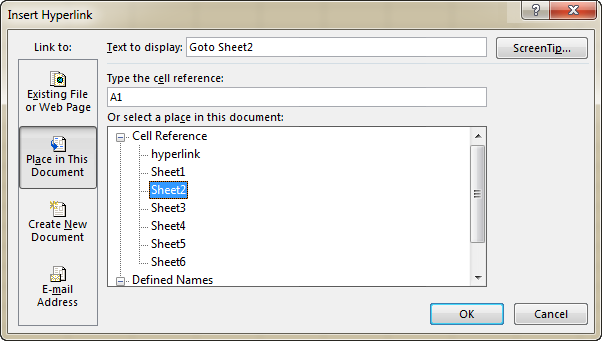
To create an Excel hyperlink to cell, type the cell reference in the Type in the cell reference box.
To link to a named range, select it under the Defined Names node.
Insert a hyperlink to open a new Excel workbook
Besides linking to existing files, you can create a hyperlink to a new Excel file. Here's how:
- Under Link to, click the Create New Document icon.
- In the Text to display box, type the link text to be displayed in the cell.
- In the Name of new document box, enter the new workbook name.
- Under Full path, check the location where the newly created file will be saved. If you want to change the default location, click the Change button.
- Under When to edit, select the desired editing option.
- Click OK.

A hyperlink to create an email message
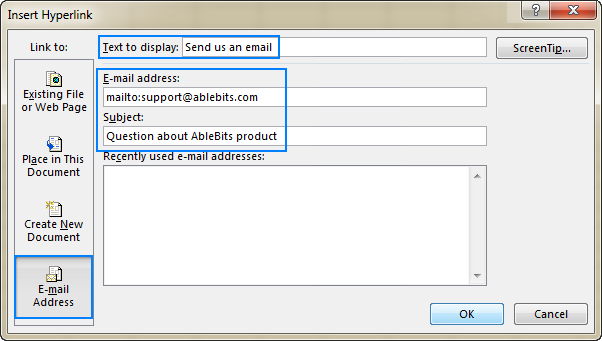
Apart from linking to various documents, the Excel Hyperlink feature allows you to send an email message directly from your worksheet. To have it done, follow these steps:
- Under Link to, select the E-mail Address icon.
- In the E-mail address box, type the e-mail address of your recipient, or multiple addresses separated with semicolons.
- Optionally, enter the message subject in the Subject box. Please keep in mind that some browsers and e-mail clients may not recognize the subject line.
- In the Text to display box, type the desired link text.
- Optionally, click the ScreenTip… button and enter the text you want (the screen tip will be displayed when you hover over the hyperlink with the mouse).
- Click OK.
Tip. The fastest way to make a hyperlink to a specific e-mail address it to type the address directly in a cell. As soon as you hit the Enter key, Excel will automatically convert it into a clickable hyperlink.
How to create links by using HYPERLINK function
If you are one of those Excel pros that employ formulas to tackle most of the tasks, you can use the HYPERLINK function, which is specially designed to inset hyperlinks in Excel. It is particularly useful when you intend to create, edit or remove multiple links at a time.
The syntax of the HYPERLINK function is as follows:
Where:
- Link_location is the path to the target document or web-page.
- Friendly_name is the link text to be displayed in a cell.
For example, to create a hyperlink titled "Source data" that opens Sheet2 in the workbook named "Source data" stored in the "Excel files" folder on drive D, use this formula:
=HYPERLINK("[D:\Excel files\Source data.xlsx]Sheet2!A1", "Source data")
For the detailed explanation of the HYPERLINK function arguments and formula examples to create various types of links, please see How to use Hyperlink function in Excel.
How to insert hyperlink in Excel by using VBA
To automate the creation of hyperlink in your worksheets, you can use this simple VBA code:
Where:
- Sheets - the name of a sheet on which the link should be inserted (Sheet 1 in this example).
- Range - a cell where the link should be inserted (A1 in this example).
- SubAddress - link destination, i.e. where the hyperlink should point to (Sheet3!B5 in this example).
- TextToDisplay -text to be displayed in a cell ("My hyperlink" in this example).
Given the above, our macro will insert a hyperlink titled "My hyperlink" in cell A1 on Sheet1 in the active workbook. Clicking the link will take you to cell B5 on Sheet3 in the same workbook.
If you have little experience with Excel macros, you may find the following instructions helpful: How to insert and run VBA code in Excel
How to change hyperlink in Excel
If you created a hyperlink by using the Insert Hyperlink dialog, then use a similar dialog to change it. For this, right-click a cell holding the link, and select Edit Hyperlink… from the context menu or press the Crtl+K shortcut or click the Hyperlink button on the ribbon.

Whichever you do, the Edit Hyperlink dialog box will show up. You make the desired changes to the link text or link location or both, and click OK.
To change a formula-driven hyperlink, select the cell containing the Hyperlink formula and modify the formula's arguments. The following tip explains how to select a cell without navigating to the hyperlink location.
To change multiple Hyperlink formulas, use Excel's Replace All feature as shown in this tip.
How to change a hyperlink appearance
By default, Excel hyperlinks have a traditional underlined blue formatting. To change the default appearance of a hyperlink text, perform the following steps:
- Go to the Home tab, Styles group, and either:
- Right-click Hyperlink, and then click Modify… to change the appearance of hyperlinks that have not been clicked yet.
- Right-click Followed Hyperlink, and then click Modify… to change the formatting of hyperlinks that have been clicked.

- In the Style dialog box that appears, click Format…

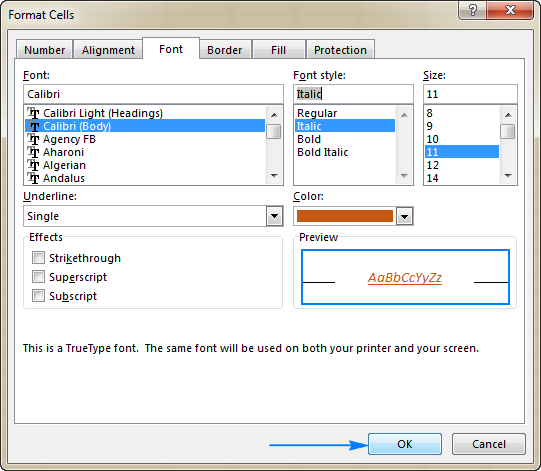
- In the Format Cells dialog, switch to the Font and/or Fill tab, apply the options of your choosing, and click OK. For example, you can change the font style and font color like shown in the screenshot below:
- The changes will be immediately reflected in the Style dialog. If upon a second thought, you decide not to apply certain modifications, clear the check boxes for those options.

- Click OK to save the changes.
Note. All changes made to the hyperlink style will apply to all hyperlinks in the current workbook. It is not possible to modify formatting of individual hyperlinks.
How to remove hyperlink in Excel
Removing hyperlinks in Excel is a two-click process. You simply right-click a link, and select Remove Hyperlink from the context menu.

This will remove a clickable hyperlink, but keep the link text in a cell. To delete the link text too, right-click the cell, and then click Clear Contents.
Tip. To remove all or selected hyperlinks at a time, use the Paste Special feature as demonstrated in How remove multiple hyperlinks in Excel.
Tips for using hyperlinks in Excel
Now that you know how to create, change and remove hyperlinks in Excel, you may want to learn a couple of useful tips to work with links most efficiently.
How to select a cell containing a hyperlink
By default, clicking a cell that contains a hyperlink takes you to the link destination, i.e. a target document or web-page. To select a cell without jumping to the link location, click the cell and hold the mouse button until the pointer turns into a cross (Excel selection cursor) ![]() , and then release the button.
, and then release the button.
If a hyperlink occupies just part of a cell (i.e. if your cell is wider than the link's text), move the mouse pointer over the whitespace, and as soon as it changes from a pointing hand to a cross, click the cell:
![]()
One more way to select a cell without opening a hyperlink is to select a neighboring cell, and use the arrow keys to get to the link cell.
How to extract a web address (URL) from Excel hyperlink
There are two ways to extract a URL from a hyperlink in Excel: manually and programmatically.
Extract a URL from a hyperlink manually
If you have just a couple of hyperlinks, you can quickly extract their destinations by following these simple steps:
- Select a cell containing the hyperlink.
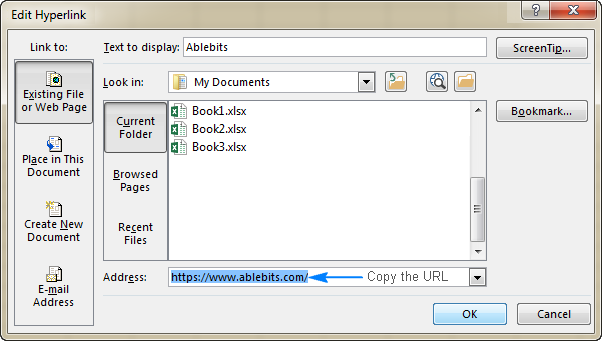
- Open the Edit Hyperlink dialog by pressing Ctrl + K, or right-click a hyperlink and then click Edit hyperlink….
- In the Address field, select the URL and press Ctrl + C to copy it.
- Press Esc or click OK to close the Edit Hyperlink dialog box.
- Paste the copied URL into any empty cell. Done!
Extract multiple URLs by using VBA
If you have a great lot of hyperlinks in your Excel worksheets, extracting each URL manually would be a waste of time. The following macro can speed up the process by extracting addresses from all hyperlinks on the current sheet automatically:
As shown in the screenshot below, the VBA code gets URLs from a column of hyperlinks, and puts the results in the neighboring cells.

If one or more cells in the adjacent column contains data, the code will display a warning dialog asking the user if they want to overwrite the current data.
Convert worksheet objects into clickable hyperlinks
Apart from text in a cell, many worksheet objects including charts, pictures, text boxes and shapes can be turned into clickable hyperlinks. To have it done, you simply right-click an object (a WordArt object in the screenshot below), click Hyperlink…, and configure the link as described in How to create hyperlink in Excel.

Tip. The right-click menu of charts does not have the Hyperlink option. To convert an Excel chart into a hyperlink, select the chart, and press Ctrl + K.
Excel hyperlinks not working - reasons and solutions
If hyperlinks are not working properly in your worksheets, the following troubleshooting steps will help you pin down the source of the problem and fix it.
Reference isn't valid
Symptoms: Clicking a hyperlink in Excel does not take the user to the link destination, but throws the "Reference isn't valid" error.

Solution: When you create a hyperlink to another sheet, the sheet's name becomes the link target. If you rename the worksheet later, Excel won't be able to locate the target, and the hyperlink will stop working. To fix this, you need to either change the sheet's name back to the original name, or edit the hyperlink so that it points to the renamed sheet.
If you created a hyperlink to another file, and later moved that file to another location, then you will need to specify the new path to the file.
Hyperlink appears as a regular text string
Symptoms: Web-addressed (URLs) typed, copied or imported to your worksheet are not converted into clickable hyperlinks automatically, nor are they highlighted with a traditional underlined blue formatting. Or, links look fine but nothing happens when you click on them.
Solution: Double-click the cell or press F2 to enter the edit mode, go to the end of the URL and press the Space key. Excel will convert a text string into a clickable hyperlink. If there are many such links, check the format of your cells. Sometimes there are issues with links placed in cells formatted with the General format. In this case, try changing the cell format to Text.
Hyperlinks stopped working after reopening a workbook
Symptoms: Your Excel hyperlinks worked just fine until you saved and reopened the workbook. Now, they are all grey and no longer work.
Solution: First off, check if the link destination has not been changed, i.e. the target document was neither renamed nor moved. If it's not the case, you may consider turning off an option that forces Excel to check hyperlinks every time the workbook is saved. There have been reports that Excel sometimes disables valid hyperlinks (for example, links to files stored in your local network may be disabled because of some temporary problems with your server.) To turn off the option, follow these steps:
- In Excel 2010, Excel 2013 and Excel 2016, click File > Options. In Excel 2007, click the Office button > Excel Options.
- On the left panel, select Advanced.
- Scroll down to the General section, and click the Web Options…
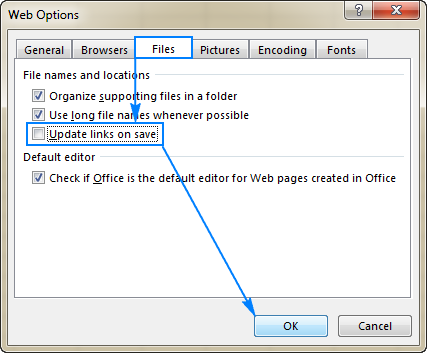
- In the Web Options dialog, switch to the Files tab, clear the Update links on save box, and click OK.
Formula-based hyperlinks do not work
Symptoms: A link created by using the HYPERLINK function does not open or displays an error value in a cell.
Solution: Most problems with formula-driven hyperlinks are caused by a non-existent or incorrect path supplied in the link_location argument. The following examples demonstrate how to create a Hyperlink formula properly. For more troubleshooting steps, please see Excel HYPERLINK function not working.
This is how you create, edit and remove a hyperlink in Excel. I thank you for reading and hope to see you on our blog next week!
 by
by
49 comments
I am trying out links to another WS, same WB. It does work most of the time. I have several names in Sheet2, with info for several rows before the next name. I want the link from sheet1 to open sheet2 with the row that has the name. I put the row and column on sheet2 in the link on sheet1. Example: A43 or A5, etc.
This works for Jane Doe, and Tom Smith and Mary Green. I return to Sheet1 each time I want to open a different link on Sheet2. And this is where the problem is. Links that opened on Sheet2 where they should, now open much further down the page. So I have to scroll to bring the name up to see all the info for that name.
And the link that has A43 right under the Alphabet at top left, is down at bottom of screen. And that is why I have to scroll.
How do I make the link on Sheet1 land on the row/column that I put in the link for sheet2.
Hi! Unfortunately, this is how hyperlinks work. It cannot be changed with the standard Excel tools.
found a way
Thank you for the reply. Is there something besides hyperlinks that will go to the desired cell?
I can't find the option to create a new file in my 'Insert Hyperlink' dialog box. Please help me with this i am using excel 2021 version.
Hi,
Is there a vb way to bulk update hyperlinks where the hyperlink uses "Place in this Document". ??
The vb I've found to date (using .address) only updates the text to display but not the hyperlink to the other worksheets.
Hi! Unfortunately, we don't create VBA code by request.
Help Urgently required :)
i have excel sheet with a lot (i mean it) cells in column with values that have hyperlink created from dropdown menu. linked files had to be moved and now I end up with links that do not work.
example: C:\Users\XXXXX\AppData\Roaming\Microsoft\04 - PROJECTS\XXX this is what i get as link now and correct path should be
S:\Personal Folders\04 - PROJECTS\XXX
is there a way to change automatically as i have more then 500 entries
Hi! Use the recommendations from the article above. Use the VBA macro to extract link addresses from hyperlinks. Replace the path using Find and Replace multiple values at once. Create a new hyperlink using the new path as described in the article above.
I used to be able to have a Column A be a hyperlink and Column B be text (the specific record ID) then use the "&" sign to concatenate both into Column C. I would then copy the format of Column A to Column C and my hyperlink would still work. That stopped working recently. Does anyone know why?
Try again to copy the format of Column A to Column C
I am creating a directory of sorts in excel, where Sheet1 has basic information and hyperlinks to more information or resources, I have added Sheet2 to Copy and paste numerous txt documents of info, in blocks. I am using Hyperlink in sheet1 in excel to reference specific cells in sheet2 where the correlating block of info is located. The issue I am running into is that when I am father down in the excel sheet i.e. A64 (Sometimes seems random the farther down it goes) the hyperlink takes me there but shows A64 at the bottom of the screen. The first few cells A1, A20, A40 all take me to the cell located as the first or second cell seen, which is what I want, so the block of information (The next 10-15 rows) is seen without having to scroll or mistake it with the block of information above it.
Easy Answer is to just space out the blocks more, but I was hoping there might be a fix or adjustment within Excel.
I have over 40 hyperlinks (1 per person), which are referenced in my workbook because I need to pull arrays from individuals' sheets that are on Sharepoint. I need to update the same part of every hyperlink when the file location on Sharepoint changes.
Examples of a hyperlink are:
h ttp://companysite.sharepoint.com/Site1/OEBKSD/5435375/Person1/[filename.xlsm]Tab Name'!$A$2:$D$75
h ttp://companysite.sharepoint.com/Site1/OEBKSD/5435375/Person2/[filename.xlsm]Tab Name'!$A$2:$D$75
Examples of a location change are:
h ttp://companysite.sharepoint.com/Site2/PSEMS/356356/Person1/[filename.xlsm]Tab Name'!$A$2:$D$75
h ttp://companysite.sharepoint.com/Site2/PSEMS/356356/4B44/Person1/[filename.xlsm]Tab Name'!$A$2:$D$75
h ttp://companysite.sharepoint.com/Site2/PSEMS/356356/Person2/[filename.xlsm]Tab Name'!$A$2:$D$75
h ttp://companysite.sharepoint.com/Site2/PSEMS/356356/4B44/Person2/[filename.xlsm]Tab Name'!$A$2:$D$75
I tried using some suggested VBA code but this did not work for me, which I think is because I am referencing the links to pull data rather than have as a clickable link.
I would prefer to use VBA to update the link references rather than find and replace, as I would also like to use VBA to open then close the target files on Sharepoint so that my workbook gets updated accordingly (the arrays don't get updated unless the target files are open).
I'm on a Mac, so using Power Query to retrieve data from Sharepoint is not an option for me. What VBA code should I use for this?
Hello!
Your request goes beyond the advice we provide on this blog. I'm really sorry, we cannot help you with this.
I have an Excel sheet with a URL in the first column and the friendly name in the second column. I created a HYPERLINK formula in the third column; all good. Now I want to get rid of the first two columns, and have the hyperlink stand on its own.
I copied all the cells with the hyperlink formulas, then used Paste Special / Values. All I got was the text of the cell, with no hyperlink.
I would rather not have to create each hyperlink individually. How do I create a series of hyperlink formulas, get rid of the source cells, and keep the hyperlinks?
Hi!
I'm sorry, but it looks like your problem can't be solved with standard Excel tools.
I'm working on particular workbook. The workbook contain several worksheet with accounting formulas, i have linked each sheet with hyperlinks to one sheet in the workbook what formula can i use to automatically input the new copied sheet to the sheet that contains the hyperlinks.
Hi!
You can automatically insert a hyperlink formula using a VBA macro.
I have both WPS and MS365 for doing .xlsx files. For a long time, I have been using only WPS (I prefer their UI), and all the default pgm settings for xls, xlsx files points to WPS. My HYPERLINKs (both feature and function) open xlsx files in WPS, which is what I want.
Lately, I have been trying MS365 to learn the new functions (not yet in WPS), as well as PowerQuery etc. Once I started saving xlsx files in MS365, my hyperlinks now opens xlsx files in MS365 (which I don't want). I have checked the default pgm settings, etc, and all still points to WPS. Opening from WinExplorer, selecting from file right-click context menus all uses WPS. Only my hyperlinks insists on using MS365. Unchecking "update links on saving" option (only available in MS365) as mentioned did not help. I even opened the file in WPS, and save, hoping it would reset some flag.
I suspect there must be a separate registry entry that control this, or could Hyperlinks use some weird file extension's default for opening xlsx files.
Any help would be greatly appreciated. Many thanks in advance.
As always, thank you, Svetlana, for your thorough articles!
You mention "If a hyperlink occupies only some part of a cell..." - could you elaborate on how to toggle this functionality?
• Hyperlink occupying entire cell.
VS.
• Hyperlink applying only to the text and not the white space of the cell.
_Thanks!_
Hi Sergey,
When a link is created by using the Link feature or HYPERLINK function, only the text is a clickable hyperlink. In that sentence, I actually meant "If a hyperlink's text occupies only some part of a cell..." i.e. if the cell is wider than the text of the hyperlink. Sorry for the confusion, I will try to reword it.
To make an entire cell a hyperlink, you can create a shape, size it exactly to the size of your cell, and link the shape (right-click the shape > Link).
can anyone answer if my below concern is possible? and if yes how?
i have multiple link in column A, then each of the cell in column A is I have preferred name that is written on column B.
the question is, can i create a formula to make the preferred name open the same url as equivalent to links in column A? I know that this can be done individually by just editing name of the link/url in column A, but I'm wondering if this is also possible via formula so i dont need to do it one by one.
Hi!
You can use cell references in the HYPERLINK formula.
=HYPERLINK(A1, B1)
or
=HYPERLINK(INDEX(A1:A10,MATCH(C1,B1:B10,0)),C1)
thanks ..
Hi - I want to add a hyperlink in excel but the URL is to long. Can I use CONCATENATE with the HYPERLINK function and if so how?
Thanks
Hello!
I’m sorry but your task is not entirely clear to me. For me to be able to help you better, please describe your task in more detail. Please specify what formula you used and what problem or error occurred. Give an example.
It’ll help me understand it better and find a solution for you.
hi
i create hyperlink but when i insert cell hyperlink loction change i dont want change it
Hi,
A hyperlink in a cell never changes automatically. It can only be changed manually.
M workbook has two sheets. I'm trying to connect cells on Sheet 2 to corresponding cells on Sheet 1 with a hyperlink. That works fine until I insert a new row on sheet 1. Here's an example of the problem: When I click Sheet 2 A10 I want to go back to Sheet 1 A10. These cells have related data. If I inset a row before Sheet 1 A10, when I click on Sheet 2 A10 I'm taken to the new data now in Sheet 1 A10, when I really should be at Sheet 1 A11. I tried using relative references in the link ($A$10), but Excel ignores that. There must be a simple way to fix this. Any gui8dance most appreciated!
Hello!
When you insert rows or columns into your worksheet, your hyperlinks won't change. This is how they differ from regular cell references.
Ohhh... I was afraid of that might be the case. So there's no clever workaround for this?
Hello!
Use the HYPERLINK function and provide the link address in a separate cell, as shown in this article.
Hope this helps to solve the problem.
Awesome hi and amazing article like loaded with full of exceptionally valuable
details. You're just amazing. Keep sharing a lot more relating to this.
You wish to learn more from you and regularly!
Hi I would like to extract the hyperlink which text is an addresses from a webpage of property auction results and insert all of the hyperlinks into an excel page as i currently have to select all and then copy and paste into excewl sheet and then edit manually and manually search individual postcodes to match suburb and it is extremely time consuming. look forward to your assistance if possible. thank you in advance.
I am having more than 5000 hyperlinks in my document. Thing were working fine till last week however when I opened my sheet this week all of the hyperlinks are having error CANNOT OEENED THE SPECIFIED FILE. No changes in file path has been done. Now all my links are gone. Request to help
How to insert hyperlink in Excel by using VBA: how the code will change if I want to hyperlink not only cell A1 but the whole column A :A2--> B6, A3 to B7 and so on especially if the column is more than 1000 rows. Thank you