The tutorial demonstrates different ways to convert time to decimal in Excel. You will find a variety of formulas to change time to hours, minutes or seconds as well as convert text to time and vice versa.
Because Microsoft Excel uses a numeric system to store times, you can easily turn hours, minutes and seconds into numbers that you can use in other calculations.
In general, there are two ways to convert time to decimal in Excel - by changing the cell format and by using arithmetic calculations or Excel time functions, such as HOUR, MINUTE and SECOND. Further on in this tutorial, you will find the detailed explanation of the first way and formula examples demonstrating the other technique.
How to convert time to decimal number in Excel
Overall, there are three ways to change a time value to a decimal number: arithmetic operation, CONVERT function or a combination of three different Time functions.
The easiest way to convert time to decimal in Excel is to multiply the original time value by the number of hours, seconds or minutes in a day:
- To convert time to a number of hours, multiply the time by 24, which is the number of hours in a day.
- To convert time to minutes, multiply the time by 1440, which is the number of minutes in a day (24*60).
- To convert time to seconds, multiply the time time by 86400, which is the number of seconds in a day (24*60*60 ).
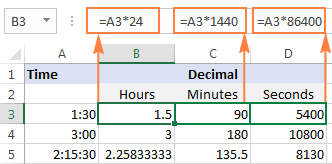
In the following sections, you will learn the other methods of converting times to a decimal number in Excel.
How to convert time to hours in Excel
This section demonstrates 3 different formulas to convert hours from the standard time format (hh:mm:ss) to a decimal number.
Formula 1: Arithmetic calculation
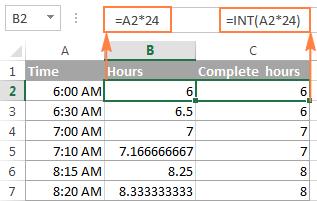
You already know the fastest way to convert a time value to a number of hours in Excel - multiplying by 24, i.e. by the number of hours in one day:
=A2*24
Where A2 is the time value.
To get the number of compete hours, embed the above formula in the INT function that will get rid of the fractional part:
=INT(A2*24)
Formula 2: CONVERT function
Another way to perform the "time > hours" conversion is to use the following Convert formula:
=CONVERT(A2, "day", "hr")
Formula 3: HOUR, MINUTE and SECOND functions
Finally, you can use a bit more complex formula, whose logic, however, is quite obvious. Extract the individual time units by using the HOUR, MINUTE and SECOND functions, then divide minutes by 60 (the number of minutes in an hour) and seconds by 3600 (the number of seconds in an hour), and add up the results:
=HOUR(A2) + MINUTE(A2)/60 + SECOND(A2)/3600
How to convert time to minutes in Excel
The same three methods can be used to convert minutes from the standard time format to a decimal number.
Formula 1: Arithmetic calculation
To convert time to total minutes, you multiply time by 1440, which is the number of minutes in one day (24 hours * 60 minutes = 1440):
=A2*1440
If you want to return the number of compete minutes, utilize the INT function like in the previous example:
=INT(A2*1440)
You can view the results in the screenshot below:

Formula 2: CONVERT function
To do the "time > minutes" conversion with the CONVERT(number, from_unit, to_unit) function, supply "day" as the unit to convert from and "mn" as the unit to convert to:
=CONVERT(A2, "day", "mn")
Formula 3: HOUR, MINUTE and SECOND functions
One more way to get the number of minutes is to multiply hours by 60 and divide seconds by the same number:
=HOUR(A2)*60 + MINUTE(A2) + SECOND(A2)/60
How to convert time to seconds in Excel
Converting time to total seconds in Excel can be done in a similar fashion.
Formula 1: Arithmetic calculation
Multiply the time value by 86400, which is the number of seconds in a day (24 hours * 60 minutes * 60 seconds = 86400):
=A2*86400

Formula 2: CONVERT function
The formula is basically the same as in the above examples with the only difference that you convert the "day" unit to "sec":
=CONVERT(A2, "day", "sec")
Formula 3: HOUR, MINUTE and SECOND functions
Use the HOUR, MINUTE and SECOND functions like in the two previous examples (I believe at this point you don't need any further explanation of the formula's logic :)
=HOUR(A2)*3600 + MINUTE(A2)*60 + SECOND(A2)
Tips:
- If any of the above formulas returns a value formatted as time, simply change the cell's format to Generalto display it as a number.
- To convert time to a decimal number that represents the time in the internal Excel system, apply the General format to the cell. With this approach, 23:59:59 will be converted to 0.99999, 06:00 AM to 0.25, and 12:00 PM to 0.5. If an integer part of the converted number is greater than zero, it means that your cell contains both date and time values.
How to split date and time in Excel
As is often the case, your Excel worksheet may contain dates and times in one cell, while you want to split them into two separate cells.
Remembering that in the internal Excel system the date value is stored as a whole part and the time value as a fractional part of a decimal number, you can extract the date using the INT function, which rounds the cell value down to the nearest integer.
Supposing your original dates and times are in column A, the following formula will accomplish the separation:
=INT(A2)

To extract the time portion, subtract the date returned by the above formula from the original date and time value:
=A2-B2
Where column A contains the original date & time values and column B contains the dates returned by the INT function.
If you'd rather not have time values linked to the separated dates (for example, you may want to remove the date column in the future), you can use the following MOD formula that refers to the original data only:
=MOD(A2,1)

Tip. If the separated date and time values are not displayed properly, change the format of the new columns to Date and Time, respectively.
This is how you split date and time in Excel. If you want to further separate hours, minutes and seconds into individual columns, then use the HOUR, MINUTE and SECOND functions, as demonstrated in How to get hours, minutes and seconds from a timestamp.
How to spell time in Excel
Sometimes, you may need to convert time into the format that reads something like "# days, # hours, # minutes and # seconds". A good thing is that you already know all the ingredients of the formula:
- Extract days using the INT function;
- Extract time units with HOUR, MINUTE and SECOND functions, and
- Concatenate all parts in a single formula.
Having difficulties with figuring out a proper formula for your worksheet? The following example will make things easy!
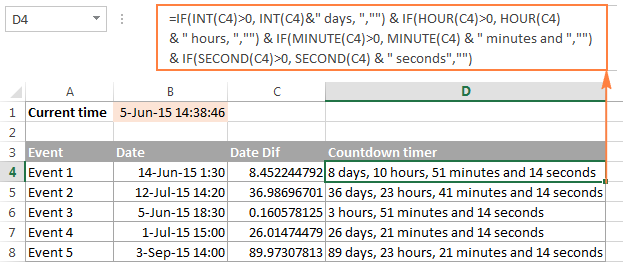
Supposing you have the dates of upcoming events in column B beginning in cell B4, and the current date and time returned by the NOW() function in cell B1.
The formula to calculate the time difference is as simple as =B4-$B$1. Of course, nothing prevents you from subtracting the current date and time directly with =B4-NOW().
And now, let's make a countdown timer that would show how many days, hours, minutes and seconds are left until each event.
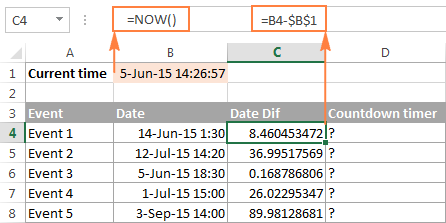
The formula to enter in cell D4 is as follows:
=INT(C4) & " days, " & HOUR(C4) & " hours, " & MINUTE(C4) & " minutes and " & SECOND(C4) & " seconds"
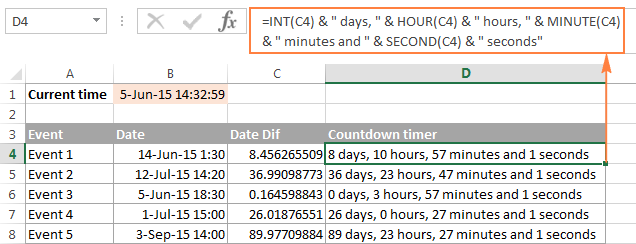
If you wish to get rid of 0 values, like in cells D6 and D7 in the screenshot above, then include the following IF statements:
=IF(INT(C4)>0, INT(C4)&" days, ","") & IF(HOUR(C4)>0, HOUR(C4) & " hours, ","") & IF(MINUTE(C4)>0, MINUTE(C4) & " minutes and ","") & IF(SECOND(C4)>0, SECOND(C4) & " seconds","")
All zeros are gone!
Note. When either of the above formulas refers to a negative number, the #NUM! error will appear. This may happen when you subtract a bigger time from a smaller one.
An alternative way to write time in words in Excel is to apply the following custom time format to the cell: d "day," h "hours," m "minutes and" s "seconds". No formulas and no calculations are required! For more information, please see Creating a custom time format in Excel.
Convert text to time in Excel
If your time formulas and calculations do not work right, time values formatted as text is often the cause. The fastest way to convert text to time in Excel is using the TIMEVALUE function.
The Excel TIMEVALUE function has just one argument:
Time_text is a text string in any of the time formats that Excel can recognize. For example:
=TIMEVALUE("6:20 PM")
=TIMEVALUE("6-Jan-2015 6:20 PM")
=TIMEVALUE(A2) where A2 contains a text string

As you see, the formulas with cell references and corresponding text strings deliver identical results. Also, please notice the left alignment of time strings (text values) in cells A2 and A6 and right-aligned converted time values in column D.
Convert time to text in Excel
Supposing you have an Excel file full of times formatted to look like "8:30:00 AM" and you want to convert them to the text format. Simply changing the cell's format to TEXT won't work because this would change your time values to underlying numeric representation of the time. For example, 8:30:00 AM will be converted to decimal 0.354166666666667.
So, how do you convert cells to the text format so that your cells still have the time in them? The answer is to use the TEXT function that converts a numeric value to text with the display formatting that you specify, for example:
=TEXT($A2,"h:mm:ss")
The screenshot below demonstrates other possible formats:

How to convert numbers to time format in Excel
If you have a list of numbers such as 1, 2, 3.5 and you want to convert them to a time format, for example 1:00:00, 2:00:00 or 3:30 AM, perform the following steps.
- Divide the numbers by 24 (there are 24 hours in a day). The formula can be as simple as =A2/24.
- Select the cell(s) with the formula result, right-click and select Format Cells from the context menu or press Ctrl+1. Either way, the Format Cells dialog will appear, you select Time on the left pane under Category, and choose the format you want on the right pane under Type. Please see How to format time in Excel for more details.

If your time exceeds 24 hours, 60 minutes, 60 seconds, use these guidelines to correctly show it.
That's all for today. If someone wants to get the first-hand experience with the formulas discussed in this article, you are most welcome to download the sample workbook below.
If you want to learn a few more useful formulas to calculate times in Excel, please check out the related tutorials at the end of this page. I thank you for reading and hope to see you again next week!
Practice workbook for download
Converting time in Excel - examples (.xlsx file)
 by
by
273 comments
3 h 35 m 46 s i need to this Chang 3:35:46 Tyep how this do
Hi! Using MID function and LEFT function, extract the desired numbers from the text and create a time using TIME function.
=TIME(LEFT(A1,2),MID(A1,5,2),MID(A1,11,2))
You can also extract numbers from the text using these guidelines: How to extract number from string in Excel. To get the time, use TIMEVALUE function.
=TIMEVALUE(SUBSTITUTE(TRIM(CONCAT(IF(ISNUMBER(--MID(A1, ROW($1:$30),1)), MID(A1,ROW($1:$30),1)," ")))," ",":"))
I have time total time calculate from
For example 5april2025 at 1324hrs work start and finshes at 6april 2025 at 0418hrs
How I calculate total hrs in excel
To create a date and time from text, extract all the numbers you need from the text.
Day:
=IF(ISNUMBER(VALUE(LEFT(A1,2))), VALUE(LEFT(A1,2)), VALUE(LEFT(A1,1)))
При помощи функции LEFT извлекаем первыйначальные 2 символа. При помощи формулы IF + ISNUMBER выбиар
I have formatted cell as [d]:hh:mm:ss to enter time in days, hours, minutes and seconds format and enter value 2:10:22:35 it displays it correctly. . But when I try to add days to this cell in another cell, I am getting value error. In other scenario when I store difference of two dates in a cell formatted as [d]:hh:mm:ss and then add days to it in another cell, it is giving no issue and gives the result by adding those days. What is difference in two? Why the entered value in proper format is not getting recognized?
Hi! Excel does not have a date and time format in which you can write 2:10:22:35. This value is written as text in Excel. Read more: How to change date format in Excel and create custom formatting.
I'd like to be able to perform calculations on video frame 'numbers' which are expressed in seconds to three decimal places.
For example 01:09:29.763 is the frame at 1 hour, 9 minutes and 29.763 seconds.
If the next frame I'm interested in is at 01:11:12.321 for example, I'd like to know the difference between those two expressed as a time (hh:mm:ss.sss) and as a number of frames (each one thousandth of a second).
I'm guessing that the way to do this is to convert the time to a digital number, do the subtraction and convert back?
Hello Malcolm!
To correctly show time values with thousandths of a second, use this time format:
h:mm:ss.000
For the detailed instructions, please see: Time formatting in Excel.
We have two values of time:
01:09:29.763
01:11:12.321
Let's write them in cells A1 and A2.
Let's find time difference between these two values in cell B1.
0:01:42.558
Let's convert this time difference into seconds.
=B1*60*60*24
We get 102.558 seconds.
Now, since each frame is one thousandth of a second, the number of frames will be equal to the difference in seconds multiplied by 1000: 102.558 seconds * 1000 = 102558 frames.
Hello!
I was recently working with a client's required Timesheet. He asked me to add columns to enter time that should be easy for workers. I decided to add two columns and a hidden for the resulted one in format of [h]:mm. The two columns for hrs and mins separately. Then I was to convert the result in AM/PM.
Like, when a worker puts In-Time for 7:00 AM as 7 in one column and 0 in other. But for the Break-Time at 12:00 PM he inputs 12 and 0, and for Restart-Time at 12:30 PM he puts 12 and 30 in the two columns, and then finally Finish-Time for 6:30 PM like 6 and 30 (instead of 18 and 30).
Now I have to add them to the Total hrs they worked. Is there any formula for this to work, please.
Regards
Nadeem Khatri
Hi! To convert two numbers to hours and minutes, use the TIME function. But you cannot automatically convert 6 to 6 PM or 1 to 1 PM. So you need to write the hours in 24 hour format.
I have a time tracking spreadsheet in excel.
Each row is an activity with a start time and duration
I want to enter whole numbers like 20, 30, 45, 90 for my duration and have excel convert the whole number to h:mm and add it to f22 to be f21
For instance; F22 is my starting time for the day, lets say 8:00, it is formatted as hh:mm
G22 is my duration - currently I must add as 0:20 for 20 minutes and the next start time in F21 is calculated by excel
If I can enter the duration as a whole number, it would save me keystrokes
Hi! If you want to enter minutes as a number instead of time, you can use these instructions to convert that number to time for calculating time: Convert number to time format. Based on your information, the formula might look something like this:
=F22+G22/1440
I have a time in excel cell as 03:15 and i want to display in another cell as 3 hours and 15 minutes. How i can convert this. Kindly guide.
Hi! If I understand your task correctly, try to use custom time format:
h "hours and "mm "minutes"
How do I convert text in a cell as 84h 30m into 84.25 as numerical figure? Thank you.
Hi! Extract numbers from the text. Look for the example formulas here: Excel substring functions to extract text from cell. Then combine them using the & operator. For example:
LEFT(A1,2)&"."&MID(A1,5,2)
But I can't guess why you want to convert 30 minutes to 0.25 hours.
I'm trying to convert 28:00:00 to decimal in google sheet but it doesnt work.
Hello Chito,
Please read here: Convert time to decimal in Google spreadsheet
Hello
I want to translate a time written as a whole number to a time value. For example, i want to input a value like "1900" for 19:00 and "530" for 05:30 . Can you please help me translate these values into a time value and all in the same cell ?
Thank you for the help
Hi! You want to automatically change the value you enter in a cell. This can be done using a VBA macro.
Alex,
I have over 2500 records. I used the formula above to calculate the difference in dates, converted to days (=F3-$C$3).
Converted time (Sep 27, 2023 07:04 PM) - Created time (Sep 25, 2023 08:32 AM) and have the answer of 2.44 which is great.
However, when I try to click and drag, the first part of the formula changes, but not the second. Dragging from (=F3-$C$3), looking for (=F4-$C$4) but getting (=F4-$C$3).
I have tried to do multiple cells (up to 10) but get the same type of result (=F14-$C$4), (=F15-$C$5). where the second part of the formula just repeats the previously highlighted fields, instead of updating similar to the first part of the formula.
If you could help, it would be greatly appreciated.
Hi! If you want the cell reference to change when you copy a formula, use a relative cell reference. $C$3 is an absolute reference.
Hi,
I want this 176 Hours 06 Mins
In Numbers like - 176.06
Hi! To extract numbers from text and insert a dot between them, try this formula:
=SUBSTITUTE(TRIM(CONCAT(IF(ISNUMBER(--MID(A1,ROW($1:$95),1)),MID(A1,ROW($1:$95),1)," ")))," ",".")
Hi, would everyone know how to conver this time stamp from SAP business objects report?
"Updated
Time"
102752
103343
114240
120446
125726
143743
144708
145859
150353
155545
160009
160009
I can't guess what result you want to get. I’ll try to offer you the following formula:
=TIME(LEFT(A1,2),MID(A1,3,2),RIGHT(A1,2))
Hello
Am trying to convert hours in this format 150:00:00 to format 150 ,is it possible or it can only be done manually?
Hi! Above in the article it is written that to convert hours into numbers, you must multiply by 24. Read it carefully.
May 1 2023 1:03AM
May 1 2023 7:30AM
Convert to M/DD/YYYY HH:MM:SS AM/PM format
Hi! If your date is written as text, use the formula below to convert it to date and time. Then apply the date and time custom format you want.
=DATE(MID(A1,FIND("~",SUBSTITUTE(A1," ","~",2),1)+1,4), VLOOKUP(LEFT(A1,3), {"JAN",1;"FEB",2;"MAR",3;"APR",4;"May",5;"JUN",6;"JUL",7;"AUG",8;"Sep",9;"OCT",10;"NOV",11;"DEC",12},2,0), MID(A1,FIND(" ",A1,1)+1,2)) + TIMEVALUE(MID(A1,LEN(A1)-6,5)&" "&RIGHT(A1,2))
I have a cell with numbers in the format of YYYYMMDDHHMMSS (20230501080229), need to convert to YYYY MM DD HH MM SS (2023 May 01 08:02:29) to easily read on the spreadsheet. Thank you.
Hi! Use the MID function to extract the required digits and create the date and time using the DATE and TIME functions.
=DATE(MID(A1,1,4),MID(A1,5,2),MID(A1,7,2))+TIME(MID(A1,9,2),MID(A1,11,2),MID(A1,13,2))
Set the date and time format you want in the cell, for example "yyyy mmmm dd hh:mm:ss"
Got time in decimal form and want 15,3722222222222 and want to form it into minutes and hours, tried =TEXT(A1/24;"h:mm:ss") with result: h:22:20 what am I doing wrong?
Hi! I got the right result. Check your regional settings. Maybe your hours are not marked with "hh" but with something else.
Hello,
I feel like I've tried everything. I have a report that needs to be converted to total minutes. See data example below.
1d 05h 44m
6h 16m
3h 00m
0m
1h 02m
1d 04h 36m
I need to convert it to show the following in total minutes. Most of the formulas I've tried error when there is a cell that has only "m" or "h" and "m' data.
1784
376
180
0
62
1716
Is that possible?
Thanks!
I am waiting for the answer to this question
Read previous comments carefully. For example, this one.
I have a column of Time say as below and rows with name. The format says General. I now wanted to show the same in a pivot but in Pivot its taking as 0:00:00 and not showing as follows. I have 3 ppl working on different days and some days its zero so wanted to know which day they had come and which day they didnt. Basically pivot is not capturing the time.
03:59:13
09:14:04
08:36:58
08:01:34
Hi!
Set the time format in these cells.
I'm trying to convert 2 minutes & 30 seconds in excel from this format 2:30 into a decimal which should show as 2.5 minutes.
Another example is 15 seconds currently shows as 0:15 in excel and I need it to show it as 0.25 minutes.
How do I do that?
Hi!
If these values are written as time and a custom time format (e.g. mm:ss) is used, use the instructions in the first paragraph of this article: How to convert time to decimal number in Excel.
Hello, I am setting up a payroll calculator on excel and wanted to see if there is an if function or any function that I can use to calculate payroll correctly. I current input hours formatted as text and then multiply by 24 but It gets thrown off if there is a whole number.
Hi!
I don't know what the data you enter looks like, but perhaps these instructions will be helpful to you: Convert text to number with formula and other ways. If this is not what you wanted, please describe the problem in more detail.
i have data sheet for wind turbine in every 10 second i get wind speed, and i need to resample this data in every second (The model is
based on a 1 s sample time, in order to resample the wind speeds the 10 s data was interpolated linearly between points)
T W
12:33:05 2
12:33:10 2
12:33:15 1
12:33:21 1
12:33:26 1
12:33:31 2
12:33:36 2
12:33:41 2
12:33:46 1
12:33:51 1
12:33:56 1
12:34:01 1
12:34:06 1
12:34:11 1
12:34:16 1
12:34:21 1
12:34:26 1
12:34:31 1
12:34:36 1
12:34:41 1
12:34:46 2
12:34:52 2
EXPECTED LIKE THIS
12:33:05 2
12:33:06 2.1
12:33:07 2.15
12:33:08 1.09
12:33:09 1.51
12:33:10 2
12:33:11 2
12:33:12 2
12:33:13 1
12:33:14 1
12:33:15 1
12:34:16 1
12:34:17 1
12:34:18 1
12:34:19 1
12:34:20 1
12:34:21 1
12:34:22 1
12:34:23 1
12:34:24 1
12:34:25 2
12:34:26 2