The tutorial explains how to quickly convert CSV files to Excel in any version, from 365 to 2007, avoiding typical issues.
Generally, there are two ways to transfer a CSV file to Excel: by opening it or importing as external data. This article provides the detailed guidance on both methods and points out the strengths and limitations of each. We will also red-flag possible pitfalls and suggest the most effective solutions.
Convert CSV file to Excel by opening it
To bring data from a CSV file to Excel, you can open it directly from an Excel workbook or via Windows Explorer. Whichever method you choose, please keep in mind that:
- Opening a CSV document in Excel does not change the file format to .xlsx or .xls. The file will retain the original .csv extension.
- The files are limited to 1,048,576 rows and 16,384 columns.
How to open CSV file in Excel
A comma separated values file created in another program can still be opened in Excel by using the standard Open command.
- In your Excel, head over to the File tab and click Open, or press the Ctrl + O shortcut.
- In the Open dialog box, select Text Files (*.prn;*.txt;*.csv) from the drop-down list in the lower right corner.
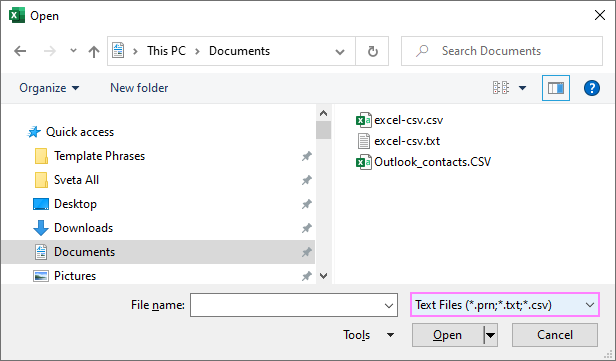
- Browse for the CSV document, and then double-click it to open.
A comma separated values file (.csv) will be opened in a new workbook straight away.
For a text file (.txt), Excel will start the Import Text Wizard. See Importing CSV to Excel for full details.
How to open CSV file from Windows Explorer
The fastest way to open a .csv file in Excel is to double click it in Windows Explorer. This will immediately open your file in a new workbook.
However, this method only works only if Microsoft Excel is set as the default app for .csv files. In this case, a familiar green Excel's icon ![]() appears next to .csv documents in Windows Explorer.
appears next to .csv documents in Windows Explorer.
If your CSV files are set to open with another default app, then right-click the file, and choose Open with… > Excel.
To set Excel as the default program for CVS files, here are the steps to perform:
- Right-click any .csv file in Windows Explorer, and then select Open with… > Choose another app from the context menu.
- Under Other options, click Excel, check off the Always use this app to open .csv files box, and click OK.

Convert CSV to Excel by importing it
Using this method, you can import data from a .csv file into an existing or a new Excel worksheet. Unlike the previous technique, it not just opens the file in Excel but changes the .csv format to .xlsx (Excel 2007 and higher) or .xls (Excel 2003 and lower).
Importing can be done in two ways:
- By using Text Import Wizard (in all versions)
- By creating a Power Query connection (in Excel 2016 - Excel 365)
How to import CSV into Excel with Text Import Wizard
First off, it should be noted that the Text Import Wizard is a legacy feature, and beginning with Excel 2016 it is moved from the ribbon to Excel Options.
If the Text Import Wizard is not available in your Excel version, you have these two options:
- Enable From Text (Legacy) feature.
- Get Excel to launch the Import Text Wizard automatically. For this, change the file extension from .csv to .txt, open the text file from Excel, and then follow the steps of the wizard described below.
To import a CSV file to Excel, this is what you need to do:
- In Excel 2013 and earlier, go to the Data tab > Get External Data group, and click From Text.

In Excel 2016 and later, go to the Data tab > Get & Transform Data group, and click Get Data > Legacy Wizards > From Text (Legacy).
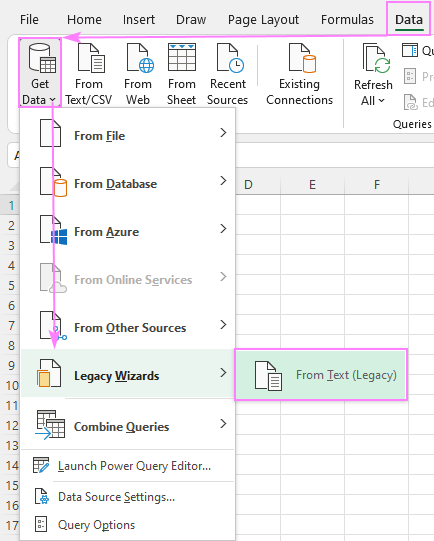
Note. If the From Text wizard is not there, make sure you have it enabled. If Legacy Wizards is still grayed out, select an empty cell or open a blank worksheet and try again.
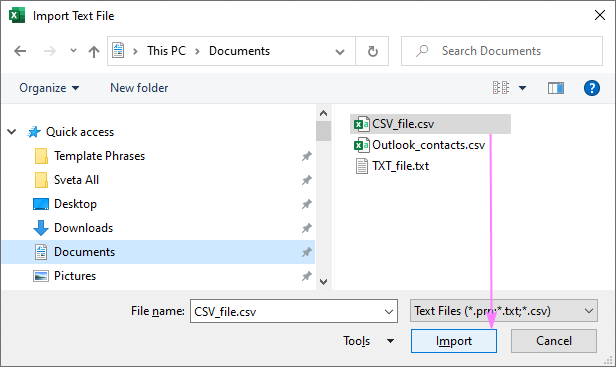
- In the Import Text File dialog box, browse for the .csv file you want to import, select it and click the Import button (or simply double-click the file).
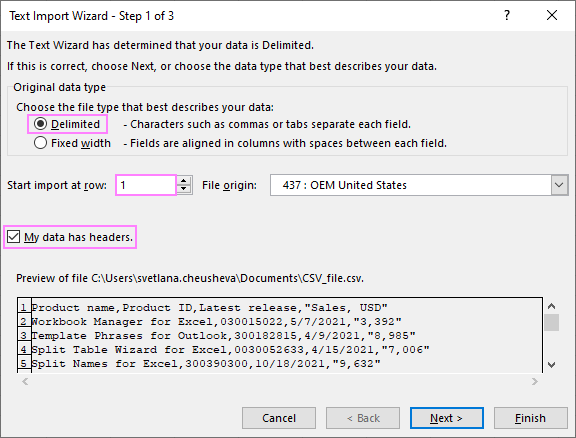
- The Text Import Wizard will start, and you follow its steps. First, you choose:
- The Delimited file type
- The row number to start import at (normally, row 1)
- Whether your data has headers
The preview window in the lower part of the wizard shows a few first entries from your CSV file.
- Choose the delimiter and text qualifier.
Delimiter is the character that separates values in your file. As CSV is a comma separated values file, obviously you select Comma. For a TXT file, you'd typically select Tab.
Text qualifier is the character that encloses the values in an imported file. All text between two qualifier characters will be imported as one value, even if the text contains the specified delimiter.
Generally, you choose the double quote symbol (") as text qualifier. To check this, you can click Back and see which character encloses the values in the preview of your CSV file.
In our case, all numbers with a thousands separator (which is also a comma) are wrapped in double quotes like "3,392", meaning they will be imported in one cell. Without specifying the double quote sign as the text qualifier, the numbers before and after a thousands separator would go into two adjacent columns.
To make sure your data will be imported as intended, look carefully at the Data preview before clicking Next.
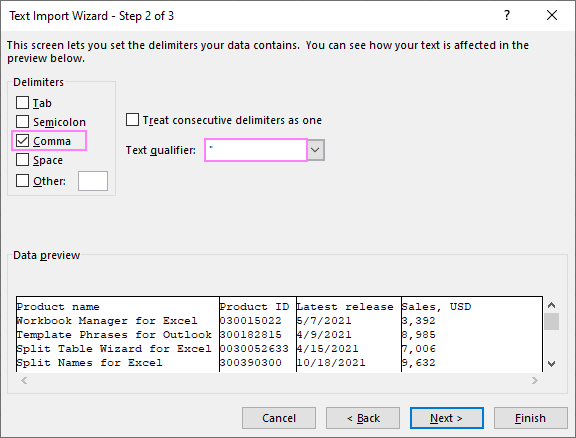
Tips and notes:
- If more than one consecutive delimiter is present in your CSV file, then select the Treat consecutive delimiters as one option to prevent empty cells.
- If the preview shows all data in one column, that means a wrong delimiter is selected. Change the delimiter, so that the values are displayed in separate columns.
- Define data format. The default is General - it converts numeric values to numbers, date and time values to dates, and all remaining data types to text.
To set another format for a specific column, click anywhere within it in the Data Preview, and then choose one of the options under Column data format:
- To keep leading zeros, choose the Text format.
- To correctly display dates, choose the Date format, and then pick an appropriate format in the drop-down box.
When you are happy with the Data preview, click the Finish button.

- Choose whether to import data to an existing worksheet or a new one, and click OK.
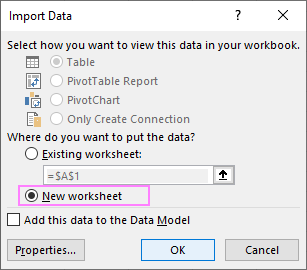
Tips and notes:
- To configure some advanced options such as refresh control, layout and formatting, click Properties… in the above dialog box.
- If some imported data are displayed incorrectly, you can change the format with the help of Excel's Format Cells feature.
Here are a couple of helpful tips on how to prevent automatic data formatting when importing from a text file.
How to enable Text Import Wizard in Excel 2016 - Excel 365
To activate the Text Import Wizard in modern versions of Excel, this is what you need to do:
- Click the File tab, and then click Options > Data.
- Under Show legacy data import wizards, select From Text (Legacy), and click OK.
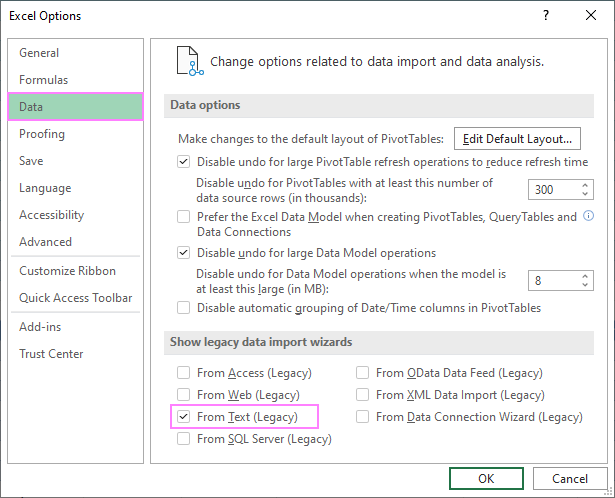
Once enabled, the wizard will appear on the Data tab, in the Get & Transform Data group, under Get Data > Legacy Wizards.
How to transfer CSV to Excel by connecting to it
In Excel 365, Excel 2021, Excel 2019 and Excel 2016, you can import data from a text file by connecting to it with the help of Power Query. Here's how:
- On the Data tab, in the Get & Transform Data group, click From Text/CSV.

- In the Import Data dialog box, select the text file of interest, and click Import.
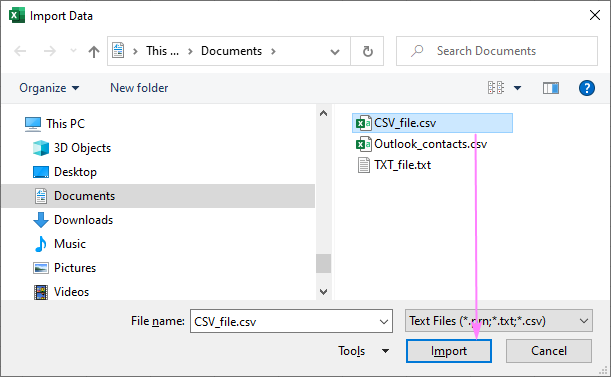
- In the preview dialog box, the following options are available to you:
- Delimiter. Pick the character that separates values in your text file.
- Data Type Detection. You can let Excel automatically determine data type for each column based on the first 200 rows (default) or entire dataset. Or you can choose not to detect data types and have the data imported in the original Text format.
- Transform Data. Loads the data to the Power Query Editor, so you can edit it before transferring to Excel. Make use of this feature to set the desired format for particular columns.
- Load. Controls where to import the data. To get the csv file imported to a new worksheet, select Load. To transfer the data to an existing or new sheet in the form of a table, PivotTable/PivotChart, or only create a connection, choose Load to.

Clicking the Load button will import the CSV data in the table format like this one:

The imported table is linked to the original CSV document, and you can update it anytime by refreshing the query (Table Design tab > Refresh).
Tips and notes:
- To change the table to a normal range, right-click any cell, and then click Table > Convert to Range. This will permanently remove the query from the sheet and disconnect the imported data from the original file.
- If values in a certain column are imported in a wrong format, you can try fixing it yourself by converting text to number or text to date.
Converting CSV to Excel: opening vs. importing
When Microsoft Excel opens a .csv file, it uses your default data format settings to understand how exactly to display each column of text data. This works fine in most situations.
If your text file has specific values and you want to control how to display them in Excel, then do importing rather than opening. Here are a few typical use cases:
- The CSV file uses different delimiters.
- The CSV file contains different date formats.
- Some numbers have leading zeroes that should be kept.
- You want to see a preview of how your CSV data will be converted into Excel.
- You are looking for more flexibility in general.
How to save CSV file in Excel
Whichever conversion method you used, you can save the resulting file like you normally would.
- In your Excel worksheet, click File > Save as.
- Browse for the folder where you want to save the file.
- To save as an Excel file, select Excel Workbook (*.xlsx) from the Save as type drop-down menu. To save as a comma-separated file, select CSV (Comma delimited) or CSV UTF-8.
- Click Save.

If you saved a CSV file in the .xls format in earlier versions, then in Excel 2010 and higher you may encounter the error "The file is damaged and cannot be opened". Try to follow these recommendations to open a corrupt .xls file.
How to open multiple CSV files in Excel at once
As you probably know, Microsoft Excel allows opening several workbooks at a time using the standard Open command. This also works for CSV files.
To open multiple CSV files in Excel, here are the steps for you to follow:
- In your Excel, click File > Open or press the Ctrl + O keys together.
- Click the Browse button and navigate to the source folder.
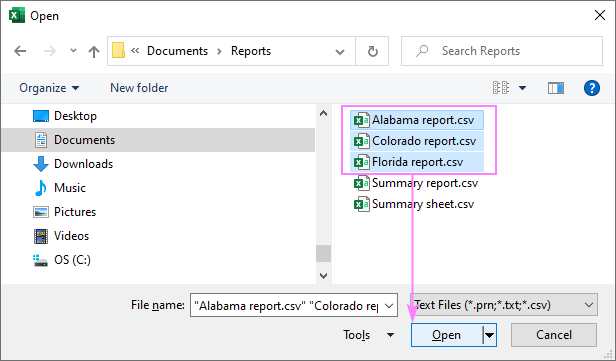
- In the drop-down list next to the File name box, select Text Files (*.prn, *.txt, *.csv).
- Select your text files:
- To select adjacent files, click the 1st file, hold down the Shift key, and then click the last file. Both of the clicked files as well as all the files between them will get selected.
- To select non-adjacent files, hold down the Ctrl key and click each individual file you want to open.
- With multiple files selected, click the Open button.
In Windows Explorer, you can right-click the selected files and pick Open from the context menu.
This method is straightforward and quick, and we could call it perfect but for one small thing - it opens each CSV file as a separate workbook. In practice, switching back and forth between several Excel files may be quite inconvenient and burdensome. Instead, you can have all files imported into the same workbook - the detailed instructions are here: How to merge multiple CSV files into one Excel workbook.
Hopefully, now you are able to convert any CSV files to Excel with ease. And thank you for your patience everyone who has read this tutorial to the end :)
 by
by
97 comments
nice
Hi all,
I am trying to set multiple Delimiters when importing a CSV file via the 'From Text/CSV' function in the data tab. It seems I am on the 2016 Excel version.
As shown in the above instructions 'How to transfer CSV to Excel by connecting to it' paragraph 2.1 'In the preview dialog box, the following options are available to you' I get thesame dropdown function in the Delimiter box. There I select 'Custom' so I can enter the variable to use as delimiter.
It seems I can only enter 1 variable as delimiter. Is there a possibility to have multiple delimiters entered there?
Thank you in advance!
Thank you for helpful information, it worked for me! :)
It worked, thank you so much
Thank for this useful information
Thank you soooooooooooooooo much
Hello sir!!, How we can import csv file to wordpress while we measure particular unit by per pieace
Hello!
If you have a specific question about the operation of a function or formula Excel, I will try to answer it. Look for advice on WordPress on special sites.
These directions indicate that you can import CSV files into individual sheets. But the icon is now called "Consolidate Sheets" and it only does calculations on the multiple files, it doesn't actually import. Can this product import multiple CSV files into individual sheets on one workbook? The screen shots shown in the directions above do not seem to exist anymore.
Hi Jeffrey,
You are right, the instructions and screenshots were from an older version, sorry for this. We have just updated that part.
In the current version of our Ultimate Suite, there is another tool, named Copy Sheets, that can import individual worksheets into one workbook. It works with CSV files too.
Good Job, it work :)
We are using Excel 2016. I have an odd situation, where a third party requires pipes (|) around text data rather than the usual double quotes. I can't seem to get Excel to allow me to choose the pipe as a text qualifier on importing. The default choices are limited to double quote, single quote, and {none}. How can I get the | added to the list?
Hello Scott!
If I understand your problem right, you can open your CSV file in any text editor, e.g. Notepad, and change any symbols in it with the Search and Replace instrument. For example, | to ; and the other way round.
I hope it will solve your problem.
Hi, need help.
I was working on CSV file, and did few formulas. but when I Saved, Closed, and then reopened the file, the formulas disappeared and the numbers was shown as a text. please advise how can i retrieve these formulas, as I do not want to repeat my work again.
thanks,
Hello Samer!
You see, CSV stands for comma-separted values. In other words, it is a simle text file thus no formulas can be entered there. If you want to save your formulas, please convers your .csv into .xlsx or .xls format.
I hope it’ll be helpful.
fantastic
Dear Sirs/Madam,
I am trying to upload csv file but it comes to our data system. But the error happen.
It say "fist line must be header".
Could you please help to to overcome it?
Thanks
Extremely helpful stuff!! Now, how do I get the
"Consolidate Worksheets" add-on?? It wasn't in
the list of "Get Add-ins".
Hi Brian,
Consolidate Worksheets is our own add-in and it's included in our Ultimate Suite for Excel. You can find more info and download a trial version from this page:
https://www.ablebits.com/excel-suite/consolidate-data.php
When import csv into excell how to excel in currency excel table (HRK) after number?
Of course - Column data format: General. Of course I can do this cell by cell, but it takes a long time and creates a possibility of error.
Thank you in advance, Krešimir
Thank you.
I would like to generate http:// and file:// links in my CSV files and have them active links when imported in to Excel. Such as a script that builds a .csv list of files in a directory structure with information in other columns that can be sorted or filtered, allowing quick access to these files from the spreadsheet.
Many thanks in advance.
When I import a csv file, I see in the preview the comma as decimal separator, as it should be, so all ok. But when I click finish, the result is terrible, instead of 5,458170215980170 it gives 5.458.170.215.980.170, so with thousands separator. How to fix this?
Thanks in advance.
Спасибо, Светлана! Очень помогли!
hi,
i have a notepad file and i am able to import the data in excel.
now, this notepad file contains a trigger word "end" at several places.
while importing, can i have some option in excel which will create a new sheet when this particular trigger word is found.