The tutorial will teach you how to quickly add multiple checkboxes in Excel, change the check box name and formatting, as well as delete one, several or all checkboxes on a sheet.
In last week's tutorial, we stared to discuss Excel Check Box and showed a few examples of using checkboxes in Excel to create a beautiful checklist, conditionally formatted To-Do list, interactive report and a dynamic chart responding to the checkbox state.
Today, we will be focusing mostly on technicalities and how-to things. Of course, this information is not as exciting to learn as practical examples, but it will help you create and manage your Excel checkboxes in the most efficient manner.
Check Box Form control vs. Check Box ActiveX control
Microsoft Excel provides two types of controls - Check Box Form control and Check Box ActiveX control:
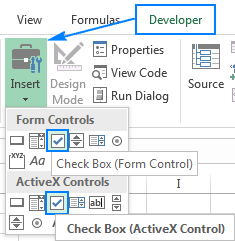
Form controls are much simpler than ActiveX, and you will want to use them in most cases. If you decide to go with Check Box ActiveX controls, here's a list of the most essential differences for you to consider:
- ActiveX controls provide more formatting options, you may want to use them when you look for a sophisticated and flexible design.
- Whereas Form controls are built into Excel, ActiveX controls are loaded separately and therefore they may occasionally freeze or "misbehave".
- Many computers don't trust ActiveX by default, as the result your Check Box ActiveX controls may be disabled until you have enabled them manually via the Trust Center.
- Unlike Form controls, Check Box ActiveX controls can be accessed programmatically via the VBA editor.
- ActiveX is solely the Windows option, Mac OS doesn't support it.
How to add a checkbox in Excel
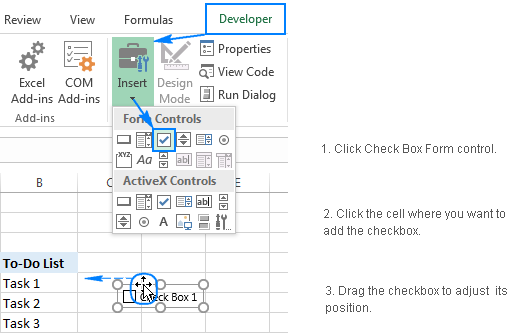
To insert a checkbox in Excel, do the following:
- On the Developer tab, in the Controls group, click Insert, and select Check Box under Form Controls or ActiveX Controls.
- Click in the cell where you want to insert the checkbox, and it will immediately appear near that cell.
- To properly position the check box, hover your mouse over it and as soon as the cursor changes to a four-pointed arrow, drag the checkbox to the desired position.
- Optionally, delete or change the caption text.
Note. If you don't have the Developer tab on your Excel ribbon, right click anywhere on the ribbon, then click Customize the Ribbon… The Excel Options dialog window will appear, and you check the Developer box in the right hand column.
How to insert multiple checkboxes in Excel (copy checkboxes)
To quickly insert multiple check boxes in Excel, add one checkbox as described above, and then copy it using one of the following techniques:
- The fastest way to copy a checkbox in Excel is this - select one or several checkboxes, and press Ctrl + D to copy and paste it. This will produce the following result:

- To copy a checkbox to a specific location, select the checkbox, press Ctrl + C to copy it, right-click the destination cell, and then select Paste in the pop-up menu.

- To copy a checkbox into adjacent cells, use the arrow keys to select the cell containing the checkbox (not the checkbox itself!), and then drag the fill handle (a small square at the lower right-hand corner of the cell) down or to the right.
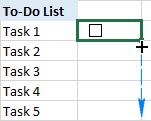
Notes:
- The caption names of all the copied checkboxes are the same, but the backend names are different since each Excel object has a unique name.
- If the original checkbox is linked to a cell, all of the copied checkboxes will be linked to the same cell. You will have to change the linked cell for each checkbox individually.
How to change the checkbox name and caption text
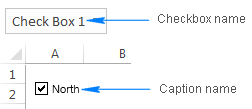
When using checkboxes in Excel, you should distinguish between the check box name and caption name.
The caption name is the text you see in a newly added checkbox such as Check Box 1. To change the caption name, right click the checkbox, select Edit Text in the context menu, and type the name you want.
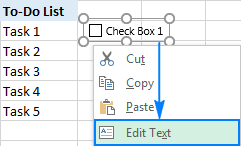
The checkbox name is the name you see in the Name box when the checkbox is selected. To change it, select the check box, and type the desired name in the Name box.
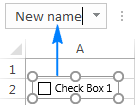
Note. Changing the caption name does not change the actual name of the checkbox.
How to select a checkbox in Excel
You can select a single checkbox in 2 ways:
- Right click the checkbox, and then click anywhere within it.
- Click on the checkbox while holding the Ctrl key.
To select multiple checkboxes in Excel, do one of the following:
- Press and hold the Ctrl key, and then click on the checkboxes you want to select.
- On the Home tab, in the Editing group, click Find & Select > Selection Pane. This will open a pane in the right-hand side of your worksheet that lists all of the sheet's objects including checkboxes, charts, shapes, etc. To select multiple checkboxes, just click their names on the pane holding the Ctrl key.
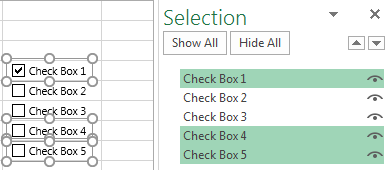
Note. The names displayed on the Selection pane are the checkboxes names, not caption names.
How to delete a checkbox in Excel
Deleting an individual checkbox is easy - select it and press the Delete key on your keyboard.
To delete multiple checkboxes, select them using any of the methods described above, and hit Delete.
To delete all checkboxes at a time, go to the Home tab > Editing group > Find & Select > Go To Special, select the Objects radio button, and click OK. This will select all the check boxes on the active sheet, and you simply press the Delete key to remove them.
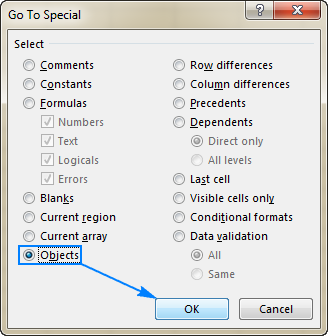
Note. Please be careful when using the last method because it will delete all the objects in the active sheet, including checkboxes, buttons, shapes, charts, etc.
How to format checkboxes in Excel
The Check Box Form control type does not allow many customizations, but certain adjustments can still be made. To access the formatting options, right-click the checkbox, click Format Control, and then do any of the following.
On the Color and Lines tab, you can select the desired Fill and Line:
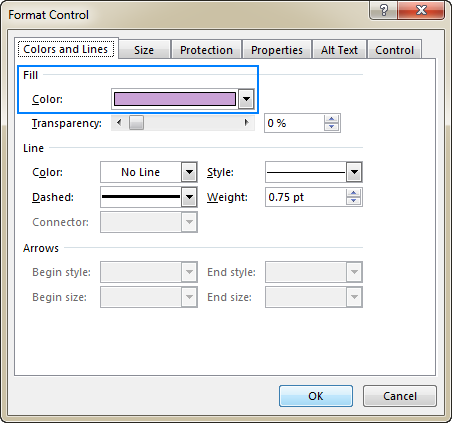
No other changes are allowed for a Check Box Form control in terms of formatting. If you need more options, e.g. setting your own font type, font size, or font style, use a Check Box ActiveX control.
The Size tab, as its name suggests, allows changing the size of the checkbox.
The Protection tab allows locking and unlocking checkboxes. For the locking to take effect, you need to protect the sheet.
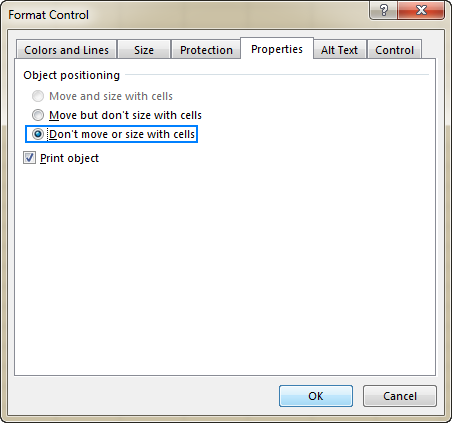
The Properties tab lets you position a checkbox in a sheet. The default setting - Move but don't size with cells - ties the check box to the cell where you've placed it.
- If you want to fix the position of a checkbox in the sheet, for instance at the very top of the sheet, select the Don't move or size with cells option. Now, now matter how many cells, rows or columns you add or delete, the checkbox will stay where you put it.
- If you want the checkbox to be printed when you print out a worksheet, make sure the Print object box is selected.
On the Alt Text tab, you can specify the Alternative text for the checkbox. By default, it is the same as the checkbox's caption name.
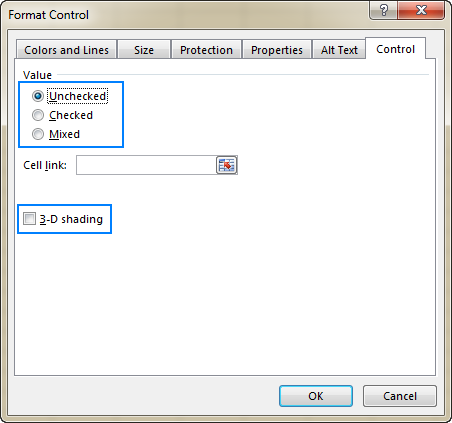
On the Control tab, you can set the initial state(default state) for the check box such as:
- Checked - displays a check box filled with a checkmark.
- Unchecked - displays the check box without a check symbol.
- Mixed - displays a check box filled with shading that indicates a combination of selected and cleared states. It can be useful, for example, when creating nested checkboxes using VBA.
To give a slightly different look to the check box, turn on 3-D shading.
To link a checkbox to a certain cell, enter the cell address in the Cell link box. You can find more about linked cells and what advantages this gives to you here: How to link checkbox to cell.
This is how you can add, change or delete a checkbox in Excel. If you are looking for real-life examples of using checkboxes in Excel, please check out the following resources.
 by
by
36 comments
I copied rows of data from QuickBooks and pasted it into Excel 365. Every row has a checkbox. I've tried going to "Special" but nothing happens...no dialog box with a list of special items, so I cannot delete them. I've also tried Find & Select > Selected Objects, but it doesn't select any of them. Any ideas what I can try? Thanks
I saved the file, closed it, and then reopened it. Then the Select & Find > Go to Special dialog box appeared and the selection of objects worked perfectly. Thanks.
Hello,
I would like to know if there is a way to have 2 sets of checkbox and if I select the 1st, the 2nd will be automatically grayed out? or does it need to have VBA script?
All the best!
Gail
or use radio buttons instead...
Hi!
Yes, this is possible with VBA.
This does not seem to have a practical use for me.
When I click and drag the cell, it does copy the checkbox, but if the checkbox has a reference cell, then all the checkboxes remain the same - i.e. when you select one of them, then all of them get selected.
This is what I'm having trouble with too. It seems that when you copy formatting of one object, the linked cell remains the same across all of them with no way to do a series fill in regard to the linked cell. I have racked my brain trying to find a way to make this an efficient action when working with a large table of check boxes, but I just can't seem to find a solution other than creating a cell link for each one individually
Hi Svetlana,
Looks like this question has been asked many times and I was wondering if you coould give us a little direction, please. I am copyingthe questiond from a previous user as it is consise:
We add a checkbox and link it to cell C1.
We drag it down until cell C100.
Unfortunately all the checkboxes are linked to cell C1.
Is there a way to drag the checkboxes until cell C100 and each one to have a different link?
We'd really appreciate your feedback.
Thank you.
Art
Hi Art,
To my best knowledge, this cannot be done automatically. How can Excel know what cells you wish the copied checkboxed to be linked to? Of course, nothing prevents you from changing the linked cell for each individual checkbox after copying.
In my view, Excel should be smart enough to allows you to drag and drop checkboxes and populate the linked cell to the same relative cell so if the check box is place in the position of cell D2 and linked to cell c2, if you have 1000 rows that need a check box, you should be able to drag the check box down 1000 rows and have it automatically populate the links with corresponding adjacent row C values (C3, C4, ... C1001). Of course with thousands of programmers such conveniences are below them. Forgive my sarcasm but with the average of size of data more and more frequently exceeding a million rows and a 5000 columns, Excel has not matured substantially in decades.
Dear Svetlana, if we have so many checkboxes it is very time-consuming to do it step by step... You are saying that there is no way to multiple format cells (like said above - in the same row -if B1 is linked to C1, then automatically link B2 to C2, B3 to C3...? Thanks in advance, Ivana
Dear Ivana,
I totally agree with you - it's very inconvenient and time-consuming to edit each individual checkbox. Unfortunately, I don't know a way to do this automatically. Even if you change an absolute cell reference to relative, the copied checkboxes are still linked to the same cell. If you manage to find a way, please do share your finding here!
please share when you find a solution. Ive been searching for this for weeks!
I found selecting multiple checkboxes quite clunky and difficult. An easier, albeit brute force, way to delete multiple checkboxes:
1. select cells
2. Ctrl+x
3. Ctrl+v into a separate and new sheet
4. Delete sheet
Ahh, much less frustrating!
You, sir, are a genius!
Absolutely brilliant!
Thank you , at last someone could explain to me how to get rid of check boxes.
Straightforward and easy. Thank you
Hi Gary,
To delete individual checkboxes, select them (hold the Ctrl key and click on the checkboxes), and then press the Delete key on your keyboard.
More people had asked the same thing and if you know it would be good to answer.
We add a checkbox and link it to cell C1.
We drag it down until cell C100.
Unfortunately all the checkboxes are linked to cell C1.
Is there a way to drag the checkboxes until cell C100 and each one to have a different link?
C "previous" + 1 ??
Hi, has anyone found a solution to this problem?
Hi Svetlana,
I have a couple questions.
Do you know how to resize checkbox that contains the check mark only and not where the text is written.
I have a couple checkbox on my form, but I need to remove only one. I'm unable to grab checkbox and remove it. Please advise how to do it.
Thank you.
Use the control button when trying to click the check box. This should allow you to select and edit rather than make the check mark appear/disappear.
is it possible to use a checkbox as a filtering mechanism. for instance, i have several columns in which a box is checked if the criteria is met for that row. for example in this spreadsheet for political supporters, i have columns for Veterans, 2nd Amendment, Women, State Party Member, etc. I would like to put a checkbox at the top of each column, that when checked, would then filter the display to only show those rows that have been checked for that criteria. that way i can see only the veterans, or only the women, etc.
Change the range to a table, then use the filter buttons at the top of each column to select only those records you want to see.
Hi
I have linked a cell to a check box so that when its ticked the linked cell goes green. The check box is positioned over on the linked cell.
I have dragged that cell down about 100 times so the following 100 cells share the same format and cell locations, etc.
My problem is that since ive dragged down from, say cell A1, all the following check boxes copy A1's checkbox.
So if i tick A1 checkbox, all other check boxes go ticked.
Is there a way I can link each check box to the cell its above without having the manually change each one in the format settings?
Ive tried writing it as $A1 and then dragging so the numeric part isn't fixed with a dollar sign but no luck.
I too have this issue and I can't find a solution anywhere!
Hello!
We have already written that the reference to a cell inside a checkbox does not change when it is copied or moved.
I have this problem too, it sucks that I have to change the lined cell manually
I also have the same question. Its a shame this question still has not been answered.
Hey David, did you find a solution yet on how to solve this problem?
I have the same problem and can't find a solution.
Me too :(
A question about inserting check boxes in multiple rows.
Can I use a conditional formatting to have a check box be inserted in a cell if certain conditions are met in other columns?
Hi Michael,
It's not possible. With conditional formatting, you can only change the formatting of a cell such as fill or font color, border, etc.
Useless. No more than the most basic information provided by Microsoft already. Why waste the time to duplicate and post it?
Then why are you here... To complain?
Hello David,
This post is for beginners, and yes, it only explains the basics. We also have a few examples that show how to use check boxes to create a to-do list (completed tasks with the strikethrough format), interactive report and dynamic chart. Hope you will like these examples better.