Three ways to create an email template with variables, text field or dropdown list that will ask for the values to fill in before sending out an email.
If replying to repetitive emails is part of your daily routine, then most likely you are using Outlook templates to automate this part of your work. But what if your template contains some variables that you need to change before an email goes off. Editing data manually is not the best way, as there is always a chance you may forget to update some important details. So, the question is - how do I create a template that will prompt me to enter the information and automatically insert it into the appropriate place in a message? The get the answer, please continue reading :)
Make Outlook email template with variables using VBA
This example shows how to insert variable information in an email template using a macro. To keep things simple, I've created this small template with two fields to enter in a message body, [date] and [percent].
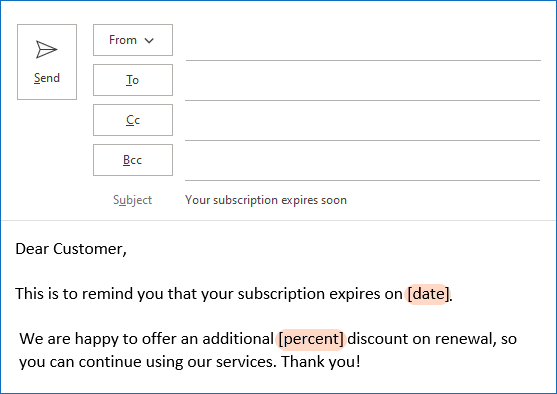
And here is the VBA code that will ask for the values to fill in based on the subject of the email:
For each variable mentioned in the code, a separate input box will be displayed:

The values you enter in the boxes will appear exactly where they should in the message:
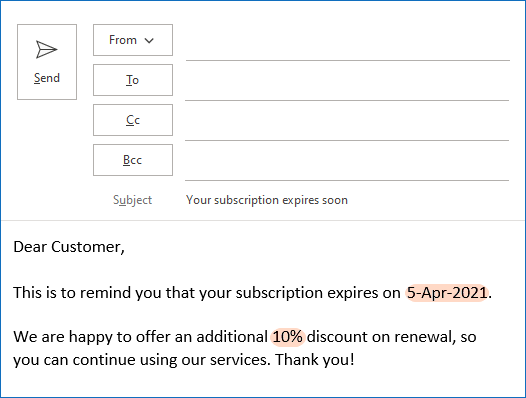
How this macro works
There are two key points in the code that you should take notice of:
- The template is identified by its subject. In our case, it's " Your subscription expires soon". Be sure to replace this text with the subject of your template.
- In our sample code, there are two placeholders, [date] and [percent]. You can modify them as needed. Please pay attention that there are 4 instances of each placeholder in the code, not counting comments, and all of them should be replaced with your own placeholders. If you have more variables, then add a similar block of code for each of them (please see the code parts with the corresponding comments).
How to create an email template with variables using the macro
Here's a short summary of the steps to make an email template with variables and send a message based on the template:
- Create a new email, insert the text in the message body, put placeholders where needed, and fill in the Subject line with some unique text that is going to be used only in the subject of this specific template.
- Save your message as Outlook template (*.oft). For the detailed instructions, please see How to create an email template in Outlook.
- Press Alt + F11 to open the VBA editor, paste the macro's code into the ThisOutlookSession module, and save the project (Ctrl + S).
- Restart Outlook.
- Create an email message based on the template you've just created. The detailed steps can be found here: How to send a message based on an email template.
- In each input box, type the value you are asked for.
- Review the finalized message and hit Send.
Email template with variables not working
If the VBA code does not work as expected or does not work at all in your Outlook, it's likely to be one of these reasons:
- You have not restarted Outlook after inserting the code in the VBA editor. Outlook restart is required to execute the code in the Startup event handler.
- Mail.Subject in your code does not correspond to the subject of your template.
- The placeholders in the code are not exactly same as in your template.
- Irrespective of how many macros there are in the ThisOutlookSession module, the first two lines of our code (Private WithEvents...) should be in the General declarations section at the top of the Code window, before any other code.
- Macros are disabled in your Outlook. To check this, click File > Options > Trust Center > Trust Center Settings > Macro Settings and select either:
- Notifications for all macros
- Enable all macros (not recommended)
Please be aware that the second option allows all macros to run, including potentially malicious codes, so it is safer to choose the first one.
Create Outlook email template with fillable fields
Now, let's explore a different approach to the same task. This time we are going to use our own tool named Shared Email Templates for Outlook. If you have never heard of it before, here is a one-sentence intro:
Shared Email Templates is an Outlook add-in to quickly create your own collection of templates with predefined or fillable fields, custom formatting, images, and attachments.
What makes it different from. oft templates? This example will show you :)
With Shared Email Templates installed in your Outlook, carry out these steps to create a fillable template:
- On the add-in's pane, select the target folder and click the New Template button.
If the text you want to include in your template is in the message you are composing, select that text, and then click New Template. The selected text will be inserted into your template automatically.
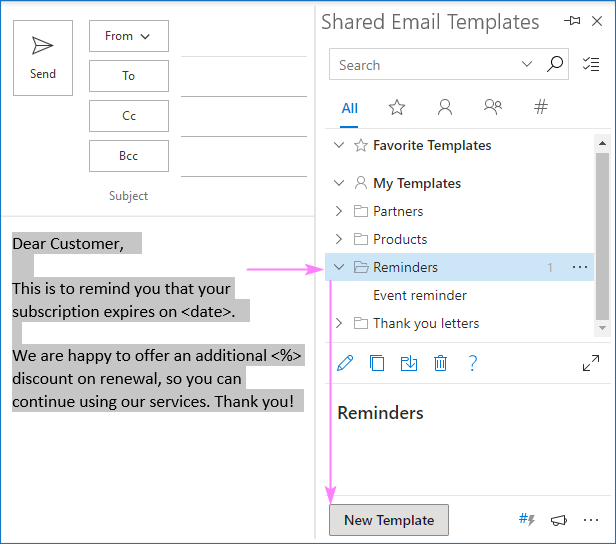
- If we wanted a simple text template, we could click Save right away, and our job would be completed. But you do want a field where you can enter some information, so it will be automatically inserted in the appropriate place in the message, right? So, let's go make the first one.
In the template's text, select your placeholder (<date> in our case), and click the Insert Macro button. If there is no placeholder in your template, then put the cursor exactly where your value should be inserted.

- In the list of macros, find WhatToEnter and click on it.

- Choose the field type (Date in our case), type the window title (usually, some meaningful name for the value to enter) and click Insert.

- As the result, a properly configured macro is inserted in your template as shown in the screenshot:

You can now save your template or add a few more macros if you have more than one fillable field.
- As our template has one more placeholder (<%>), we select it and click the Insert Macro icon again. This time we choose Text in the first box, type the corresponding window title, and click Insert.
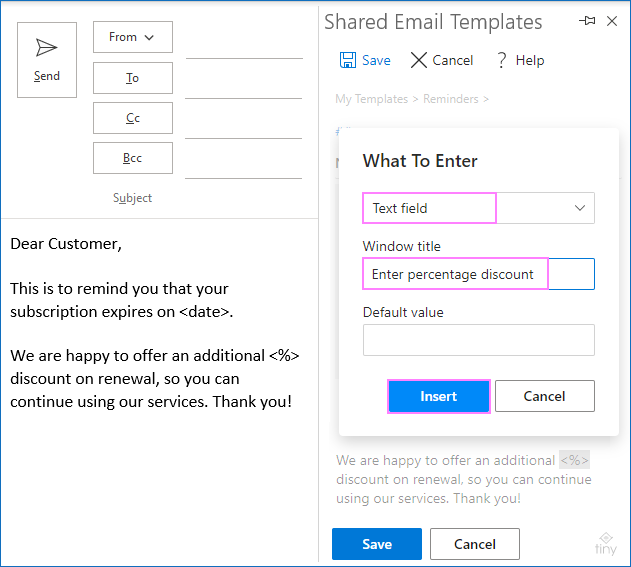
- Apply some formatting to your template if needed, name it and save.
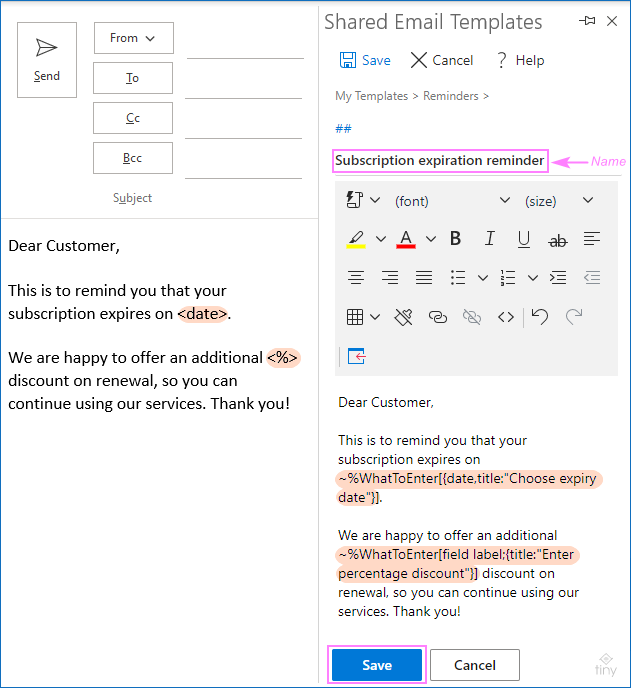
Done! Your fillable email template for Outlook is good to go.
Note. Shared Email Templates macros are not VBA macros. They are kind of placeholders in a template that are replaced with corresponding values in a message. All functional code is executed on the add-in's side, so there is no need to enable macros in your Outlook.
How to use an email template with input fields
Preparing an email template for sending out is as easy as it could possibly be. To insert a template into a message, double-click on it or click the Paste icon on the left.
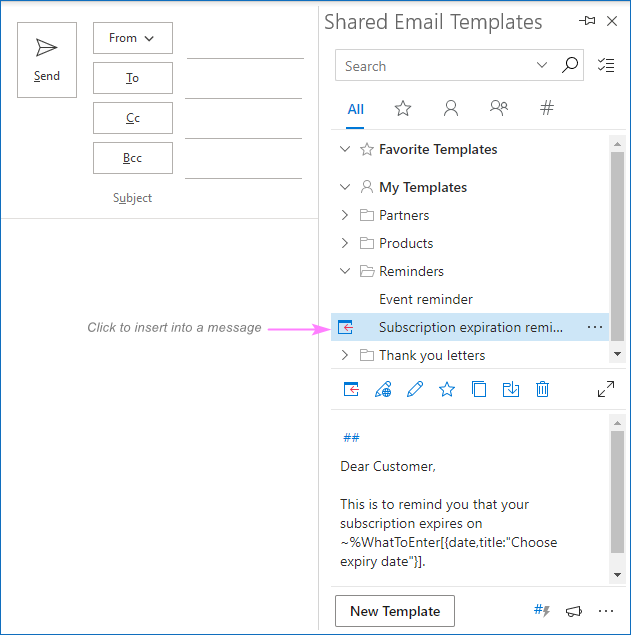
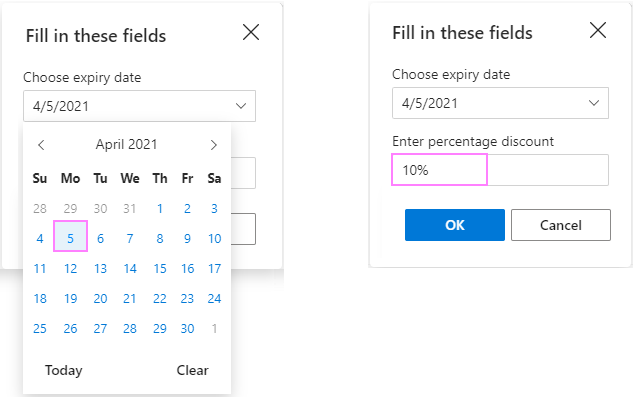
A small form will show up asking you to pick a date from a dropdown calendar and enter a percentage discount in the text box:
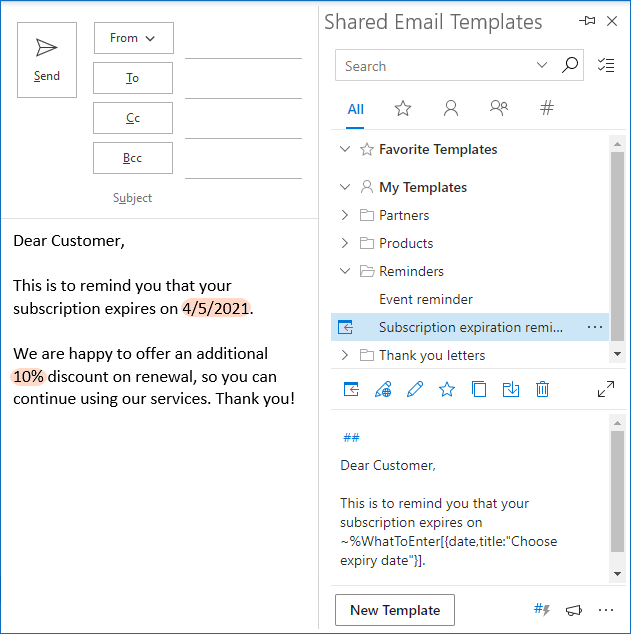
A moment later, your message with all the necessary information is ready to be sent:
Tip. Want to automatically fill in the Subject line or To, Cc and Bcc fields? Shared Email Templates macros can do all this and a lot more things!
Insert dropdown in Outlook email template
The steps to add a dropdown list to your email template are the same as described above. The only difference is step 4 where you configure the What To Enter fields:
- In the first box, choose Dropdown list.
- In the Window Title box, put some text that will remind you what kind of value you will be selecting (Number of days before expiry in our case).
- In the Items box, type the dropdown values one per line.
To be able to enter a value other than in the dropdown list, select the User can edit selected items checkbox. To limit the input to the predefined items, leave this box unselected.

The finalized macro that will trigger our dropdown list takes this form:
~%WhatToEnter[3;5;10;{title:"No. of days before expiry",editable}]
If any changes are needed at a later point, you can edit the dropdown items directly in the template without recreating the macro from scratch.
In a similar fashion, we insert one more macro for the percentage discount. In this case, we limit the choices to only the items in the drop-down list (the User can edit selected items checkbox is unselected):

After all these customizations, our Outlook email template with two dropdown lists looks as follows:

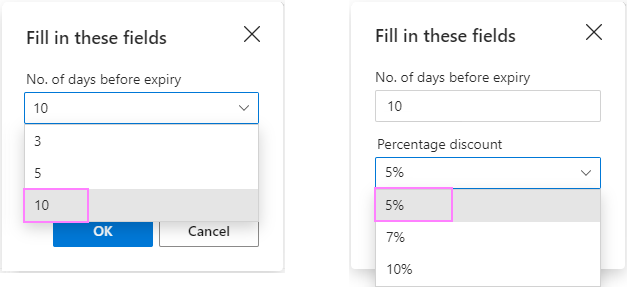
When inserting the template in a message, the following form will appear asking you to select both values:
Tip. To add other types of drop-down menus to you templates, please check out these examples:
It is also possible to insert user-specific text, images, and attachments in each individual message automatically. This tutorial explains how: How to create dynamic Outlook email template for current user.
This was a quick demonstration of just one capability of Shared Email Templates. You can find plenty more useful features on the above linked page. Curious to give it a try? Download a free version from Microsoft AppSource.
That's how you can create an email template with fillable or dropdown fields. Thank you for reading and hope to see you on our blog next week!
Available downloads
Why Shared Email Templates? Top 10 reasons (.pdf file)
 by
by
30 comments
Can someone please let me know what I am doing wrong?
Private WithEvents m_Inspectors As Outlook.Inspectors
Private WithEvents m_Inspector As Outlook.Inspector
Private Sub Application_Startup()
Set m_Inspectors = Application.Inspectors
End Sub
Private Sub m_Inspectors_NewInspector(ByVal Inspector As Outlook.Inspector)
If TypeOf Inspector.CurrentItem Is Outlook.MailItem Then
'Handle emails only
Set m_Inspector = Inspector
End If
End Sub
Private Sub m_Inspector_Activate()
Dim Item As MailItem
Dim Value As String
If TypeOf m_Inspector.CurrentItem Is MailItem Then
Set mail = m_Inspector.CurrentItem
'Identify the message subject
If mail.Subject = "TFS Service call closure report" Then
'Check message format
If mail.BodyFormat = OlBodyFormat.olFormatPlain Then
'Replace [Name] with the entered value
If InStr(mail.Body, "[Name]") > 0 Then
Value = InputBox("Enter the customer name")
mail.Body = Replace(mail.Body, "[Name]", Value)
End If
'Replace [Instrument] with the entered value
If InStr(mail.Body, "[Instrument]") > 0 Then
Value = InputBox("Enter the Instrument")
mail.Body = Replace(mail.Body, "[Instrument]", Value)
End If
'Replace [Call] with the entered value
If InStr(mail.Body, "[Call]") > 0 Then
Value = InputBox("Enter Call number")
mail.Body = Replace(mail.Body, "[Call]", Value)
End If
'Replace [Description] with the entered value
If InStr(mail.Body, "[Description]") > 0 Then
Value = InputBox("Enter the Description")
mail.Body = Replace(mail.Body, "[Description]", Value)
End If
Else
'Replace [Name] with the entered value
If InStr(mail.HTMLBody, "[Name]") > 0 Then
Value = InputBox("Enter the customer name")
mail.HTMLBody = Replace(mail.HTMLBody, "[Name]", Value)
End If
'Replace [Instrument] with the entered value
If InStr(mail.HTMLBody, "[Instrument]") > 0 Then
Value = InputBox("Enter the Instrument")
mail.HTMLBody = Replace(mail.HTMLBody, "[Instrument]", Value)
End If
'Replace [Call] with the entered value
If InStr(mail.HTMLBody, "[Call]") > 0 Then
Value = InputBox("Enter Call number")
mail.HTMLBody = Replace(mail.HTMLBody, "[Call]", Value)
End If
'Replace [Description] with the entered value
If InStr(mail.HTMLBody, "[Description]") > 0 Then
Value = InputBox("Enter the Description")
mail.HTMLBody = Replace(mail.HTMLBody, "[Description]", Value)
End If
End If
End If
Set mail = Nothing
End If
End Sub
Formatting is lost but here is the fix:
Problem:
The template is saved as an *.oft
When loading the template the inputboxes appear (after enabling macro with notification)
When finished, all formatting of the template is gone. bold text, H2 & H3 is converted to plain text.
This is because the mail.Body holds the clear-text body of the Outlook item.
Replacing all instances of mail.Body -> mail.HTMLBody keeps the formatting in place for me.
Example of if statement after changes:
'Replace [aanhef] with the entered value
If InStr(mail.HTMLBody, "[aanhef]") > 0 Then
Value = InputBox("Voer Aanhef in: Heer, Mevrouw of Heer/Mevrouw")
mail.HTMLBody = Replace(mail.HTMLBody, "[aanhef]", Value)
End If
hi, my email templates in outlook are working fine. But have now found that when i set up a new template using VBA, with a document attachment added it comes up with a run time error, an object could not be found. If I redo the template and remove attachment it works fine.
Has something changed in outlook?
any help appreciated
Hi Simon,
There is nothing in our code that could impact attachments, and I am not aware of any changes in Outlook that could potentially affect this. May it be that you have a third-party add-in(s) installed or some other VBA code added in your Outlook?
Hi
Your VBA is amazing. How do i make it so that no matter what text i enter, it comes out all CAPS?
Hi Fred,
To have the text output all CAPS, wrap each instance of the InputBox function in your code in UCase$ like this:
Value = UCase$(InputBox("Enter the expiry date"))
There are 4 such instances in our code.
I'm having issues with the Cancel button on the prompts. It just keeps cycling through the prompts rather than canceling and closing the template\email form. How do I resolve this?
Hi Kevin,
That was a bug in our code, sorry for this. It is fixed, and the updated version is published. Thank you for pointing this out for us!
Hi LIz, your VBA works great for my templates. I have one minor problem. Once am done filling all of my input boxes and it presents my email, it changes my font size and color. On my template I have certain sentences with red letters and a bigger sized font to draw attention. The VBA seems to strip all of that out. Any way to get around that?
Hi Curtis,
From all appearances, your code replaces some html tags or attributes with text. What placeholders do you use in your code and what values do you enter in the input box(es)?
Hello,
I am also having an issue with an error in the top declarations portion of the code:
Private WithEvents m_Inspectors As Outlook.Inspectors
Private WithEvents m_Inspector As Outlook.Inspector
Is there perhaps a specific reference or library that I need to turn on?
Hello, I tested your skript a few weeks ago and it worked perfectly.
Now I want to implement it and the exact skript in this article returns a syntax error.
Line 15 is marked in yellow in the debugger and the cursor is set to line 31.
Do you have any information about this?
Hi Jens,
Our new code editor mangled the code, aargh... Sorry for this. The code is fixed, please copy the updated version. My apologies for the inconvenience.
Hi, is there any way to add the HTML to the code to make certain fields bolded in the final email?
For example, if one of my placeholders is [day], and I want the value I type to appear bolded in the email text, is there a way to do this in the code?
Hi Vickie,
No changes in the code are really needed. Simply, apply the bold format to the [day] placeholder in your .oft template.
This was extremely helpful for me, thanks a lot!
Though I have two questions which would make my day if answered
1) I managed to create the fillable fields for one (1) template, but I have a total of 12 templates and it seems to me that I cannot create a new VBA file for each template since its always stored in "ThisOutlookSession". How do I proceed?
2) I works greatly for templates, but what if I want to apply it to regular email replies, meaning: I use building blocks for replies and would like prompt fillable fields. How do I trigger / activate the prompts, similar like with templates (with .oft, the trigger is the subject line, which obviously wouldn't be possible with replies).
Thanks a lot!
I have completely inspected the code, made sure my macros were activated, fixed the bug and it still is not providing me with any pop ups. I am also recieving a red error on some of the code, which I have removed and tried again, with nothing.
Errored:
Private WithEvents m_Inspectors As Outlook.Inspectors
Private WithEvents m_Inspector As Outlook.Inspector
Any thoughts?
Hello!
When copying the code from the webpage, please make sure no extra characters get into your clipboard. Without seeing your code, we are unable to give any other advice, sorry.
I adjusted the adjusted the code and followed everything but when I go to open the macro, it's not opening the form at all. I pasted below the coding for opening the template. There is an error popping up saying "Compile Error: Invalid attribute in Sub or Function." I also adjusted the macro security settings. Please help!
Hi Brittney,
Irrespective of how many macros there are in the ThisOutlookSession module, the first two lines of our code (please see below) should be at the top of the Code window, in the General declarations section:
Private WithEvents m_Inspectors As Outlook.Inspectors
Private WithEvents m_Inspector As Outlook.Inspector
Is that the case?
Having issues creating this. While I am replacing the code to match my placeholders it keeps saying Compile Error: Invalid Outside Procedure.
It just wont work and I don't know why.
Hi Tyler,
Can you please give an example of your placeholder? In particular, do your placeholders contain any special characters, angle brackets, double quotes, etc?
This is exactly what I've been looking for. Thanks for the breakdown!
It is been working great. Thanks! Only one thing thought, I have a couple of templates and if by mistake I choose this one I'm not able to close the template until I type something in the input boxes. Is there any way to fix this?
Hello Pam,
Unfortunately, nothing can be done about it (at least I don't know a way). Just try closing the input boxes without typing anything if you've mistakenly opened a wrong template.
Hi Svetlana,
No worries. I thought it was worth to ask. Thanks again for such a helpful article :)
i have this working fantastic, one thing though - after it runs and gives me my updated email message, it pulls all images out of my signature
Hi Liz,
There was a bug in the code, sorry for this. We used the MailItem.Body property representing the plain text format that does not support images. Adding the MailItem.HTMLBody property has fixed the problem.
Please copy/paste the updated code and restart your Outlook.
Ok I did the VBA code and saved it and closed out of Outlook, when I pull up that template - I get no prompts or input boxes to input the values? What am I missing? Something isn't syncing - I don't know if I didn't restart the right way?
Hi Madeline,
Are macros enabled in your Outlook? Please check File > Options > Trust Center > Trust Center Settings > Macro Settings.
In your VBA code, did you change Mail.Subject corresponding to the subject of your template? Also, please make sure the placeholders in the code are exactly the same as in your template.