Looking for a way to create a drop down list in your email template? What about selecting multiple items? And is it possible to populate a dropdown from a database? You will find all the answers in this tutorial.
Email templates are a great way to save time on routine correspondence. But very often, you still have to manually input some variables when preparing an email to send out. In case you are entering unique data in every message, the optimal solution would be an email template with fillable text fields. When choosing from a predefined set of values, nothing beats a dropdown menu.
Regrettably, there is no easy way to make a dropdown in an Outlook template. Perhaps, you could approach the task by creating a custom form, placing a ComboBox control onto it, and somehow plugging a selected value into a message. But even for an experienced VBA programmer, that isn't a trivial task. Wait… did I say "no easy way"? I meant no easy traditional way :) Put in a little creativity, and you will have a working solution in a moment!
Add dropdown or combo box control to Outlook message
Though it is not possible to create a dropdown box directly in an email message, nothing prevents you from creating it in Word, and then simply copying to Outlook. Because Word is generally used as Outlook's email editor, the copied dropdown will retain all its functionality.
Create a drop down list in Word
Because all the controls reside on the Developer tab, you need to add it to your Word ribbon first. We have the detailed instructions for Excel: how to enable the Developer tab. In Word, it is done exactly the same way.
With the Developer tab activated, carry out these steps to create a drop-down list:
- Open a blank document and type the text of your email template or copy/paste it from Outlook.
- Put the cursor where you want a dropdown menu to appear.
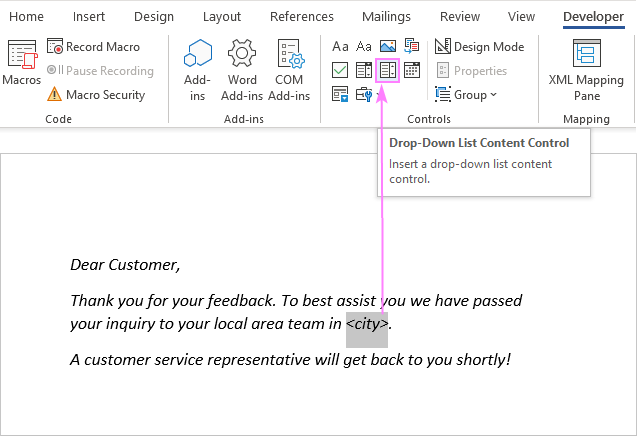
- On the Developer tab, in the Controls group, click either:
- Drop-Down List Content Control - only allows selecting one of the predefined values.
- Combo Box Content Control - a combination of a drop-down list and an editable text box that allows both picking an item from the list and entering a custom value that isn't in the list.
In this example, we'd rather limit the user's input to a predefined set of values, so we are inserting a drop-down control:

- With the control selected, click the Properties button in the Controls group.

- In the Content Control Properties window, click the Add button, then type the first item in the Value box (the Display Name box will get filled automatically), and click OK. Repeat for all other items you wish to include in the list.

- Remove the default "Choose an item", and then click OK to save your list.

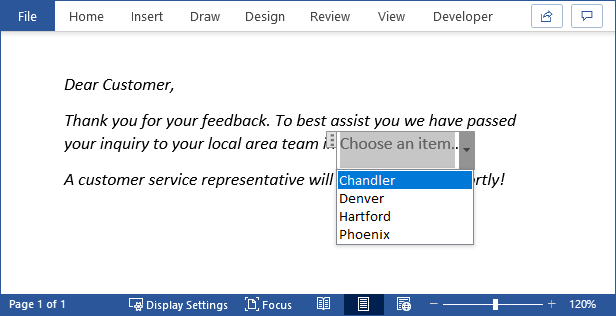
When done, click the arrow in the box to make sure all the items are in place.

Copy drop-down to Outlook message and save as template
In Word, simply select the template's text and drop-down box you've just created, and press Ctrl + C to copy it to clipboard.
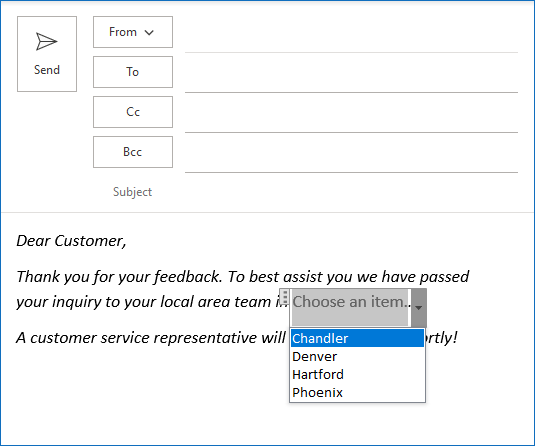
In Outlook, create a new message and press Ctrl + V to paste the copied content. Verify that your list is fully-functional, and all the items are there.

And then, save the message as an email template by clicking File > Save As > Outlook Template (*.oft). If you feel like you need more detailed instructions, please see How to create email templates in Outlook.
To open the template, go to the Home tab > New Items > More Items > Choose Form, and look in User Templates in file System. More details can be found in How to use Outlook email templates.
That was an easy solution, wasn't it? However, it does have a substantial flaw. With a content control in the message body, you won't be prompted to make a selection and may simply forget to pick an item. A lot more convenient would be placing a dropdown on some kind of a form that you cannot miss, and it is exactly what we are going to do next!
Insert dropdown in Outlook email template
In this example, a drop-down list that we create will be displayed on a small form. And the value you pick from the list will be automatically placed into the appropriate part of the message.
Please don't feel intimidated - there will be no VBA and no custom forms. All we need is Shared Email Templates. If you don't have this add-in in your Outlook, you can quickly download a free version from Microsoft AppSource, and then follow the below steps.
To add a dropdown to your Outlook template, this is what you need to do:
- In the template editor, place the cursor where a selected value should appear and click the Insert Macro button.

- In the list of macros, choose WhatToEnter.

- Configure your list in this way:
- In the first box, choose Dropdown list.
- For Windows title, type some descriptive prompt, e.g. Select a city.
- In the Items box, enter the items one per line.
When done, click Insert.

- A properly configured macro is embedded in your template like shown in the screenshot below, and you click Save to keep the changes. Done!

Tip: Personalize your email templates
Shared Email Templates provides a variety of different macros to help your messages sound personal and friendly. For example, to address the recipient by name, you can use ~%InsertRecipientFirstName or ~%InsertRecipientFullName.
Additionally, you can preset any of the email fields such To, Cc, Bcc and Subject. Please see a full list of macros to find out what other things you can automate.
How to use an email template with a drop-down list
To insert a template into a message, click the Paste icon to the left of the template's name or double-click the template:

A mini-form will pop up asking you to pick one of the items from the list:

A moment later, your message is ready to be sent:

Create multiple selection dropdown with checkboxes
As you know, a classic drop-down allows selecting just one value - when you pick another item, it replaces the current selection. But what if you wish to insert several values from the same dropdown into the same message? A multi-select dropdown with checkboxes is the thing you need. And Shared Email Templates makes it possible too!
To add a multi-select dropdown to your message template, use the WhatToEnter macro as described in the previous example. And then, enable the User can select multiple items option and specify the delimiter to separate the items. That's all there is to it!
Depending on the template text, the delimiter could be a comma, space, comma and space, or some word. In our example, it's the conjunction or surrounded by spaces, i.e. " or ".
Optionally, you can also allow the user to edit the selected items.
In the image below, the What to Enter settings on the right demonstrate how to configure an editable multi-select dropdown, and the highlighted placeholder on the left shows the desired outcome:

Clicking the Insert button replaces the placeholder with the following macro:
~%WhatToEnter[Chandler;Denver;Hartford;Little Rock;Phoenix;{title:"Select one or more cities", multiselect, editable, delimiter:" or "}]
And it lets you select as many values as you like:

Also, it shows exactly how your section will appear in the email. If something is wrong, you can make corrections directly in this box, e.g. type a different delimiter for this particular message:

Clicking OK pastes the template's text with all the selected items into an email like shown below:

Populate dropdown list from Excel table
In many situations, "hard-coded" items work just fine. However, when your list continuously changes, such an approach would be a needless waste of time because you'll have to update your template manually with every change. In this case, a far better solution would be to dynamically populate a drop-down list with values from a database. It is especially useful when your template contains several related variables like in this example:

Depending on which city is selected in the dropdown list, the corresponding phone number and email address should be fetched from the database and inserted into a message. Is that even possible? With Shared Email Templates, yes, it is :) Here's how:
- First off, create a dataset in Shared Email Templates or connect to an Excel table or import from a .txt or .csv file. For this example, I've imported the following table from Excel and named my new dataset Regional Offices:

It is important that the leftmost column in the dataset is always the key column - it is these values that will appear in the dropdown (cities in our case).
- In the template editor, place the cursor where you want to plug a value from the dataset, click Insert Macro, and select WhatToEnter.
- Set up your dropdown list as follows:
- In the first box, choose Dataset.
- In the Windows title box, type something that will help you understand what kind of value you are to select.
- Choose the Dataset where to look for the data.
- Pick the Target column to fetch the value from.

Clicking the Insert button will replace the <city> placeholder with the following code:
~%WhatToEnter[{dataset:"Regional offices", column:"City", title:"Select a city"}] - In a similar fashion, we configure 2 more macros for the <phone> and <email> variables. The difference is only in the Target column, which is Phone and Email, respectively.
Eventually, our finalized email template takes the following look:

When using this template, you are only requested to select a city:

All the related data will be pulled from the dataset and pasted into the message automatically!

The real beauty of this method is when the source data changes, you only need to make changes in one place (the dataset), without having to update every template that uses that data.
How to quickly edit a dropdown list in email template
To update an existing list, there's no need to recreate the macro from scratch - you can easily edit the macro's code itself. The below visual explains what each part of the code does:

- Items - are listed within square brackets and separated by semicolons. You are free to delete or change the existing values as well as type new ones.
- Title - can also be changed.
- Multiselect - allows selecting multiple items.
- Editable - allows changing the selected values or entering a value that isn't in the list (combo box behavior). To only allow picking the predefined values (drop-down list behavior), delete "editable".
- Delimiter - one or more characters that separate the items in case of a multi-select dropdown.
Adding dropdown menus is just one of many unique features available with Shared Email Templates. After experimenting a bit, you will discover that there is almost nothing you cannot do. If there is such a thing, please let us know here in comments :)
I thank you for reading and hope to see you on our blog next week!
Available downloads
Shared Email Templates presentation (.pdf file)
 by
by
6 comments
there is no SHARE EMAIL Templates in the microsoft store.
Hello Teresa,
You can download Shared Email Templates from Microsoft AppSource
This one doesn't work on new Outlook.
Hi Joycee,
The first method with the drop-down list control does not work in the new Outlook indeed, as this app does not support .oft templates. However, Shared Email Templates does work in the new Outlook as well as in Outlook on the web.
Hi
Thanks for posting this but the word doc process doesn't work. The only way a dropdown box works is to lock or protect the word doc but then you can't copy the text.
If I copy and past into the email without locking/protecting the word doc then the dropdown box doesn't work. (Ut shows the properties if I double click but doesntoperate)
Hi Will,
In my Word for Microsoft 365 (version 2111), a dropdown box works and copies nicely without locking/protecting. In an Outlook template, a pasted drop-down also works without any problem, A test message with a selected item sent to my own email address looks absolutely normal.