In this short tutorial, you will learn a few efficient ways to change the column width manually and have it adjusted automatically to fit the contents (AutoFit).
Changing the width of a column in Excel is one of the most common tasks that you perform daily when designing your reports, summary tables or dashboards, and even when using worksheets only to store or calculate data.
Microsoft Excel provides a variety of ways to manipulate the column width - you can resize columns using the mouse, set the width to a specific number or have it adjusted automatically to accommodate the data. Further on in this tutorial, you will find the detailed information about all these methods.
Excel column width
On an Excel spreadsheet, you can set a column width of 0 to 255, with one unit equal to the width of one character that can be displayed in a cell formatted with the standard font. On a new worksheet, the default width of all columns is 8.43 characters, which corresponds to 64 pixels. If a column's width is set to zero (0), the column is hidden.
To view the current width of a column, click on the right boundary of the column header, and Excel will display the width for you:

Also, you can get the width of a column by using a CELL formula with "width" as the first argument. For example, to return the width of column A, the formula is:
=CELL("width", A1)
Columns in Excel do not resize automatically as you input data in them. If the value in a certain cell is too large to fit in the column, it extends over the column's border and overlaps the next cell. If the column to the right contains data, then a text string is cut off at the cell border and a numerical value (number or date) is replaced with a sequence of hash symbols (######) like shown in the screenshot below:
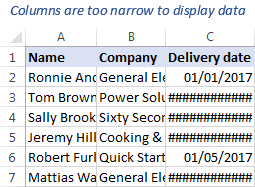
If you want the information in all cells to be readable, you can either wrap text or adjust column width.
How to change the width of a column in Excel using the mouse
I believe everyone knows the most common way to make a column wider or narrower by dragging the border of the column header to the right or to the left. What you might not know is that using this method you can adjust the width of several columns or all columns on the sheet at a time. Here's how:
- To change the width of a single column, drag the right border of the column heading until the column is set to the desired width.

- To change the width of multiple columns, select the columns of interest and drag the border of any column heading in the selection.
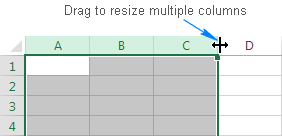
- To make all columns the same width, select the entire sheet by pressing Ctrl + A or clicking the Select All button
 , and then drag the border of any column header.
How to set column width to a certain number
As explained at the beginning of this tutorial, the Excel column width value represents the number of characters that can be accommodated in a cell formatted with the standard font. To resize columns numerically, i.e. specify an average number of characters to be displayed in a cell, do the following:
- Select one or more columns that you wish to resize. To select all columns, press Ctrl + A or click the Select All button.
- On the Home tab, in the Cells group, click Format > Column Width.
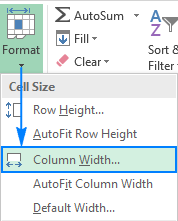
- In the Column width box, type the desired number, and click OK.
Tip. You can get to the same dialog by right-clicking the selected column(s) and choosing Column Width… from the context menu.
How to AutoFit columns in Excel
In your Excel worksheets, you can also auto fit columns so that they get wider or narrower to fit the largest value in the column.
- To autofit a single column, hover the mouse pointer over the right border of the column header until the double-headed arrow appears, and then double click the border.
- To autofit multiple columns, select them, and double click any boundary between two column headers in the selection.
- To force all columns on the sheet to automatically fit their contents, press Ctrl + A or click the Select All button, and then double click a boundary of any column header.
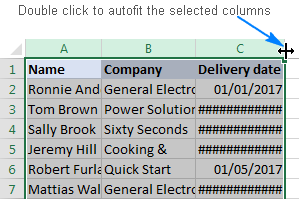
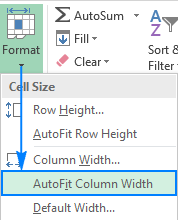
Another way to autofit columns in Excel is by using the ribbon: select one or more columns, go to the Home tab > Cells group, and click Format > AutoFit Column Width.
How to set the column width in inches
When preparing a worksheet for printing, you may want to fix the column width in inches, centimeters or millimeters.
To have it done, switch to the Page Layout view by going to the View tab > Workbook Views group and clicking the Page Layout button:

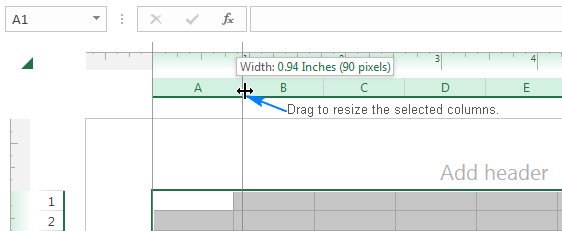
Select one, several or all columns on the sheet, and drag the right boundary of any of the selected column headings until you set the required width. As you drag the boundary, Excel will display the column width in inches like shown in the screenshot below:
With the width fixed, you can exit the Page Layout view by clicking the Normal button on the View tab, in the Workbook Views group.
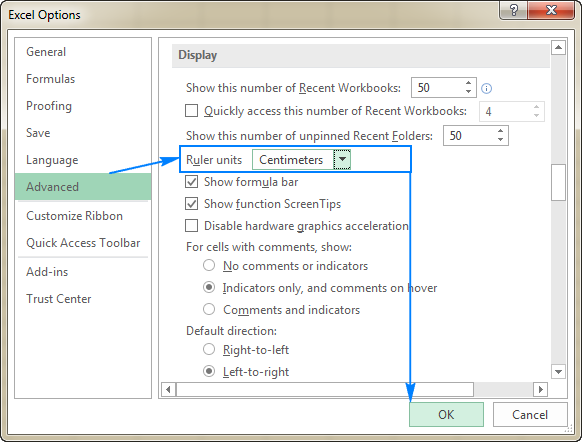
Tip. In the English localization of Excel, inches is the default ruler unit. To change the measurement unit to centimeters or millimeters, click File > Options > Advanced, scroll down to the Display section, select the desired unit from the Ruler Units drop-down list, and click OK to save the change.
How to copy the column width in Excel (in the same or to another sheet)
You already know how to make several or all columns on the sheet the same width by dragging the column border. If you have already resized one column the way you want, then you can simply copy that width to other columns. To have it done, please follow the steps outlined below.
- Copy any cell from the column that has the desired width. For this, right-click the cell and choose Copy in the context menu or select the cell and press Ctrl + C.
- Right-click a cell(s) in the target column(s), and then click Paste Special….
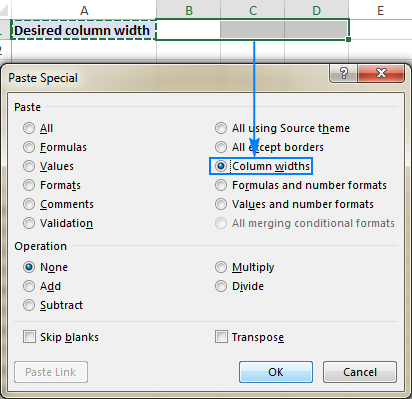
- In the Paste Special dialog box, select Column widths, and click OK.
Alternatively, you can select some cells in the target columns, press the Paste Special shortcut Ctrl + Alt + V, and then press W.
The same technique can be used when you create a new sheet and want to make its column widths the same as those in an existing worksheet.
How to change the default column width in Excel
To change the default width for all columns on a worksheet or the entire workbook, just do the following:
- Select the worksheet(s) of interest:
- To select a single sheet, click its sheet tab.
- To select several sheets, click on their tabs while holding the Ctrl key.
- To select all sheets in the workbook, right-click any sheet tab, and choose Select All Sheets from the context menu.
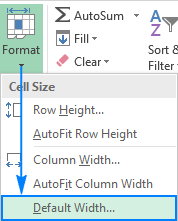
- On the Home tab, in the Cells group, click Format > Default Width… .
- In the Standard column width box, input the value you want, and click OK.
Tip. If you would like to change the default column width for all new Excel files that you create, save an empty workbook with your custom column width as an Excel template, and then create new workbooks based on that template.
As you see, there exist a handful of different ways to change column width in Excel. Which one to use depends on your preferred work style and situation. I thank you for reading and hope to see you on our blog next week!
 by
by
16 comments
Is there a way to keep excel from changing column width when a "number" is entered that exceeds the column width? Thank you!
Hi! I don't think it's possible to do this with standard Excel tools.
Go to VBA and do following steps;
Click on sheet name from left panel
Select WORKSHEET from drop-down menu in coding window.
Paste this code in coding section or body.
Private Sub Worksheet_SelectionChange(ByVal Target As Range)
Columns().AutoFit
End Sub
Hi all,
Is there a way to make Excel automatically update the column widths without using autofit?
I am busy using a formula that brings up various versions of a report and each have various column widths.
I want the columns to always auto adjust without me doing anything
Hello!
If the recommendations in this article do not suit you, try AutoFit column width and row height using a keyboard shortcut.
This is all good information. One thing that I don't know how to do is autofit all columns simultaneously based on the widths of just the row-1 values. I often have field names in the first row but longer data values below, and I just need to see the full field names. Autofitting to the longest data value would make the columns much too wide.
Can anyone tell me a good way to do this? For bigger spreadsheets, one method that occurred to me is copying row one into a temporary worksheet, using autofit, and then pasting the formatting to the original sheet. This doesn't save any time, though, if I have just ten or fifteen columns; I might as well just drag the width of each one manually.
Any ideas? Thank you!
Hey Jeff,
To do this, simply select the row you would like the width to be based off of - probably row 1 if you want it based off headers. Then hold down ALT while pressing H O I - this will auto width the colums to the words in your headers. Hope that helps!
I want to write amount of check( spelt in word) on the cheque having two small lines. if amount is small one line is okey. But when amount is greater it necessitates two lines. How to fix column width in such case which automatically fixes it
It sounds like you want to turn off text wrap for that cell or column if I understand your question. Then set a determined column width in Home -->Cells-->Format to fit your parameters.
Helpful article.
I want to copy and paste a formatted Excel (weekly) report to MS Outlook.
When I do that the table expands as if I did a "auto fit" for the column width.
How can I prevent this from happenning. Basically I want the same column widths to be maintained in Outlook as well.
I could do this on Gmail, but not in Outlook - App or the Web.
thanks in Advance.
/Rukshan
Any reply received on this ?
What will 80 pixels convert to in characters? And how can I calculate this in the future?
Hello, Jimmy,
unfortunately, we can’t tell you exactly how many characters 80 px will take, because it depends on the font family, font size, Excel and Windows versions installed, and your monitor resolution. The simplest way to see how many characters fits into your cell is to right-click and hold between two column headings, and Excel will instantly show you the result.
I think Jimmy was looking for a default calculation. The article states, "On a new worksheet, the default width of all columns is 8.43 characters, which corresponds to 64 pixels." It makes sense that the character width to pixel ratio is dependent on the standard font (although I haven't tested to see if changing the standard font affects this ratio). However, I suspect the default ratio of 8.43 characters to 64 pixels is pretty standard. Or perhaps the article should not have stated the default column width and the corresponding pixel count?
Jimmy, on my version of Excel, which has the default ratio above, each character past the first one takes up 7 pixels. For some reason, Excel divides the first character into 12 divisions. You can hover over each column divider to see the width in both characters and pixels. Test by changing the column width, then hover the mouse to confirm that ratio is correct on your version also.
So the formula to convert column width to pixels (for the default ratio above, which has valid widths from 0 to 255) is this:
=ROUND(IF(ColWidth<1, ColWidth*12, 12+((ColWidth-1)*7)), 0)
To convert back to ColumnWidth, use this formula:
=ROUND(IF(Pixels<12, Pixels/12, 1+((Pixels-12)/7)), 2)
Thanks!!! Svetlana Cheusheva!!! Very nice Article. Can you please publish Article on Form control and Basic VBA lessions
Hi Rohan,
Thank you for your kind feedback! I think we have a few articles on the subject of interest:
How to insert calendar in Excel (Date Picker control)
How to insert and run VBA code in Excel (step-by-step guide)
Tutorial with Excel examples about Macros