The tutorial shows how to border cells in Excel by using the predefined options and how to create your custom cell border style.
Sometimes Excel worksheets can be difficult to read because of dense information and complex structure. Adding border around cells can help you distinguish different sections, emphasize certain data, such as column headings or total rows, and make your worksheets better presentable and more attractive.
What are cell borders in Excel?
Border is a line around a cell or a block of cells in Excel. Generally, cell borders are used to accent a specific section of a spreadsheet to make it stand out. For example, you can insert a border to draw attention of viewers to totals or other important data on the sheet.
Please do not confuse cell borders with worksheet gridlines. Borders are ticker and more prominent. Unlike gridlines, cell borders do not appear in a worksheet by default, you need to apply them manually. When printing out a document, the borders will appear on printed pages regardless of whether you print gridlines or not.
Microsoft Excel offers a few different ways to add a border around a single cell or a ranges of cells.

How to create border in Excel
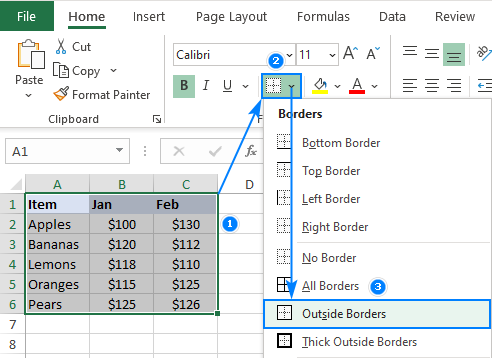
The fastest way to make a border in Excel is to apply one of the inbuilt options directly from the ribbon. Here's how:
- Select a cell or a range of cells to which you want to add borders.
- On the Home tab, in the Font group, click the down arrow next to the Borders button, and you will see a list of the most popular border types.
- Click the border you want to apply, and it will be immediately added to the selected cells.
For example, this is how you can apply an outside border around cells in Excel:
More examples of Excel cell borders can be found here.
Tips:
- To apply a line color and style other than defaults, choose the desired Line Color and/or Line Style under Draw Borders first, and then select borders.
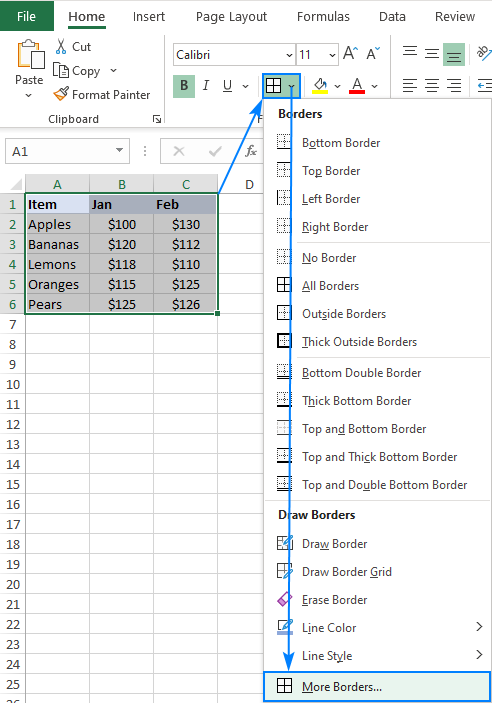
- The Border button on the ribbon only provides access to outside border types. To access all available settings, including inside borders, click More Borders… at the bottom of the drop-down menu. This will open the Format Cells dialog box, which is explained in detail in the next section.
How to insert border in Excel with Format Cells dialog
The Format Cells dialog is the most effective method of adding borders in Excel. It gives you easy access to all the settings including the line color and thickness as well as a nice diagram preview.
To insert a border via the Format Cells dialog, this is what you need to do:
- Select one or more cells to which you'd like to add borders.
- Open the Format Cells dialog box by doing one of the following:
- Click the down arrow next to the Borders button, and then click More Borders at the bottom of the drop-down list.
- Right click the selected cells and choose Format Cells… from the context menu.
- Press Ctrl+1 shortcut.
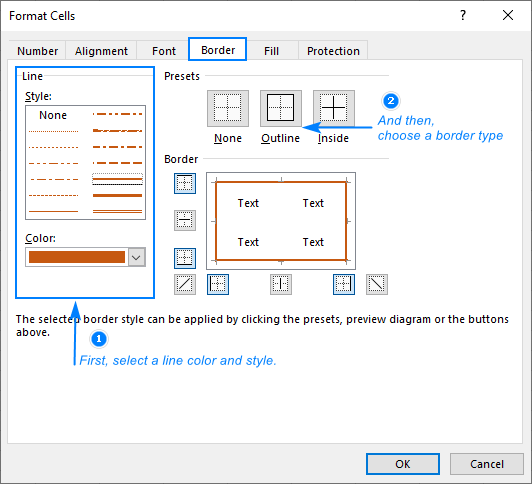
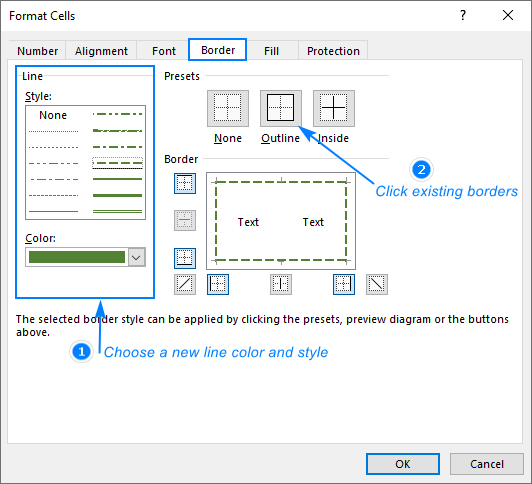
- In the Format Cells dialog box, switch to the Border tab and choose the line style and color first. And then, either use Presets to add the outside or inside borders or construct the desired border by selecting individual elements such as border top, bottom, right or left. The preview diagram will reflect the changes immediately.
- When done, click OK.
Excel border shortcuts
To quickly insert and remove cell borders, Excel provides a couple of keyboard shortcuts.
Add outside border
To add an outline border around the current selection, press the following keys at the same time.
Windows shortcut: Ctrl + Shift + &
Mac shortcut: Command + Option + 0
Remove all borders
To remove all borders within the current selection, use the following key combinations.
Windows shortcut: Ctrl + Shift + _
Mac shortcut: Command + Option + _
Note. Excel border shortcut does not give you control over the line color and thickness. To create borders professionally, it is recommended to use the Format Cells dialog that provides full access to all the settings.
Shortcuts for Format cells dialog
On the Borders tab of the Format Cells dialog, you can also use the following shortcuts toggle borders on and off:
- Left border: Alt + L
- Right border: Alt + R
- Top border: Alt + T
- Bottom border: Alt + B
- Upward diagonal: Alt + D
- Horizontal interior: Alt + H
- Vertical interior: Alt + V
Tip. In case you are adding multiple borders, it is sufficient to press Alt just once, and then you can hit only the letter keys. For example, to place the top and bottom borders, press Alt + T, and then B.
How to draw borders in Excel
Instead of selecting cells first, and then choosing from a set of built-in options, you can draw borders directly on the worksheet. Here's how:
- On the Home tab, in the Font group, click the down arrow next to Borders. Near the bottom of the drop-down menu, you will see the Draw Borders group of commands that let you choose a drawing mode, line color and style.
- First, pick a Line Color and a Line Style. Once either one is selected, Excel automatically activates the Draw Border mode, and the cursor changes to a pencil.
- You can now start drawing individual lines in the default Draw Border mode or switch to Draw Border Grid mode. The difference is as follows:
- Draw Border allows drawing a border along any gridline, which works great when making irregular borders. Dragging across cells will create a regular rectangular border around a range.
- Draw Border Grid places outside and inside borders at a time when you click and drag across cells. When you follow a gridline, a single line is added just like when using the Draw Border option.
- To stop drawing borders, click the Border button on the ribbon. This will force Excel to exist the drawing mode, and the cursor will change back to a white cross.

Tip. To delete the entire border or any of its elements, use the Erase border feature as describe in Erasing borders.
How to create a custom border style in Excel
In none of the predefined cell borders meet your needs, you can create your own border style. Here are the steps to perform:
- On the Home tab, in the Styles group, click Cell Styles. If you do not see the Cell Styles button, click the More button in the bottom right corner of the Styles box.

- Near the bottom of the drop-down menu, click New Cell Style.

- In the Style name box, type a name for your new cell style (Bottom double border in our case), and then click Format.

- The Format Cells dialog box will open. You switch to the Border tab and select the line style, line color and borders of interest. When done, click OK.
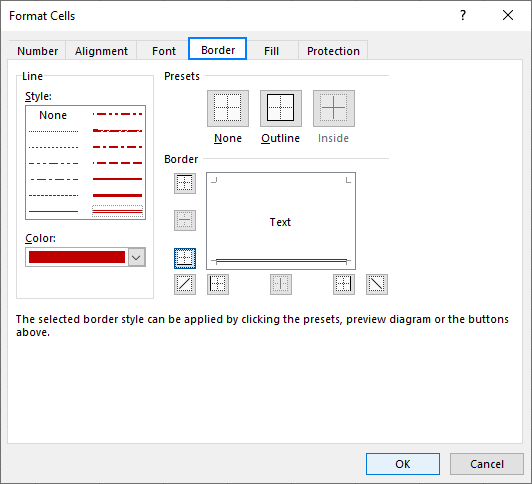
- In the Style dialog box, clear the boxes for any formatting that you do not want to include in the new style, and click OK. Done!

To apply your custom border style, just do the following:
- Select the cells you'd like to format.
- On the Home tab, in the Styles group, click the style you've created. Usually appears in the top left corner of the Styles box. If you do not see it there, then click the More button next to the Styles box, find your new style under Custom, and click on it.
Your custom style will be applied to the selected cells at once:

How to change the color and width of cell borders
When you add a cell border in Excel, a black (automatic) line color and a thin line style is used by default. To change the color and width of cell borders, please follow these steps:
- Select the cells whose border you want to change.
- Press Ctrl + 1 to open the Format Cells dialog box. Or right-click the selected cells, and then click Format Cells in the popup menu.
- Switch to the Border tab and do the following:
- From the Line box, choose the desired style for the border line.
- From the Color box, pick the preferred line color.
- In the Presets or Border section, select your existing border type.
- Check the result on the preview diagram. If you are happy with the changes, click OK. If not, try another line style and color.
Examples of cell border in Excel
Below you will have a few examples of how your Excel borders may look like.
Outside border
To apply an outline border around cells, use either Outside Borders or Think Outside Borders option:

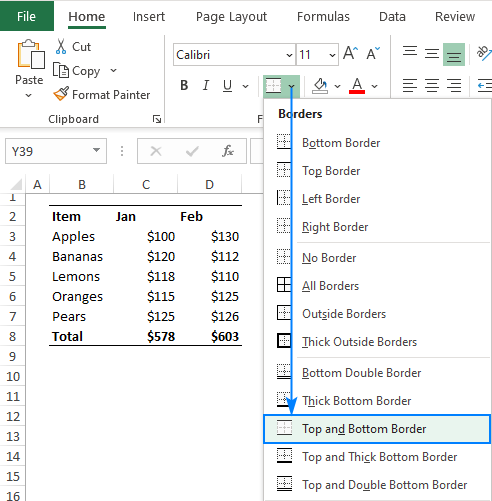
Top and bottom border
To apply top and bottom border in Excel with a single command, use this option:
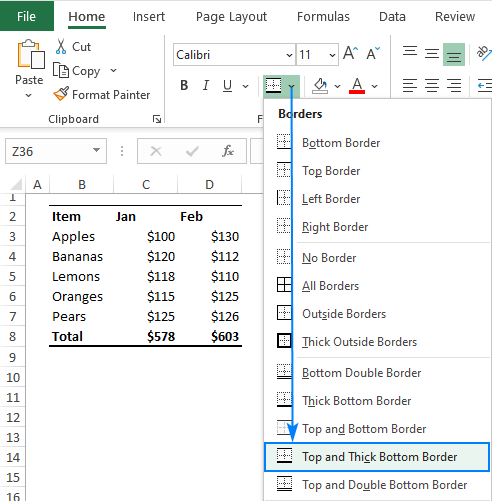
Top and thick bottom border
To apply top and thick bottom border, use this one:
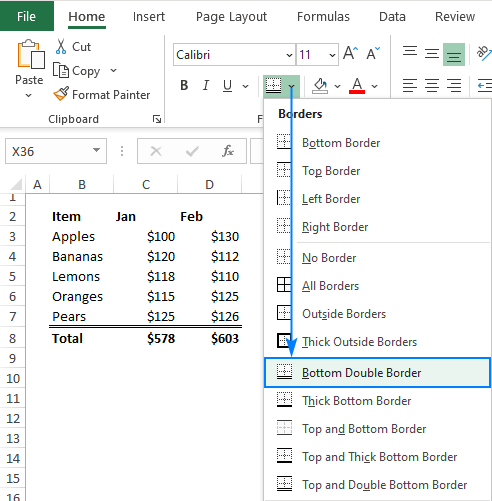
Bottom double border
To place a bottom double border in Excel, use the below command. This option comes especially handy for separating a total row:
Inside and outside borders
To place both inside and outside borders at a time, use the All Borders command:
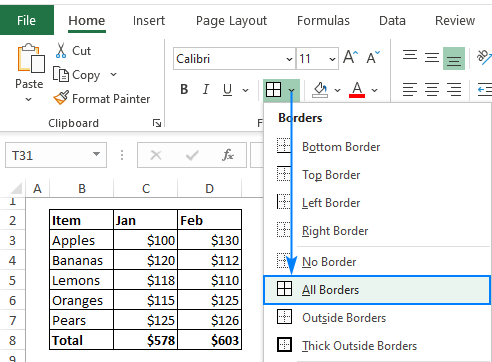
To put only inside borders or use different colors and line styles for inside and outside borders, use either the Draw Borders feature the Format Cells dialog. The below image shows one of many possible results:

Creating borders in Excel - useful tips
The following tips will give you some insight into Excel cell borders that may help you use them more efficiently.
- Each border that you add or change will follow the current settings for the line style and thickness. So, be sure to choose the line color and style first, and then select the border type.
- Unlike gridlines that may or may not be visible on printouts, cell borders always appear on printed pages.
- To have cell borders inserted automatically, format your data as an Excel table and choose from a rich collection of predefined table styles.
How to remove a cell border in Excel
Depending on whether you want to delete all or specific borders, use one of the following techniques.
Remove all borders
To delete all borders within a range, this is what you need to do:
- Select one or more cells that you wish to remove a border from.
- On the Home tab, in the Font group, click the arrow next to Borders, and choose No Border.

Alternatively, you can use the remove borders shortcut: Ctrl + Shift + _
If you choose to remove all formatting in Excel, this will also remove cell borders.
Erase individual borders
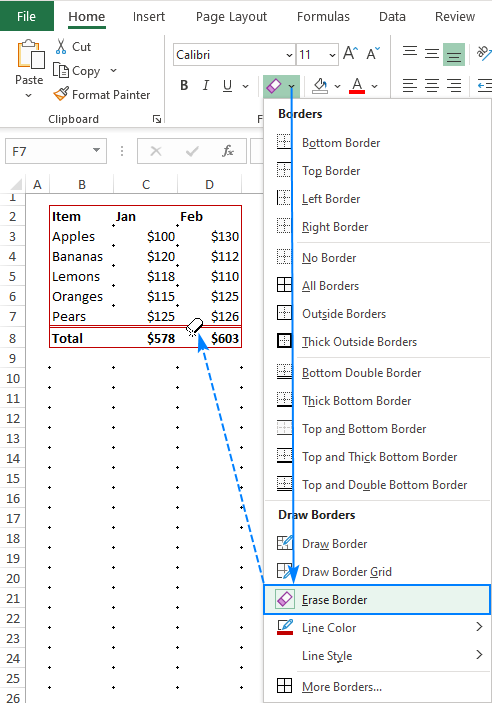
To remove borders one at a time, use the Erase Border feature:
- On the Home tab, in the Font group, click the arrow next to Borders, and choose Erase Border.
- Click each individual border that you want to delete. It's also possible to erase all borders in one go. For this, click Erase Border and drag the eraser across cells.
- To exit the erasing mode, click the Border button.
That's how to create and change borders in Excel. I thank you for reading and hope to see you on our blog next week!
 by
by
5 comments
The borders I am trying to delete are the ones that were already on an Invoice template. None of the suggestions above seems to work to delete them.
It is Excel for Mac.
Any suggestions?
Good
How do I use the greyed out parts under the More Borders option? I want the border across the middle of the cell.
Your tips are more that that - they are thorough tutorials! Plenty of pictures, too! Thank you!
There is a style that I frequently like to use: double lines as outside borders. I often use it to outline entire tables.
Is there a way to add this configuration (or any other configuration, like colored lines, for instance) to the drop-down menu? It would make my life a lot easier.
Again, thanks for any help you can provide.
Hi Marilyn,
Thank you for your kind feedback! I do not know a way to add a custom style to the Borders drop-down menu. However, you can add it to the Styles gallery like shown in How to create a custom border style, and then apply with a mouse click.