This end-to-end tutorial will teach you how to effectively mail merge in Word using an Excel sheet as the data source.
Mail Merge can be a real time-saver when it comes to sending mass mailings. It lets you quickly create custom letters, emails or mailing labels in Word by merging the information you already have in your Excel spreadsheet. This tutorial provides an overview of the main features and explains how to do a mail merge from Excel step-by-step.
Mail Merge basics
A mail merge may look like a daunting task, but in fact the process is pretty simple.
To get a grasp of the basics, you can think of it in terms of 3 documents.
- Excel source file with information about the recipients such as names, addresses, emails, etc.
- Word document with codes for the personalized fields.
- The final Word document with personalized letters, emails, labels, or envelopes.
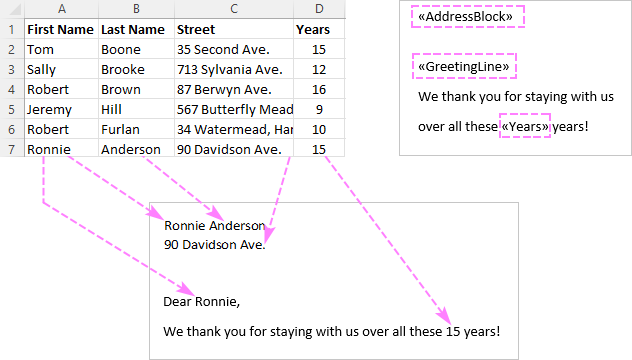
The goal of the mail merge is to combine the data in File 1 and File 2 to create File 3.
Preparing Excel spreadsheet for mail merge
When you run a mail merge, your Excel file will get connected to your Word document, and Microsoft Word will be pulling the recipient details directly from the connected worksheet.
Before running a mail merge in Word, make sure your Excel file has all the information you want to include such as first name, last name, salutation, zip codes, addresses, etc. If you want to add more details, you'd better do this before starting the merge.
Important things to check:
- Your Excel sheet has one row for each recipient.
- The columns in the spreadsheet match the fields you want to use in a mail merge. For instance, if you wish to address the recipients by their first name, be sure to create separate columns for the first and last names. If you intend to sort the contacts by state or city, verify that you have a separate State or City column.
- If your Excel file contains postal codes or any other numbers with leading zeros, format them as text to retain zeros during a mail merge.
- If you create an Excel spreadsheet by importing information from a .csv or .txt file, this tutorial will help you do that right: Importing CSV files into Excel.
- If you plan to use your Outlook contacts, the following article may be helpful: How to export Outlook contacts to CSV.
Here's an example of an Excel sheet that can be used for a mail merge:

How to mail merge from Excel to Word
Once the source data spreadsheet is set and reviewed, you are ready to run the mail merge. In this example, we will be merging letters. For email messages, the steps will be essentially the same.
- Create a Word document. If you have already composed your letter, you can open an existing document, otherwise create a new one.
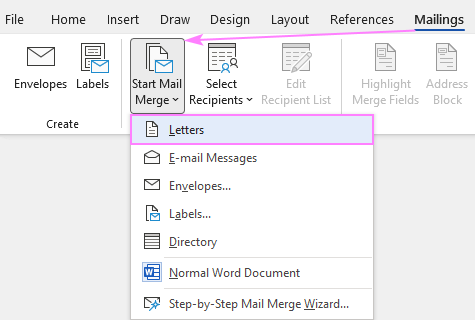
- Choose what kind of merge you want to run. On the Mailings tab, in the Start Mail Merge group, click Start Mail Merge and pick the mail merge type - letters, email messages, labels, envelopes or documents. We are choosing Letters.
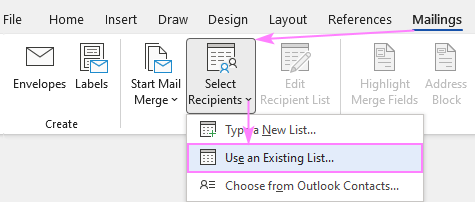
- Select the recipients. On the Mailings tab, in the Start Mail Merge group, click Select Recipients > Use Existing List.
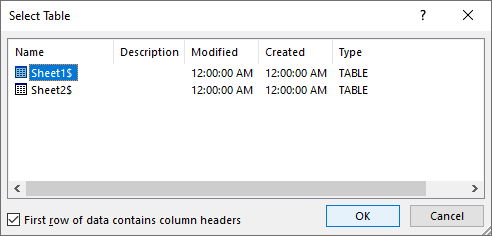
- Connect Excel spreadsheet and Word document. Browse for your Excel file and click Open. Then, select the target sheet and click OK.
By setting the connection between your Excel sheet and the Word document you ensure that your mail merge data source will be automatically updated each time you make changes to the Excel file that contains the recipient details.
- Refine the recipient list. If you want to exclude certain recipients, then click the Edit Recipient List button in the Start Mail Merge group.

The Mail Merge Recipients dialog pops up, and you check or uncheck checkboxes to add or remove the recipients from the mail merge.
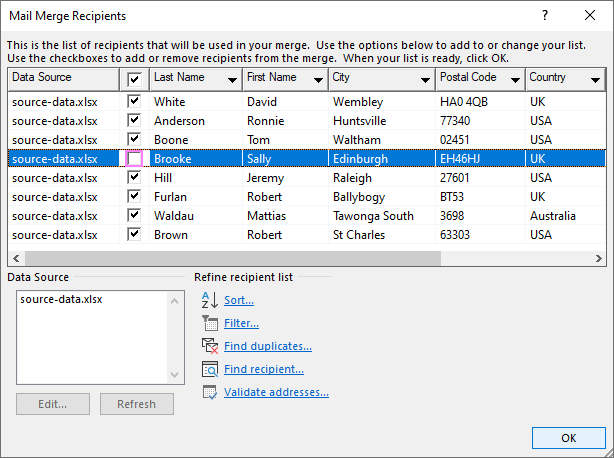
Tip. You can also sort, filter and dedupe the recipients list as well as validate the email addresses by clicking the corresponding option under Refine Recipients List.
When the recipients list is finalized, you are ready to start on the letter. Type the text directly in a Word document or copy/paste from an external source.
- Add Address Block and Greeting Line. Now it's time to add placeholders for the Address Block and Greeting Line for Mail Merge to know exactly where to place that data. To add a placeholder, click the corresponding button on the Mailings tab, in the Write & Insert Fields group.
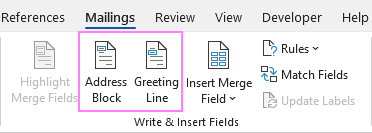
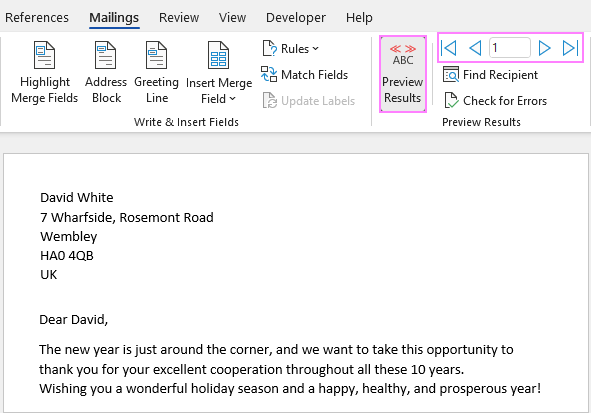
Depending on which merge field you are inserting, a dialog box will appear with different options. Select the ones that work best for you, observe the results in the Preview section and click OK. To switch to the next or previous recipient, use the right and left arrows.
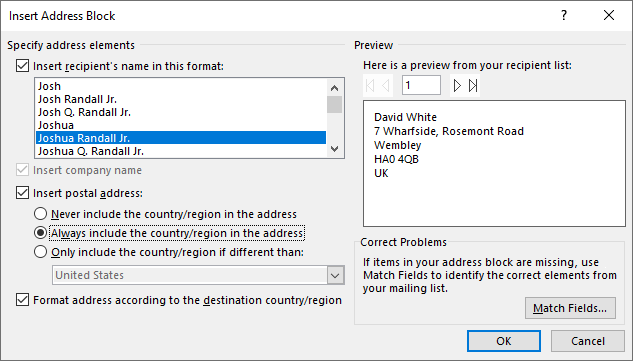
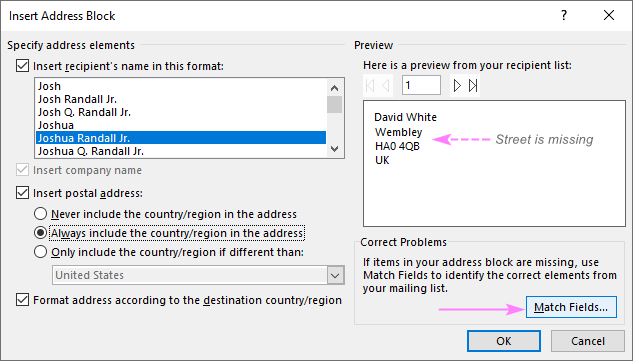
Tip. If Word pulls wrong information from the Excel file, click the Match Fields button to match a specific field.
When done, the merge field placeholders will appear in your document like shown in the screenshot below:

- Insert merge fields. In some cases, adding only the Address block and Greeting line will suffice. When the letter is printed out, all the copies will be identical except for the recipients' names and addresses.
In other situations, you may wish to insert more merge fields to personalize your letters a little further. To do this, place the cursor exactly where the personal information should appear in the letter, click the Insert Merge Field button on the ribbon, and choose the field from the drop-down list.
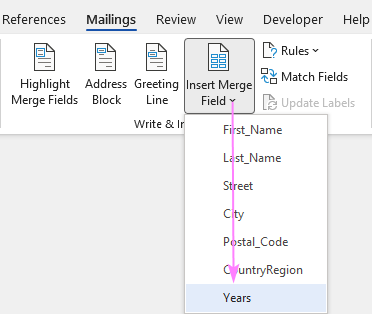
If a merge field is inserted within the text, make sure there are spaces on both sides of it:

- Preview the results. To verify that the recipient details correctly appear in the letter, click the Preview Results button on the Mailings tab, and then use the left and right arrows to switch between the recipients.
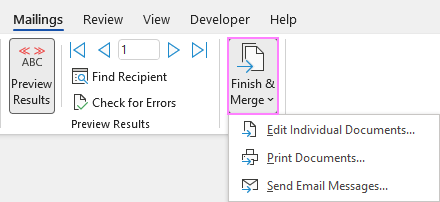
- Finish mail merge. If you are happy with all the previews, head over to the Finish group and click the Finish & Merge button. Here you can choose to print the letters or send them as email messages. To make some edits before printing or emailing, click Edit Individual Documents. A new document will open, and you will be able to make the changes in each particular letter.
- Save the mail merge document. Save the mail merge results as a usual Word document by clicking the Save button or pressing the Ctrl + S shortcut.
Once saved, the file will stay connected to your Excel mailing list. When you want to use the mail merge document again, open it and click Yes when Word prompts you to retain that connection.

Using step-by-step Mail Merge Wizard
In addition to the options accessible on the ribbon, the same features are available in the form of the Mail Merge Wizard.
To start the wizard, go to the Mailings tab and click Start Mail Merge > Step-by-Step Mail Merge Wizard.
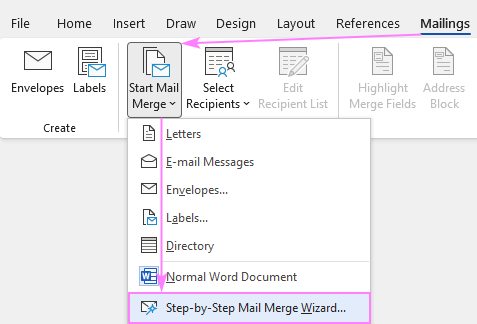
Once clicked, the Mail Merge pane will open on the right side of your document and walk you through the process step-by-step.

In my opinion, working with the ribbon is more convenient as it lets you use exactly the feature you need at the moment. When doing the mail merge for the first time, the wizard's step-by-step guidance may come in helpful.
How to get mail merge to match fields
For Word Mail Merge to recognize fields correctly, you need to be very specific with the column names in your Excel file. This is especially true for the Address Block and Greeting Line features.
- For the Name fields, First Name and Last Name work without a hitch. Other column names may cause matching failures.
- For the Address fields, use the full words such as Address, City, State, Postal code, or Zip code.
If your data source in Excel has different column names, you will have to match the fields manually. Here's how:
- In the Insert Address Block or Insert Greeting Line dialog box, click the Match Fields button. (This button is also available on the Mailings tab, in the Write & Insert Fields group.)
- In the Match Fields dialog box that pops up, you will see the list of fields required for a given block. To match a specific field, click the drop-down arrow next to it, and pick the correct field from the list.
In the screenshot below, we've matched the Street column from our Excel source data file to the Address 1:

Mail Merge shortcuts
If you do a mail merge in Word on a regular basis, learning a few shortcuts can save you quite a lot of time and make you more productive.
| Shortcut | Description |
|---|---|
| Alt+F9 | Switch between all field codes and their results in a mail merge document. |
| Shift+F9 | Display the coding of the selected field. |
| F9 | Update the selected filed. Place the cursor anywhere in the field and press F9 to update it. |
| F11 | Go to the next field. |
| Shift+F11 | Go to the previous field. |
| Alt+Shift+E | Edit the mail merge document. Note, this will break the connection between your Excel file and Word document, as a result your mail merge source won't be automatically updated any longer. |
| Alt+Shift+F | Insert a merge field from your mail merge source. |
| Alt+Shift+M | Print the merged document. |
| Ctrl+F9 | Insert an empty field. |
| Ctrl+F11 | Lock a field. The field results won't be updated when the information in the Excel source file changes. |
| Ctrl+Shift+F11 | Unlock a field. The field results will be updated again. |
| Ctrl+Shift+F9 | Unlink a field. The field will be permanently removed from a document, replaced by its current value and from then on treated as normal text. |
| Alt+Shift+D | Insert the DATE field that displays the current date. |
| Alt+Shift+T | Insert the TIME field that displays the current time. |
| Alt+Shift+P | Insert the PAGE field that displays the page number. |
| Alt+Ctrl+L | Insert LISTNUM field. |
Hopefully, this information has been helpful, and now you know how to perform mail merge from Excel to Word correctly. Thank you for reading!
 by
by
11 comments
I have a problem that i am facing in mail merge. I have multiple heads in the excel that i want to use in the word doc examples (A to RQ) but i am able to see head till IU. Can you help me let me know what can be issue in this
Hello good afternoon,
I need to send receipts to 25 different email addresses and in pdf format.
I have the original text in word.
Any way to print each sheet separately and in pdf once the merge is complete?
Thanks!
Dear Sir,
I prepared my excel data & inserted in my word via mail merge, in excel the default date is "dd mm yyyy" or "30 April 2025", but in word in data is reflected in format 04/30/2025, i tried all the methods possible to reflect the date in desired format but was unable to do so, kindly help.
Hi! To display date as text in format you want, use TEXT function. You can find the examples and detailed instructions here: Convert date to text in Excel - TEXT function and no-formula ways.
You can also change default date format in your computer's regional settings to format you want.
Hi, is it possible to make make a mailing list for a MS Word presentation. I make the same presentation for different countries and need to change addresses, sentences, paragraphs,dates etc. I was hoping if i could have it all in a list in excel I can make it alot easier.
Thanks,
Hello Thomas!
Maybe this article will be helpful: Mail Merge in Outlook: send bulk email individually
I have followed the instructions above and it does not give me an option to change the date to the current date. I want this to be an option.
Thank you for your assistance.
Hello Jean!
Replace the date with the current date in the Excel data, and then follow the instructions. For more information, please visit: How to insert dates in Excel.
Hi, when i am trying to merge a number (i.e. 10,236) it pops up as 10236. How can i add comma?
Hi! To keep the comma in a number, convert it to text. Here are instructions that may be helpful: How to convert numbers to text.
Thank you! Spasibo!