Moving on to another stop of our "Back to Basics" journey, today I will tell you more about managing your spreadsheets when collaborating with others. You will learn how to share, move and protect your data in Google Sheets.
As you may already know from my previous article, the main advantage of Google Sheets is the possibility for several people to work with the tables simultaneously. There's no need to email the files or to guess what changes were made by your colleagues anymore. All you need to do is share Google Sheets documents and start working.
How to share Google Sheets files
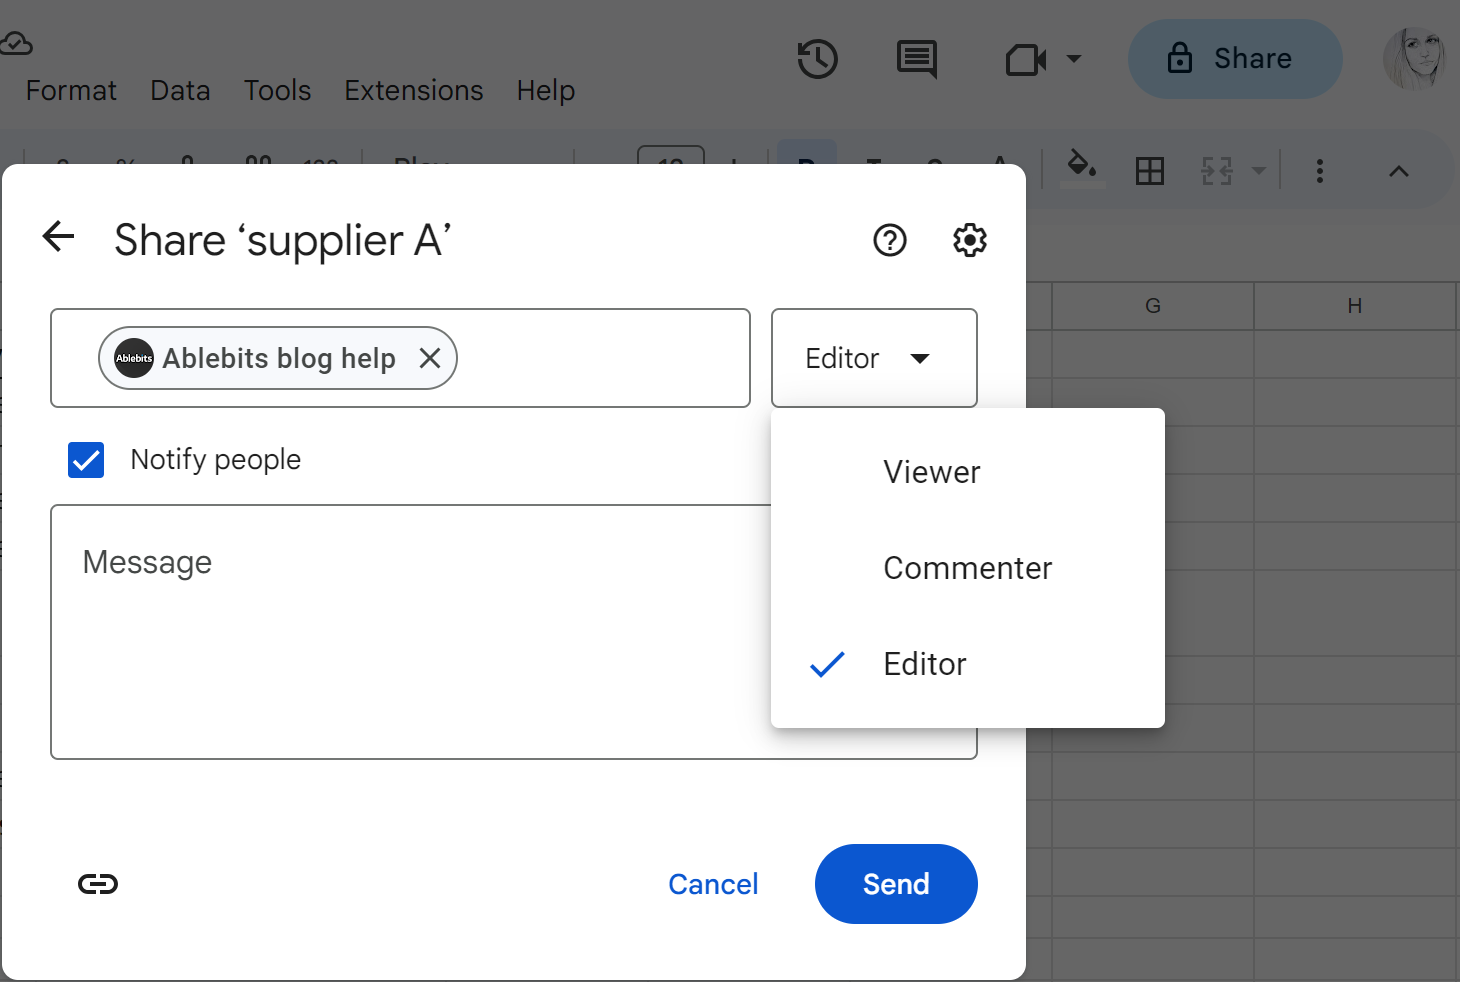
To grant access to your tables, press the Share button at the upper right corner of the Google Sheets and enter the names of those users who will work with the table. Decide whether to give each person the right to edit or comment on the table or only to view the data:
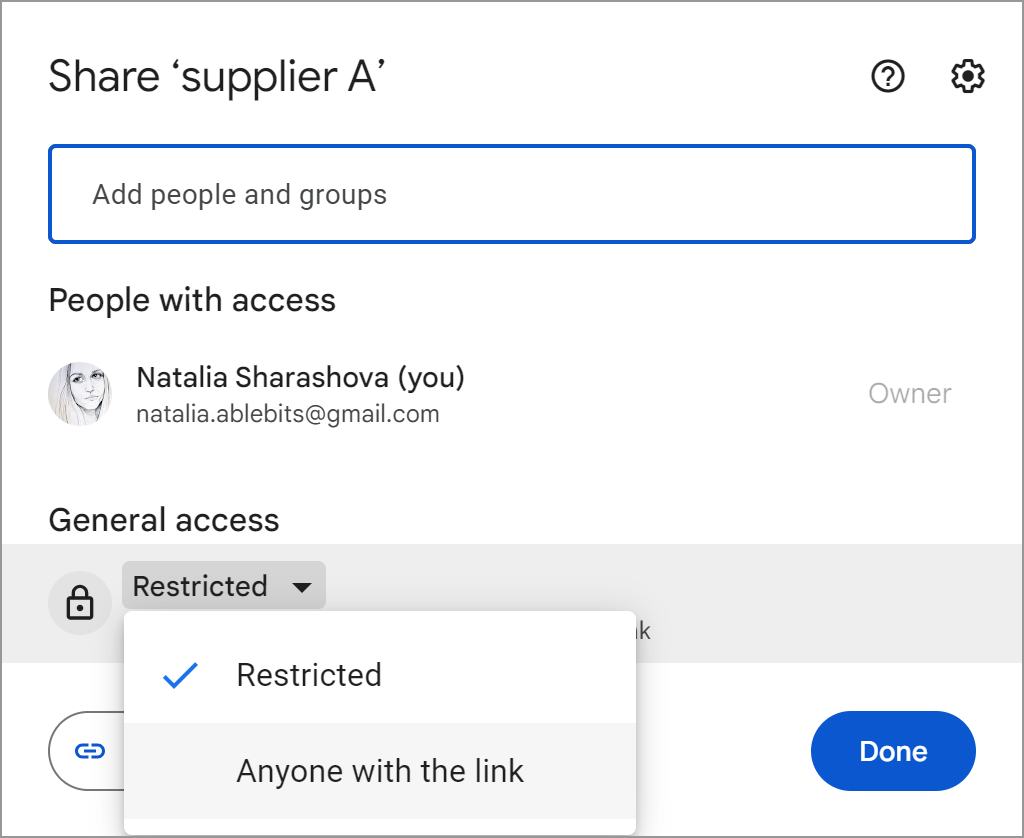
What's more, you can get an external link to your table and send it to your colleagues and partners. To do that, change the setting under the General access section from Restricted to Anyone with the link:
Every person with a link can view the spreadsheet by default. For them to be able to edit it, you should either share the spreadsheet with them directly (by adding their email address and personalizing the access) or change the role for everyone with the link:
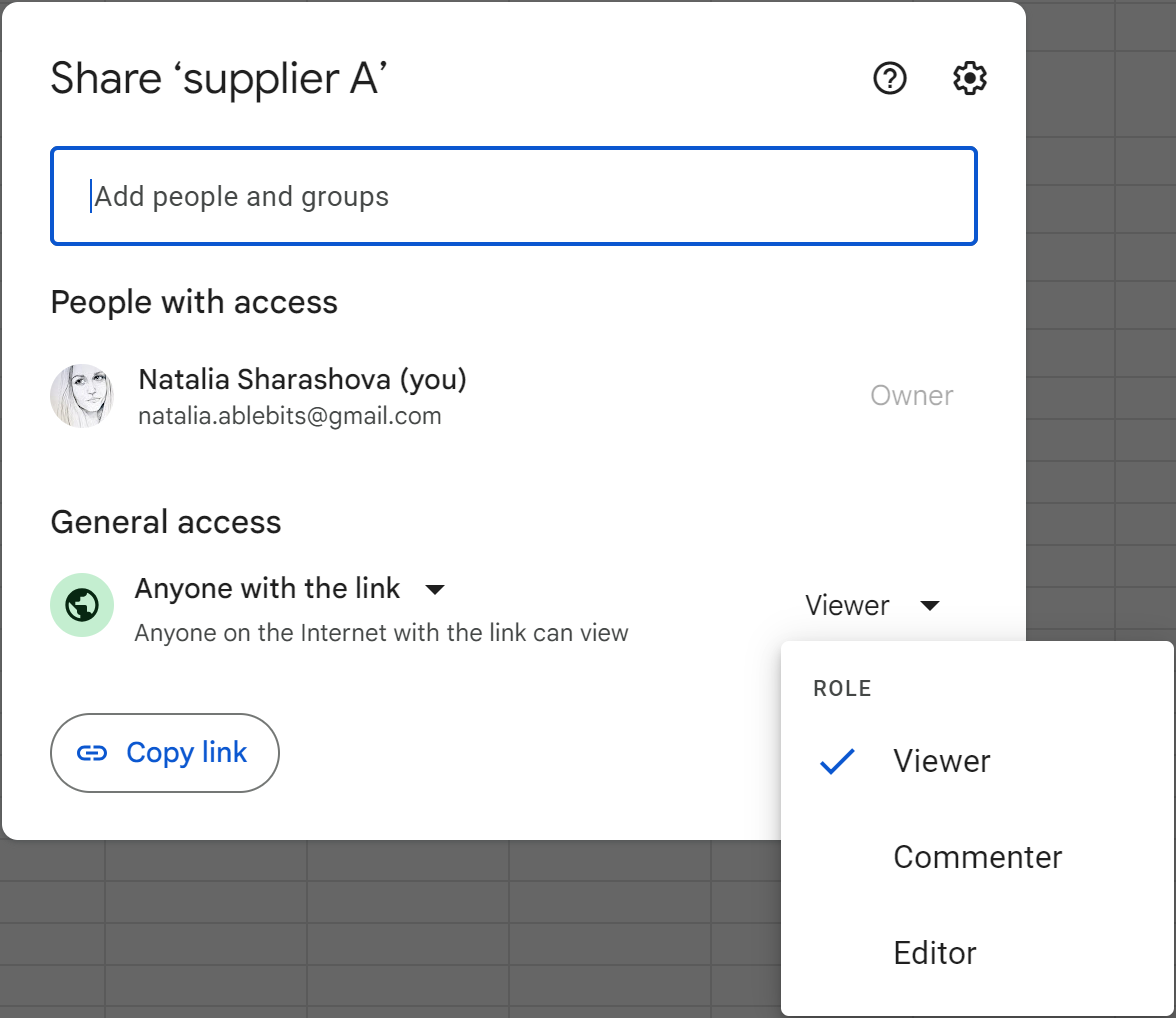
Note. If you skip it, the users will have to request access if they want to comment or edit the file.
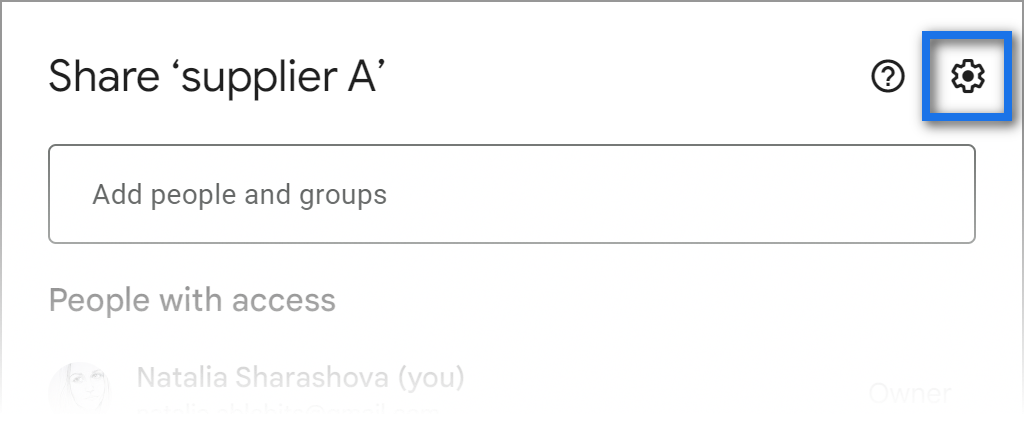
Further on, you will find some extra sharing options if you click the Settings icon at the upper-right corner of the sharing window:
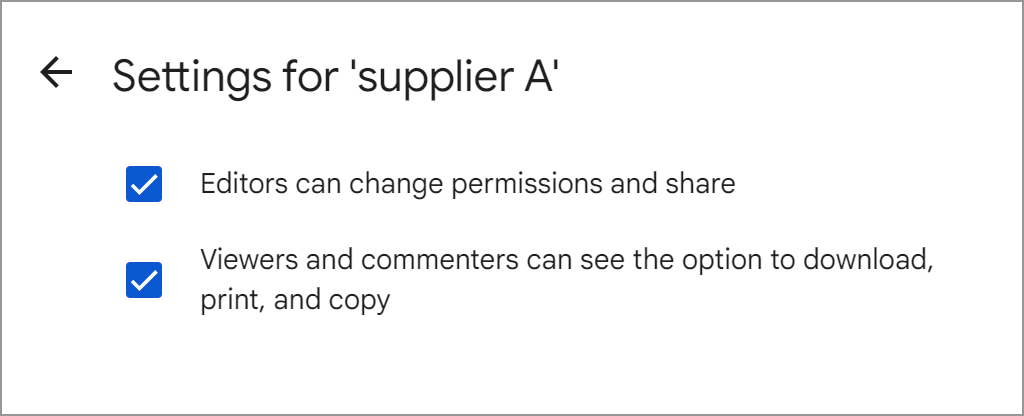
Here you can limit some editor permissions as well as prohibit downloading, printing and copying the files for viewers & commenters:
Finally, when the spreadsheet is already shared, you can appoint a new owner to it. Just open the drop-down with the permissions next to the required account name and pick Transfer ownership.
How to move Google Spreadsheets
Saving the files has never been so easy. You don't need to do anything special to save the changes anymore. Google Sheets saves the data automatically with every change you make. Let's see how to organize your data in Google Drive.
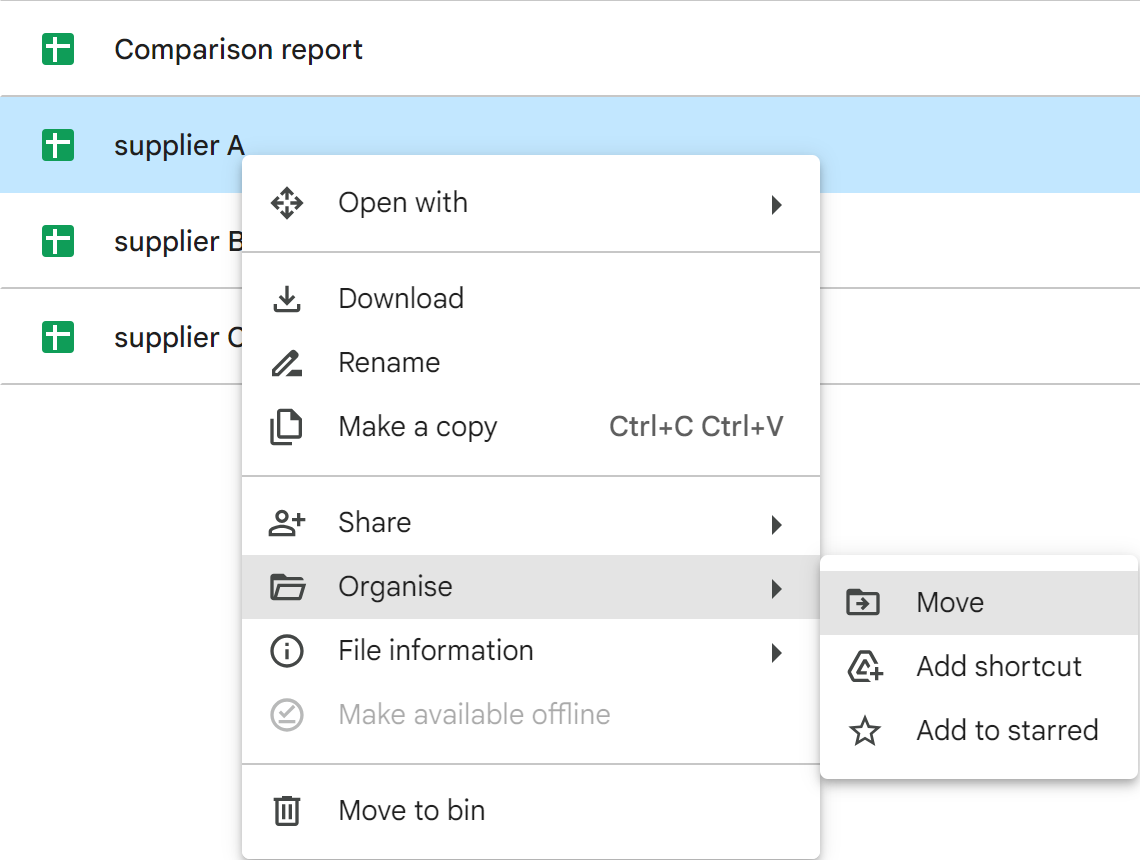
To move your spreadsheet to any other folder, just find it in your Drive, right-click and choose Organize > Move:
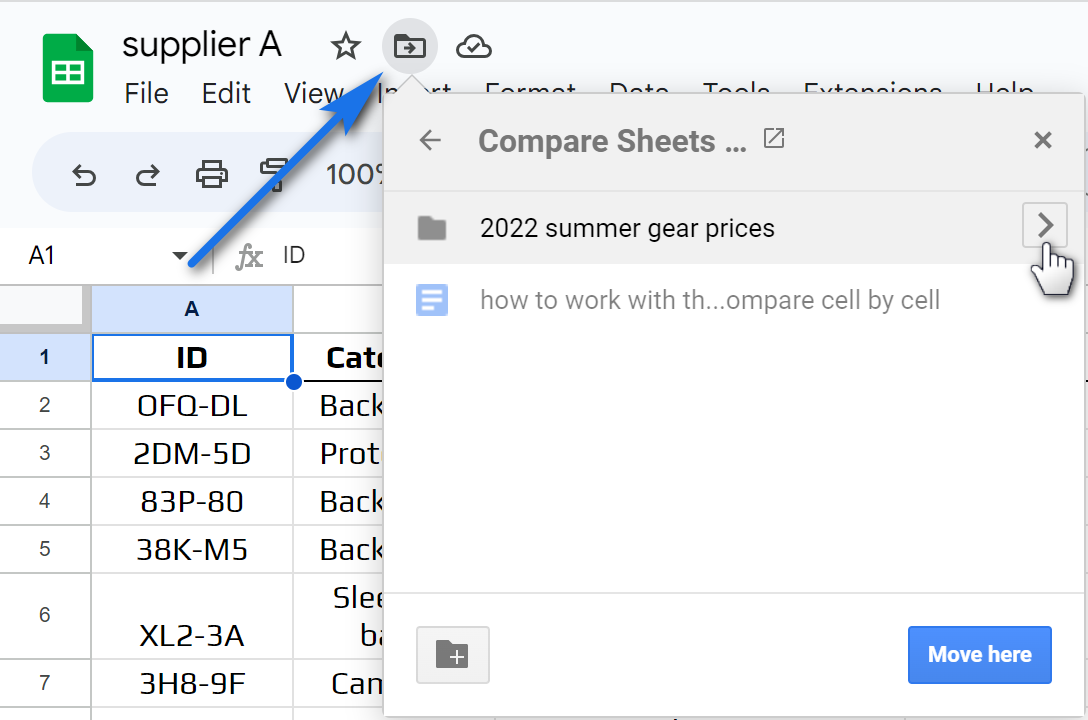
Or open the spreadsheet and click the Move icon at its top:
Tip. Of course, you can also drag and drop spreadsheets in Drive or make use of the File > Move menu options in the opened file.
How to lock cells in Google Sheets
When many people access your Google Sheets, you may want to protect the data: certain cells or the entire tab.
"What for?", you may ask. Well, one of your teammates may happen to change or remove the data accidentally. And they may not even notice that.
Of course, you can always view the version or cell-edit history and undo the changes. But it will take some time to look through the whole list and, besides, it will cancel the rest of the "correct" changes. To avoid that, you can protect your Google Sheets data.
Protect the entire spreadsheet
Since you already know how to give access to your tables and what rights you can grant the users, the first very simple piece of advice would be to try and allow viewing the table instead of editing. Thus, you'll reduce the number of unintentional changes to the minimum.
How to lock a Google sheet
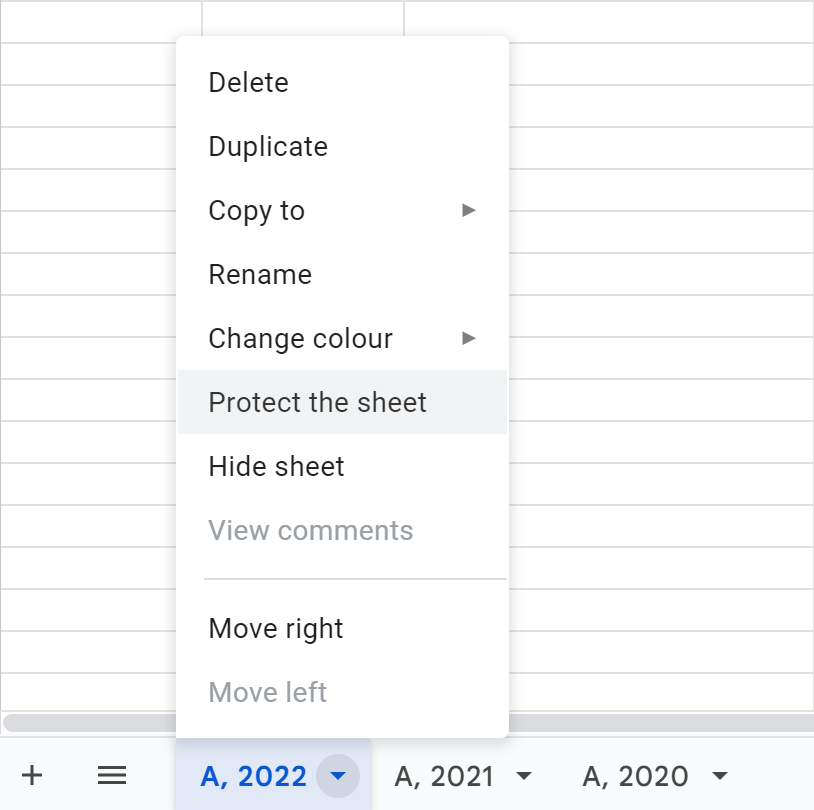
Right-click the tab of interest and choose Protect the sheet:
Make sure Sheet is selected in the opened pane:
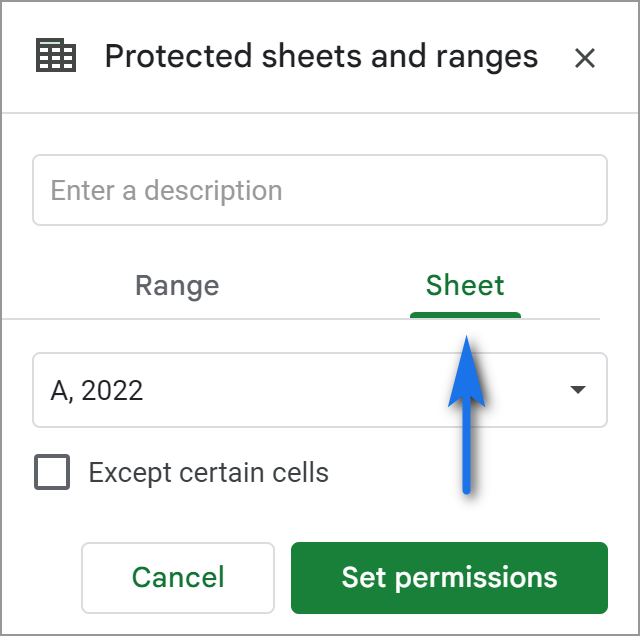
Tip. The Enter a description field is not required, yet I'd recommend filling it in to remember what and why you decided to protect from the changes.
Tip. If you're wondering how to protect Google sheet except for certain cells, simply check the box with the exact same name: Except certain cells. You will need to enter these cells or ranges:
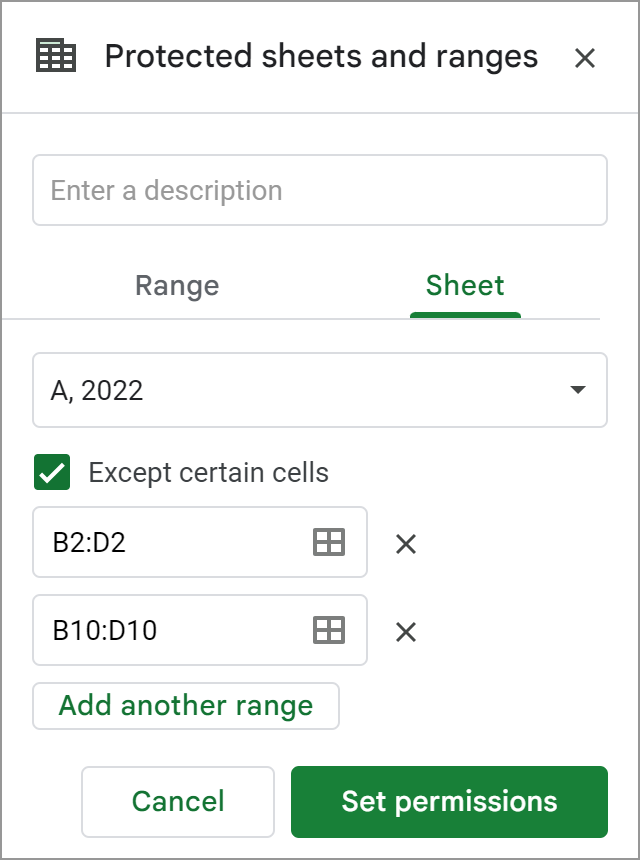
This way, you will still allow access to some cells on the locked sheet.
The next step would be to adjust the settings for the users. Press the Set permissions button and you'll see the Range editing permissions pop-up:
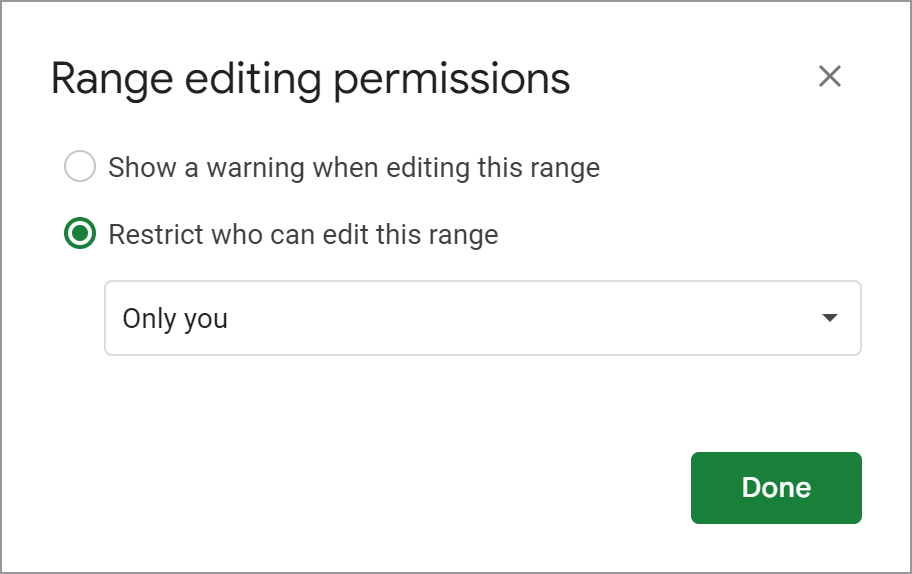
- If you select Show a warning when editing this range, everyone with access to the file will be able to edit this sheet as well. Once they try to change something, they will get a warning about editing the protected cells in Google Sheets and they will have to confirm the action. At the same time, you will get an email with the actions the users perform in the spreadsheet.
- If you select Restrict who can edit this range, you'll have to enter every single user who'll be able to edit the sheet.
As a result, you'll see a padlock on a Google sheet meaning it's protected:

To unlock a Google sheet, go to Data > Protect sheets and ranges in the menu:
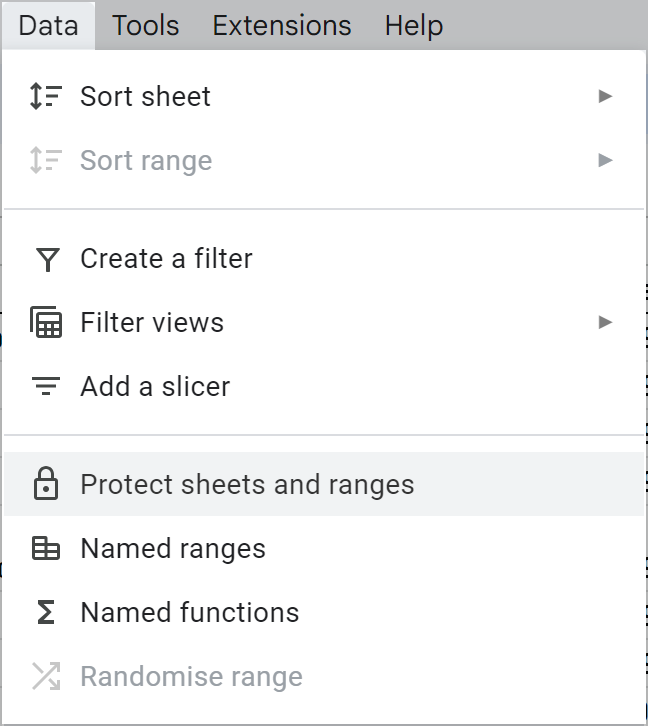
Pick the protection you'd like to remove:
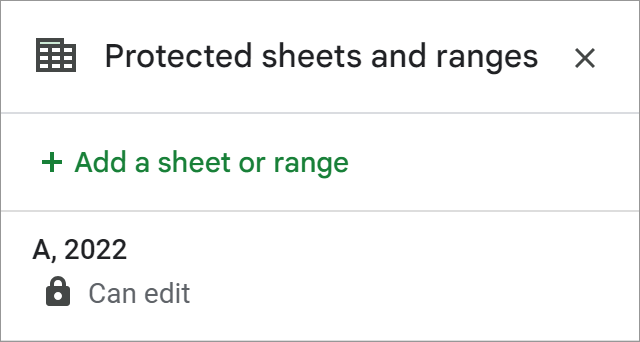
Then change its settings or remove the protection by clicking the trash bin icon:
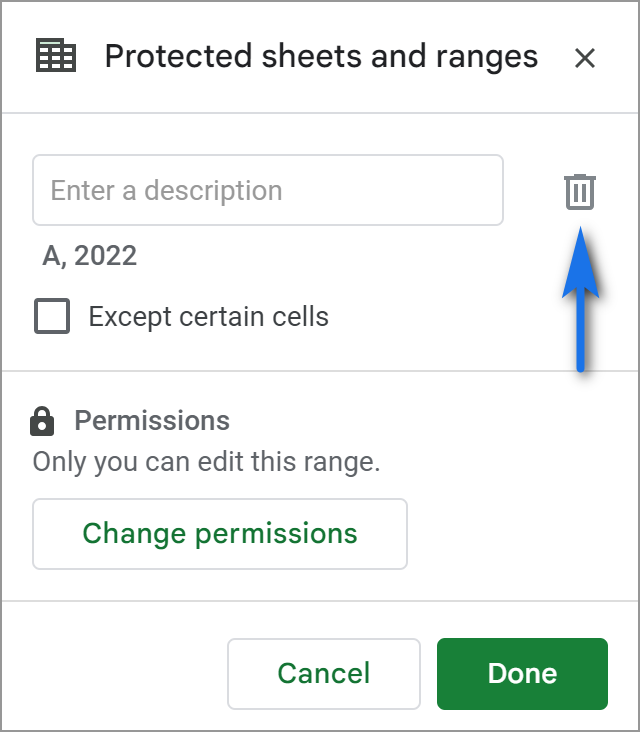
Lock & unlock multiple Google sheets at once
In case you need to protect multiple Google sheets, doing it one by one can be frustrating. Luckily, there's an easy solution in the Power Tools add-on called Sheets Manager.
You'll see all your tabs listed with checkboxes. You just tick off those Google sheets you'd like to lock and click the Protect button:
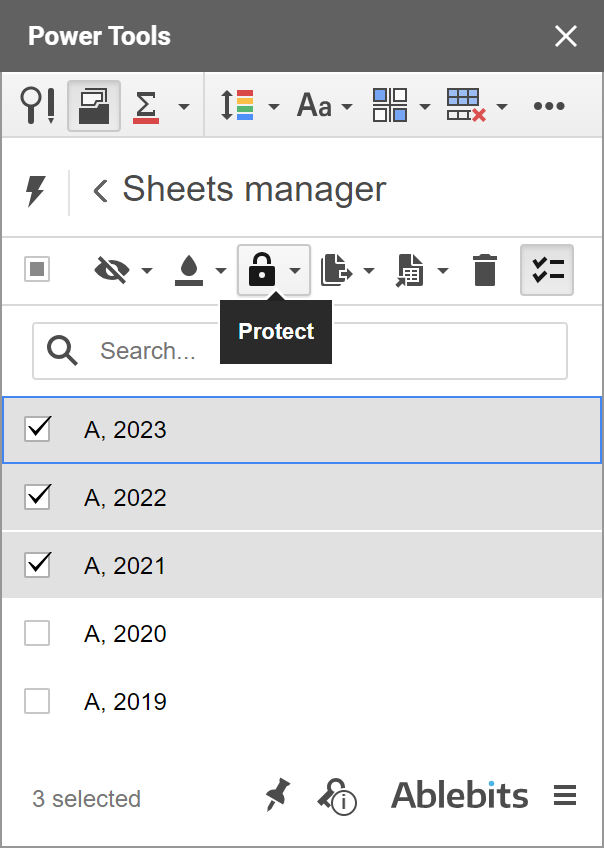
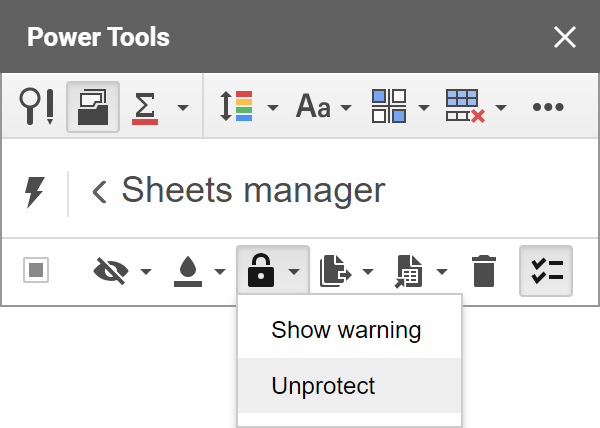
Then select the way to protect these sheets:
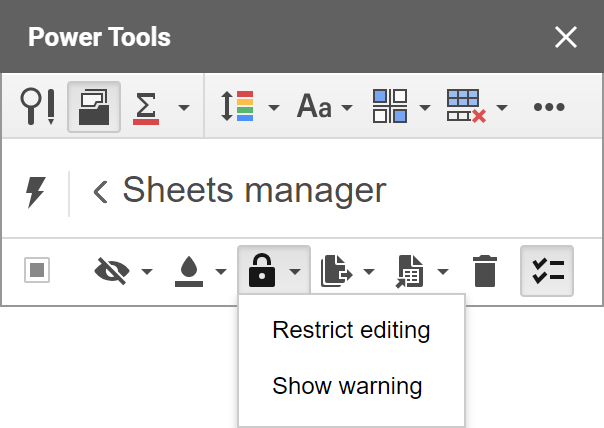
- Restrict editing will make the sheet accessible only to you and the owner of the spreadsheet.
- Show warning will make the users confirm whether they want to make the changes.
In a similar manner, you can use Sheets Manager to unlock all protected Google sheets in one go. You also select them all, and this time pick Unprotect:
Watch this demo video and you'll see how simple the tool is and how easy it is to use. Tip. To follow the video along, install just Sheets Manager from the Google Workspace Marketplace or get it as part of Power Tools: a collection of 30+ tools for hundreds of daily operations in spreadsheets.
Video: How to protect/unprotect multiple Google sheets
Protect cells in Google Sheets
To protect certain cells in Google Sheets, select the range, right-click on it and choose View more cell action > Protect range:
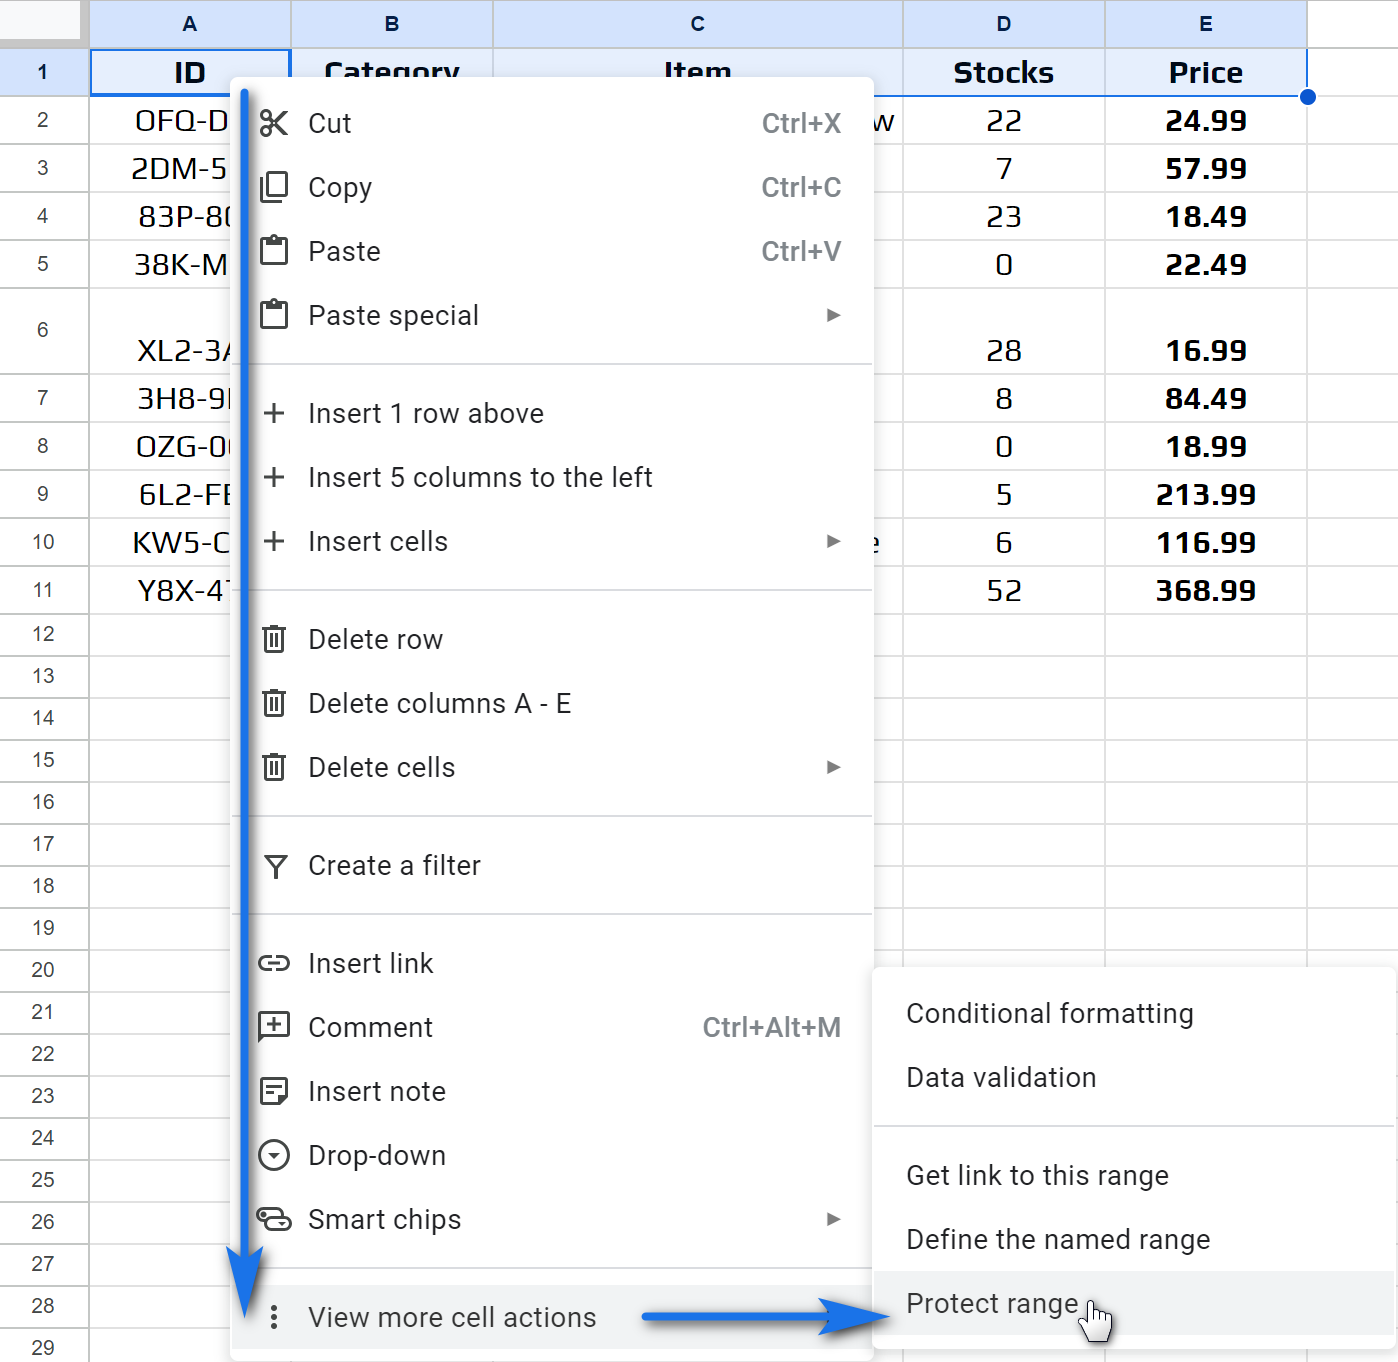
You'll see a familiar settings pane and be able to set the necessary permissions.
Tip. If in time you forget what is protected and who can access the data, you can easily recall it from the same Data > Protected sheets and ranges menu that you used to unlock Google sheets.
Now you know how to organize your files in Drive, share them with others and protect cells and sheets in Google Sheets without fear of losing or corrupting any important pieces of information.
Next time I'll dig deeper into some aspects of editing the tables and share some peculiar aspects of working in Google Sheets. See you then!
 by
by
22 comments
Hi team,
I know how to protect a worksheet from editing by an unauthorised user BUT
how do I protect the formatting on the worksheet from being altered by anyone bar owner of spreadsheet?
For example I have a drop-down list of House, Flat, Bungalow. I don't want the editor to add another option, only the OWNER can do this.
Please help.
Thanks.
Hi! Unfortunately, both Excel and Google Sheets do not consider formatting a worksheet as a change because the data in the cells does not change.
Como fazer para copiar uma planilha com proteção da planilha toda com exceção de intervalo de células, de uma pasta no google para outra pasta do google sem perder as proteções?
A Ideia era ter uma pasta de "Templates" com proteção de estrutura da planilha e das formulas e com campos de edição. Os usuários iam a esta pasta faziam uma copia e moviam para a pasta destino. Na pasta destino abriam a planilha e trabalhavam apenas nas células editáveis da planilha protegida.
Tentei, mas a proteção é perdida.
Hello Paula,
I'm sorry, we provide assistance in English only.
I'm afraid what you need is impossible. Once any user copies the spreadsheet to their Drive, they become the owners of the file, meaning they can edit every single cell.
Hence, you need to create multiple spreadsheets (one per user) in the Shared drive and set the editing permissions for each user right from there.
I need help please. I was recently removed off a google sheet I created, it was shared but as edit access only, ownership was never transfered. Now maliciously removed from my own work how can I regain access to this? I don't even know how it was possible to remove me in the first place, as owner do you not have any rights to what happens on these sheets? I'm floored and absolutely devastated that others not have control of my work while I was kicked out.
Hello Tasmin,
I'm so sorry this happened. If the spreadsheet was shared with you with editing permissions and the ownership was never transferred to your account, you won't be able to regain access, I'm afraid, until the spreadsheet is shared back with you.
google-drive-sheets-or-docs
Because people share password, it is possible for someone with your password to make changes under your name.
But you will not be notified of a change, because this feature only works when changes are made not by you.
So, is there a way to be notified when you make a change?
Why? Because to prevent your work being sabotaged by a co-worker.
Can you please enlighten me and help? Thank you
_____________________
p.s. because google spreadsheet / docs are shared, the files cannot be restricted. The managers have access and can make changes under my name. I need to know how to be notified of a change made under my name
______________________
Hello Penelope,
I'm sorry but there's no way in Google Sheets to get notifications about changes you make in your spreadsheets. However, you can track changes via Version History, it contains records about the changes made by you as well.
When you create any kind of restrictions either thru cells/range or for the entire sheets then save it after... Then when you try to Make a Copy thru File > Make a Copy, suddenly all restriction/s you've just set are lost for some reason/s is there any solutions for this concern?
Hello Julius,
At the moment Google Sheets doesn't support functionality that would copy the protection settings. You'll have to protect sheets/ranges manually anew in a copy of your spreadsheet.
Hello,
I was wondering if there was a way to protect the same cells that are protected on Google Sheets when downloading as a Microsoft Excel file. Thank you.
Hello Julie,
When you protect ranges and tabs in Google Sheets, the rules work only for the Google Sheets accounts. Since Google Sheets and Excel are different platforms with their own settings and accounts required, the protection you applied in Google Sheets will not be kept after downloading the spreadsheet as an Excel file.
Hi,
In my group we have diiferent tabs for team members.Is there any way that I can remove owner(me) in their tabs so that only they get the access
Hi Aditya,
No, the owner of the spreadsheet always has editing access to all tabs of the file. The only workaround would be to move those sheets to separate spreadsheets, share those spreadsheets with respective team members and make them the owners of those files.
I have create the one google file and many spreadsheet, share the sheet, My requirement was The spreadsheet all sheet view edit only owner, the share user only access spreadsheet edit and view option particular sheet only other sheet could not view and edit how do create.
Hello Vijayakumar,
Please review this paragraph to learn how to protect separate sheets from editing.
If you want to completely hide them from others, you will find the instructions in this blog post.
I deal with groups of people who pay for a conference. Each group has a group leader who is in charge of payment. Payments come in throughout the year. I have used a pivot table and slicer to create an 'invoice/statement' on a new tab for each group leader. How can I share this 'invoice tab' without having the group leader be able to see the rest of the information in my google sheet? My goal is to be able to update my main google sheet which will update each 'invoice tab' so that the leader can securely see the updates in real time. In the past I have had to do a lot of cutting and pasting and I would like to progress away from that archaic way of handling things. Thank you.
Hello Michele,
I'm afraid there's no way to share different tabs from one spreadsheet with different people.
As a workaround to manual copy-pasting, I can suggest you to try using the IMPORTRANGE function. It will copy the data to other files and will update there as you make changes to the source sheet.
I am trying to remove cell protection. The instructions say "Select any of the protected ranges and edit the permissions, or delete the protection by clicking the trash bin icon." Where is the trash bin icon? It does not appear on my Google sheet just as it does not appear in the screen shot above.
Hello Myrna,
Once the pane with ranges appears (like on the screenshot above), click on the range. Its settings will open and you'll be able to delete it.
Hi there, i've created google sheet and i am the owner of the google sheet. I've protected the cell by different user access. only granted user can modify the cell. everything is well until recently i've granted existing protected cell to a new user. The new user is not able to modify the cell. I've tried so many ways like remove the protected cell and recreate the protected range, re-added back all users inclusive the new user. Unfortunately, the new user still not able to modify the cell, whereas it working fine with other users. please help.
Hi Wawa,
It's hard to tell what may cause problems. It can be the lack of a locale (File > Spreadsheet setting) for both you and the user. It can be an old browser where Google Sheets doesn't work correctly (see system requirements). It can be any setting used to protect the range or share the spreadsheet.
If you've checked all of these and are sure they are not the causes of the issue, please try asking Google support or Help community for assistance:
https://support.google.com/docs/community?hl=en