We continue our "Back to Basics" journey by learning some peculiarities of editing Google spreadsheets. We'll start with some simple features like deleting and formatting the data and continue with fancier ones like leaving comments and notes, working offline, and quickly reviewing all the changes made in the file.
Not so long ago I've shed some light on the very basic features Google Sheets offers. I explained in detail how to create a table from scratch, share it and how to manage many files. (If you missed them, it may be a good time to check them out beforehand.)
Today I invite you to deepen your knowledge even more. Take some tea and have a seat - we continue with editing the documents :)
How to edit in Google Sheets
Deleting the data
Okay, this option is as easy as you can imagine: select a cell or a range of cells and press the Delete button on your keyboard.
To delete formatting in Google Sheets, select the range of cells and go to Format > Clear formatting or press Ctrl + \ on your keyboard.
Ways to format cells in Google Sheets
- The main way to format cells is using the toolbar. If you hover the cursor over an icon you'll see a tip explaining what it does. Google Sheets tool arsenal allows you to change the number format, the font, its size and color, and cell alignment. If you have at least the slightest experience in working with tables, this won't be a problem at all:

- To continue, you can freeze the top row in Google Sheets so that when you scroll the table up and down you could always see the names of the columns. And rows for that matter. This helps a lot when working with loads of data.
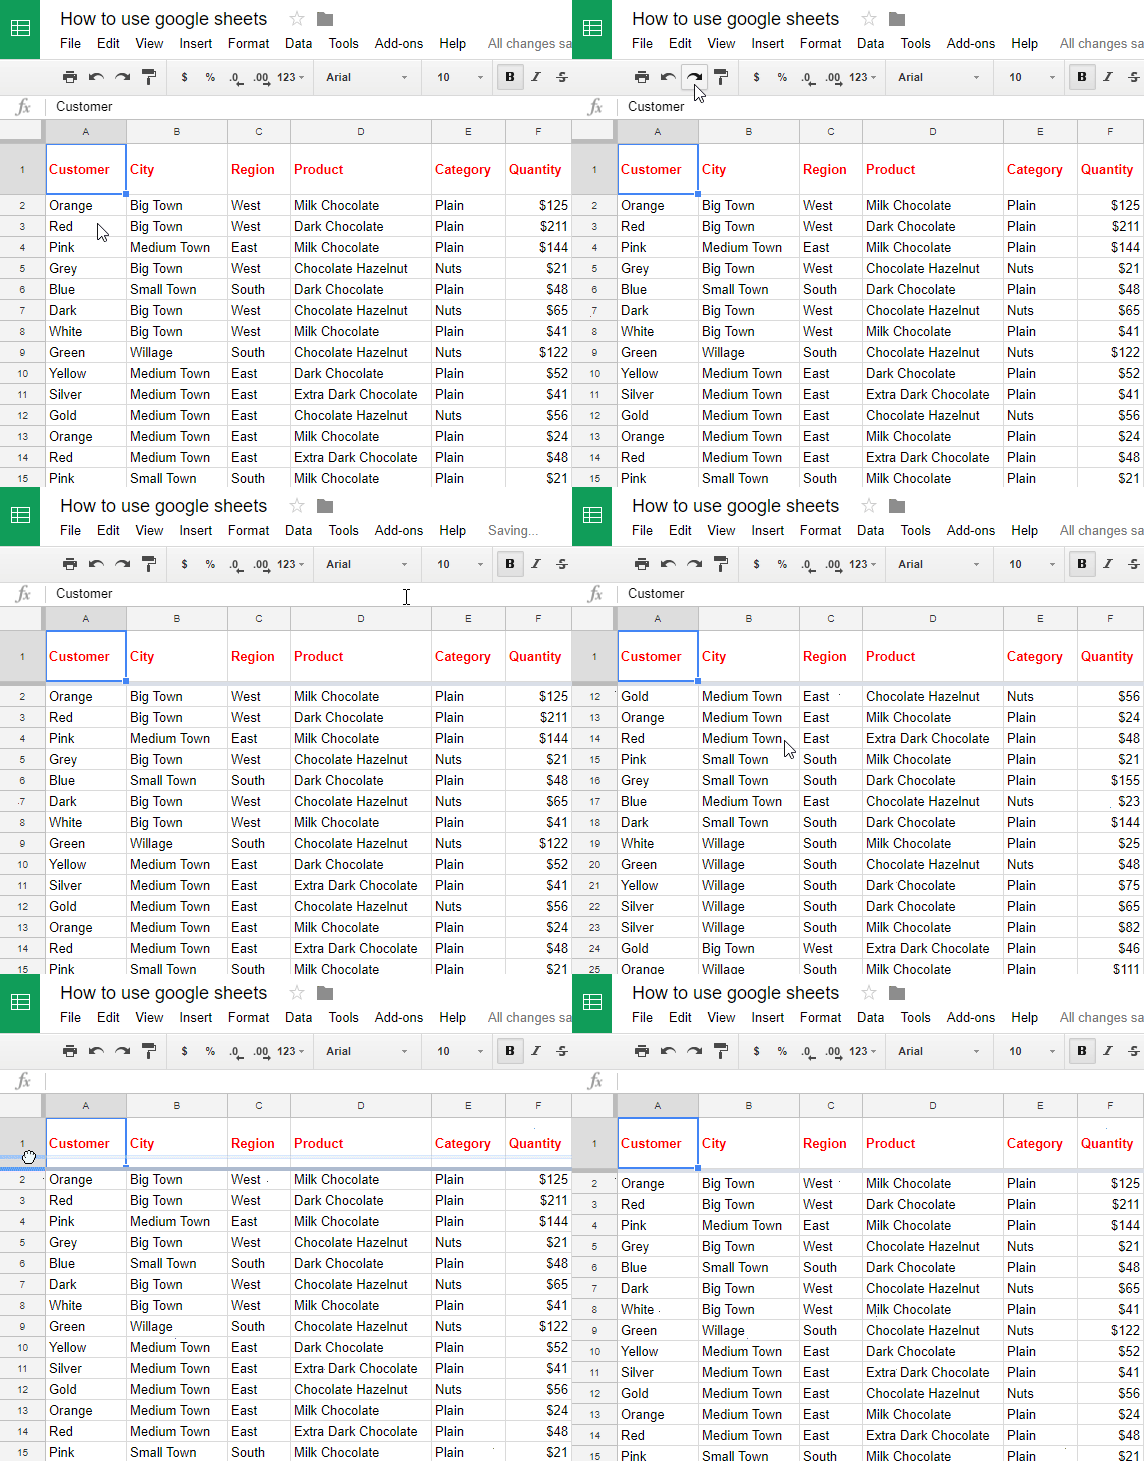
Let's suppose that we have a table with information on chocolate sales. We want the table to be as easy to read and understand as possible. To freeze the first row and column you can:
- Go to View > Freeze and choose the number of rows and/or columns to freeze.
- See that empty gray rectangle at the upper left corner of the spreadsheet where the column and row headers meet? Hover the cursor over its thick gray bar until the cursor changes to a hand. Then click, hold and drag this border line one row down. The same is used to freeze the columns.
Add, hide and "unhide" a sheet
Very often one sheet is not enough. So how do we add a few more?
At the very bottom of the browser window you can find the Add Sheet button. It looks like a plus (+) sign:
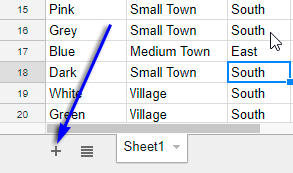
Click it and one blank sheet is added to the workspace right away. Rename it by double-clicking on its tab and entering a new name.
Note. Google Sheets limits the number of sheets in the file. Find out why it may prohibit adding new data to your spreadsheet.
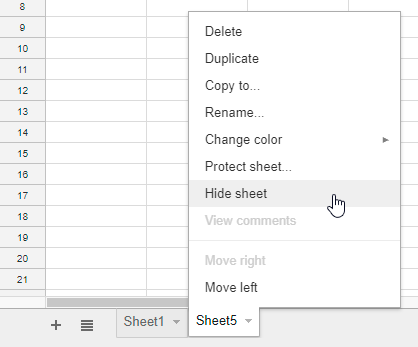
One peculiar thing is that you can hide Google sheets from other people. For that, right-click the sheet tab and choose to Hide sheet. Note that this context menu allows you to change the color of the tab, delete the sheet, copy or duplicate it:
Ok, we hid it. But how do we get it back?
Click the icon with four lines (All Sheets) to the left of the first sheet tab, find and click the hidden sheet. Or you just go to View > Hidden sheets in the Google Sheets menu:
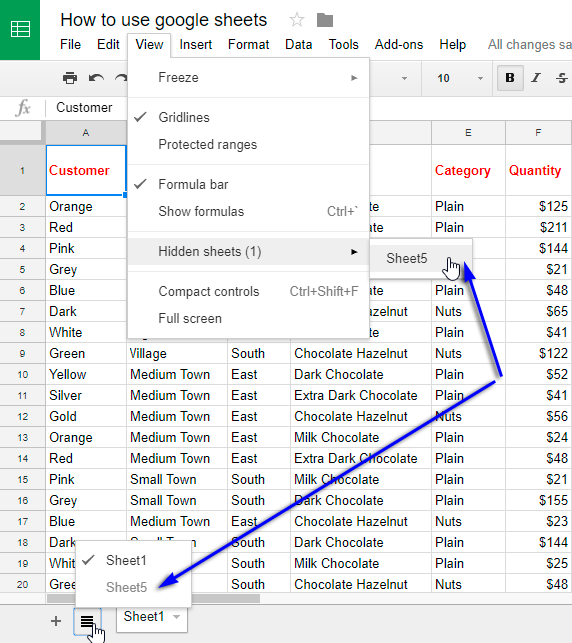
The sheet is back to play and is ready to be edited and managed.
Check edit history in Google Sheets
What happens if some mistakes were made when editing the table or, what's even worse, someone deleted a piece of the information by accident? Do you need to create copies of the documents every day?
The answer is no. With Google Sheets everything's much simpler and more secure. It saves the history of every change made to the file.
- To check the history of the entire spreadsheet, follow these steps.
- To check the edit history of single cells, follow these steps.
Resize your spreadsheet
One more question that may arise when editing the table - how do I resize it? Unfortunately, it's not possible to resize a table in Google Sheets. But since we're working in the browser, we can use its built-in option.
To do that, we have the traditionally used shortcuts:
- Ctrl + "+" (plus on the numpad) to zoom in.
- Ctrl + "-" (minus on the numpad) to zoom out.
Also, you can switch to the full screen mode in View > Full Screen. To undo the resizing and show controls press Esc.
How to use and edit Google Sheets offline
Many believe that the main disadvantage of Google Sheets lies in the inability to use it offline since the files are saved in the cloud. But it is a common misconception. You can make Google Sheets available offline, work with the tables in this mode and save the changes to the cloud later when the internet access is restored.
To edit Google Sheets offline, you need to set the synchronization with Google Drive.
Add Google Docs extensions to Google Chrome (this will be suggested to you once you turn on the offline mode in Google Sheets):
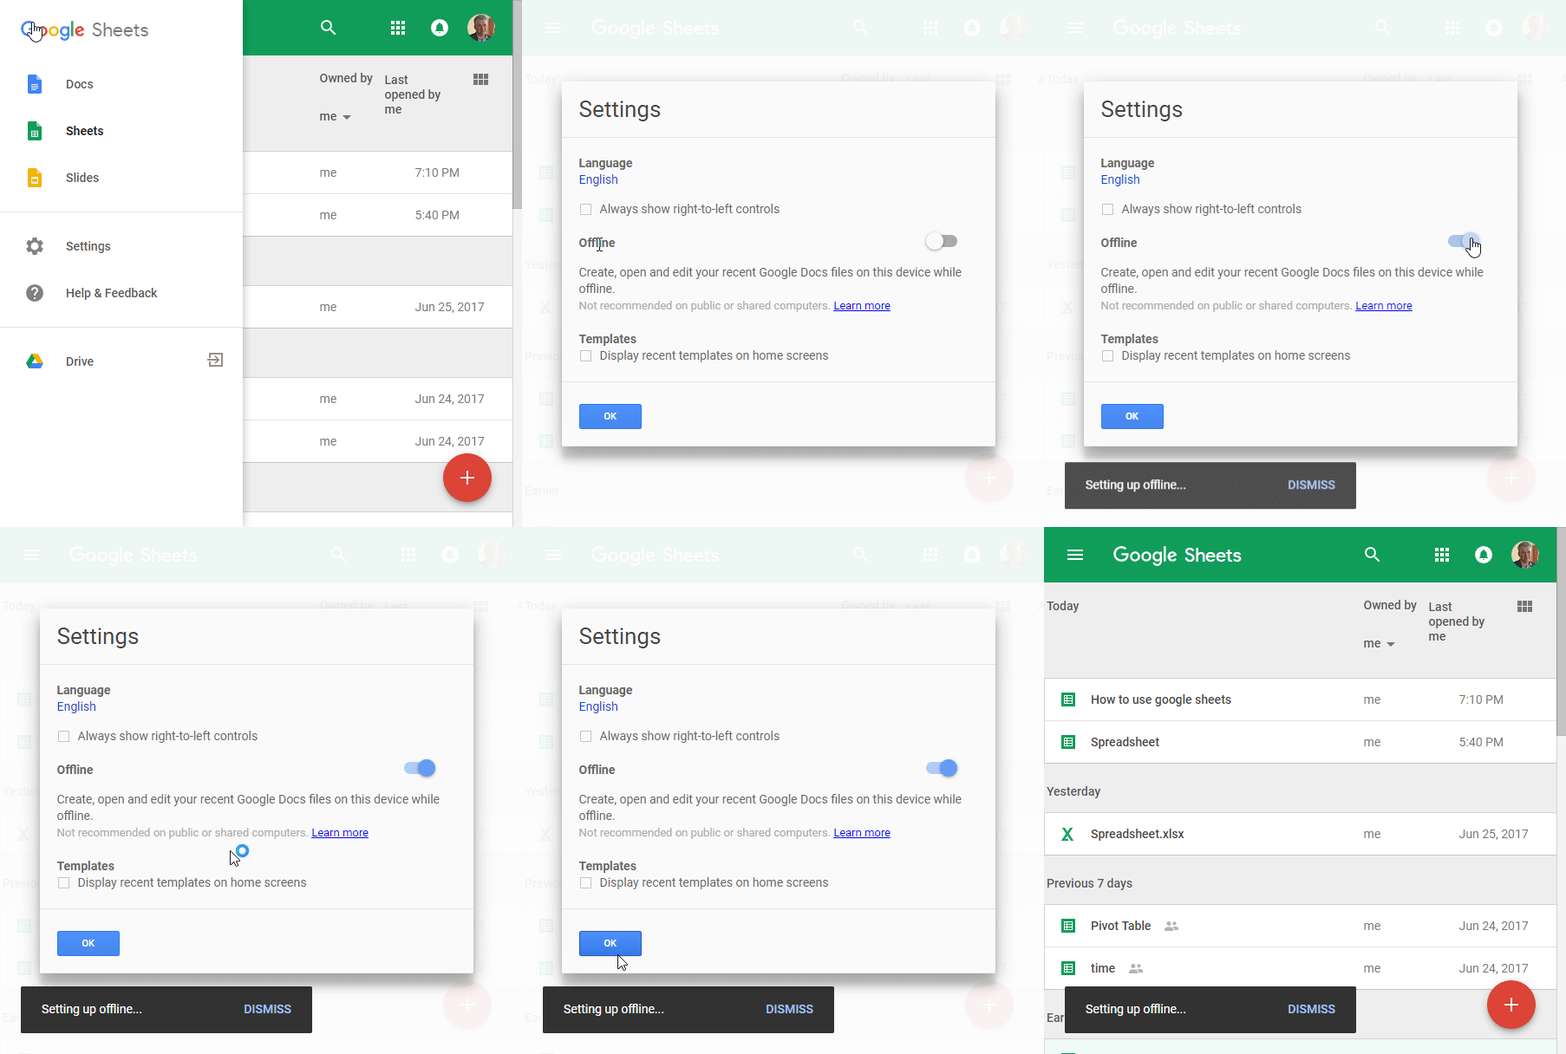
If you're going to use a mobile device or a tablet, make sure to install all the applications for Google tables, docs, and presentations as well as Google Drive.
One more piece of advice - before going to the places free from the internet, sign in to your Google account and open those files and applications that you plan to use, for example, during the flight. Leave the applications open so that you won't have to sign in to the account, which will be impossible without the internet. You'll be able to start working with the files immediately.
When editing Google Sheets offline, you'll see a special icon at the top of the screen - a bolt of lightning in the circle. When going back online, all the changes will be saved immediately and the icon will disappear. This allows working with Google Sheets at almost any time and any place despite the Internet access and without losing the data.
Note. You can only create, view and edit the tables and other documents when working offline. You won't be able to move the tables, rename them, change permissions and perform other actions connected with Google Drive.
Comments and notes in Google Sheets
As you may know, MS Excel offers to add notes to cells. With Google Sheets, you can add not only notes but also comments. Let's see how it works.
To add a note, place the cursor into the cell and choose one of the following:
- Right-click the cell and choose Insert note.
- Go to Insert > Note on Google Sheets menu.
- Press Shift + F12.
To add a comment, place the cursor into the cell as well and choose one of the following:
- Right-click the cell and choose Insert comment.
- Go to Insert > Comment on Google Sheets menu.
- Use the Ctrl + Alt + M.
A little triangle in the upper right corner of the cell will hint that there's either a note or a comment added to the cell. Besides, you'll see the number of cells with commentaries on the spreadsheet name tab:
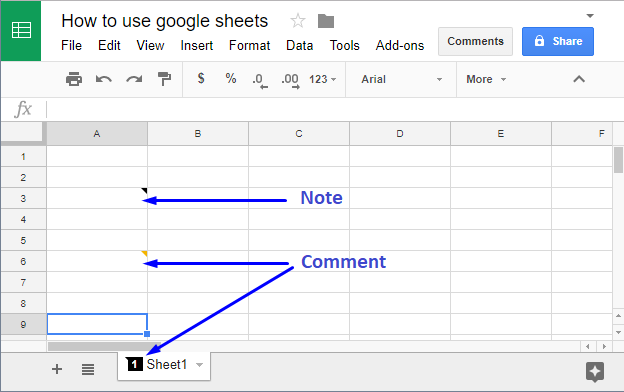
What is the difference between notes and commentaries? The link to the commentary can be sent to a colleague who edits the file with you. He or she will be able to reply to it:

Every comment can be replied directly within the table and every user who has access to it will get a notification about new comments and replies.
To delete the comment, press the Resolve button. It means that the questions discussed are resolved but their history will remain. If you press the Comments button at the upper right corner of the table, you'll see all the comments and will be able to re-open the resolved ones.
There, you can also adjust the notification settings by clicking the Notifications link. Choose whether you want to be notified about every comment, only yours, or none of them at all.
Print and download your Google spreadsheets
Now that you've learned how to create, add and edit the spreadsheets, you need to know how to print or save them to your machine.
To print Google sheets, use the menu: File > Print, or just use the standard shortcut: Ctrl+P. Then follow the steps on the screen, choose the printing options and get your physical copy.
To save the table as a file to your machine, go to File > Download as and choose the needed file type:
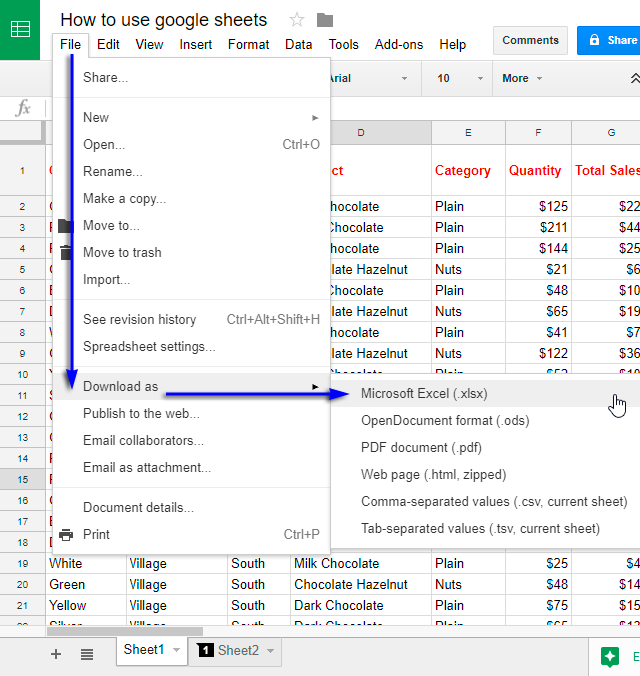
I believe that the formats offered are enough for almost every user's need.
All these basic features you've learned contribute to the daily work with tables. Make your files look nice and presentable, share them with others and work offline - it's all possible with Google Sheets. Just don't be afraid of exploring new features and give them a try. Trust me, at the end of the day, you will wonder why you hadn't used this service before.
 by
by