Today you will learn the very basics of Google Sheets. See how you can benefit from using the service: add and delete the sheets in the blink of an eye and get to know what functions and features you can use on a daily basis.
It's not a secret that most people are used to working with the data tables in MS Excel. However, now it has a worthy competitor. Allow us to introduce you to Google Sheets.
What is Google Sheets
Many of us think that Google Sheets is just a convenient tool to view the tables that are sent via email. But to be honest - it is an utter fallacy. This service can become a true MS Excel replacement for many users if, of course, they are aware of all the advantages and options Google offers.
So, let us compare these two rivals.
Google Sheets Pros
- Google Sheets is a free service. You don't need to install any additional software since you work with the tables right in your browser. Charts, filters and pivot tables contribute to effective data analysis.
- All the information is stored on Google Cloud, meaning that if your machine dies, the information will remain intact. We can't really say the same about Excel where the information is stored on one computer unless you intentionally copy it somewhere else.
- Sharing the documents has never been so easy - just give someone the link to the file.
- You can access the Google Sheets tables not only at your home or office but at any place with the Internet. Work with the table from the PC or a laptop browser, tablet or a smartphone and it doesn't matter what operating system is installed on the device. The electronic devices, in addition, give an opportunity to manage the tables even without the Internet connection.
- It's perfect for team work one file can be edited by several users at the same time. Decide who can edit your tables and who can only view them and comment on the data. You can adjust the access settings for every user as well as for groups of people. Work with colleagues simultaneously and you'll see the changes in the table immediately. Thus, you no longer need to email the edited versions of the files to one another.
- Version history is very convenient: if a mistake sneaks into the document but you discover it some time later, there's no need to press Ctrl + Z a thousand times. The history of the changes shows what's been happening with the file from the very moment of its creation. You'll see who worked with the table and what changes were made. If, for some reason, some data vanish, they can be restored in a couple of clicks.
- If you know Excel through and through you'll get used to Google Sheets in no time since their functions are very much alike.
Google Sheets Cons
- It works a little slower, especially if you have a slow Internet connection.
- The safety of the documents depends on the safety of your Google account. Lose the account and you may lose the documents as well.
- The variety of the functions is not so wide as in MS Excel but it's more than enough for the majority of the users.
Of Google Sheets functions and features
Let's examine Google Sheets functions and features more closely since it is they that interest many of us the most.
Google Sheets numbers 371 functions! Here you can find a full list of them with their descriptions. They are grouped into 15 sections:
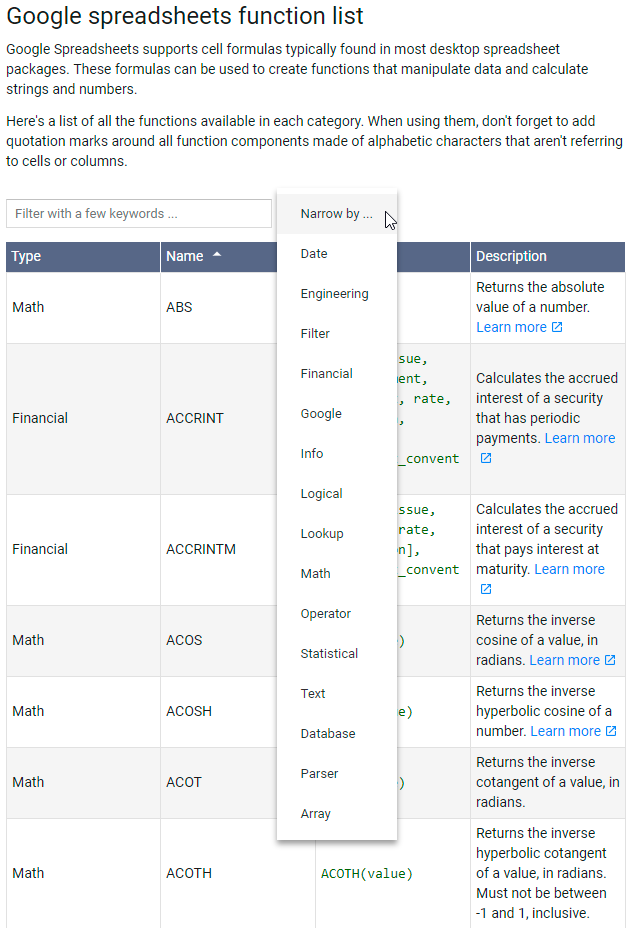
Tip. Useful Google Sheets functions for daily use: formula examples.
Yes, MS Excel has 100 more functions.
But you may be surprised at how this apparent shortage in Google turns into an advantage. If you didn't manage to find a familiar or necessary Google Sheets function, it doesn't mean you need to give up the service right away. You can create your own function using Script editor:
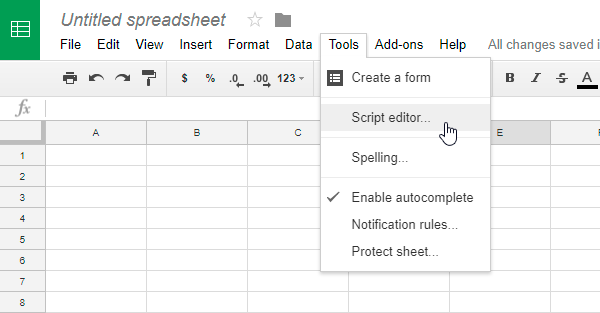
Google Apps Script programming language (an extended JavaScript version for Google services) opens multiple possibilities: you can write a separate scenario (script) for every table. These scenarios can alter the data, merge various tables, read files and much more. To run the scenario, you need to set a certain condition (time; if the table is open; if the cell is edited) or just click the button.
Google Apps Script allows the following apps to work with the Sheets:
- Google Docs
- Gmail
- Google Translate
- Google Forms
- Google Sites
- Google Translate
- Google Calendar
- Google Contacts
- Google Groups
- Google Maps
If you can't solve your task with the standard features of Google Sheets, you can try looking for the necessary add-on. Just open the Store with all the available add-ons from the menu: Extensions > Get add-ons...
I'd recommend you check Power Tools in particular: a collection of 40+ different tools for Google Sheets.
Google Sheets has a couple of dozens of keyboard shortcuts for almost every operation. You can find the full list of these shortcuts for PC, Mac, Chromebook and Android here.
I believe that the combination of all these features is enough for Google Sheets to meet your basic table needs.
If you are still not convinced then please tell us: what tasks can be solved within Excel but not with the help of Google Sheets?
How to create a Google spreadsheet
For starters, you will need a Gmail account. If you don't have one - it's never too late to create it. Once you register, you'll be able to use the service. Click the Docs option from the Google apps menu in your profile and choose Sheets. Or simply follow the link sheets.google.com.
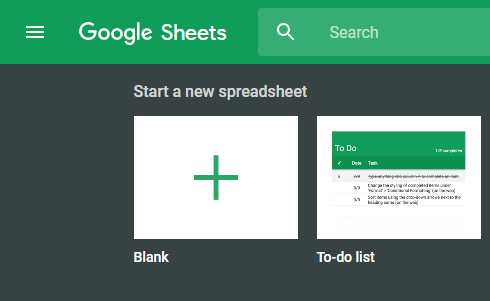
You will be redirected to the main menu. (In the future, you'll have a list of your recently used files here.) At the top of the page, you'll see all the options to start a new spreadsheet, including Blank. Click on it:
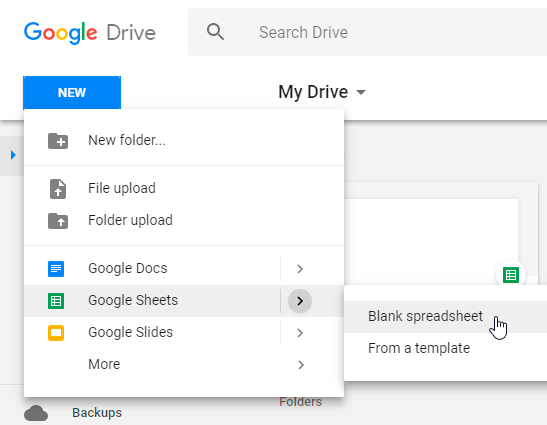
Another way to start working with Google Sheets is via Google Drive. It is created automatically once you register a Gmail account. Open your Drive, click New > Google Sheets > Blank Spreadsheet:
And finally, if you open the table you worked with previously, you can create a new table by choosing File > New > Spreadsheet:
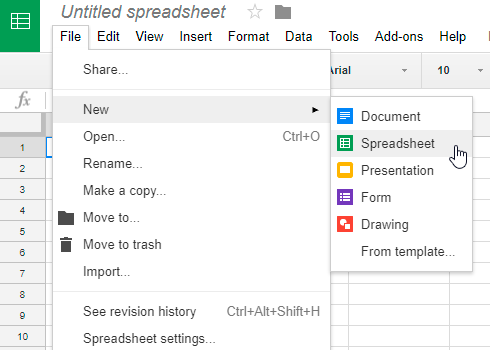
So, you've created a new spreadsheet.
Let's give it a name. I think you will agree that "Untitled Spreadsheet" can be easily lost among other nameless files. To rename the table, click on its name in the upper left corner and enter the new one. To save it, press Enter or click somewhere else in the table.
This new name will appear on the main Google Sheets page. Every time you open the main page you'll see all your saved tables.
How to use Google Sheets
So, a blank table is looking at you from the screen.
How to add data to Google spreadsheet
Let's fill it with some data, shall we?
Just like other electronic tables, Google Sheets works with rectangles that are known as cells. They are arranged in rows marked with numbers and columns marked with letters. Each cell can obtain one value, whether textual or numeric.
- Select the cell and enter the needed word. When the data is there, it should be saved in one of the following ways:
- Press Enter (the cursor will be moved to the cell below).
- Press Tab (the cursor will be moved to the adjacent cell on the right).
- Click any other cell to move to it.
As a rule, the numbers are aligned to the right side of the cell while the text is to the left. Though this can be easily changed by using the Horizontal align tool. Select the cell or the range of the cells where you want to edit the alignment and click the following icon on the toolbar:

Choose the way of aligning the data from the drop-down menu - to the left, center it or to the right.
- The information can also be copied to a cell (a range of cells). I think we all know how to copy and paste the data: select the cell (the needed range), press Ctrl + C, put the cursor into the other needed cell (if you copied the range this will be the top left cell) and press Ctrl+V. This is the fastest and easiest way.
- You can also copy the data from one cell to another by drag'n'dropping. Hover the cursor over the blue dot at the bottom right corner of the cell, click it, hold and drag in the needed direction. If the data contains numbers or dates, press Ctrl and the series will continue. This also works when the cell contains text as well as numbers:
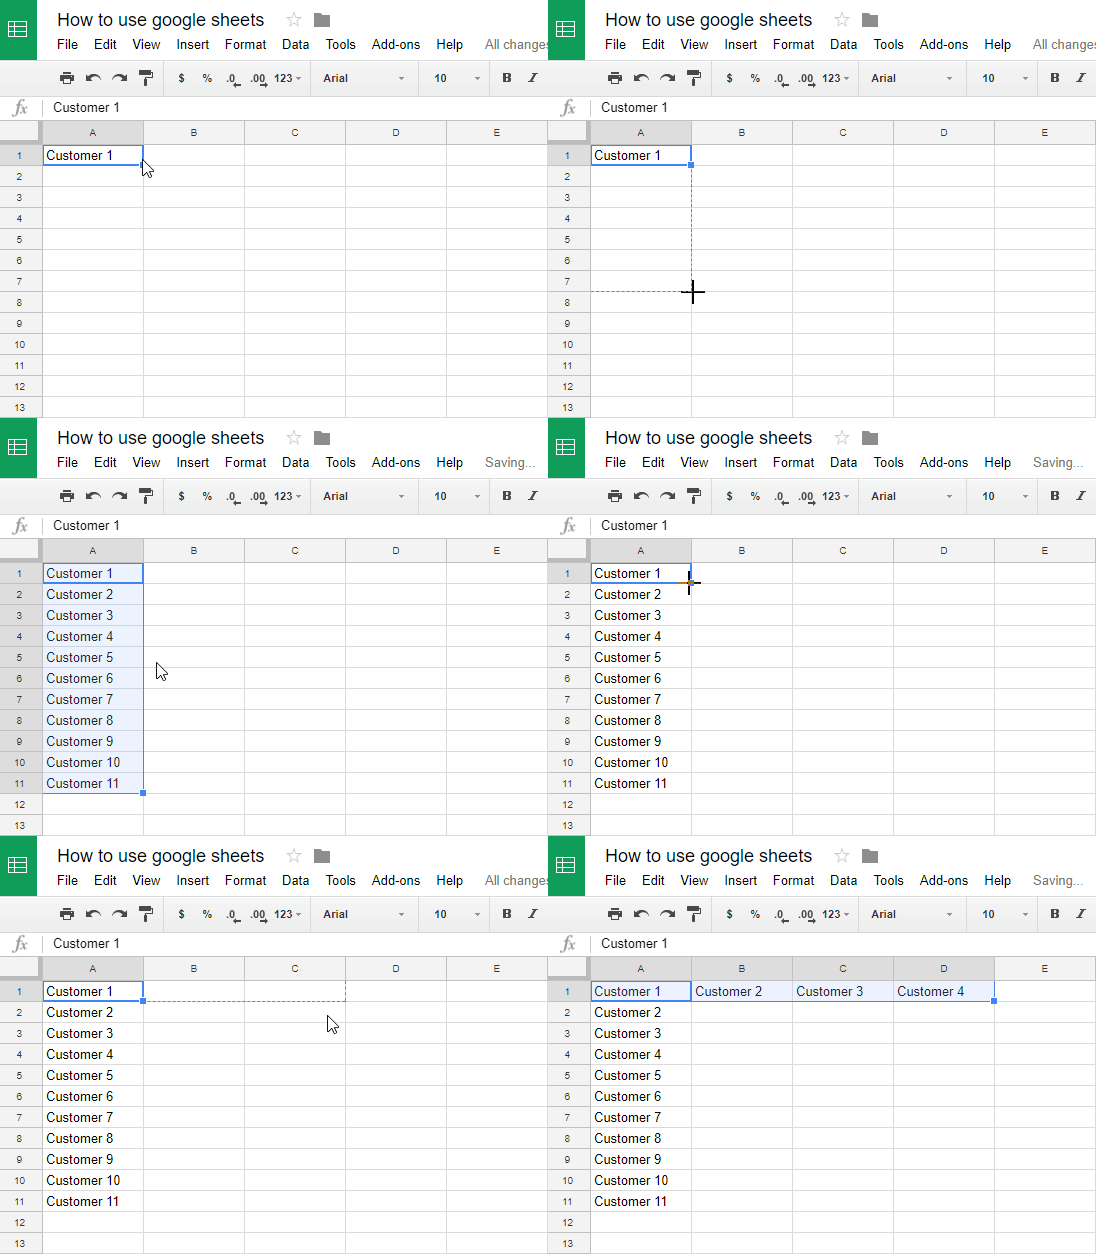
Note. If you try to copy the dates in the same way, you won't get the same result.
We've shared a few ways to help you enter the data faster.
- But what if the needed information is already there, in other files, and you don't want to enter it manually again? Here are some useful methods to lighten the work.
The simplest way is to copy the data (numbers or text) from another file and paste it in the new table. For that, use the same Ctrl + C and Ctrl + V combination.However, this method has a tricky part - if you copy from the browser window or .pdf file, all the records are often pasted in one cell or one column. But when you copy from another electronic table or from the MS Office file, the result is as needed.
What you should be aware of is that Google Sheets doesn't understand Excel formulas, thus only the result can be transferred. As a workaround, there's another more convenient way - to import the data.
The most common file formats to import from are .csv (the values divided by comma), .xls and .xlsx (Microsoft Excel files). To import, go to File > Import > Upload.
In the Import file window, My Drive tab is active by default. You will see the list of .xlsx files if there are any on Google Drive. What you need to do is to click the needed file and press the Select button at the bottom of the window. But you can go to the Upload tab and select a file from your computer, or simply drag one directly into the browser:
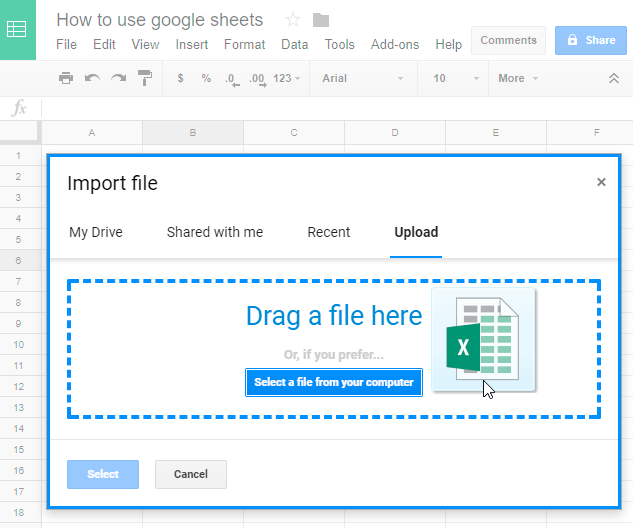
You can import the data directly to the sheet, create a new table with it or replace the worksheet with the imported data.
- As always, there's another, more complicated way of creating Google Sheets from another file on your machine.
Open Google Drive (you can create a special folder for the new files there). Drag the document located on your PC to the browser window with Google Drive open. When the file is uploaded, right-click it and choose Open with > Google Sheets:
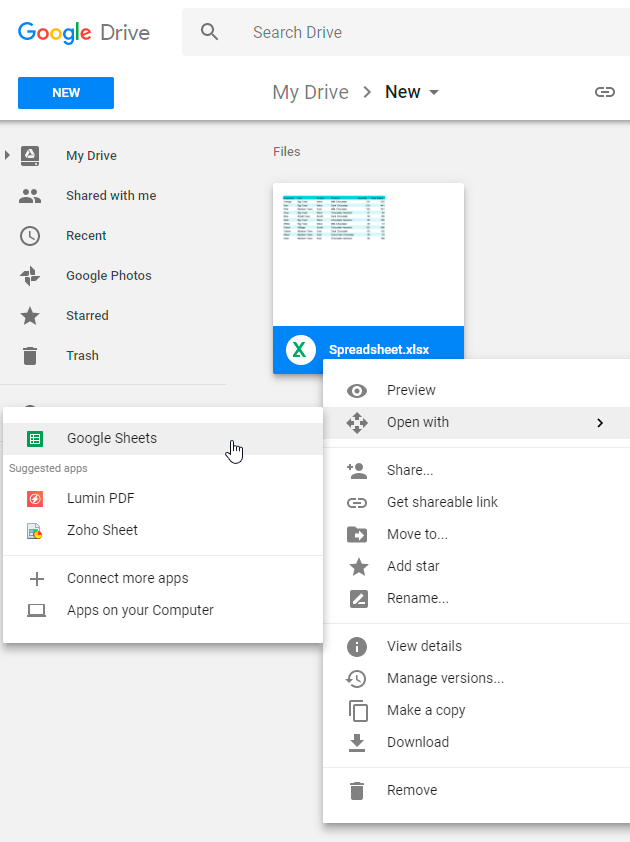
Voila, now you have the data in the table.
Tip. Want to make it look pretty and organized? Check out this tutorial.
As you could have guessed, there's no need for you to worry about the safety of the table anymore. Forget the Ctrl + S combination. The server saves the changes automatically with every single character entered. You won't lose a word if anything happens with your PC while you work with the table.
Remove Google spreadsheet
If you use Google Sheets on a regular basis, in time you may notice that you no longer need many of the tables. They only take space in Google Drive and space is what we often require the most for our documents.
That's why you'd better delete redundant and unused files. How?
- Open the table you're ready to delete and go to File > Move to trash:
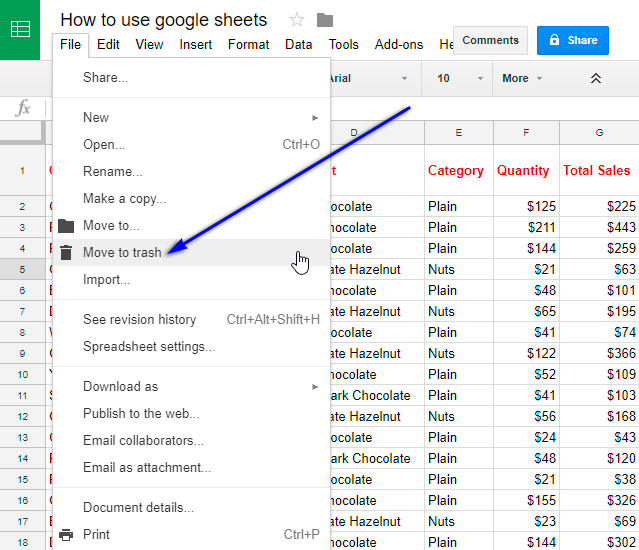
Note. This action won't delete the file from Google Drive permanently. The document will be moved to trash. The people whom you gave access to the file will lose it as well. If you want others to work with the tables, consider appointing a new file owner and then delete the file from your documents.
- The table can also be deleted from the main Google Sheets window:

- Another option is to find the file on Google Drive, right-click it and select the trash bin icon or press the same icon on the Google pane at the top of the page:
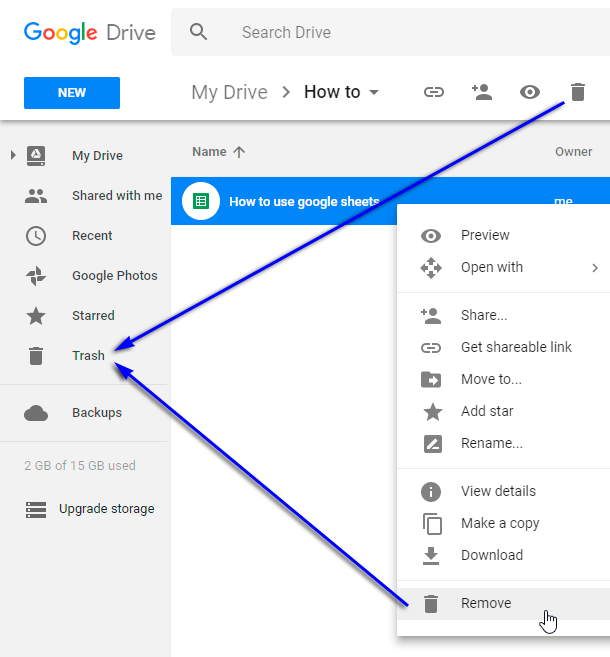
Don't forget to empty the bin to delete the files permanently and clear some space on Google Drive. If you don't empty the bin, the files can be restored the same way as you've most likely done in Windows.
Note. Only the owner of the table can delete it. If you try to delete the file owned by others, you will no longer see it while others will. This is the main difference between your own tables and others'. Your own table can always be restored from the trash, while to access the table owned by others you'll need to ask for permission to work with it once again.
Please keep in mind that the main Google Sheets page allows filtering the files according to their owners:
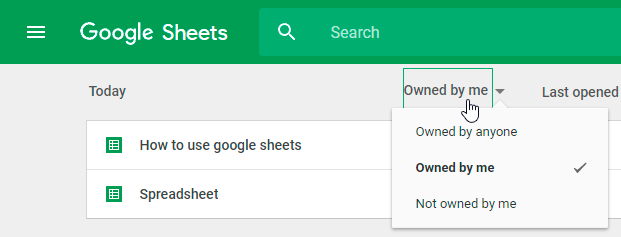
- Owned by anyone - you'll see the files you own as well as those you were given access to. Also, the list contains all the tables that were viewed from the links.
- Owned by me - you'll see only the tables that you own.
- Not owned by me - the list will contain the tables that are owned by others. You won't be able to delete them, but you'll be able to view and edit them.
That's it for today, boys and girls. I hope you found this information helpful!
Next time I will tell you more about sharing, moving and protecting your worksheets and the data. Stay tuned!
 by
by
2 comments
How do I stop Google Sheets from turning phone numbers and emails into hyperlinks (specifically turning them blue and underlining the email or numbers)?
Hello Paul,
Could you please provide the examples of the numbers and emails you have? You see, they don't turn into hyperlinks when I enter them.
If this helps, you can select all hyperlinks, right-click them and choose Unlink from the context menu.