This tutorial explains how to save an email as a template in Outlook 365 through 2016. It also covers how to edit your templates, pin them for quick access, and use them when replying to frequently sent messages.
Outlook message templates are a really powerful feature, though often underestimated. Rather few people know that templates for Outlook emails exist and even fewer know how to make and use them the right way.
Just imagine how much time you could save if instead of typing the same text over and over again, you could simply click on a template, and a nicely formatted message with accurate, pre-verified information would be ready to send!
Note. This tutorial covers email templates in classic Outlook for Windows. If you are using the new app or Outlook online, please refer to these guides:
- My templates add-in - create short reusable text snippets.
- Full-featured email templates - equivalent to classic .oft templates in the new Outlook and web.
How to create an email template in Outlook
To make a message template in Outlook, carry out these steps:
- Create a new message. In Outlook, go to the Home tab and click New Email. Compose your message just like you normally would. Format the text, insert links or images, attach files, include tables, lists and other elements.
- Fill message fields.
- Fill in the Subject line.
- If needed, you can add addresses in the To, Cc, or Bcc fields, though this is optional, as in most cases you'll choose recipients later when using the template.
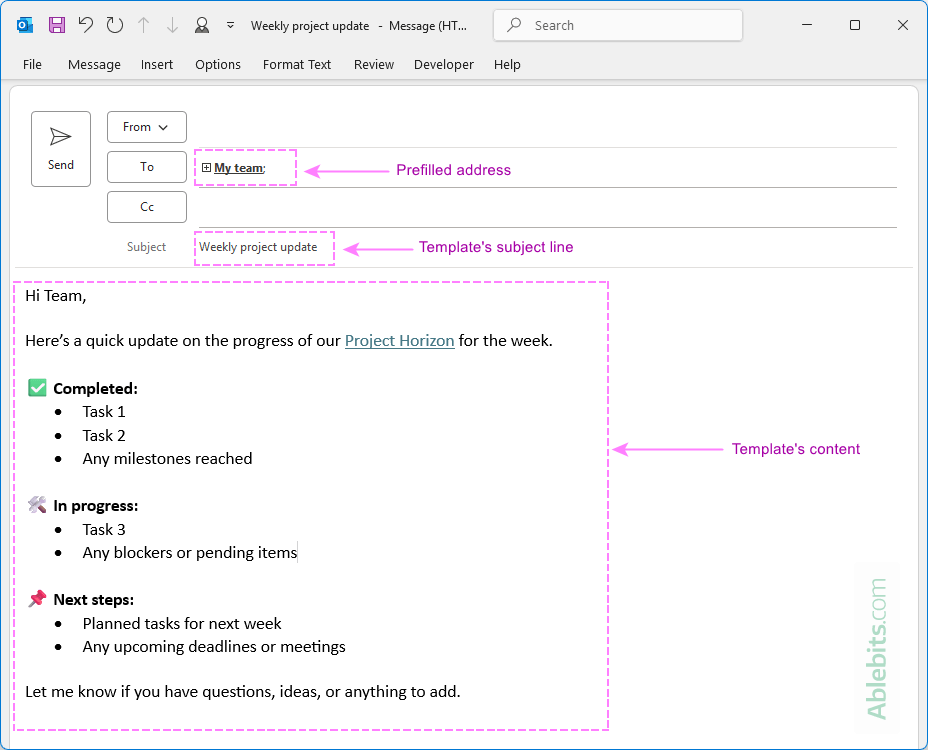
- Save an email as a template in Outlook.
- Click the File tab, then choose Save As.
- In the Save as type dropdown, select Outlook Template (*.oft).
- Give your template a clear name you'll recognize later.
- Click Save.
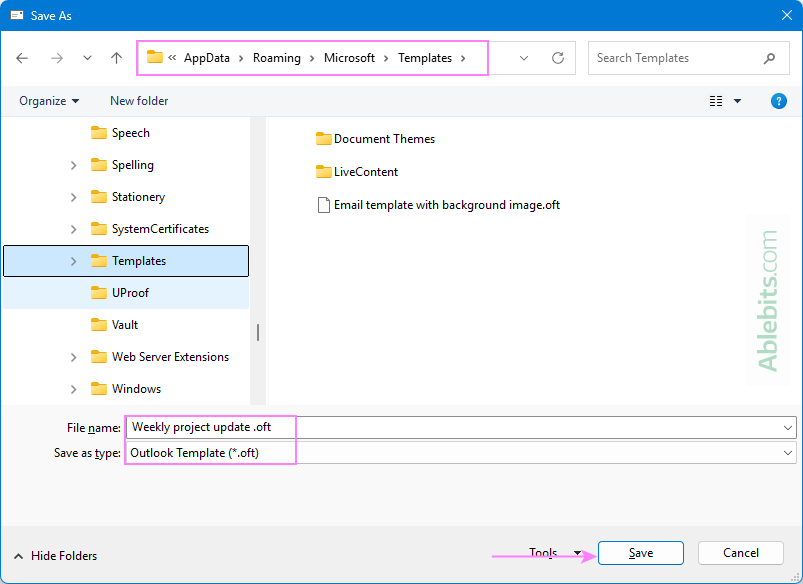
That's it! Your new template is now saved and ready to use whenever you need it.
How to use email templates in Outlook
To start a new message using a saved template, this is what you need to do:
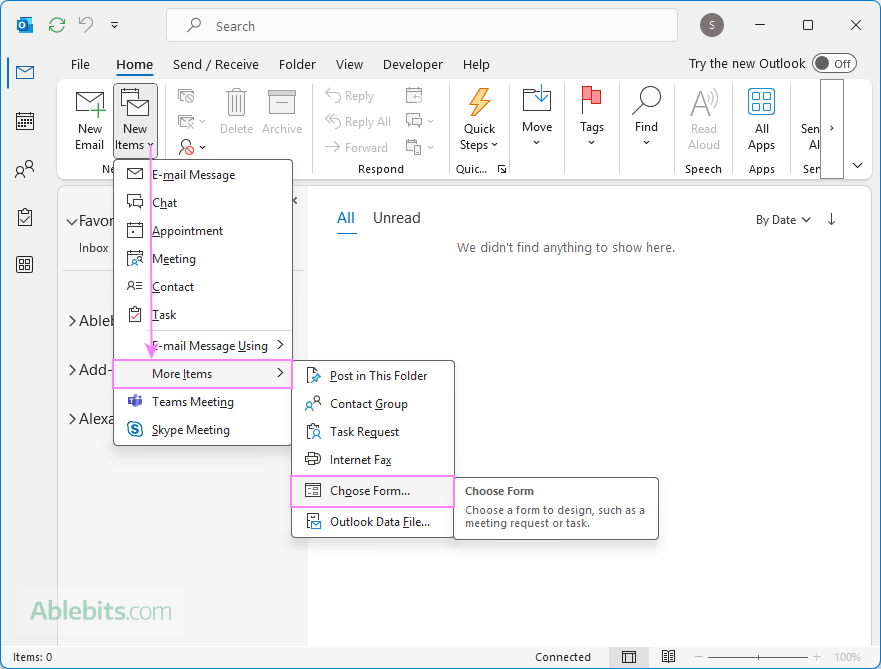
- Access email templates in Outlook. On the Home tab, click New Items > More Items > Choose Form.
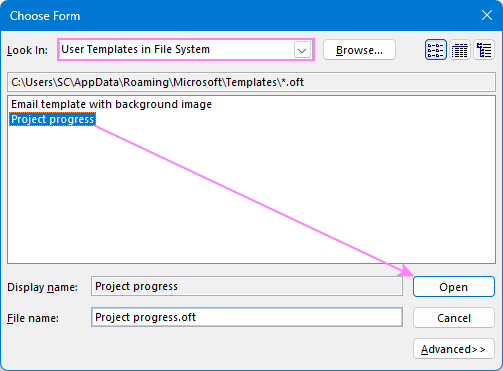
- Insert a template into a message. In the Choose Form dialog box that appears, select User Templates in File System from the Look in drop-down list. This will display all templates you've saved in the default location. Select the template you want to use and click Open.
A new message will be created based on the chosen template, auto-filled with the subject, body text, formatting, and embedded images.
Note. If your .oft file is saved in a custom folder (e.g. on your desktop, a shared network drive, or cloud storage), click the Browse button in the Choose Form window and navigate to where it's stored.
Tip. If you use templates often, you can reduce the number of clicks by adding the Choose Form command directly to your Outlook ribbon. We have a special guide on how to add a custom button to Excel ribbon. In Outlook, the steps are identical.
How to change Outlook email template
If you need to update the content of a saved email template in Outlook, follow these steps:
- Open the existing template. In your Outlook, go to Home tab > New Items > More Items > Choose Form > User Templates in File System. This will open your template as a new message.
- Make your changes. Edit the message just like any regular email: update the text, pictures, subject line, or formatting as needed.
- Save the updated template. Click File > Save As and choose to save an email as an Outlook Template (*.oft). You can use the same file name as the original if you want to overwrite it, or give it a new name to keep both versions.
That's it! Your updated template is now ready to use the next time you need it.
How to delete Outlook templates
If you have some outdated message templates you no longer need, you can delete the corresponding .oft files directly from your file system. Here's how:
- Access the templates folder. Launch File Explorer (Win + E) and navigate to the folder where your templates are stored.
- Delete the template. Select the .oft file you want to remove, and press Delete on your keyboard. Or right-click the unwanted template and choose Delete from the context menu.
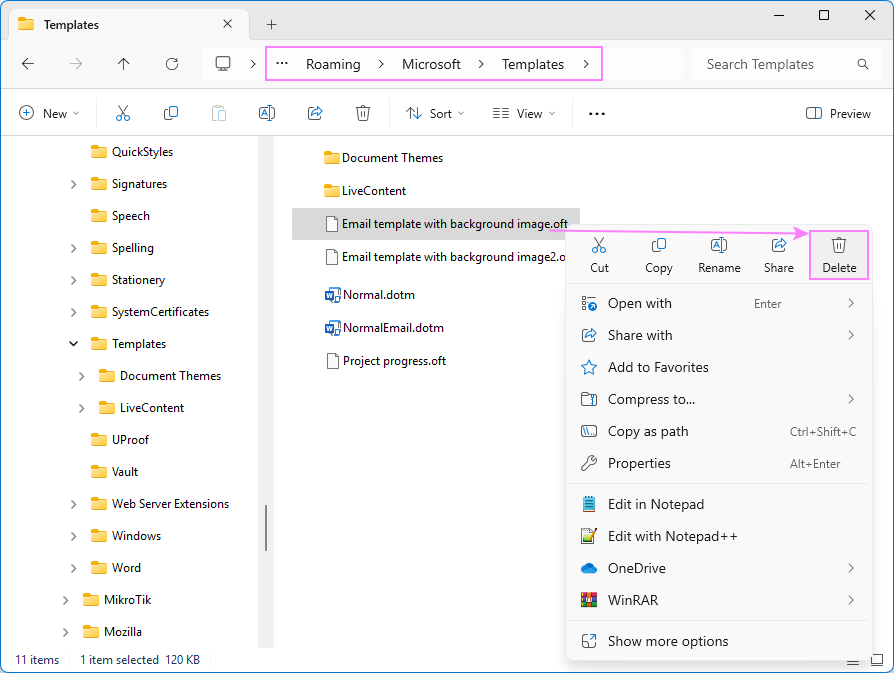
Done! You have successfully removed an Outlook template from your system.
Tips for using and customizing Outlook templates
Here are a few helpful ideas to get the most out of your message templates.
Share Outlook email templates with others users
Want others to use your template? While Outlook does not provide a sharing feature, there are a couple of easy workarounds:
- Send your .oft files as email attachments to your colleagues.
- Save your .oft files in a shared OneDrive or SharePoint folder instead of the default location, so your teammates can access it.
Please refer to How to share Outlook email templates for a step-by-step walkthrough.
Turn any sent or received email into a template
If you want to reuse a message you've already sent or received, just do this:
- To save a full message as a template, open it from your Sent Items, Drafts, or any other folder and save it as an Outlook .oft template.
- To include a specific part of an existing message in a template, copy that part into a new email, and then save that message as a template.
Include attachments in Outlook templates
If you regularly send files with your messages, you can build them into your template:
- Start a new email.
- Attach the files you want to include.
- Save the message as a .oft file.
For detailed steps, check out the guide on creating Outlook template with attachments.
Use images or emojis for a personal touch
To make your templates feel more attractive and human, you can insert company logos, headers, or other visuals. Use emojis to lighten the tone when appropriate, for example in internal or friendly messages.
For the detailed guidance, see How to include images into Outlook templates.
Avoid duplicate signatures
If your Outlook is set to automatically add signature into emails, turn it off before creating a template. Once the template is saved, you can re-enable your auto-signature again. This ensures your message includes only one signature when it's sent.
Where are Outlook templates stored?
By default, classic Outlook saves all email templates (.oft files) to the following location on your computer:
C:\Users\UserName\AppData\Roaming\Microsoft\Templates
Quick access to the templates folder
To jump straight to the default Outlook templates folder, copy and paste the path below into File Explorer's address bar and press Enter:
%userprofile%\AppData\Roaming\Microsoft\Templates
Can I save templates to another folder?
Yes, you can save your Outlook templates to any folder you prefer, including a shared drive or cloud folder. Just keep in mind that when inserting a template into a message, you'll need to browse to that exact folder if it's not the default location.
Tip. The AppData folder is hidden by default in Windows. If you don't see it in File Explorer, click View > Show and check Hidden items.
How to pin templates in Outlook
If you use certain templates often, opening them through the Choose Form menu each time can feel quite a long way. While it is not possible to pin a template directly to the Outlook ribbon or Quick Access Toolbar, there's a handy workaround – pinning templates to the Windows taskbar for quick access.
Step 1. Pin a template to the taskbar.
- In File Explorer, open the folder where your Outlook templates are located. The default one is here.
- Find the .oft file you want to pin and drag it over the Outlook icon on your taskbar. When the icon highlights, release the mouse. This will pin the template to the Outlook icon's right-click menu.
You can repeat this process for any other .oft files to pin as many templates as you need.
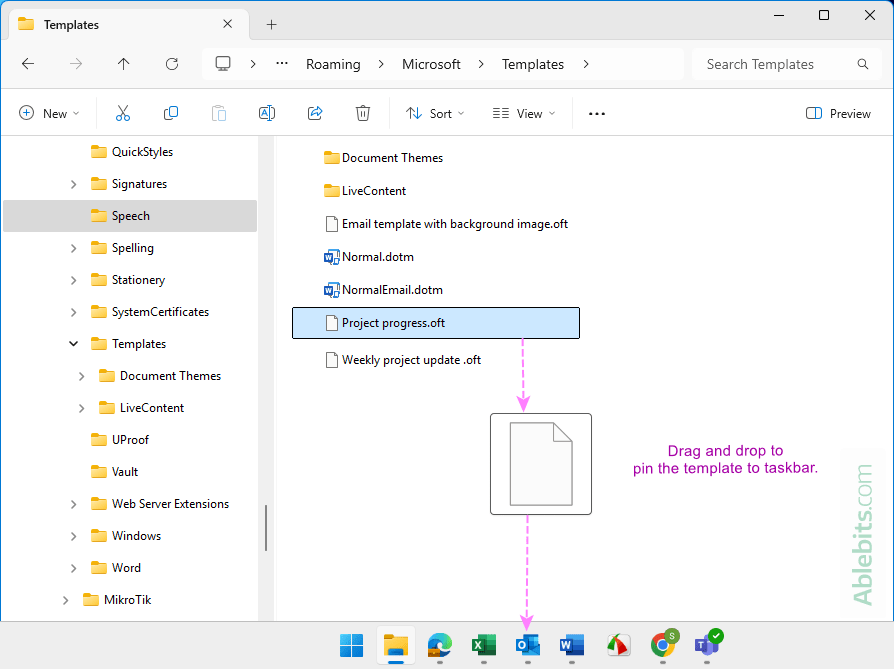
Step 2. Access the pinned template.
Next time you want to email with template in Outlook, just do this:
- Right-click the Outlook icon on your taskbar.
- Under Pinned, click your template to open it right away.
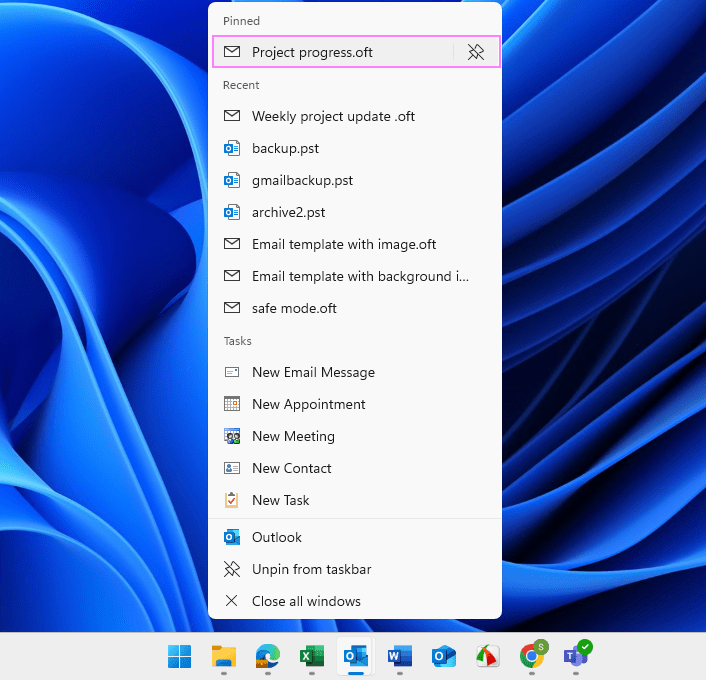
This drag-and-drop method works nicely on Windows 10 with Outlook 2016 and newer versions, however it does not work on Windows 11.
How to pin Outlook template to taskbar on Windows 11
To pin an email template to the taskbar on Windows 11, proceed in this way:
- Open the template in Outlook. Use the Choose Form method to open your template as a new message.
- Save it again as a template. Without changing anything, click File > Save as > Outlook Template (*.oft). This will add the template to the Recent list in the Outlook taskbar menu.
- Pin the template from the Recent list:
- Right-click the Outlook icon on the taskbar.
- Under Recent, find your template.
- Click the Pin icon next to it or right-click and choose Pin to this list.
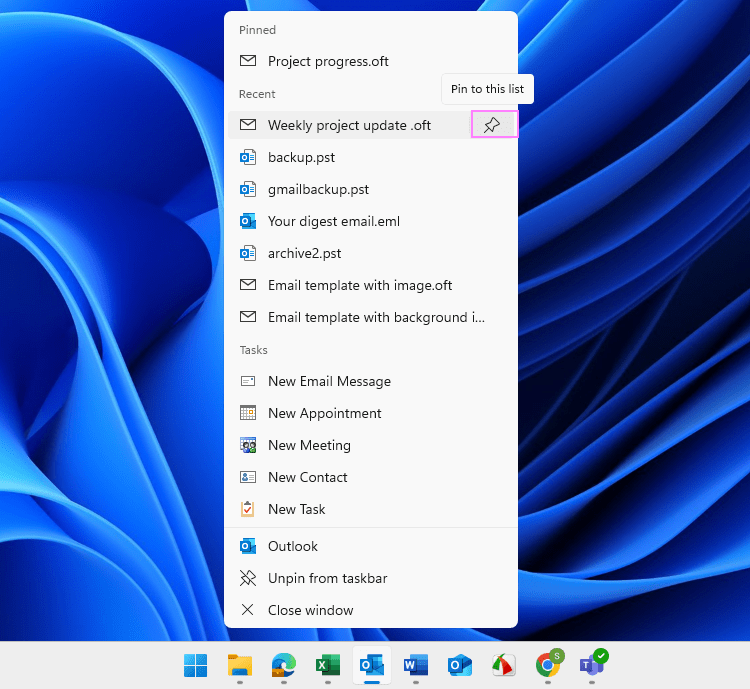
Remove pinned email template from taskbar
If you don't want a particular template on your Windows taskbar any longer, here's how you can unpin it:
- Right-click the Outlook icon in the taskbar.
- Hover over the template and click the Unpin icon next to it. Or right-click the template and select Unpin from this list.
Create Outlook template shortcut
Another quick way to access your frequently used message template is to make a desktop shortcut. Here is how you can do this:
- In File Explorer, navigate to the folder where your Outlook templates (.oft files) are saved.
- Create a desktop shortcut based on your version of Windows:
- On Windows 10 and earlier, right-click the template file and choose Send to > Desktop.
- On Windows 11, right-click the template, select Show more options, then choose Send to > Desktop (create shortcut).
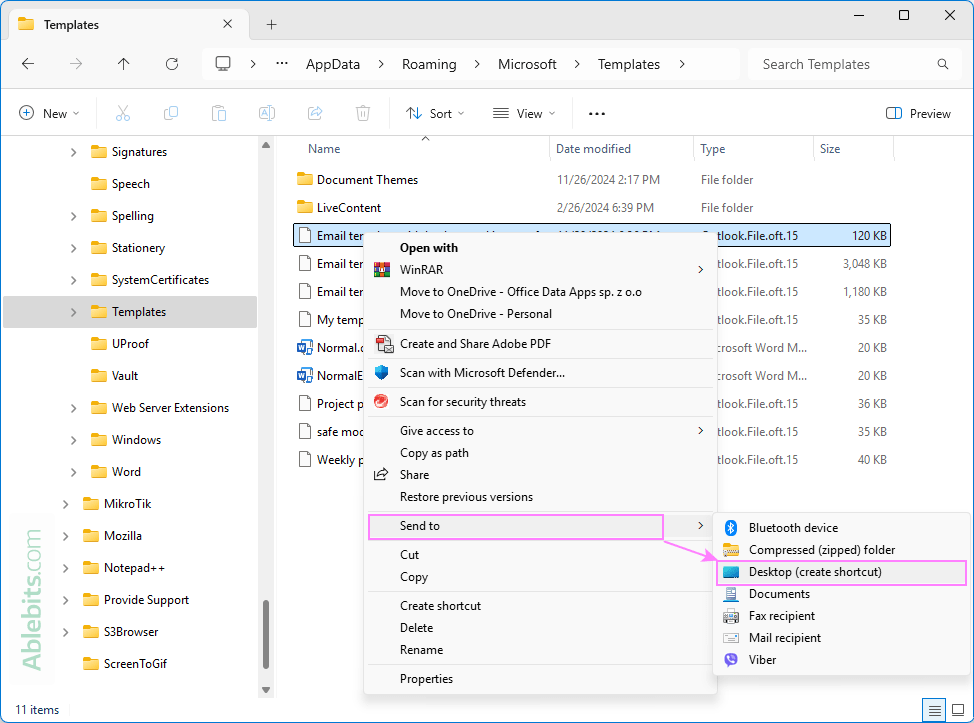
You'll now see the newly created shortcut on your desktop. Just double-click it to start a new message using that template.
Using My Templates add-in in classic Outlook
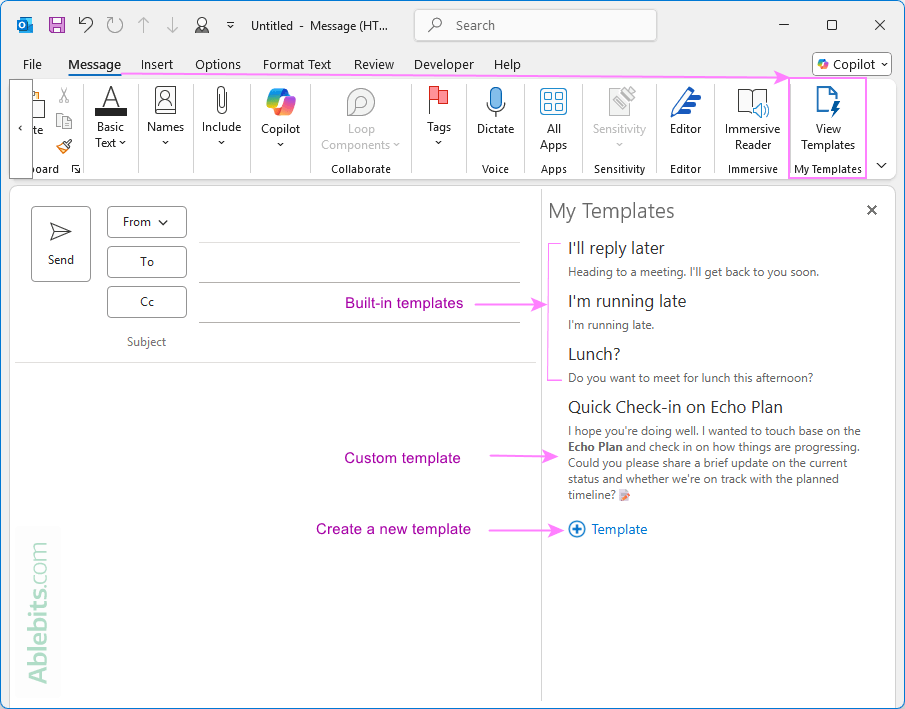
Aside from traditional .oft templates, modern versions of Outlook, including Microsoft 365, Outlook 2024 and 2021, offer another simple way to set up canned responses using the My Templates add-in. This tool, originally designed for the new Outlook and web app, is now available in the classic desktop version too. Here's how to use it:
Access My Templates
- Create a new message.
- On the Message tab, click View Templates.
- A task pane will appear on the right, showing a few prewritten snippets.
Create a template
- In the My Templates pane, click + Template.
- Enter a title for your template and type the message content in the corresponding boxes.
- Click Save.
Your new canned response will now appear in the list and be ready to use.
Insert the template into a message
- Create a new message or start replying to an existing one.
- Open the My Templates pane.
- Click on the template you want to use.
Outlook will instantly insert the saved text into your message. That's it!
What to know about My Templates add-in
Before you start using My Templates, here are a few important details to keep in mind:
- Templates are synced across Outlook apps. Templates you create in classic Outlook are saved to your primary mailbox and sync across platforms. You'll be able to use them in Outlook on the web, the new Outlook for Windows, and Outlook for Mac, as long as you're signed into the same account. This works both ways: templates created in the new Outlook or web will show up in classic Outlook too.
- Shared mailbox limitations. Templates created while using a shared mailbox are only accessible to your account. Other users with access to the shared mailbox won't be able to view or use your templates.
- Missing the add-in. If you don't see My Templates in the ribbon, your organization may have disabled add-ins. Check with your IT administrator to enable it.
How many templates can I save in Outlook?
The number of email templates you can save in Outlook depends on the feature you're using:
- Classic Outlook templates. There's no fixed limit on how many .oft templates you can create. You can save as many as you need, provided your system has enough storage space.
- My Templates add-in. The total storage limit for all templates is 32 KB. This includes all text and formatting combined, not per template.
How to make shared email templates for Outlook
Outlook's built-in templates are great for saving time on routine emails. However, if you're sending dozens of similar messages each day, you've probably wished for more useful features.
For instance, what if you want to automatically greet recipients by name, choose the right attachment from a predefined list, or pull specific details from an Excel sheet and have them inserted exactly where they belong in your message?
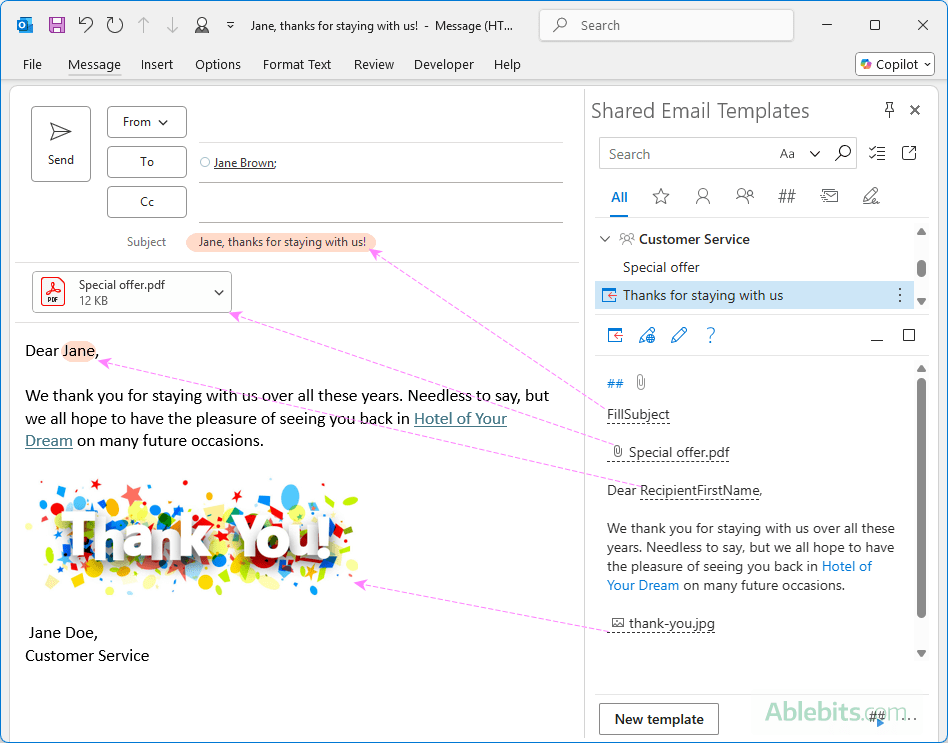
It might sound like something for the Outlook feature wish list, but all of this is already possible with the Shared Email Templates add-in. There's no need to create desktop shortcuts or switch tabs – everything happens right within your message window.
Best of all, it works across platforms: classic and new Outlook, Windows, Mac, and Outlook on the web.
Here's what you can do with Shared Email Templates:
- Write a message as usual and save it as a reusable template.
- Include images, links, and attachments.
- Personalize your templates by including the recipient's name or any context-sensitive details.
- Insert custom input fields like text boxes, dropdowns, or date pickers.
- Pull in data dynamically from Excel tables.
- A lot more!
Once your templates are ready, you can save them for personal use or share them with your team.
The screenshot below gives a preview of how your shared email template can appear in action:
This was just a quick look at what Shared Email Templates can do. If you're curious to learn more, check out the full feature list or download the add-in for free from Microsoft Marketplace and try it out.
 by
by
28 comments
Hello
My husband has just had a new computer installed, running Windows 11. He had a specific template for his emails in Outlook on his old system and I have edited the Outlook.File.oft.15 template in the User AppData folder but when I open a new email in Outlook (Classic) it does not contain the changes I made. What are we doing wrong? (I am 75 and he is 85 so we are struggling quite a bit with the changes!).
Thanks in advance.
Jenny
Dear Jenny,
We understand how confusing this can be after moving to a new computer.
At the moment, it is not quite clear exactly which file you edited and where. For the sake of clarity, Outlook.File.oft.15 is not an email template, it is the file type name that Windows associates with Outlook template files. Generally, the only place where it is shown and can be edited in the system registry, and we strongly recommend NOT editing the registry, as incorrect changes can cause serious system issues.
As for editing and transferring your Outlook templates, please try these steps:
One the old computer:
1. Open the default location where Outlook templates are stored: C:\Users\UserName\AppData\Roaming\Microsoft\Templates
2. If you see any .oft files there, copy the ones you need to a flash drive or cloud storage.
One the new computer:
1. Open the same templates folder: C:\Users\UserName\AppData\Roaming\Microsoft\Templates
2. Paste the copied .oft files into this folder.
To make changes to your Outlook templates, please follow the steps described in the "How to edit email templates" section in this tutorial.
I have created a number of different templates but now wish to delete some to tidy up the folder. How do I delete one or two templates? Many Thanks
Hi Maree,
Thank you for this question!
Simply delete the unwanted templates (.oft files) from the below folder as you would normally delete a file in Windows File Explorer:
C:\Users\UserName\AppData\Roaming\Microsoft\Templates
Also, I've added a separate section to the article with detailed steps and screenshot.
I don't want a set of stock formatted content in new email messages.
I just want to override the default styles that Outlook uses in new email messages. For example, I want to define the hanging indent, tab stop, and Spacing Before the paragraphs when the Bullets ribbon tool button is used to add bullets.
Even if I leave one bullet in the stationery template, using this button to add a bullet to a paragraph applies the Outlook default 0.25" hanging indent with a 0.25" tab stop, and no spacing before.
How can these deeply-embedded defaults be changed?
Hello, Craig,
Please try to change the Normal style. In a new email go to Format Text tab -> Styles -> right-click Normal -> Modify. Select all the necessary styles and select New document based on this template. Click OK to finish up.
Please tell me what went wrong. I've been using outlook for my emai for a long time . however today I seem to be locked out
Hello Kenneth,
Please try the solutions described in the following articles:
https://www.ablebits.com/office-addins-blog/cannot-start-microsoft-outlook-solutions/
https://www.ablebits.com/office-addins-blog/outlook-not-working/
I have a client using Outlook 2010 who wants to have an email template made. The catch is that he does not want certain content in the template to be editable (both images and text) -- his plan is to share this email template with co-workers to send out from their own accounts, but he does not want them to change or delete parts of the content by mistake.
Is there any way to "lock" content in an Outlook email template, so that when a user opens a new email from the template, they can't edit designated sections?
Thank you in advance!
Hello Amanda,
I regret to tell you that it is not possible with with standard Outlook templates. Our developers will do some research to investigate whether it is possible in principle. If if is, we will try to implement this feature in our add-in.
I have a business partner who wants to save the template so that it is coming from a specific “From” email address. When we try to update it in the “From” menu, after we save it and try to open it again, it’s reverting back to my own email address.
Is there a way to do this?
A standard template doesn't store the contents of the From field. You can create an Outlook macro to automatically add addresses in the From field to a particular template.
Or you can try our Shared Email Templates. It can fill the From field as well as other email fields.
Hello Svetlana,
May I ask you if it would be possible to have a email template with different tabs? So I can use it for sending out information of different vendors in the same email.
Kind Regards,
Gilly
Hello Gilly,
Regrettably, it's not possible to create an email template with tabs either with standard Outlook templates or with our Shared Email Templates add-in. The Shared Email Templates allows adding fillable fields that will prompt the user to enter some text in a message before it goes out, though I am not sure this feature is fit for the case.
Thank you Svetlana for your feedback! It is a shame we cannot do it.
I want to create a template and have a file attached to it so I don't have to attach it each time I use it. Can this be done?
Your directions on creating the template has been a huge help; particularly as we have 6-8 different emails that must be sent upon hiring of new employees! I atached a file to the email (before I saved it as a template)and, when I opened the template, it was still there. My only question is this: If we make a change to the document (that the attachment is pulling from), when we send a new email (using the template), it still has the original file attachment, not the updated version (which we "saved as" with the same file name. It appears this attachment is static and does not pull "live" from the source. Do you know if this is the case? Is there a way around this?
Hello Linda,
I do not know a way to do this with standard Outlook email templates, but you can easily create such a template with Shared Email Templates.
Good Morning Svetlana
I have followed your instructions completely and created my template and saved in the right location. However I can run the form and open it up perfectly but when I send it to myself to test it I receive the email but with no text that I typed in at all. I have checked to see if the text box was enabled and visible etc which it is I just cant seem to fathom it out - any help would be greatly appreciated.
Thank you
Ryan
Hello Svetlana
I have sent you the .oft template that I am using. There is no sensitive information in it. If you could have a look at it for me then that would be great.
Kind Regards
Ryan
Hello Ryan,
You have created a very complex form, we are really impressed! I consulted our Outlook guru and he spotted a couple of issues that need to be fixed. I emailed you the details a few minutes ago, hopefully the information will be helpful.
Hi Svetlana,
I am also facing a similar issue in my environment as Ryan in my Outlook 2013. I have Windows 7 with office 2007 and some with Office 2013. The Forms works perfectly on Outlook 2007 but not in Outlook 2013, when we reply back to the user the message content is empty. Could you please send me the steps to help resolve the issue.
Thanks in advance.
Regards,
Pralhad
Hello Pralhad,
The issue can be resolved in different ways, please see the answers here, esp. page 2:
https://answers.microsoft.com/en-us/office/forum/office_2010-outlook/outlook-2010-custom-form-not-visible-to-recipient/bae48b4e-a792-43ce-8af1-c66849d65688
Hi Svetlana
You and your gurus have worked wonders - the form works perfectly now.
Thank you ever so much.
Ryan
I have set up an email template. However, is it possible to make it customer specific? I want to be able to tab to the name and other various fields to make the changes. There is heavy volume, so I am trying to make this time efficient. Maybe there is another option that i do not know of. Thank you
Hi Angie,
I am afraid Outlook email templates are not well suited for this purpose. You can check out the Mail Merge features. The above article describes how to do a mail merge from Excel to Word, but you can merge with your Outlook contacts list exactly in the same way.
As an alternative, you can consider using some personalized software for Outlook such as .
I would like to add my company logo so that it appears in the top left corner of all of my emails and doesn't move. I can add it as a new stationery option but when I tab down from the subject field, the logo moves down as well placing the cursor above it. Any suggestions?
Thank you,
Tom
Hi, i'm looking to do something very similar by adding a hyperlinked image to the top right hand corner of all new mail but again it moves down when i click on new mail. Can you let me know what to do?