Shared Email Templates for Microsoft Outlook
Create, manage, and close teams
Note. Personal accounts this page relates to are deprecated. For up-to-date information, follow this link: Manage teams.
Note. Follow the instructions below only if you have a personal Shared Email Templates account. If you have a company account, it's a company administrator's responsibility to create, manage, and close teams.
On this page, learn to create and edit teams in Shared Email Templates. Teams are needed if you want to have not only private templates for your own use but also shared ones to work together with your colleagues. So, first, you create a team, then invite teammates and create templates that will be available to all the members of a team.
Here is a quick How to share templates cheat sheet, click on the button below to open or download it:
Video: How share Outlook email templates
Create new team
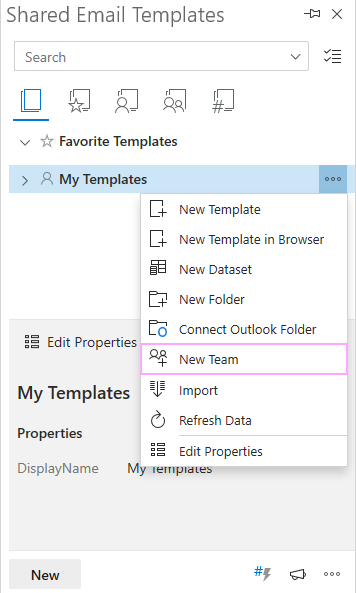
To create a team, right-click My Templates and pick the New Team option:
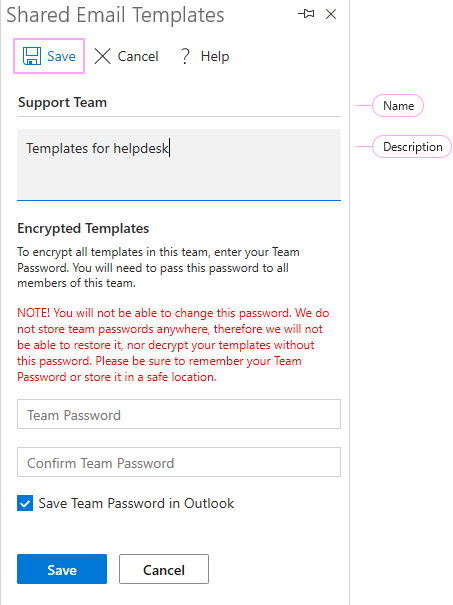
Enter the name of the team, description, and click Save:
When you stand on a team, you can see its name, description, whether it's encrypted or not, members, properties, and templates (if there are any):
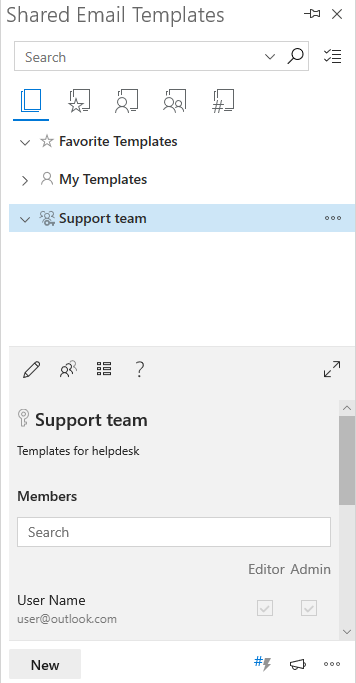
Until you add new members, you are the only one here and you still can encrypt the team.
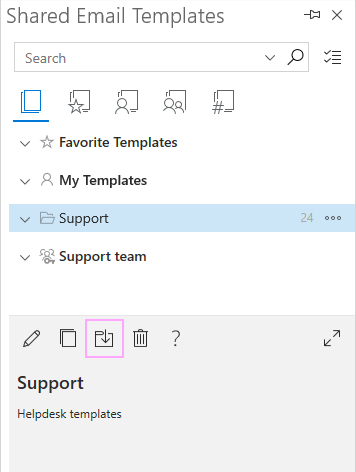
The same way but using another action button on the left, you can Copy a folder/template.
Encrypt your team
To protect your privacy even more, you can encrypt your teams by entering and confirming the Team Password.
The Password is the guarantor of encryption. We do not have any access to your data in encrypted teams as we get it only in coded form. Before entering the Password, read carefully the notes below.
Important notes about Team Password
- Once created, the Password cannot be changed in the future.
- There is no way to automatically pass the Password to your team members, so think of a safe way to communicate the Password to your colleagues: email, phone, any messenger, etc.
- The Password is stored locally on your device in a separate storage of each client application, e.g. Outlook, Chrome, etc.
- When you create an encrypted team, you are the only person who knows the Team Password. To get access to templates in the team, all team members will have to enter the Team Password.
- It is impossible to restore or retrieve the Password as it is not stored on the server. So, if you lose the Password, we will not be able to help you. Please make sure to remember it or keep in a safe location.
You can find more information about the protection of your security and privacy on the Privacy, security, and data safety page.
How to encrypt your team
While creating a team, enter and confirm the Team Password:
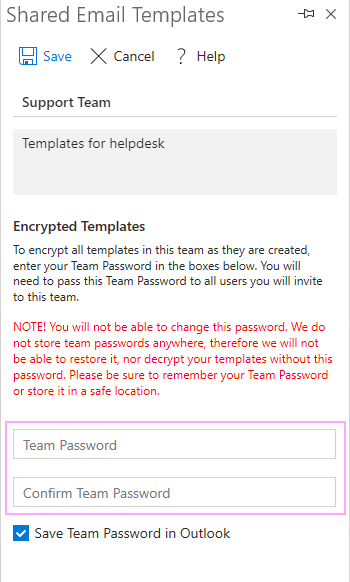
Don't forget to click the Save button.
How to find Team Password in your account
If you're an admin in an encrypted team and already saved the Team Password in your Outlook or in your browser with the Save Team Password option when creating the team or when accessing its templates, you can find the Team Password in your account:
- In the Shared Email Templates add-in in your desktop Outlook by clicking Edit properties.
- In the Shared Email Templates web app in your browser. Simply click the Edit Properties icon.


If you're an editor in an encrypted team and already saved the Team Password in your Outlook or in your browser with the Save Team Password option when accessing the team templates, you can find the Team Password in your account:
- In the Shared Email Templates add-in in your desktop Outlook. You just need to click Edit Properties.
- In the Shared Email Templates web app in your browser by clicking the Edit Properties icon shown in the screenshot below.


If you have neither admin nor editor permissions, you can't see the Team Password in your account.
How to change Team Password or remove encryption
Once you create a team, enter the Team Password for it, and click the Save button, it becomes impossible to change a Team Password or remove encryption from a team, but we can offer you a rather quick workaround:
- Create a new folder in My Templates or another team.
- Go to the Selection Mode and tick all the templates in the encrypted team.
- Move the templates to the newly created folder.
- Save the list of all members of the encrypted team, their emails, and permissions.
- Close the encrypted team.
- Create a new team, move to it all the templates that you saved before, and add your teammates anew.
How to join team
To join a team, you need to be invited by the team admin. As soon as your colleague invites you to a team, you'll get a Shared Email Templates invitation email. Open it and click the Join the team button:

If the team is not encrypted, this is the only action you have to perform.
To become a member of an encrypted team, you have to enter the Team Password. Team Password is defined by the person who creates an encrypted team, so ask this person to give you the password. Then stand on the team (after you join it, the team will appear in your account) and find the Team Password box. Paste the received password into this box and click Get Access:

Invite members to your team
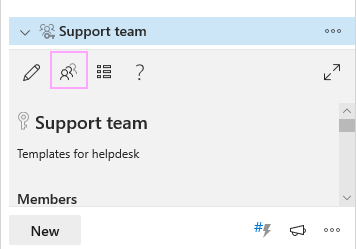
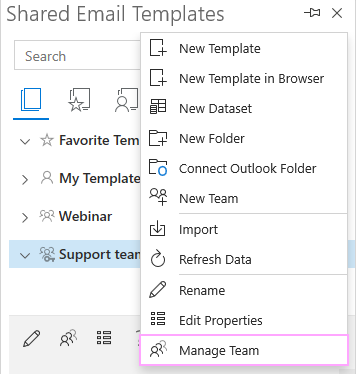
To invite colleagues to your team, click the Manage Team icon:
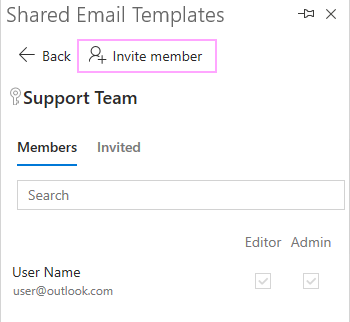
To add team members, click the Invite member button:
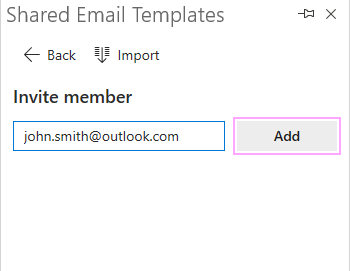
Enter the new team member email and click Add:
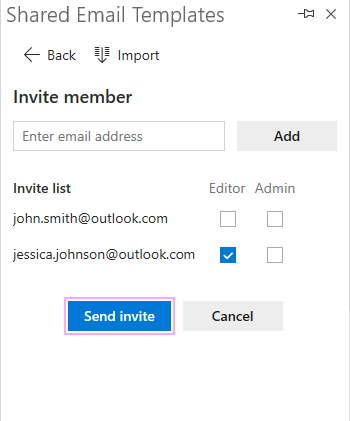
In the Invite member window, you can enter another email and invite several persons at once:

Define permissions
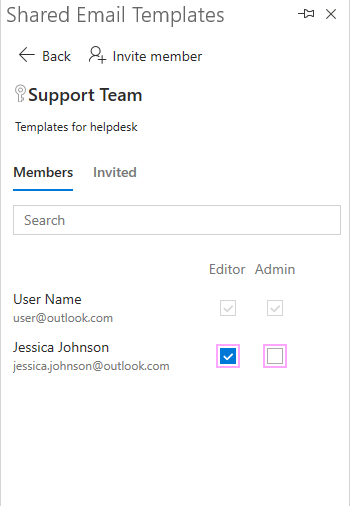
While inviting new members, you are to manage permissions for them by ticking the corresponding boxes:
- If you leave both boxes unchecked, a team member will have the Read only status and will be able to use templates and leave a team only. A member won't manage to edit templates, create new ones, etc.
- The checked Editor box lets your colleague edit, create, and delete templates and folders.
- A teammate with the Admin box checked can invite new members and remove them; edit, create, delete templates and folders; edit or close the team.
When you click Send invite, an invitation will be sent to the listed emails. As soon as the invitation is accepted, you'll see the names of your teammates in the Members field. Until that happens, they will be listed in the Invited section:

As soon as your team is created, you can add new templates and use them together with your teammates.
How to invite numerous users and define their permissions
If you have a lot of colleagues to invite to your team, you can save some time by taking advantage of the Import option. Select the team and click Manage:

And then click Invite member:

To import emails and permissions, pick Import:
![]()
The add-in will ask you to select a file to import. Please note, this has to be either .txt or .csv file.
You can select to import either emails or emails with permissions.
-
If you want to import simply emails, just list them in your file, each on a new line:

When you import the file, emails are added, but the boxes are not checked and you have to select permissions by ticking the boxes:

-
If you are looking to import permissions as well, add one of the following combinations of numbers to emails in the file:
-
user@outlook.com,0,0
for a user to have the Read only permissions in a team, which equals to two unchecked boxes. -
user@outlook.com,1,0
for a team member to get the Editor permission. -
user@outlook.com,0,1
or
user@outlook.com,1,1
to give a teammate the Admin permission.
Note. Please make sure not to add any spaces between emails, commas, and numbers. All info has to be entered without any spaces.So, the list in this case will look like this:

And when you select such a file to import, the boxes are checked the way you need:

-
user@outlook.com,0,0
Working with shared templates
In teams, you create and manage templates the same way as you would do this in your private folders. Please find the detailed instructions on the How to create and manage templates page.
However, as templates in teams are shared with other users and they can be able to edit, create, and remove the templates (depending on the permissions), there are some important peculiarities you'd better know before sharing your templates with a team:
- Teams don't keep the history of changes. In case you notice some unwanted or, on the contrary, appropriate changes in your shared templates, it will be impossible to detect who made them and when it happened.
- Saving changes in shared templates, we use the First in, first out (FIFO) method. It means that the changes in a team are saved in order of their occurrence. For example, if you delete a template and in one second your teammates decide to edit it, they won't manage to do this as the template will be already gone.
Manage your team
Edit team name and description
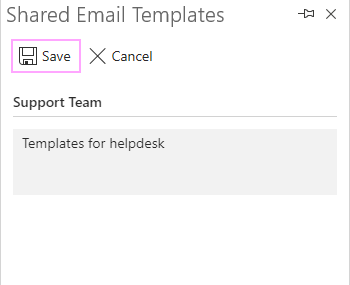
As the creator and administrator of a team, you can edit the team name and description. For this, click the Edit icon:
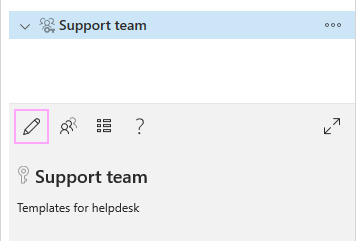
Make the necessary changes and click Save:
Team properties
To see the properties of your team or create new ones, click the Edit Properties button:
![]()
Please go to the How to use team & profile properties page to learn more about properties and how you can use them.
Manage team members
To invite new members, change permissions for the existing ones, or remove members, click Manage:

Edit permissions
To edit permissions for your teammates, simply check or uncheck the boxes near their names:


Remove team members from a team
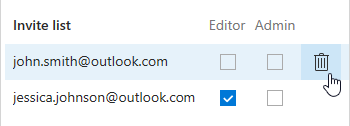
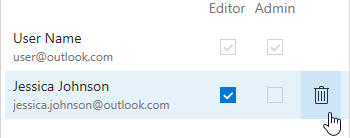
To delete a member from a team, stand on the name and email of the member and click on a trash can icon:
Export and import team templates
To export and import team templates, please see the Export and import templates guide.
Close team
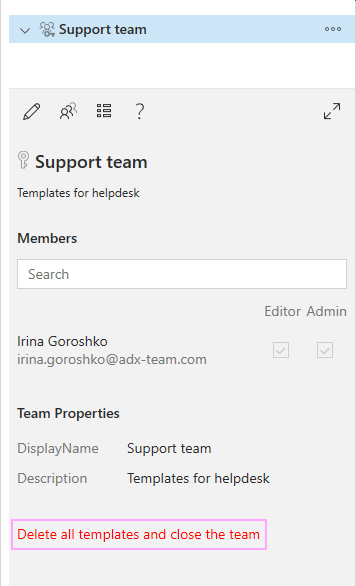
To delete a team with all its templates, select it and click the Delete all templates and close the team button:
Responses
When I try to add my co-worker, I keep getting this error saying "Error, Sorry, the user of Company Account cannot be invited to Personal team". Why can I not add my co-worker to my Team Ablebits? I was able to add my other co-workers with not problem at all.
Hello Brian,
Thank you for your question.
As you have a personal account, you can add to your team only the users who have personal accounts as well. The user you are trying to add has likely created a company account and that's why he/she can't join your team. This user needs to delete the company account and create a personal one anew. I have sent you the detailed instructions on how to do this correctly by email.
If you have any questions or need further assistance, please do not hesitate to email back.
Hi,
How many team members can be in a single team? What is the limit?
Asside of the quantity limits in terms of team members and amount of templates that you can store, are there additionnal functionalities that come with the paid version?
Hello Mathieu,
Thank you for your questions. Please see the subscription limitations here:
https://www.ablebits.com/outlook-shared-email-templates/index.php#id-lp20block-subscription-plans
The functionality is the same for all subscription plans.
How can I effectively share my templaes with the team?
Hello Henrik,
Please read carefully the instructions above and watch this video tutorial on how to share templates with the team:
https://www.ablebits.com/docs/outlook-shared-templates-teams/#shared-email-templates-video
If the sharing process is not clear enough or you have a particular request, please contact us at support@ablebits.com for further assistance.
Good Morning,
I am trying to add a team to use the templates but the option is greyed out and will not let me select it. Can you please help me in creating a team to share the templates. Thank you.
Hello Rachel,
Thank you for your interest in our software. For us to understand the problem better, please send us a screenshot of the add-in pane with the grayed-out option to support@ablebits.com. We'll see what the issue is. Thank you.
Post a comment
Seen by everyone, do not publish license keys and sensitive personal info!