This tutorial shows how to wrap text in a cell automatically and how to insert a line break manually. You will also learn the most common reasons for Excel wrap text not working and how to fix it.
Primarily, Microsoft Excel is designed to calculate and manipulate numbers. However, you may often find yourself in situations when, in addition to numbers, large amounts of text need to be stored in spreadsheets. In case longer text does not fit neatly in a cell, you can of course proceed with the most obvious way and simply make the column wider. However, it's not really an option when you work with a large worksheet that has a lot of data to display.
A much better solution is to wrap text that exceeds a column width, and Microsoft Excel provides a couple of ways to do it. This tutorial will introduce you to the Excel wrap text feature and share a few tips to use it wisely.
What is wrap text in Excel?
When the data input in a cell is too large fit in it, one of the following two things happens:
- If columns to the right are empty, a long text string extends over the cell border into those columns.
- If an adjacent cell to the right contains any data, a text string is cut off at the cell border.
The screenshot below shows two cases:

The Excel wrap text feature can help you fully display longer text in a cell without it overflowing to other cells. "Wrapping text" means displaying the cell contents on multiple lines, rather than one long line. This will allow you to avoid the "truncated column" effect, make the text easier to read and better fit for printing. In addition, it will help you keep the column width consistent throughout the entire worksheet.
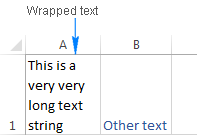
The following screenshot shows how wrapped text looks like in Excel:
How to wrap text in Excel automatically
To force a lengthy text string to appear on multiple lines, select the cell(s) that you want to format, and turn on the Excel text wrap feature by using one of the following methods.
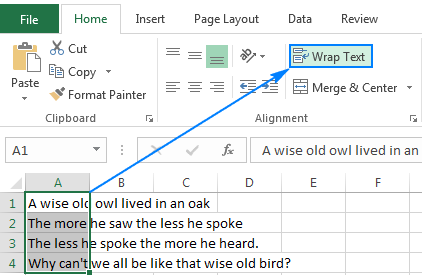
Method 1. Go to the Home tab > Alignment group, and click the Wrap Text button:
Method 2. Press Ctrl + 1 to open the Format Cells dialog (or right-click the selected cells and then click Format Cells…), switch to the Alignment tab, select the Wrap Text checkbox, and click OK.
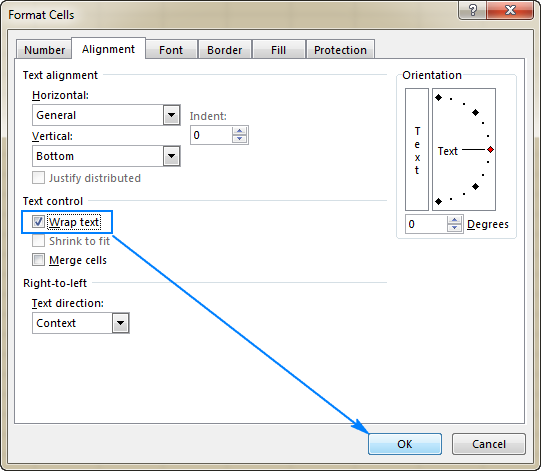
Compared to the first method, this one takes a couple of extra clicks, but it may save time in case you wish to make a few changes in cell formatting at a time, wrapping text being one of those changes.
Tip. If the Wrap Text checkbox is filled in solid, it indicates that the selected cells have different text wrap settings, i.e. in some cells the data is wrapped, in other cells it is not wrapped.
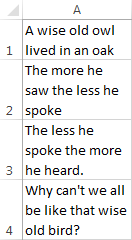
Result. Whichever method you use, the data in the selected cells wraps to fit the column width. If you change the column width, text wrapping will adjust automatically. The following screenshot shows a possible result:
How to unwrap text in Excel
As you can easily guess, the two methods described above are also used to unwrap text.
The fastest way is to select the cell(s) and click the Wrap Text button (Home tab > Alignment group) to toggle text wrapping off.
Alternatively, press the Ctrl + 1 shortcut to open the Format Cells dialog and clear the Wrap text checkbox on the Alignment tab.
How to insert a line break manually
Sometimes you may want to start a new line at a specific position rather than have lengthy text wrap automatically. To enter a line break manually, just do the following:
- Enter cell edit mode by pressing F2 or double-clicking the cell or clicking in the formula bar.
- Put the cursor where you want to break the line, and press the Alt + Enter shortcut (i.e. press the Alt key and while holding it down, press the Enter key).
Result. Inserting a manual line break turns on the Wrap Text option automatically. However, the line breaks entered manually will stick in place when the column is made wider. If you turn off text wrapping, the data displays in one line in a cell, but the inserted line breaks are visible in the formula bar. The following screenshot demonstrates both scenarios - a line break in entered after the word "owl.
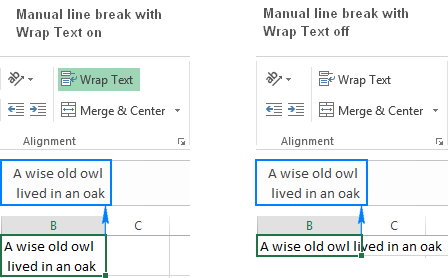
For other ways to insert a line break in Excel, please see: How to start a new line in a cell.
Excel wrap text not working
As one of the most often used features in Excel, Warp Text was designed as simple as possible and you will hardly have any problems using it in your worksheets. If text wrapping does not work as expected, check out the following troubleshooting tips.
1. Fixed row height
If not all wrapped text is visible in a cell, most likely the row is set to a certain height. To fix this, select the problematic cell, go to the Home tab > Cells group, and click Format > AutoFit Row Height:
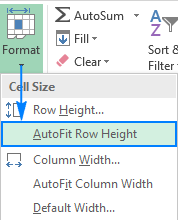
Or, you can set a specific row height by clicking Row Height… and then typing the desired number in the Row height box. A fixed row height comes in especially handy to control the way the table headers are displayed.
2. Merged cells
Excel's Wrap Text does not work for merged cells, so you will have to decide which feature is more important for a particular sheet. If you keep the merged cells, you can display the full text by making the column(s) wider. If you opt for Wrap Text, then unmerge cells by clicking the Merge & Center button on the Home tab, in the Alignment group:
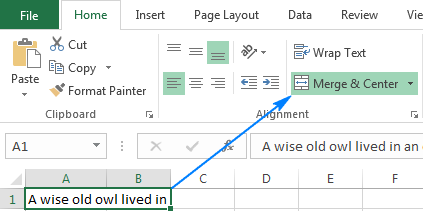
3. The cell is wide enough to display its value
If you try to wrap a cell(s) that is already wide enough to display its contents, nothing will happen, even if later on the column is resized and becomes too narrow to fit longer entries. To force the text to wrap, toggle the Excel Wrap Text button off and on again.
4. Horizontal alignment is set to Fill
Sometimes, people want to prevent text from spilling over into next cells. This can be done by setting Fill for horizontal alignment. If later on you enable the Wrap Text feature for such cells, nothing will change - text will still be truncated at the cell's boundary. To resolve the issue, remove the Fill alignment:
- On the Home tab, in the Alignment group, click the Dialog launcher (a small arrow in the lower-right corner of a ribbon group). Or press Ctrl + 1 to open the Format Cells dialog box.
- On the Alignment tab of the Format Cells dialog box, set General for Horizontal alignment, and click OK.

This is how you wrap text in Excel to display longer text on multiple lines. I thank you for reading and hope to see you on our blog next week!
 by
by
13 comments
custom format e.g.
"average "0.00%"
Is there a way to wrap the result to have the word average above percentage?
Namor
Hi! You can select part of the cell content using a mouse, and then press Ctrl+1 to get Format Cells dialog box. Select Superscript option.
See for details: How to align text in Excel.
how to wrap text in date format such as: Sunday, 1 januari 2012
Hi! If I understand correctly, you can find the position of the first word in text with SEARCH function and delete it using MID function.
Then try using DATEVALUE function to convert text to a date as desctibed in this manual: How to convert text to date and number to date in Excel. For example:
=DATEVALUE(MID(A1,SEARCH(" ",A1),50))
You can solve the problem without using formulas. I recommend paying attention to the Text to Date tool. This tool easily converts text strings of different formats to dates. The tool is included in the Ultimate Suite for Excel and can be used in a free trial to see how it works.
I am in "wrap text' mode, have multiple lines in a cell row. when I go to the next line/row, how do I get the previous lines of text to collapse to only one visible line? when I double tap the single visible line, the remaining lines in that cell appear.
Interesting question. I don't know how to do that. But what I do is that I select all rows and reduce column height to one row. Then I either use F2 button to view details of an individual cell or auto adjust the row height of any row I want to view. Not the most practical way to do it but it's all I got at the moment.
Dear,
Is it possible to wrap a cell in excel which contains a formula? I would like to show the fomula entirely and to print the file.
regards
Hello!
Here is the article that may be helpful to you: How to show formulas in Excel.
My wrap text is also not working in Excel. None of the three fixed mentioned above work. Please assist. Thank you, Michael
Hi Michael,
One more reason I can think of is horizontal alignment set to Fill. I've added it to the list, but this option is quite rarely used, so there is a very slim chance it's your case. If applicable, try to clear all formats for problematic cells, and then turn Warp Text on. Without seeing your worksheet, I don't have any other ideas, sorry.
Does anyone know how to turn OFF automatic text wrapping in Excel 2016?
Every time I enter or edit text, it wraps it and I have to manually unwrap. Driving me crazy!
Hi Michele,
To my best knowledge, there is no way to disable automatic text wrapping in Excel. However, you can use the following workaround:
1. Select all rows for which you want Wrap Text to be turned off.
2. Right click on the selected rows, and then choose Row Height from the popup menu.
3. In the Row Height window, just click OK, without changing the default value (15).
This will let Excel know that you want a fixed row height instead of auto-sizing it.
Hello Svetlana.
Thanks, but unfortunately this is only half of the solution I would need: It's true that this operation makes the cell stay in the same size. But my problem is, that I still have to click each time "not wraped" manually for something else that I want: 1. If its "not wraped" -> Once I go back to a cell and I double-click: it shows the text across all the screen so I can easily read all the text at once and see whats in there. (THATS GREAT!)
2. If I added in a cell (it wraps automatically) -> If I then do not click on "not wraped" before entering again (THAT IS EXHAUSTING), it shows the text only in the length of the cell ...so I cannot see all the text at one across my screen.
(PS: I know I could see the text also in the screen on the top, but that window is not big enough ..., or if I make it bigger, I would not be able to quickly see my table after, without making it little again.)
Thanks for your help!