I’d like to continue acquainting you with Shared Email Templates and tell you a few tricks on how to create and manage drafts in Outlook, and then use them as templates for your messages. First, I'll show you how to make a new draft, find or change its folder and remove and restore your drafts. Then, I’ll teach you converting drafts into templates and sharing those with others.
Create and use Outlook drafts
Let’s start from the very beginning. What is a draft? For example, you were creating a message and accidentally closed the New Email window. This unfinished message will become a draft. Or, let’s say, you’ve written something, re-read it and thought “I can do better”. You save this incomplete email to finish later - this is your draft.
So, a draft is an unsent email. Now let’s see how to manage drafts in Outlook and what they can be used for.
How to save a draft in Outlook
There is unlikely something easier than creating a draft. There are just 3 steps to take to save a draft in Outlook:
- Open a new email or create a reply to any message.
- Write your text, add links, formatting and pictures if necessary.
- Save this email (either by clicking on the Save icon or by closing the window).
That’s pretty much it :) This unfinished email will be saved as a draft in your Outlook.
But how to find drafts in your Outlook? You may see all of them in the Drafts folder on the Navigation Pane:
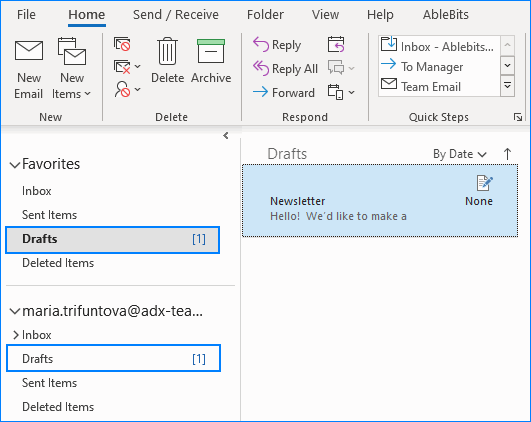
Tip. If you have too many folders and subfolders on your Navigation Pane and you have no time for checking where the Drafts folder is in your Outlook, just enter “drafts” in the Search field and the necessary folder will be opened:

Double-click on any draft and it will become an email that you may continue editing or send.
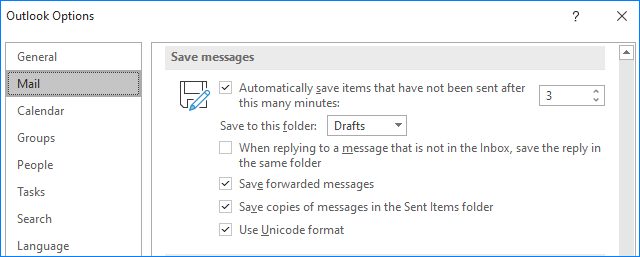
Tip. You may enable the automatic saving for the emails you create and set the time frame for the autosave in Outlook options. Go to File -> Options -> Mail and check/uncheck the necessary options on the “Save messages” group:
I told you, it couldn’t be easier :)
How to delete a draft
It may happen that there are too many drafts and some of them were created accidentally, hence, there is no need in them. How to get rid of the drafts you don’t need? Easily! There are several ways to remove a draft in Outlook:
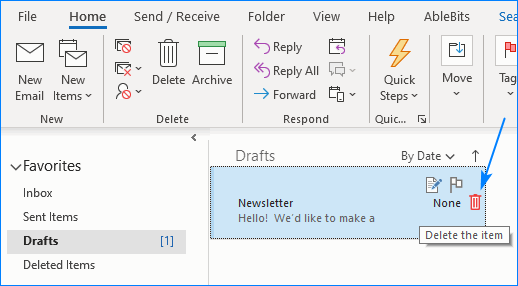
- Go to the Drafts folder and hover the cursor on the unwanted draft. You’ll see the trash icon on the right side, just click on it and the draft will be removed right away:
- If there are several drafts you need to get rid of, select them (or use Ctrl+A to select all of the drafts), right-click on any of them and choose Delete from the dropdown list:

- You may also do it in an old-fashioned way - by drag and dropping the unwanted drafts into the Deleted Items folder.
How to recover deleted drafts in Outlook
Restoring drafts doesn’t differ from restoring messages at all. There are also a few ways to go:
- You may use the Undo button (or the Ctrl + Z shortcut) in your Outlook and retrieve the last removed message.
- As draft is just an email, it goes right to the Deleted Items folder after you remove it. So, open Deleted Items, find the drafts you still need and move them to the necessary folder in your Outlook:

- Or even simpler, select the draft(s) to restore, drag and drop it into the necessary folder.
- If however, you have already emptied your Trash folder, you may still restore the removed messages. Hit “Recover items recently removed from this folder”, choose the items to retrieve and get them back in a click:

Please keep in mind that once you send a draft, it gets converted into a sent email and it will no longer be available. Draft is a to-be-sent email so when you finally send it, you actually lose your draft with all its content.
Disappointing a little bit, right? But what if I told you that there is a way to save a draft and use it as a pattern for the outgoing messages? Would you like to know how you may make your drafts Outlook templates so that they don’t get lost, removed and can be used as long as you want? Keep up reading ;)
Use Outlook drafts as email templates
If you want a re-usable draft so that you could paste the pre-saved perfectly formatted text as many times as you need, I have a solution for you. Let me introduce you to our Shared Email Templates - a simple yet very efficient Outlook add-in that’ll help you make your email correspondence as quick and easy as never before.
I’ll give you an example of this add-in’s work so that you understand and share my excitement on this case. Imagine the following situation - your company has just launched a promo about your new product and the feedback is great! There are many users emailing you every day asking for more info and the special links to make the purchase with a special discount.
Although you may be thrilled to get such feedback at first, you’ll get bored retyping or copy-pasting the same text over and over again very soon. Here comes the draft solution for Shared Email Templates.
First off, you’ll need to create a draft of your future reply: write some text, apply coloring, paste an image and include a link.
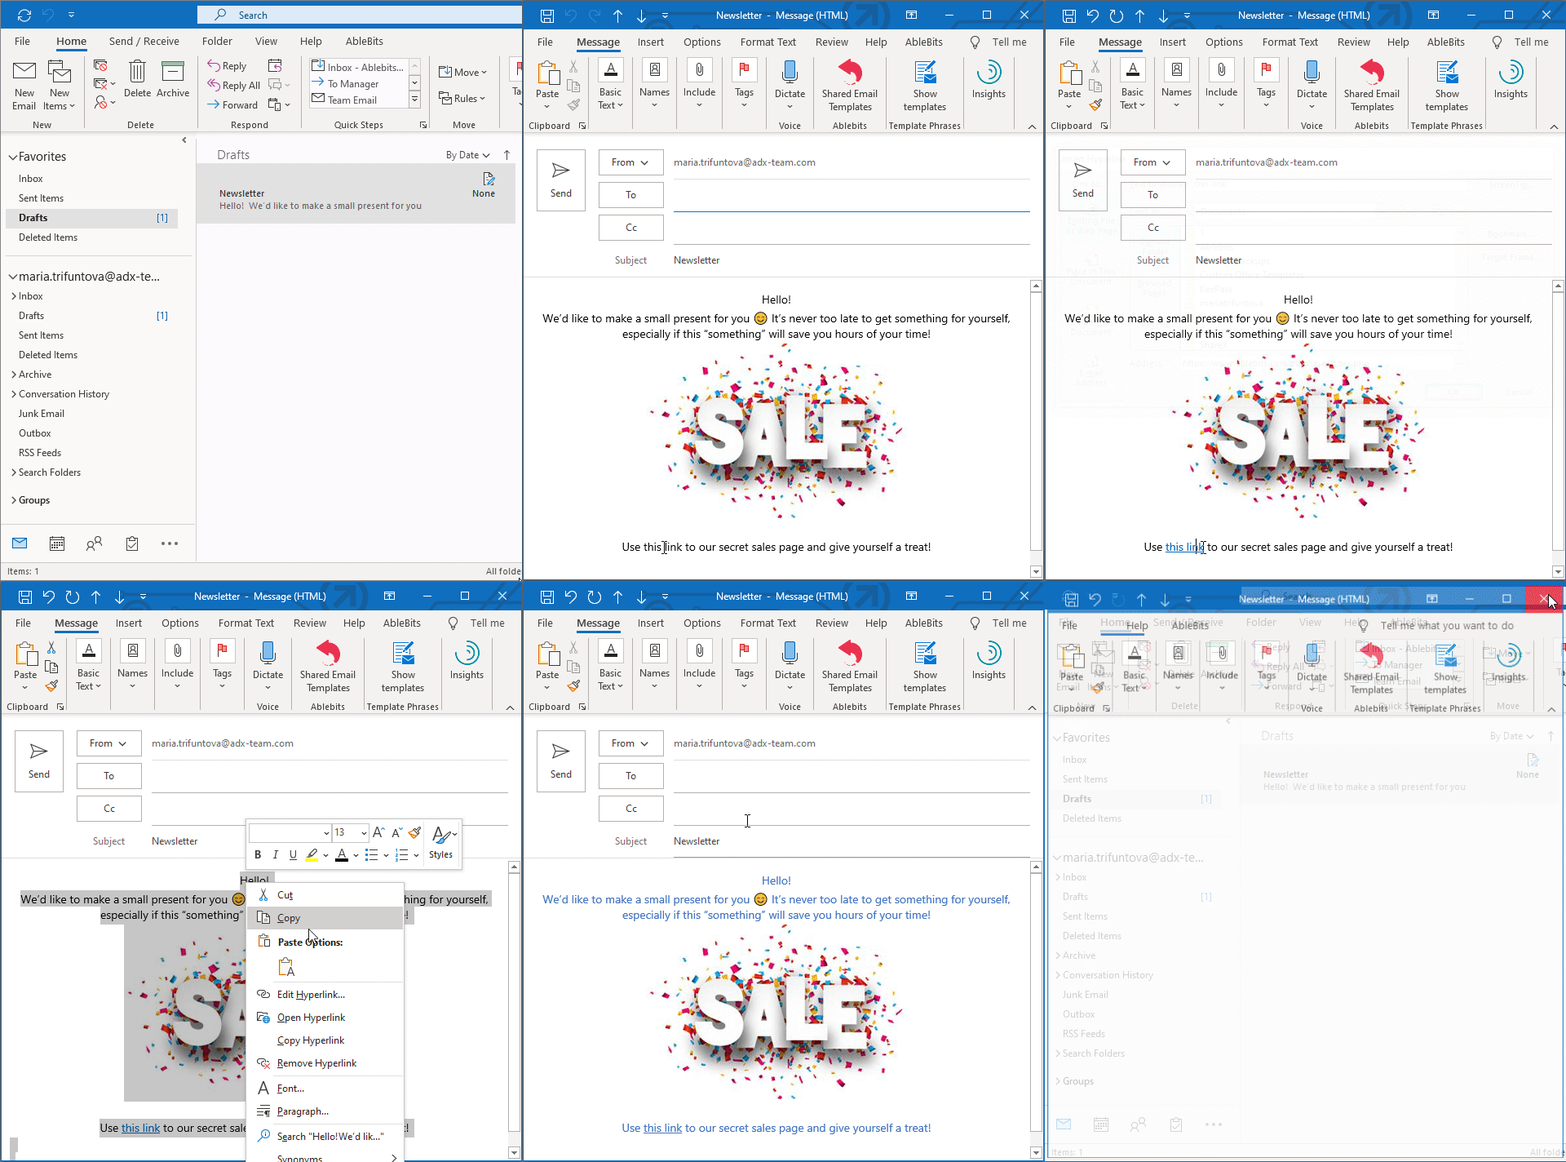
Here is the draft. But how to use it for the future replies? Simply! Save it as a template.
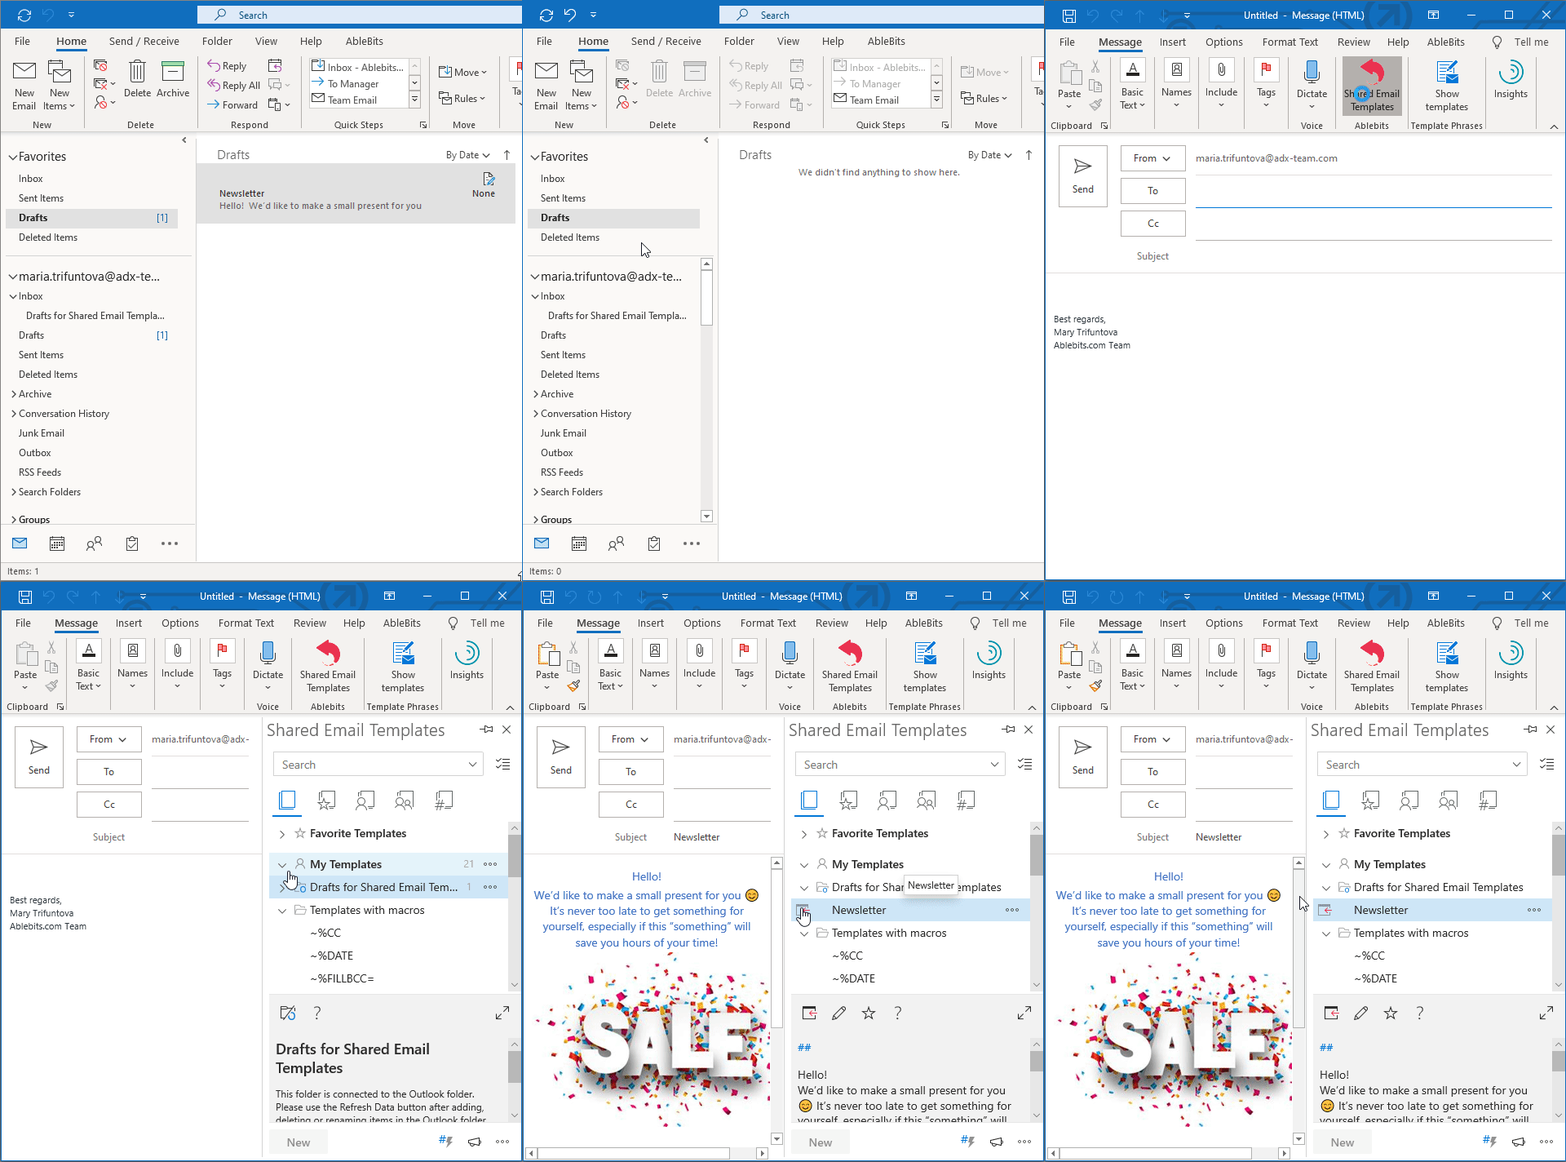
Looks like nothing difficult, right? I’ll tell you more, once I walk you through the entire process and show you how effortlessly and quickly it is, you will not want to write repetitive emails manually anymore ;)
Create folder for your templates
For Shared Email Templates to “see” your drafts, you’ll need to place them in a separate folder in Outlook and then connect it to the add-in. To begin with, create a new folder and place your future templates there.
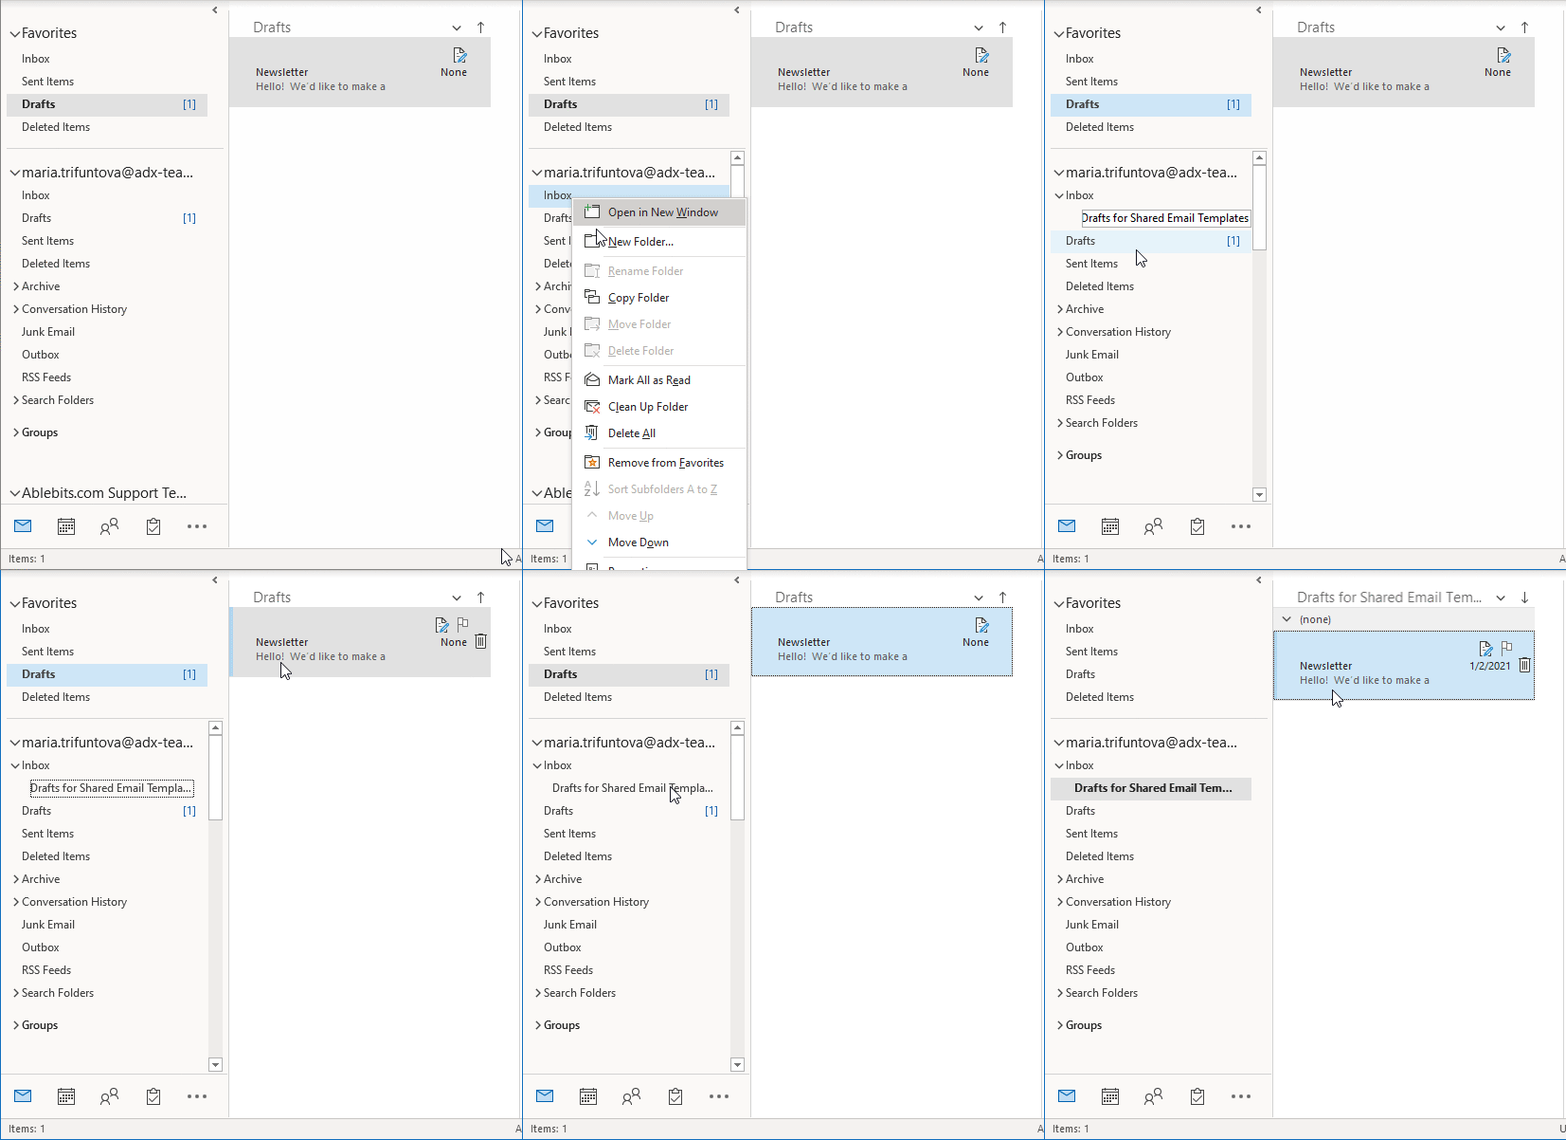
You may create several folders and place different sets of drafts in each of them or share the particular folder with the particular people.
Now you need to add this folder to Shared Email Templates.
Connect drafts folder to Shared Email Templates
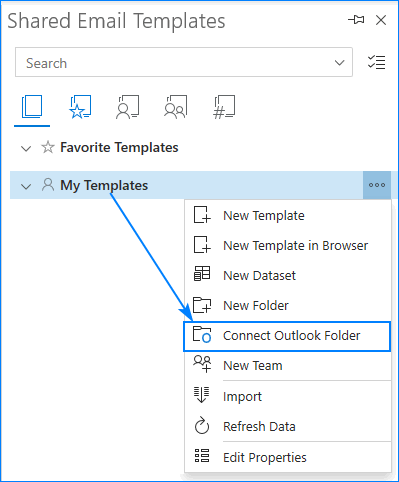
Once the folder is ready and filled with drafts, let’s connect it to the add-in to make them templates. So, start Shared Email Templates, choose a folder on the add-in’s pane, right-click on it and choose “Connect Outlook Folder”:
Then browse for the necessary folder with your drafts, add it and it’ll be available as a new folder with a small O letter on its icon:
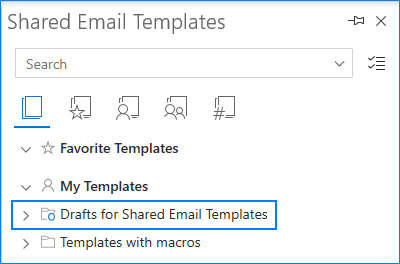
If you expand this folder, you’ll see all the drafts you’ve created.
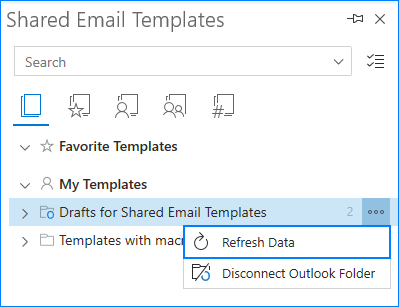
Tip. If you don’t see any recent updates or newly created templates, first try to refresh your data.
Share connected folders within a team
If your teammates want to use the templates you’ve created too, there is no need to send them the content and make them follow the same steps to create and add drafts in Shared Email Templates. You may simply share your own drafts with the rest of your team. It’ll take no more than a few minutes, let me guide you through this process:
- Start Shared Email Templates and create a new team.
- Connect your Outlook folder with the drafts so that the to-be-shared templates get loaded.
- Invite your teammates to your team and set the desired permissions level for everyone.
- Now let’s grant the others access to your special folder with drafts. Find the folder with your drafts on the Navigation Pane, right-click on it and choose Properties:

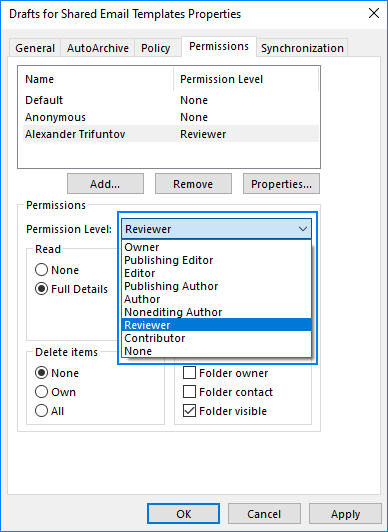
- Go to the Permission tab and click on the Add icon:

- You’ll get the Add Users dialog window open. Here you choose and add the accounts you’d like to share your drafts with. Once everyone is added, hit OK to get back to the folder’s properties.
You’ll see the newly added accounts with the None permission level. In this case, your teammates still won’t see your drafts and won’t be able to use them. Stand on the necessary account, open the Permission Level drop-down list, and pick Reviewer or higher.
One more step to take - you need to make your Outlook folder available to everyone. But it is not enough to open the drafts folder you are to share, you’ll need to share your Outlook mailbox. It’s easier done than said, see:
- Get back to your root folder, right-click on it and hit Folder Permissions:
- Pick the necessary account and check the Folder Visible checkbox:

Note. No worries, the others won’t be able to access your account and emails once you enable the Folder Visible option. It just lets the add-in to check the structure of your folders, nothing more.
- Do it for each and every account you are to share your drafts with and you’re good to go :)
In case you forget to add a user’s account in the folder’s properties or don’t set the permission level, your teammate will get the following notification:
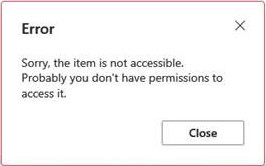
In this case you go to step 4 and in a minute your colleague is all set up.
See? It’s not rocket science, the drill is plain and simple. From now on, your teammates may use the drafts you’ve created as templates.
Notes to remember
There are a few things I should point out so that you don’t get confused when working with your template-drafts:
- There is no automatic synchronization so once the changes are applied, you’ll need to refresh your data to see the changes.
- When you choose the draft-template, you see no formatting on the add-in pane. That’s ok, you’ll paste the text with all the formatting applied.
- If you are to share your Outlook drafts, please keep in mind that it’ll work within one Office 365 business domain only. If you have a paid personal Office 365 account (Home, Personal, Student or a free Outlook.com account), you won’t be able to share your drafts.
I do hope I managed to convince you that it is easy to create and use drafts as templates and you’ll give our Shared Email Templates a shot :) If you have any feedback to share, please leave a few words in the Comments. And, of course, stay tuned as there are more tutorials are about to come ;)
 by
by
8 comments
An add-in may or may not be able to installed in office laptop. Therefore, an available by default option of mail template will be more useful.
I however used another method.
One can create multiple signatures.
I created a signature to be used as a template. Signature to be created at the path : File --> Options --> Mail --> Signatures --> New
Thereafter you can insert the signature in a new email and use it as a template.
As someone else pointet out in their comment - a lot of steps....
Can you look into/comment the way I'm doing
* Forward the draft and it will still be there (you will have to enable the Forward button: File -> Options -> Mail -> Open replies and forwards in a new window)
Why the hell we need so many steps instead of just sending a template that everybody can re-use, edit, and save in the draft?
Unfortunately, the steps you outlined are not available in in the current version of Microsoft 365 Outlook for Mac (v.16.66.2).
My inconvenient is that I use MAC and so far, my servers might be old (myhosting.com), so I can‘t use tyhe. new interface. Even though, with the old interface, when I use a template, the sent message dissapears. Well it is shown for about five seconds and then... where is it!
It is not shown in the draft folder, neither in the sent folder, nothing, and I wonder if the message was really sent, and to whom!
I read somewhere that is not good to use the template tool for this issue, insetad is better draft and maybe save on another folder, I don‘t remember exactly. What‘s your experience on that? Thank U.
The whole point of a draft is to CONTINUE it but when one does as soon as you go to send the moronic message "cannot be sent because it has been changed"
THAT IS THE POINT OF A DRAFT
I'm using Office 365 and I do not get the option to connect a draft folder.
I was going to send a screenshot but I didn't know how to attach it.
Hello Phillip,
Thank you for your comment. Sorry to hear you faced difficulties with our add-in. Please send us a screenshot illustrating the issue to support@ablebits.com. We'll do our best to help. Thank you!