How to combine duplicate rows in Excel
Merge Duplicates is an add-in for Microsoft Excel specially designed for combining data from duplicate rows into one.
Video: How to work with Merge Duplicates
Before you start
Before running the add-in, take account of the following:
- We recommend keeping the Back up this worksheet checkbox selected as Excel doesn't let you cancel changes made by add-ins.
Clear this checkbox if you do not want to keep the original data. - Hidden rows are processed by the add-in.
- The tool inserts the results as values, not formulas.
How to use Merge Duplicates
Start Merge Duplicates
On the Ablebits Data tab in the Merge group, click the Merge Duplicates icon:
![]()
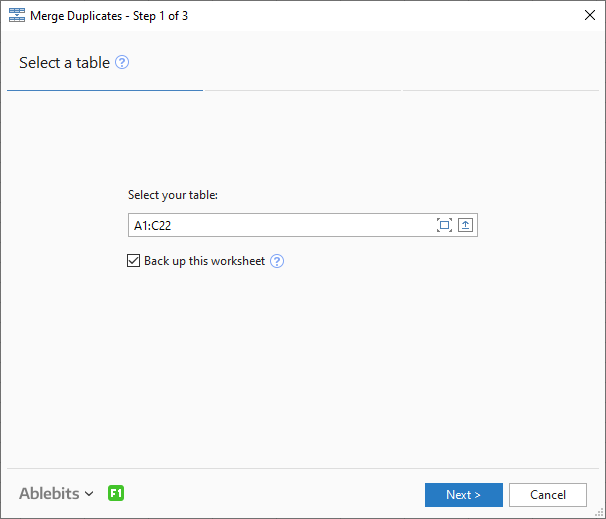
Step 1: Select your table
In the first step, the add-in picks the entire range with your data:

- To expand the selection into the current table or select a different range, choose the corresponding icon on the right side of the Select your table box.
- You can also select the records right in the worksheet, the add-in will pick up your selection.
- Another option is to type the range address in the Select your table field manually.

Remember to tick the Back up this worksheet checkbox to have a copy of your data.
Click Next.
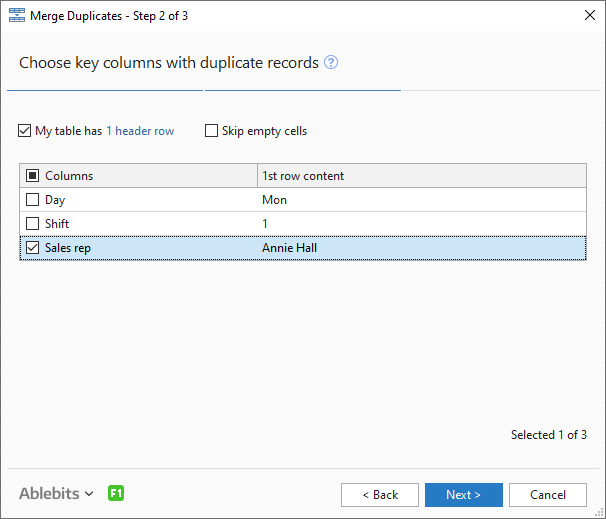
Step 2: Choose key columns with duplicate records
In this step, you can see a list of the columns your range contains:

Pick the columns where you want to find duplicate entries. If you select more than one column, a record will be considered duplicate if values in all the selected key columns are the same.
- If you have header rows, the My table has 1 header row checkbox at the top is selected by default. You can change the number of header rows by clicking on 1 header row.
- If you do not have labels, look at 1st row content to understand what kind of data the columns contain.
- Select the Skip empty cells option if you have blanks in your key columns and don't want to merge them. Unselect the checkbox to consider blank values as duplicates.
Click Next to continue.
Step 3: Pick columns with the values to merge
In this step, select the columns with the entries to merge:

Tick the checkboxes next to the columns with the data you need to combine and take advantage of the advanced options:
- Check Delete duplicate values if the records you need to combine may contain identical items but you want to keep only unique values in your results:

- Select the Skip empty cells option to avoid adding extra delimiters to blank cells.
- To get the merged values sorted, opt for Sort merged values.
Note. The add-in sorts merged values as text strings.
- To use the same delimiter in each column, click the Choose delimiter drop-down list at the top. You can either enter your own separator or select one from the predefined options. Standard delimiters include a semicolon, comma, period, space, and a line break. Besides, you can select one of the following aggregate functions: AVERAGE, COUNT, COUNTA, MAX, MIN, PRODUCT, STDEV.P, STDEV.S, or SUM:
 Note. The tool uses the standard Excel functions (SUM, AVERAGE, COUNT, COUNTA, MAX, MIN, PRODUCT, STDEV.P, STDEV.S), so if you face certain difficulties, please consult a corresponding section here.
 - If you want to have different delimiters for each column, enter or select the needed ones in the Delimiter field next to the column name:

- If you don't want the add-in to process some of the columns your range contains but want to see their first or last row values in the resulting table, pick the option of interest from the drop-down menu next to For unprocessed columns.
For instance, if this is your table:

In Step 2, we check columns A and B and in Step 3—column C.
-
If we select For unprocessed columns keep first rows data, the result will be:

-
If we select For unprocessed columns keep last rows data, the result will be:

-
If we select For unprocessed columns keep first rows data, the result will be:
Click Finish to get the duplicates in the selected columns merged:

Scenarios
How to save scenarios
Before proceeding to processing your data with Merge Duplicates in Step 3, click the Save scenario button:

In the tool's dialog that will show up, enter the name of your scenario and click OK:

A message saying that your scenario has been saved will appear. Click OK.
How to run scenarios
On the ribbon, click the Merge Duplicates icon. Then choose both the scenario that you want to run and the table that is going to be used and click the Start button:

Responses
I'm trying to identify Parent and Child records for import to a relational database. Where a duplicate set is found, the first row will be designated as the "parent", and any duplicates to that should get a reference to the group's parent row.
The format is -
id|name|address|...|parentid
For each group of duplicates, the value in the "id" column should be written to the "parentid" column.
Hello Geoff,
Thank you for contacting us. For us to be able to help you better, please send us a small sample workbook to support@ablebits.com: 1 - your source data and 2 - the result you expect to get. I kindly ask you to shorten the tables to 10-20 rows.
Note! The result sheet is of great importance and often gives us a better understanding of your task rather than any text description. Please don't forget to include it.
We'll look into your task and see if our software can help.
Been spending so long trying to get this to work using python, excel, bedtools... finally a light at the end of the tunnel, thank you so much, this is extremely useful for genomic work
Hello Sam,
Thank you for your kind words. Your positive feedback motivates us to provide the best experience for you and helps others understand how our product makes their life easier :)
Should you require any assistance, please don't hesitate to email us at support@ablebits.com.
with the help of add-on tools i have merged the duplicates in my sheet perfectly and it's great!
My concern is that, I am entering new data to the same sheet and is there any way to automatically merge a duplicate data to the previously merged row in the primary column?
For example, if i am sorting names with same addresses and if i entered another name with a merged address, how to merge that data with the previous data automatically?
Need an answer ASAP.
Thank you.
Hello Hinata,
Thank you for your comment. Unfortunately, there is no way to process the data with our tool automatically. You need to run it each time the new data are added to your table.
If you have any other questions, please let us know.
Hi, do you have this tool working for Excel for Mac Version 15.33 ?
Thank you!
Hi Mauro,
Thank you for your question. You see, Ultimate Suite for Excel does not work on Mac. Please take a look at the Remove Duplicates add-on for Google Sheets. It has the functionality you are interested in and can be run in a browser on your Mac.
Do the "key columns" function as an "and" statement? Say I have 3 columns A, B, and C. If I choose A & B as the key columns, will it only merge the cells that are duplicates in BOTH columns A & B? Or will it merge the cells that are duplicates in EITHER column A & B?
Hello Jared,
Thank you for your question.
If you select 2 key columns, a record will be considered duplicate if values in both selected key columns are the same.
I am trying to combine rows or use Merge to merge rows, but it is putting spaces in the columns with different text....not creating separate column for the data.
Other ID Sibling 1 Other ID Cur School Code Grade 1
316753 425854 043 07
316753 376197 005 12
317307 455642 129 04
317307 437647 051 08
I want all of data associated with other ID to be on one row, different columns. I could do this with combine rows.
Merge make you select delimiter and I don't want a delimiter.
Hello Amy,
Thank you for contacting us. I'm sorry but your case is not entirely clear from the description you provided. For us to be able to help you better, please send us a small sample workbook with your source data and the result you expect to get to support@ablebits.com. Just about 10-20 rows will be enough.
If you have confidential information there, you can replace it with some irrelevant data, just keep the format.
We'll look into your task and try to find a solution for you.
Hello,
I used the Delete Duplicate Wizard to remove duplicated rows in a single sheet and used the =MAX() delineator. Howver I'm running into a Database issue when importing the result. Instead of importing the result of =MAX() it is importing the entire equation =MAX(32,0). Is there a way for the tool to just leave the result behind and not the formula?
Thanks,
Dan
P.S. This is hands-down the best add-on I've ever needed and used.
Hello Dan,
Thank you for your feedback! We have just sent you a reply via email. Please provide us with the requested details, we’ll do our best to help. Thank you!
Holy cannoli, this feature alone was worth the price of the tool.
Is it possible to work these into VBA routines? I tried recording a macro with this, but it didn't work. (Very annoying when you need to run this on a template with 3 key columns, sum a fourth, and comma-delimit the fifth... repeated across several dozen spreadsheets per week!)
Hello Melissa,
Thank you for contacting us. I regret to tell you that our add-ins can't be called/run from VBA scripts. Sorry about this.
I am using Office 365 and once I combine the sheets and then merge duplicates; I have the delimiter appear in most of the cells when there is no duplicate. Below is an example of 2 columns that should not have the delimiter after the information:
Street2 City
n/a, Huntersville,
n/a, Winston Salem,
n/a, Pickens,
n/a, Randleman,
n/a, Mooresville,
n/a Raeford
n/a, Lumberton,
n/a Robbins
n/a, Statesville,
n/a, Kannapolis,
n/a Fayetteville
Hello Natricia,
Thank you for contacting us.
Our support team assistant has just replied to you via email. Please check your Inbox. Thank you.
Hey There,
I merged a table in excel with duplicate values, once I updated my source table with new values and hit refresh the duplicate values start showing up again.
Could you please help me with this issue.
Regards,
Arsalan Qureshi
Hello Arsalan,
For us to understand the problem better, please send a sample workbook with the duplicate values and the expected result to support@ablebits.com. Please also describe in detail what steps you follow before the issue occurs and include screenshots of each step of the Wizard with the selected options into your email.
We'll try to reproduce the issue on our side and see what is causing the problem. Thank you.
I am floored by how much is in this tool and am so excited to use this for a lot of excel projects!
I am trying to currently merge rows with duplicate data in Column H, but also override data from Columns B-G rather than put it in one cell with delimiters. Column A will be the determiner as to which data in B-G to override. For example, my first argument is to merge duplicate data identified in H, second argument is to override any data in B-G (unless null) if column A =NEW.
My long answer is probably use the delimiter, then run an if function to remove data from those cells...I was hoping there would be a simpler option. I hope this makes sense - I also emailed support but it is the weekend and I'm hoping for a quick answer.
Hello Jennifer,
Thank you for contacting us.
Our support team assistant has just replied to you via email. Please check your Inbox. If you have any questions, do not hesitate to address them to support@ablebits.com. Thank you.
Is there an option to not merge the values into a single cell, but rather to use a new cell (column) for subsequent values? I can always use a character that isn't in my data set and then use text to columns to achieve the result, but that assumes that one of the available delimiters isn't in use.
Hello Robert,
Thank you for contacting us.
I'm sorry, but your task is not entirely clear. For us to be able to help you better, please send us a small sample workbook with your source data and the result you expect to get to support@ablebits.com. I kindly ask you to shorten the table to 10-20 rows.
We'll look into it and see if our software can help.
Hi ,
I downloaded the ultimate suite, but am not able to find the "Combine Rows" functionality.
Hi Milan,
Thank you for contacting us.
Please note that Combine Rows was renamed to Merge Duplicates with a major upgrade we have released. You can find it in the "Merge" section under the "Ablebits Data" tab in the new version of Ultimate Suite.
Feel free to contact us again if you have any other questions or need further assistance.
I can't chose delimiter [Line break]. How to chose it ?Pls help me !
Hello Thuc,
To choose the line break as a delimiter on the final step of the wizard, just select the following symbol from the "Choose delimiter" drop-down list: ↲
If there is anything else we can help you with, please let us know.
Just find this amazing function, saved me for hours of work
OK, it didn't removed all duplicate value, some "," before and after was not removed, but all together saved me for lot's of work
Tom
Hi, Tom,
Thank you so much for your kind feedback, it is always very important to know that our products help people save precious time!
I am sorry to know that you’ve encountered difficulties with removing quotes. Please contact our support team with this issue at support@ablebits.com. It would be perfect if you could attach a sample of your dataset and indicate the version of Ultimate Suite you use. We’ll do our best to help you.
Thank you.
I am having an issue when I try to sum decimal numbers. When I merge the cell with decimal numbers it makes the formula looks like two numbers in a cell (ex. cells 2,4 and 3,4 appears as sum(2;4;3;4) )
Obs. I am from Brasil and here we use comma as separator of decimal numbers.
Hello, Raul,
Thank you very much for your comment. You helped us to find a bug and our developers are already working on fixing this issue. As soon as it is solved, I will send you details via e-mail.
Thank you!
I have this problem too. I need the data to be in order. but the similar data are deleted now.
Hello,
Please make sure that the option "Delete duplicate values" is unchecked in step 3 of the Wizard. If it is not the case, then please describe the problem you've faced in more detail. If you can send us a small sample workbook with your data and screenshots of each step with the selected options to support@ablebits.com, it will be of great help. We'll try to reproduce the issue on our side and find its cause. Thank you.
Post a comment
Seen by everyone, do not publish license keys and sensitive personal info!