Excel: prevent text from spilling over into next cells

In this post, you'll learn what causes data to overflow into the next columns and how to keep text from spilling over in Excel.

When entering a long text in a cell, you may notice that sometimes it spills out into adjacent columns and at times gets hidden behind the neighboring cells. How does Excel determine what to do and how do you stop words from overflowing into next cells?

What causes words to spill over into other columns?

Knowing the circumstances under which text continues beyond the edge of the current column can help you better control the layouts of your Excel sheets. So, let's make up two lists.

Text is spilling over

For the cell content to overflow beyond the cell boundaries, all of the following conditions must be true:

  • The cell value exceeds the width of the cell.
  • The cell value is text. Long numbers are generally converted to scientific notation, and dates appear as ### when the column is not wide enough to display the date.
  • Neither the current nor adjacent cell is merged.
  • The adjacent cell is absolutely empty - does not contain spaces, non-printing characters, empty strings, etc.
  • Wrap text is off.

Text is NOT spilling over

For text to be truncated at the cell's edge, any one of the following conditions must be true:

  • The adjacent cell is not blank.
  • Either the current or adjacent cell is merged.
  • Wrap text is on.
  • The Show Formulas mode is enabled.
  • The cell's horizontal alignment is set to Fill.

Now that you know what things affect text overflowing, you can reasonably assume that fulfilling any requirement from the second list will prevent Excel cells from spilling out. And you are right! However, there is a small complication - all conditions but one would make some visual changes to the sheet. Which is the safe option that won't impact the spreadsheet's consistency in any way? Obviously, the last one. And the next section provides the detailed steps on how to implement it.

How to prevent text from spilling over in Excel

To keep Excel cells from spilling out into the next column, perform these steps:

  1. Select the cells you want to prevent from overflowing.
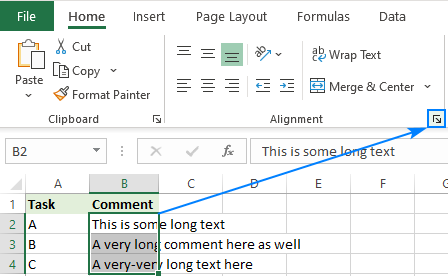
  2. On the Home tab, in the Alignment group, click the Dialog launcher (a small arrow in the lower-right corner of a group). Click the dialog launcher to get more alignment options.
  3. On the Alignment tab of the Format Cells dialog box, choose Fill in the Horizontal drop-down list. Set the Horizontal alignment to Fill.
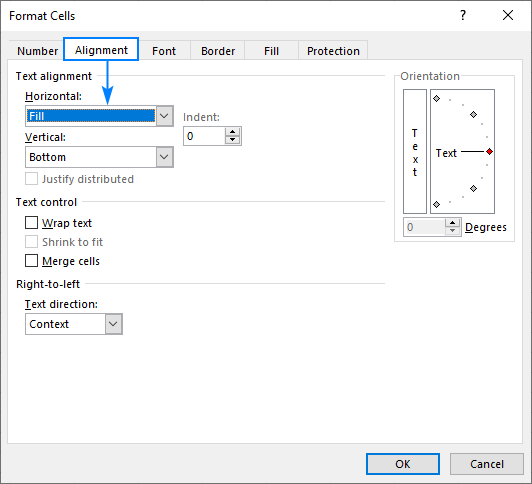
  4. Click OK to save the changes and close the dialog.

Now, the data in the selected cells is truncated at the cell boundary. Text spilling over is stopped.

Note. This method works correctly only if all of the selected cells spill out - in this case, the text will crop correctly. If some cell contains shorter text, Fill will populate an entire cell with the content, repeating it as many times as necessary. For example, a cell containing the word "Hey!" may look like "Hey!Hey!Hey!".

Stop words from spilling into next cells using Wrap Text

Those of you who know how the Wrap Text feature works in Excel may feel skeptical about this method. Indeed, turning wrapping on makes rows very tall: Wrap Text feature

However, there is a small clever trick to avoid this effect! Before wrapping text, this is what you need to do:

  1. Select the cells you wish to stop from spilling over.
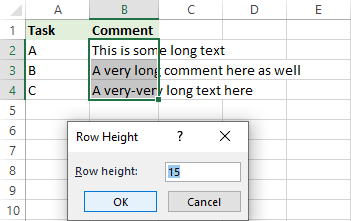
  2. On the Home tab, in the Cells group, click Format > Row Height. Row height
  3. The Row Height box will appear showing the current height of the selected cells. Click OK without changing anything just to confirm your present row height. (In the latest versions of Excel, the default is 15 points on a 100% dpi. If you see a number other than 15, keep it - Excel row height is determined by the font size and may be different in your worksheet). Set the row height.
  4. On the Home tab, in the Alignment group, click the Wrap Text button: Turn Wrap Text on.
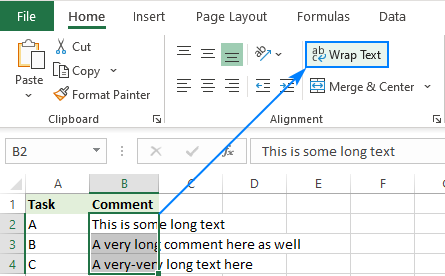
That's it! Using these two features together forces long text to be cut off at the cell edge. Make words not to spill over in Excel.

Tip. This also works in the reverse order. If you have already enabled Wrap Text and now want to get rid of tall rows, set the row height back to default (15 points) as explained above. The result will be normal rows that do not overflow into adjacent empty cells.

One more way to hide overflow text in Excel

And here's another amazingly simple way to keep long text within the cell boundaries - just type something in the neighboring cell. Don't want any extra data in your sheet? Type a space :) There are too many overflowing cells? Enter a space in a range or entire column to remove spill-over from multiple cells in one go!

Here are the steps to hide long text that overflows beyond the cell edge:

  1. Select a range of empty cells adjacent to the overflowing cells. Or select an entire column on the right (in case the whole column is empty).
  2. Type a space character and it will appear in the first cell like shown in the screenshot below.
  3. Without disturbing the selection, press Ctrl + Enter. This will insert a space in each cell of the selected range.
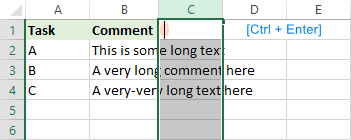
Type a space into adjacent column to prevent cells from spilling over.

Done! The adjacent column still looks empty but no text flows into it from the left.

Keep text from overflowing into specific cells

In some situations, an additional hurdle may arise - some cells in the adjacent column may be filled with data while others are not. As the result, the contents of some cells will continue into the next column and beyond while other data will be limited to the visible part of their current cells. This tends to confuse things and makes quite an ugly view. The contents of some cells continue into the next column.
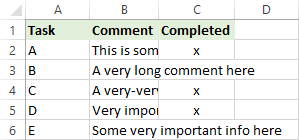
To resolve this case, enter a space only in blank cells of the column into which data is spilling (column C in our example). To quickly select blank cells, make use of the Go to Special feature:

  1. Select a range of cells or a whole column to the right of the overflowing cells.
  2. On the Home tab, in the Editing group, click Find & Select > Go to Special. Or press F5, and then click Special… .
  3. In the Go To Special dialog box, select Blanks and click OK. Select blank cells.
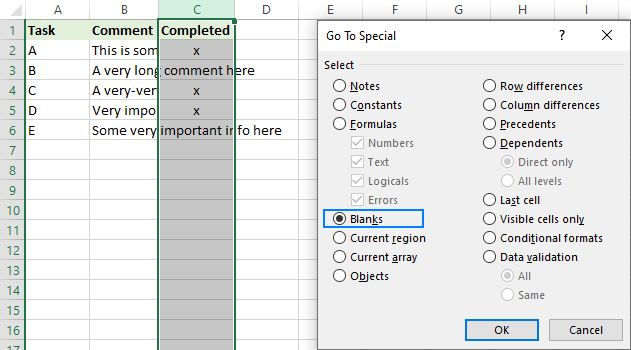
  4. With the blank cells selected, type a space character and press Ctrl + Enter. A space will be inserted in every selected blank cell.

Voilà, no data is spilling into the next columns even if an adjacent cell is empty (in fact, it does contain a space character, but who will know it? ;) Text is not spilling into the next columns even if an adjacent cell is empty.

Tip. The first two methods (Fill horizontal alignment and row height + wrap text) will also work in this scenario.

These are four quick and easy ways to remove cell's spill-over in Excel. I thank you for reading and hope to see you on our blog next week!

26 comments

  1. Thanks from the bottom of my heart

  2. Thanks you very much, exactly what I needed!

  3. Using "Fill" left-justifies the text. Is there any way to prevent right-justified text from spilling into an empty cell in the the column to the left, without entering spaces into those cells?

  4. thanks for the tips! Helped me a lot

  5. Hi I am looking for Text overflow Ellipsis in Excel. Is there any way to achieve the ellipsis (...) For the used range in my sheet for the cells have long text in it. And My column width is fixed. Just highlight Ellipsis to tell the user that it has long text in the cell..
    Kindly please help!
    Thanks in advance#

  6. It's absolutely absurd that a program as powerful as Excel can't just add a super simple "clip" option like Google Sheets has! I can't believe this. Sure you can do the "Fill" option but then any text that *doesn't* reach the end of the cell gets repeated, which I can't think of any situation where a user would want that. Or you can Wrap Text but then the Rows get super big. Sure I can do adjust row height, but JUST GIVE US A CLIP OPTION!

  7. You guys really need to add a text-clipping option. It would make this much smoother.

  8. BEST! Thanks!

  9. Awesome!

  10. Thank you, I've been scouring the entire internet trying to figure this out. My only complaint is that I didn't find it sooner, lol. Never again, though, it's saved to my favorites. 🙏👍

  11. Thank you! I was able to fix my problem in less than 3 minutes....I appreciate it!

  12. This was super helpful (and easy to do), thank you!

  13. Doesn't work for me. Instead, fill causes idiotic excel to fill all blank space with copies of whatever is in the cell. Basically the opposite of what I want. Count on Microsoft to make the default setting useless and make it difficult/impossible to find how to make it work the intuitive way. FU GATES!

      • The true function of "Fill" is it takes whatever is in the cell and visually repeats it until the cell is full. So if your text is long, it just truncates it to the cell edge. But if it has a short entry, it just repeats it. No good if you have a mix of entry lengths.

  14. So, Excel in 2022 can't do what Google Sheets has been doing for several years.

  15. The first way, FILL, does not work.

    Sure, if text is too long, it will crop correctly.

    But TYPICALLY when you want to format a column of cells with text, not ALL the cells contain "too long data".

    Example:
    *************
    Thisissometoolongtext
    Thisisalsosometoolongtext
    And This Is A Sentence
    ShortText
    HelloBob
    Hi!
    *************
    With the column width show by the ***** line above: clearly WIDER than the short texts, but not wide enough for the long sentences!

    What you obtain with FILL is this:

    Thisissometool
    Thisisalsosome
    And This Is A Se
    ShortTextShort
    HelloBobHelloB
    Hi!Hi!Hi!Hi!Hi!Hi

    Which is NOT good at all.

    That trick works ONLY if ALL the text rows are too wide.

    It's a CROP function that is needed.
    Not a "FILL" function!

    Also the word wrap "solution" is no good either.
    I want to show the maximum amount of characters, not have it wrap at *WORDS*.

    *************
    And This Is A Sentence
    *************

    Should become:

    And This Is A Se

    Not become:

    And This Is A
    Sentence

    (and then forme me to manually go and shrink the cell box to hide the actual 2nd line)

    And also not jumping through any weird "change actual cell content" hoops.
    Like say "Try putting an x or a space character in the next cell over".

    It's a simple display formatting problem.
    Not a cell content problem!
    Not a cell size problem, either!

    • Hello Patrick,

      Thank you for your feedback. Your remarks about FILL make perfect sense, I've added a corresponding note to the article.

      As for the other 2 methods, of course they have some limitations and drawbacks - these are workarounds, not "by design" features. If you know a better way, I'll be grateful for sharing your knowledge.

      • I have found a way for cropping text without needing anything in the adjacent cells.
        - Select all the rows in the target area using the row numbers.
        - Right-click and set Row Height to desired value.
        - Select specific cells that text is to be cropped in, apply Wrap Text formatting.

        Essentially, while Excel has the default of adjusting the Row Height to match the text in the cells, if the desired Row Height is specified beforehand then that desired value overrides the auto-adjust.

        Something I noticed was that this formatting does NOT automatically extend. What I mean by that is that if this formatting is used on a data set that is formatted as a Table, then adding new rows to the bottom of the Table will not extend this formatting to the new rows. If the Row Height has been specified for rows that extend past the Table boundaries, and the newly added Table rows are within those specified, then the specified Row Height will still hold and not be overwritten by the Table formatting. As soon as the Table is extended beyond that boundary, however, the formatting will return to the default.

        • Of all the work-arounds suggested here, this is actually the one that comes closest to achieving what (most) people likely desire. It doesn't fill all the available width then truncate (unless the text itself is something like a web address without any spaces), but ratrher wraps the text without actually expanding the line to show everything. You can see the something is in the cell. If it doesn't seem "complete" you just select the cell and read the full entry in the display at the top of the page.

          I do agree, though, with others here who have wondered why not just have a 'Clip' option. It's simple, It's effective. It's what the customer wants. It's a Microsoft product. Don't hold your breath.

  16. This is aweosme! I learned something new, and this is exactly what I was looking for!

  17. Thanks, very much, exactly what I needed!

  18. thank you

  19. THANK YOU. I could not find this information anywhere.

  20. Is there a way to do this if I'm using a drop down in a cell? I tried all the tricks above and they don't prevent the spill over.

  21. My problem is that some or the text spills over when printed. Everything looks OK in print preview but when printed some text has spilled over even when there is content in the adjacent cell.

Post a comment


Thank you for your comment!
When posting a question, please be very clear and concise. This will help us provide a quick and relevant solution to
your query. We cannot guarantee that we will answer every question, but we'll do our best :)