The tutorial will guide you on how to send auto replies in Outlook while you are away. You'll learn how to set up out-of-office messages for both work and personal email accounts, and for different versions of Outlook, including classic, new, and web-based.
In today's busy world, we all need a break sometimes, even from our emails. But whether you're off on vacation or a business trip, you don't want to leave your contacts hanging. You can let them know that you are away and when you will be back by setting up an Outlook auto reply. This message will be automatically sent to anyone who emails you during your absence.
Determine Outlook email account type
To set up an automatic out-of-office message in Outlook, you need to know what type of email account you have. There are different methods for Exchange, POP/POP3, IMAP and SMTP accounts.
Here is how you can find out your account type and create your auto reply accordingly.
- Go to the File tab on the top left corner of the ribbon.
- In the Info section, under Account Information, select the account you want to use and look at the options below.
- For Microsoft Exchange account, you will see the Automatic Replies (Out of Office) option. Click on it and follow the instructions.
- For POP3 and IMAP accounts, the Automatic Replies feature is not available. Instead, you can create a rule to send your out of office notification.
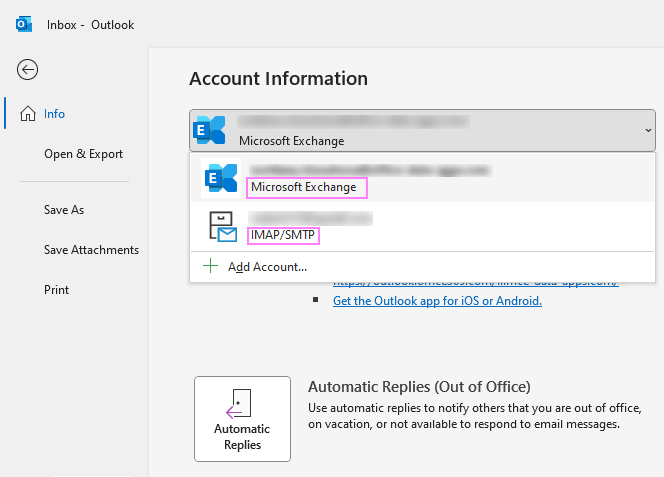
Now, let's explore how to set up an automatic reply for each of these account types.
How to set automatic out of office message in Outlook
To send an auto reply in Outlook with an Exchange account, follow these simple steps:
- In the Outlook desktop app, click on the File tab in the top left corner.
- In the Info section, click the Automatic Replies (Out of Office) button.
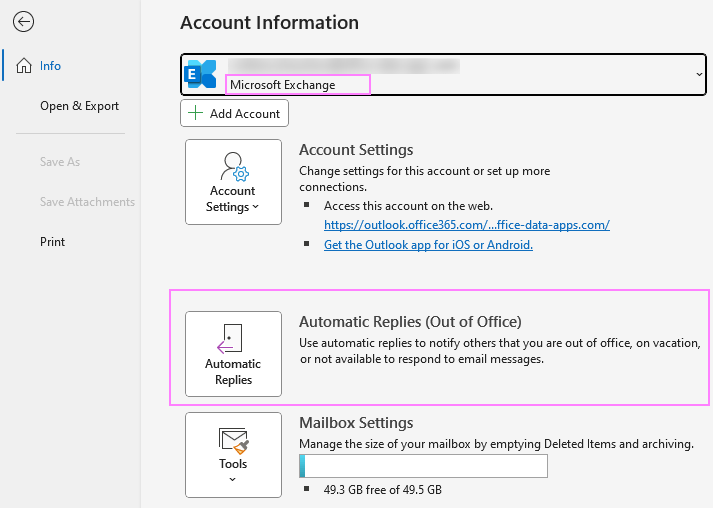
- In the dialog window that appears, select Send automatic replies.
Optionally, you can define a date range to deactivate auto replies when the specified end date is reached. If you don't set a date range, you'll need to turn them off manually when you return.
- On the Inside My Organization tab, enter the message you want your coworkers to receive while you are away.

- On the Outside My Organization tab, write the message you want to send to external contacts. Be careful when choosing to auto reply to Anyone outside my organization, as this will send your “away message” to every incoming email, including advertisements, newsletters, and junk email. To prevent this, it's advisable to choose My contacts only.

- Click OK to save your settings.
That’s it! Your Outlook out-of-office message is now set up and will be automatically sent to people who email you during your holiday or business trip.
How to set an away message for Outlook POP/IMAP accounts
When it comes to setting up out-of-office notifications for POP and IMAP/SMTP accounts in Outlook, the process is a bit different from Exchange accounts. These types of accounts lack the built-in feature for automatic replies, so you'll need to create an email template and configure a rule to respond with that template to every message you receive. This method is applicable across various versions of Outlook, from 2010 to 365. Let's get started!
Step 1. Create an away message template
Before you create the rule, you need to prepare the message that you want to send as an auto-reply.
- In your Outlook, create a new email with the subject and text that you want your away message to convey. For example, you can write something like this:

- Click File > Save As and save the email as an Outlook Template (*.oft).

Word of caution: do not change the default location where Outlook saves templates, which is typically: C:\Users\UserName\AppData\Roaming\Microsoft\Templates
(This note is aimed at advanced users; newcomers are usually best off sticking to the defaults.)
- Close the message window without sending it.
Step 2. Set up an auto reply with template rule
Now that you have your away message template ready, it's time to create a rule that will send it automatically when you receive new emails.
- Click the File tab, and then select Manage Rules & Alerts.

- In the Rules and Alerts dialog window, click on New Rule.

- Under Start from a blank rule, select Apply rules on messages I receive, and then click Next.

- Choose the conditions for the rule. You can select “from people or public group” or “through a specified account” to define which emails trigger the out-of-office reply. If you are setting an auto response for all incoming messages received from all your accounts, then don't check anything here and just click Next. When Outlook asks you if you want to apply this rule to all messages, click Yes to confirm.

- Next, specify what you want to do with the messages. Since we want to reply using a specific template, choose exactly this option under “Step 1: Select action(s)”. Under “Step 2: Edit the rule description”, click “a specific template” link.

- The Select a Reply Template dialog window will appear. In the Look In dropdown box, choose User Templates in File System, select the away message template you’ve created, and click Open.

- Back in the Rules Wizard, you will see the path to your template in the lower pane and click Next.

- Optionally, you can add exceptions to the rule. Otherwise, click Next without selecting anything.

Tip. You can make an exception not to send auto replies to returned emails that contain "returned" or "undeliverable" in the subject. This will prevent a situation where emails keep bouncing back and forth between servers. However, this is not strictly necessary, as the reply using a specific template rule will only send your away message once per session, which lasts until you restart your Outlook.
- In the final step, name your rule and choose additional options. To activate the rule immediately, keep the Turn on this rule box checked (default setting). If you want to enable the rule later, uncheck this box. Once done, click Finish to save the rule.

Congratulations! You have successfully set up an automatic out-of-office message in Outlook. Now you can enjoy your time off without worrying about missing any important emails.
For more information, please see Outlook rules: how to create, edit and remove.
Tips and insights:
- For the away message to be sent automatically, make sure Outlook is open and configured to regularly check for new messages. Of course, your computer should be on during this time.
- If needed, you can create several rules with different templates for your personal and work email accounts, or for messages from specific groups like friends or colleagues.
- You can set up your auto-reply rule in advance and turn it on later. Just go to the Rules and Alerts window (as described below) and check the box next to the rule.
How to set out of office reply in new Outlook
The new Outlook for Windows has a simpler way of creating an out-of-office message:
- Click the View tab and select View settings.

- Choose Accounts > Automatic Replies and toggle on the Turn on automatic replies switch.
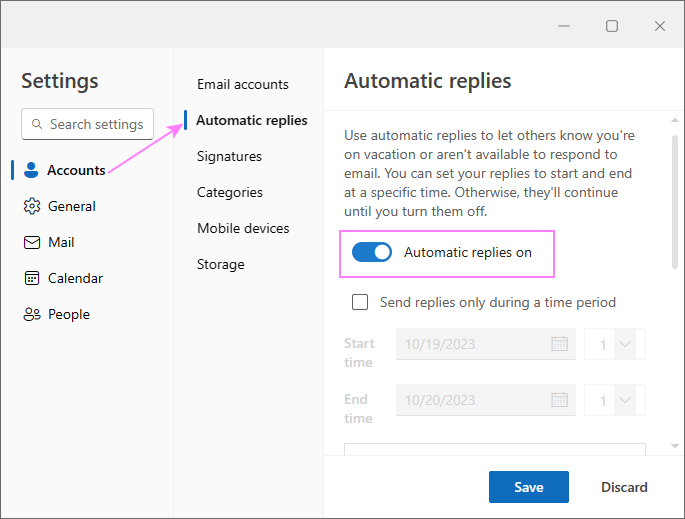
- To define a time period, check the Send replies only during a specific time period box. Then, enter the start and end dates and times.
- Under Send automatic replies inside your organization, type the message that you want to send to your colleagues. You can use the formatting options to change the font, size, color, or alignment of your text.
If you also want to send an out of office message to people outside your organization, tick the Send replies outside your organization box and write the message that you want them to receive.
- To limit the recipients, you can select the Send replies only to contacts box. This option ensures that your away messages are exclusively sent to contacts in your address book, excluding emails from unknown or unwanted sources.
- Once you've configured all the desired settings, hit Save.
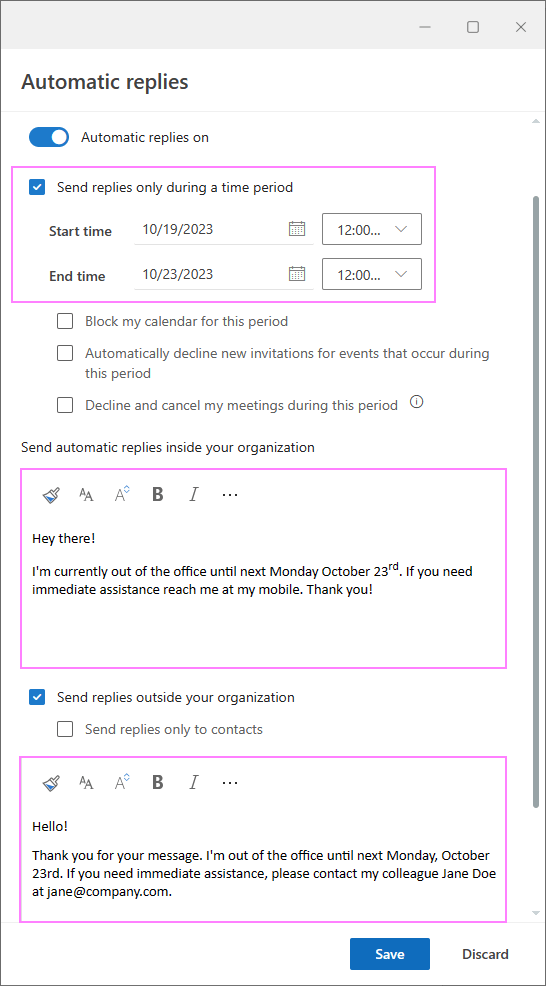
Your out-of-office reply in the new Outlook is good to go and will be sent to anyone who emails you while you're away.
For more details, please refer to New Outlook rules guide.
How to create auto reply in Outlook on the web and Outlook.com
Creating an out of office reply in Outlook Online and Outlook.com is a straightforward process, much like in the new Outlook for Windows. Here's a simple guide to get you started:
- In the upper right corner, click Settings (the gear icon). Alternatively, on the View tab, click View Settings.
- In the left pane, click Mail, then choose Automatic replies.
- Click on the Turn on automatic replies toggle to activate the feature.

- You can choose to send automatic messages only for a specific time period by checking the box next to Send replies only during a time period and entering the start and end dates. If you don't choose a time period, your away messages will stay on until you turn them off manually.
- You can also select some additional options for your calendar and meetings.
- Type the message that you want to send as an auto reply to people inside your organization and, optionally, to people outside your organization as well.
- When you're done, click the Save button at the bottom of the window.
Note. If you haven't specified a time period for your vacation messages, remember to deactivate them manually upon your return by clicking the Automatic replies on toggle.
How to turn off out of office messages in Outlook
The method of turning off your Outlook auto replies vary depending on your Outlook version and account type. Below are instructions for the most common scenarios.
Turn off auto reply in classic Outlook
When out of office messages are activated in classic Outlook with an Exchange account, a yellow box will appear under the ribbon, saying "Automatic Replies are being sent for this account". To stop sending out-of-office messages, click the Turn off button to the left of the message.

Alternatively, you can change the dates and times for your away messages by going to File > Info > Automatic Replies and adjusting the settings as needed.
Disable out-of-office rule in Outlook
If you've set up an away message rule for a POP or IMAP account, you need to disable the rule manually when you come back because the rule does not have a built-in time limit.
Here's how you can do that:
- In Outlook, click File > Manage Rules & Alerts.
- In the Rules and Alerts dialog box, look for the rule associated with your “away message” and uncheck the box next to it.
- Click OK to save the changes.
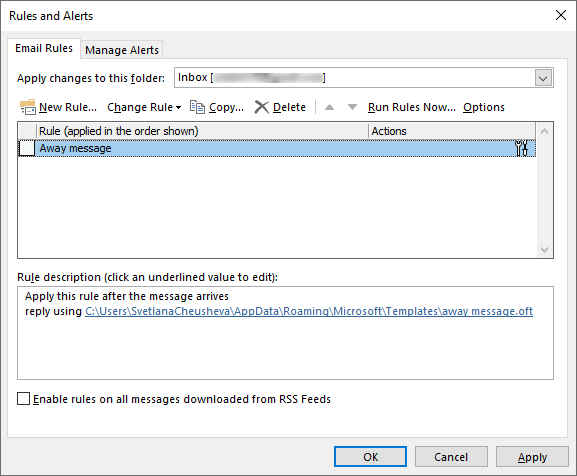
Tip. To ensure you don't forget to disable your rule, you can set a reminder in Outlook by creating a new task with a reminder alert.
Switch off auto reply in new Outlook
In the new Outlook for Windows, disabling auto replies is as straightforward as enabling them:
Go to the View tab > View setting > Accounts > Automatic Replies and toggle off the Automatic replies on switch.
This will stop sending out-of-office messages until you turn them on again.

That’s how you can send out-of-office replies in different Outlook accounts and versions. With your away message properly set up, you can now take a well-deserved break while your contacts will be informed about your absence and expected return date. Enjoy your time off without worrying about your work communication :)
 by
by
41 comments
thanks a lot of information
Thanks for the excellent information you shared I appreciate your efforts and for taking the time and sharing this content. It was indeed beneficial.
Thank you very much for creating such a wonderful and informative blog. It was a lot of fun and I learned a lot from it. You did an excellent job.
A new thing to learn about this article. Thank you for sharing the information.
This is a great blog! Thanks for sharing your knowledge.
I have tried the instructions over and over again, it just does not work, there is no reply and the rule just defaults to a standard template even with my template selected
I was wondering if I have outlook running on my Android phone, is that a way of sending to OOO notices?
Hello Alexander;
My story;
Yesterday I had the fantasy of getting out of the office for a few days to visit family who went camping. As I was receiving job applicant emails through a gmail account (forwarding to Outlook 2016- Office 365) I wanted to let people know that I was not ignoring them so set up a rule based on the link below.
https://www.ablebits.com/office-addins-blog/out-of-office-autoreply-outlook-gmail/
Fast forward to this morning…Truck is loaded and I am ready to head out at 3 Am so I might get to the camp spot by breakfast to surprise the kids. But maybe a quick check on email to make sure all is good.
Check main office email…..Hmmmmm.. Set up dispatch for an emergency call but all pretty good
Check personal email….all good….Hooray I am almost ready to go
Scroll down to gmail address……Wait a minute????? There is only one email thanking me for letting them know that I will be gone for the weekend….I had at least 14 email in the Inbox last night… OMG Where are the emails??? Frantically start erasing the “Rule” to stop any more damages and now I am seeking where those emails went.
Went on to Gmail account to see if I could find but no..... everything is erased on email except that one response.
If you have posted this condition and the fix on your blog I would bow to the 4 gods and register you with Goddess Haven if you might point me in that direction. .
Hello Kayne,
I've never run into anything like that. The only ideas that comes to mind is check the Trash folder on gmail (Deleted Items in Outlook), if the messages are not there, switch to the All mail folder and sort it by date.
Sorry, but I have no other ideas about where those messages could have disappeared.
Thank you so much for the absolute fool proof instructions - fabulous tutorial.
80000K Final Fantasy XIV Gil in Excalibur [US/NA Server] Sold, Customer Left the Review: I have placed my order on your site many times. The delivery is very fast and the gil is really cheap. I will definitely recommend your site to my friends. Thanks again.
25000K FFXIV Gil in Titan [JP Server] Sold, Customer Left the Review: I have bought gils from this site couples of times.Rate A+++.Thank you.
Thank you so much for your instructions. My auto reply is working properly, so now I am headed out the door!
my tools will not let me click on vacation auto reply to cancel on windows live mail
Great job on this tutorial! Everything was where you said it would be and it worked. Thanks
I have cleared the rule and the suto out of office reply is still being sent. I am on a pop3 server
Very helpful information and it works thanks.
Hi,
I have followed the instructions for my work email, but still don't receive the automatic response from my work email.
i have closed the outlook and then open it again, but the result is still the same when i do the test (send email to my work email to see if i get a reply).
How can I correct it or is there a step that I am missing?
Worked! Thanks,
Hi.
kindly assist; I want to remove the out of office reply, using office 2010, without exchange server?
Please Reply this Blog, Iam Waiting For your reply...
Your Blog is Usefull, But I had one Issue, When My outlook or my System in Shutdown, this option will not work, Whats the solution for that...
Ive closed my hotmail account its due for closure in 60 days. Will my holiday reply still send to my contacts while waiting to close
Upon setting the rule for POP3/IMAP accounts, can the email that the Out of Office rule is applied to send out emails?
For example: I set the rule for my PM's account, as he is on vacation. I have noticed twice, today, wherein he has replied to one of my messages, sent TO him during his time out of the office. The message appears in my inbox, and then moments later disappears. (We are on the same server.) Is this because of the rule? When we remove the rule upon his return, will the current messages appear? Or could I have other issues going on? Thx!
Hi Alexander,
I have followed the instructions step by step - however when I receive emails it says 'Error - Can Not Reply To Message'. Do you know why this might be happening? Is there a way that I can fix this?
How to stop out of the office reply when the incoming email is identified as junk or spam?
I need a text of good automatic reply .....can any one help in this regard.
,Thanks.
Scott,
I also think the same way
mine will work one time for each received email address and then not again until i delete the rule and reset it. What's the fix for that?
maybe that is what you meant by:
"But this is actually an extra precaution, because the "reply using a specific template" rule will send your auto-reply only once during a single session, i.e. until you restart your Outlook."
So is that "once" for each person that sends you an email - I assume?
You can't imagine how many blogs I've read, instructions I tried before this and nothing. But this is MAGIC! Thank you. One little difference you had from all the others is in the rules section for Outlook --- not sent to a "person" but "sent "through the specified account". That did it! I simply used "exceptions" for the solicitation email so not every email is responded to. Thank you very much. I'll be back.
Setting any auto-response for every email received is asking for trouble!
Imagine two people with these running where one decides to email the other... so what happens?
The auto-response emails to say 'I'm out... blah blah' and you client emails back to say 'I'm out... blah blah blah. This loops until somebody's email server fails and dies under the load!
Be warned! I have seen servers fail from using responders to every email. beware the LOOP!
Hello,
One of our email accounts is sending an automated reply-but it is not located in 'rules'. We would like to turn it off but can't locate where it originates from. It is an IMAP/SMTP account on MS Office Home and Business 2010.
Any ideas on how to locate the rule and turn it off?
Thanks!
Hello Jessica,
You can open the mail properties and find the email sender.
https://www.ablebits.com/office-addins-blog/view-outlook-email-headers/
However, there is a probability that the rule is set up on the server rather than client. Additionally, you can check the add-ins installed in your Outlook, maybe one of them is sending those auto-replies.
but it'still working outlook offline
I want to setup a auto responce for my support email address in hotmail.
With the name system generated mail.
Hello Srikanth,
Sorry I do not quite understand what you mean by “with the name system generated mail”. The general approach to setting up an auto reply in hotmail is described in the article.
Wonderful instructions. Great information on how to set up auto reply in Outlook 2007 without a microsoft exchange server. Worked perfectly! Simple and concise.
This worked perfectly. Thank you very much.
Hi Brian,
Which account type did you try to set up an autoreply for: POP/IMAP, Gmail or Outlook.com?
I tried fatherly following the instructions you give , but my outlook still does not work ? There is wrong?
thanks