Google Sheets offers more than just standard cells for data; it also has interactive elements like checkboxes that will make your data more organized. They’re used to create interactive lists, manage task completion, and even format data based on checked or unchecked boxes. Let’s explore how you can add, use and make the most of checkboxes in Google Sheets.
How to insert checkboxes in Google Sheets
Adding checkboxes in Google Sheets is simple:
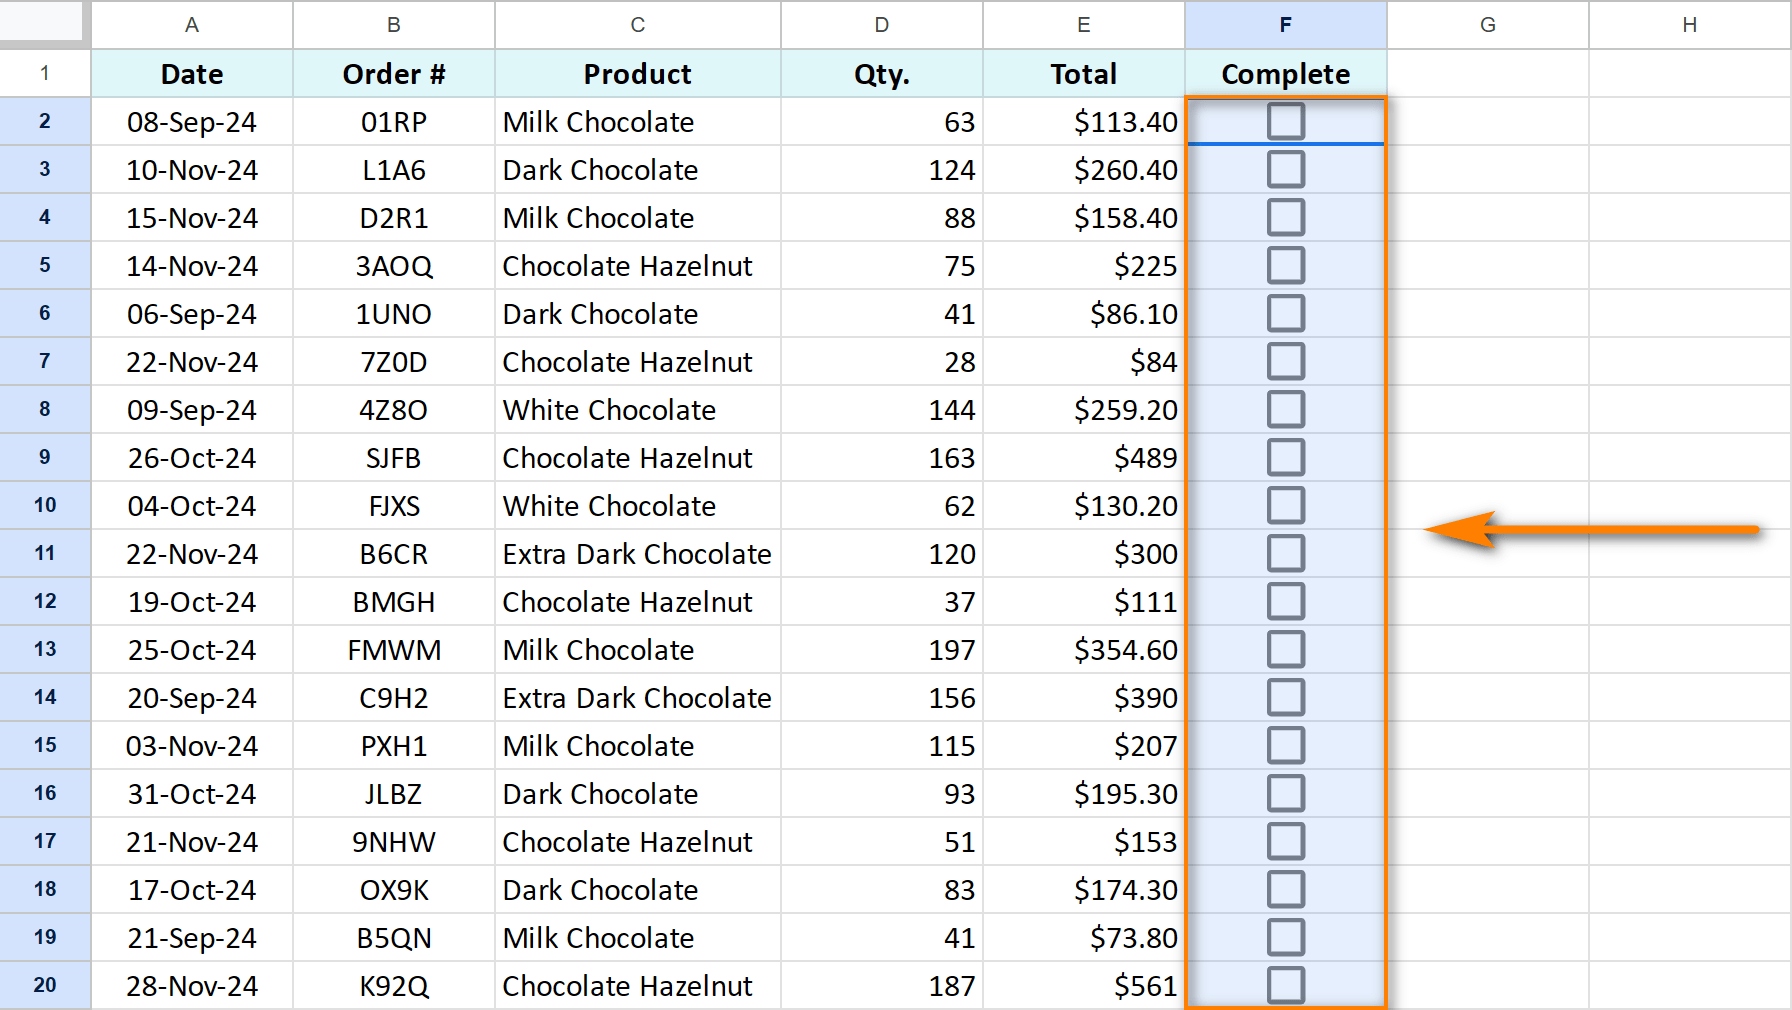
- Select the cells where you want to insert a checkbox. In my case, it's a whole column.
- Go to Insert > Tick box in the top menu:
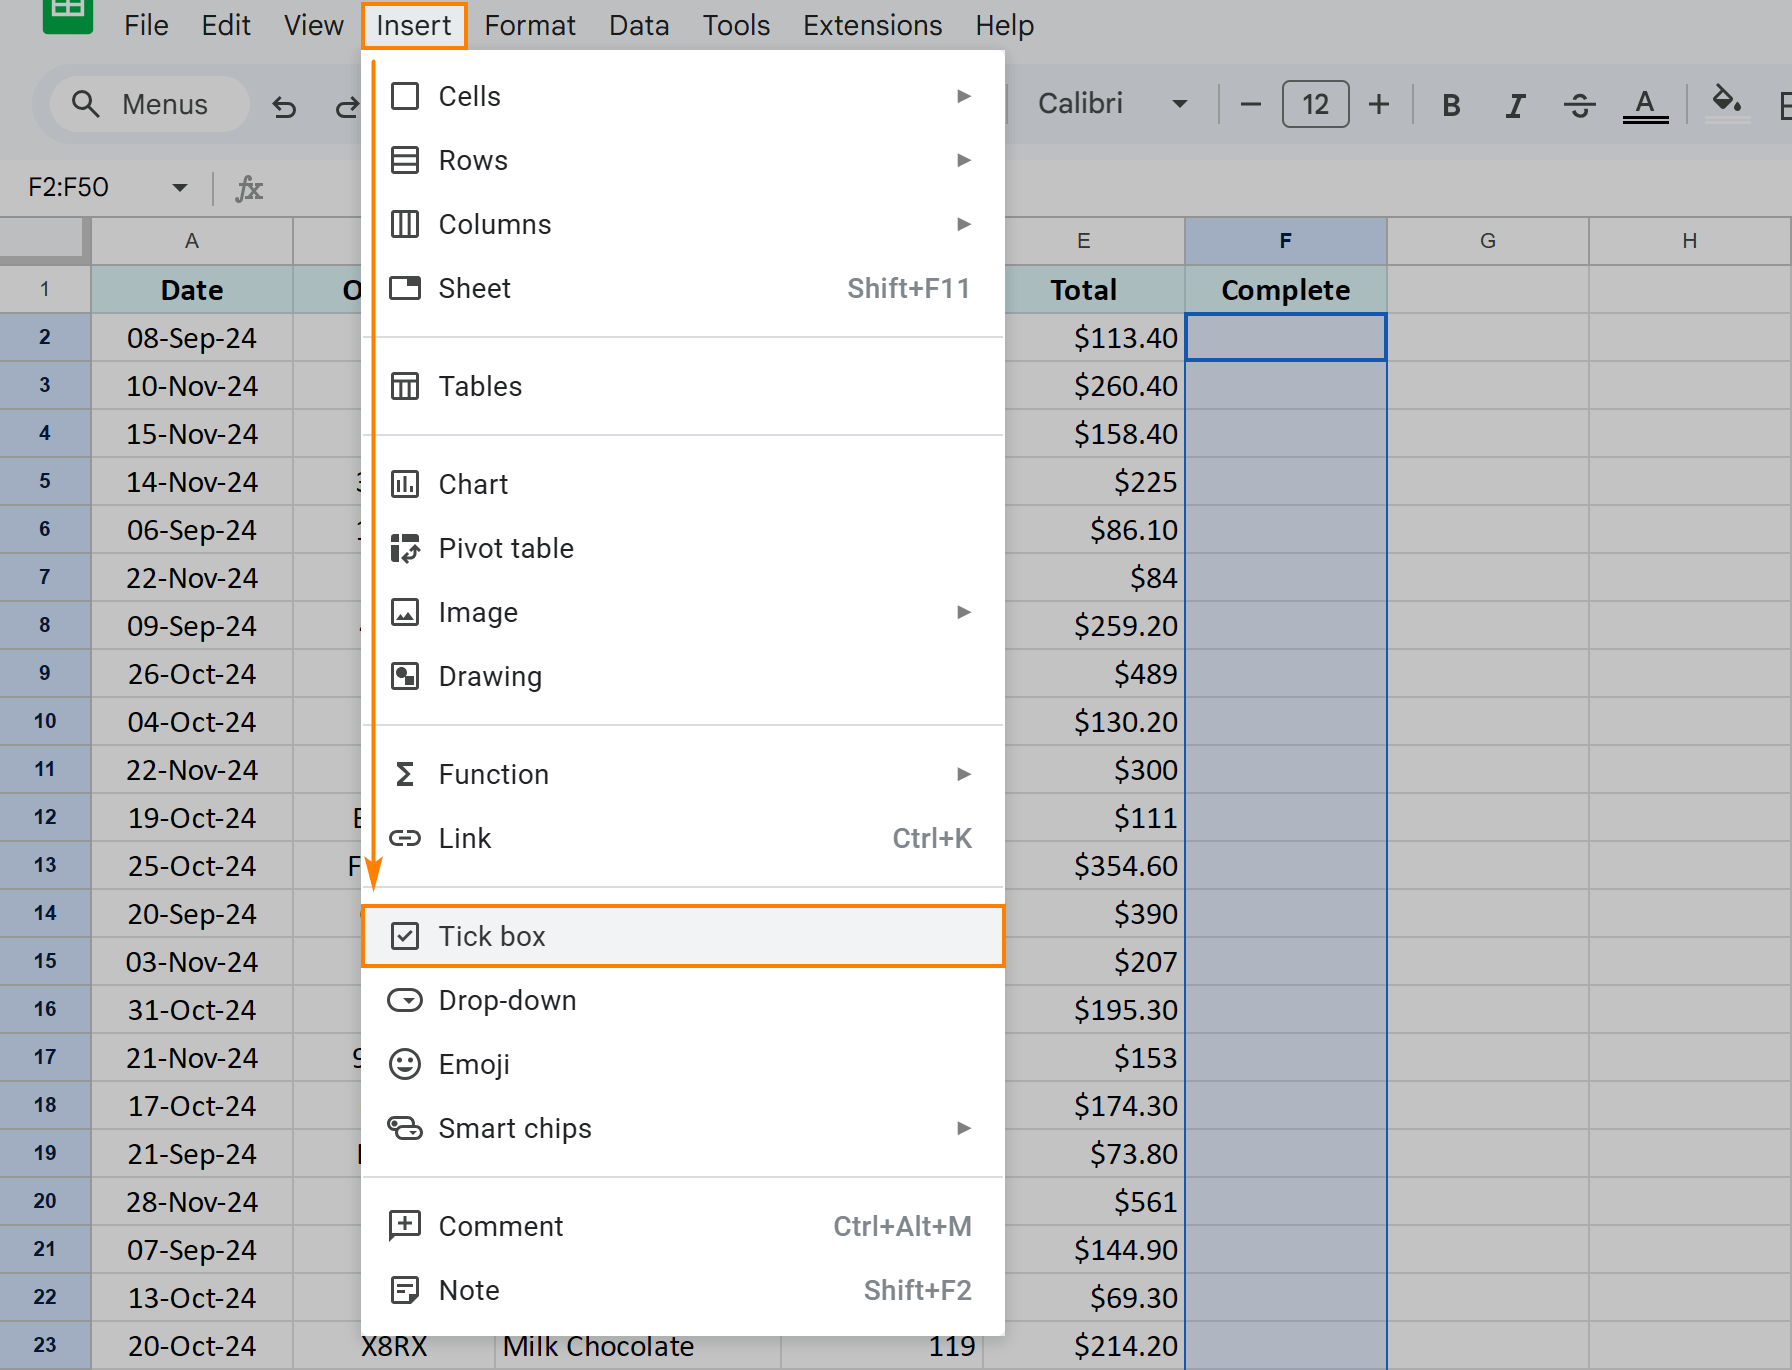
- You’ll see an empty checkbox appear in each selected cell:
If you’re looking for a different style of the checkboxes, you can create static boxes as symbols using special Google Sheets checkbox formulas:
- Empty checkbox:
=CHAR(9744) - Filled checkbox:
=CHAR(9745)
![]()
These will appear as icons rather than interactive checkboxes which sometimes could be useful for layout purposes.
Tip. See what other types of checkboxes you can add in Google Sheets in this blog post.
Does Google Sheets let multiple checkboxes in one cell?
Google Sheets doesn’t let you add multiple fully functional checkboxes in one cell, but there are ways to get creative if you just need the look of it.
Option 1. CHAR function
Concatenate several CHAR functions to add multiple checkbox symbols into one cell, like this:
=CHAR(9745)&" "&CHAR(9746)&" "&CHAR(9744)
Where:
=CHAR(9744) is en empty box=CHAR(9745) is a box with a tick=CHAR(9746) is a box with a cross mark
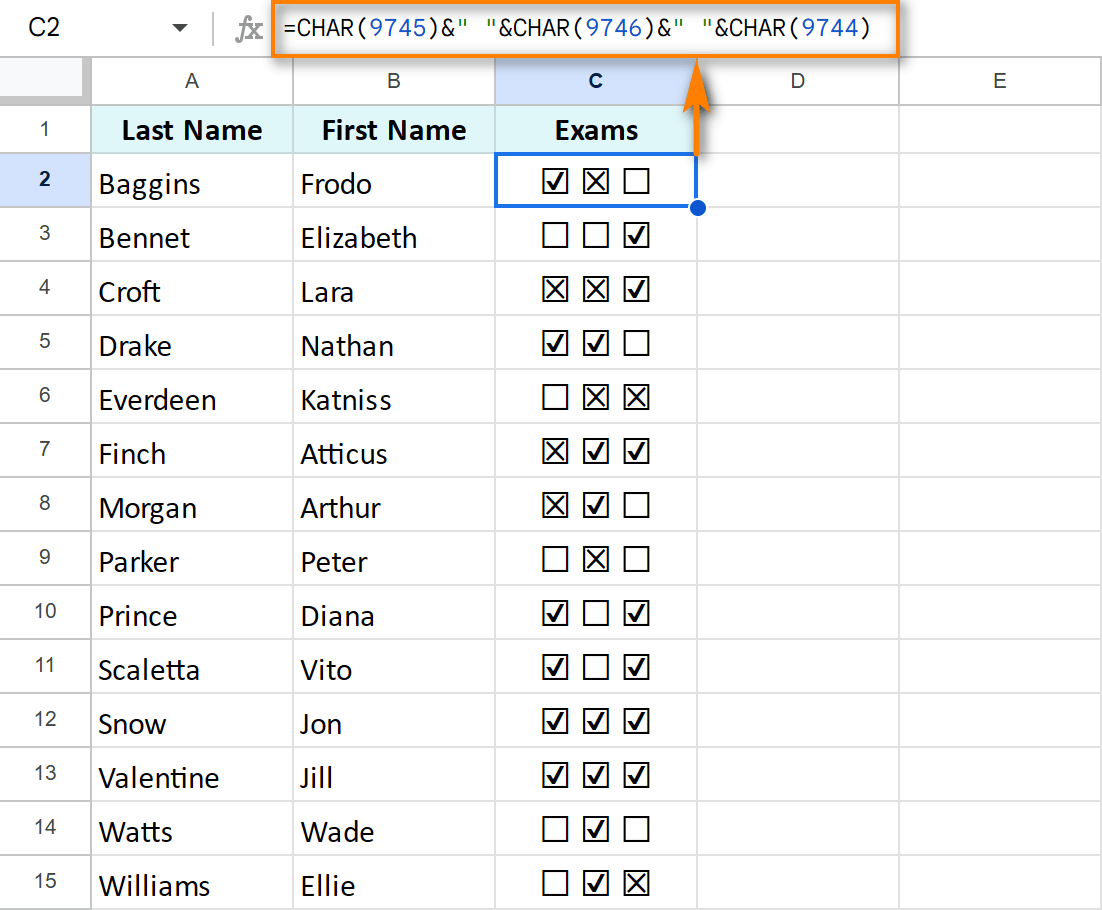
This will display checkbox symbols in a single cell but they won’t actually work as checkboxes you can click.
Tip. You can add some text labels in-between checkboxes. This article about concatenation in Google Sheets will show you several ways to do that.
Option 2. Group checkboxes visually
If you want real functional checkboxes, you’ll need to use separate cells and group them visually to make it look like they belong together:
- resize column
- adjust alignment
- color internal vertical borders white
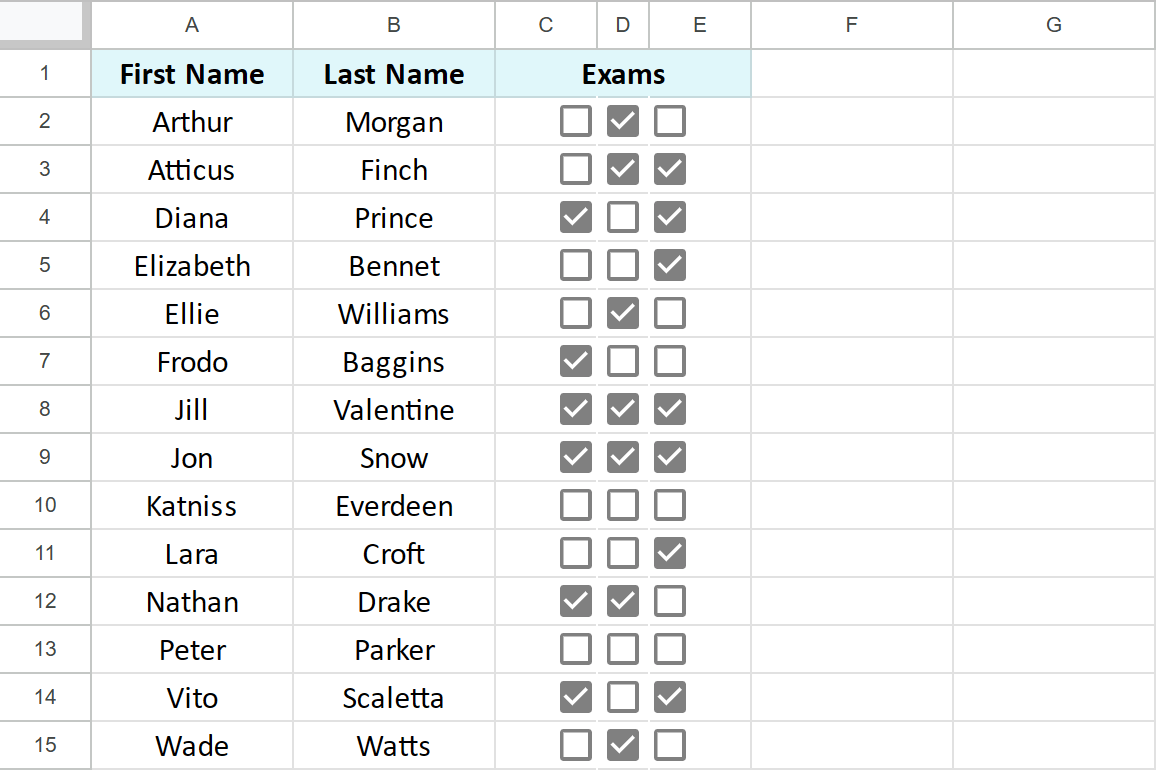
So remember, you can make Google Sheets show multiple checkboxes in once cell visually, but if you need fully clickable checkboxes, there’s no way to fit them all into one cell.
How to copy checkboxes to other cells
So, you fill your column with checkboxes. But your table grows, with more rows appearing every now and then.
Should you select every new blank cell and insert checkboxes there?
Nope! You don’t have to insert checkboxes anew in every new cell. Instead, you can:
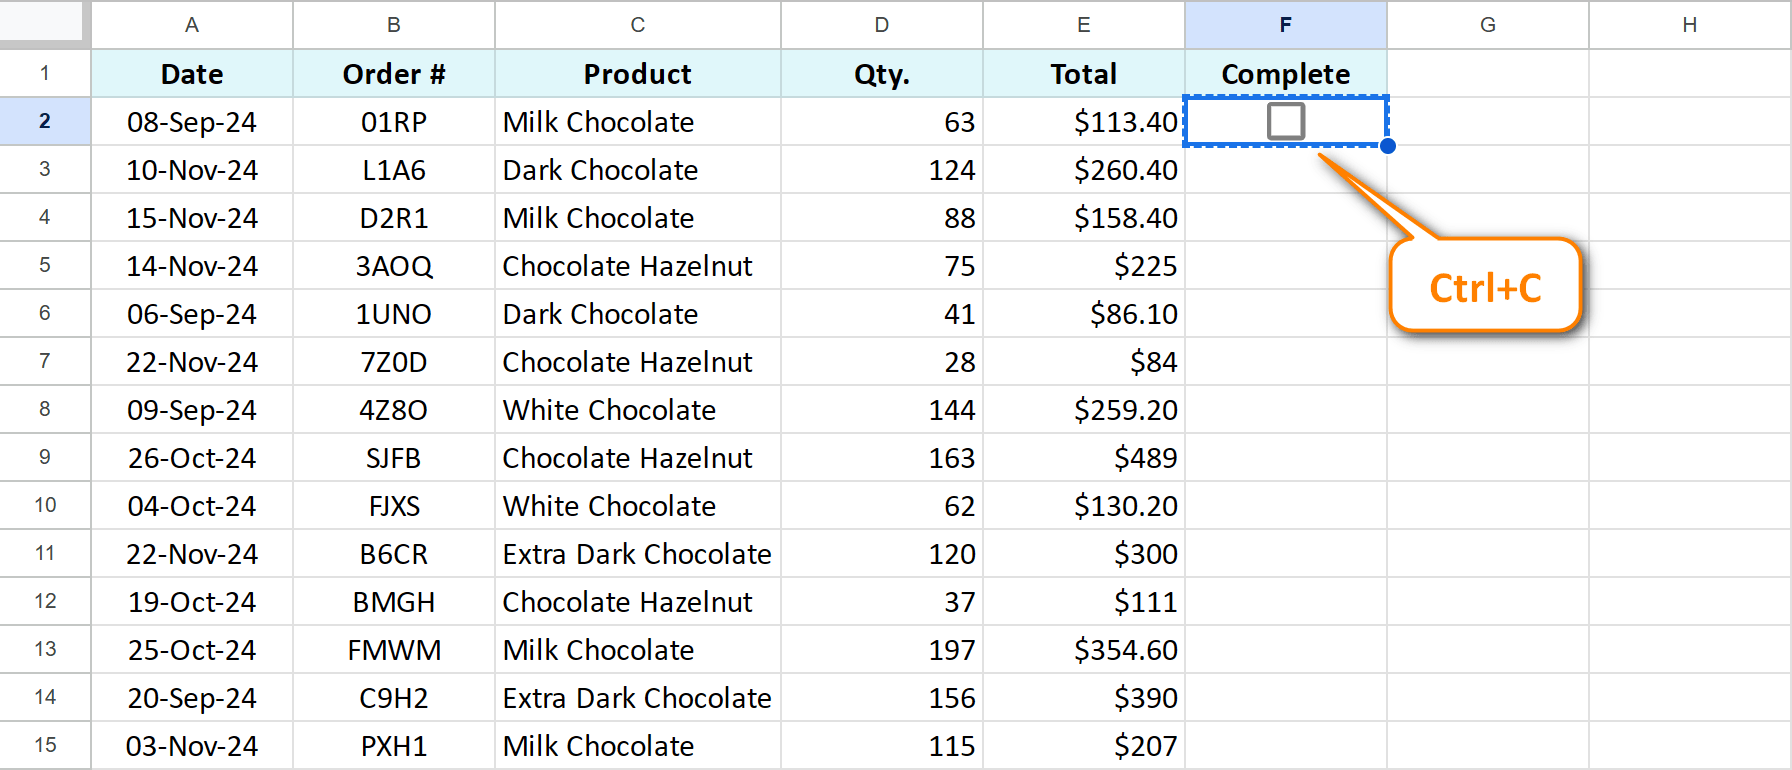
- Simply copy a cell with a checkbox (Ctrl+C):
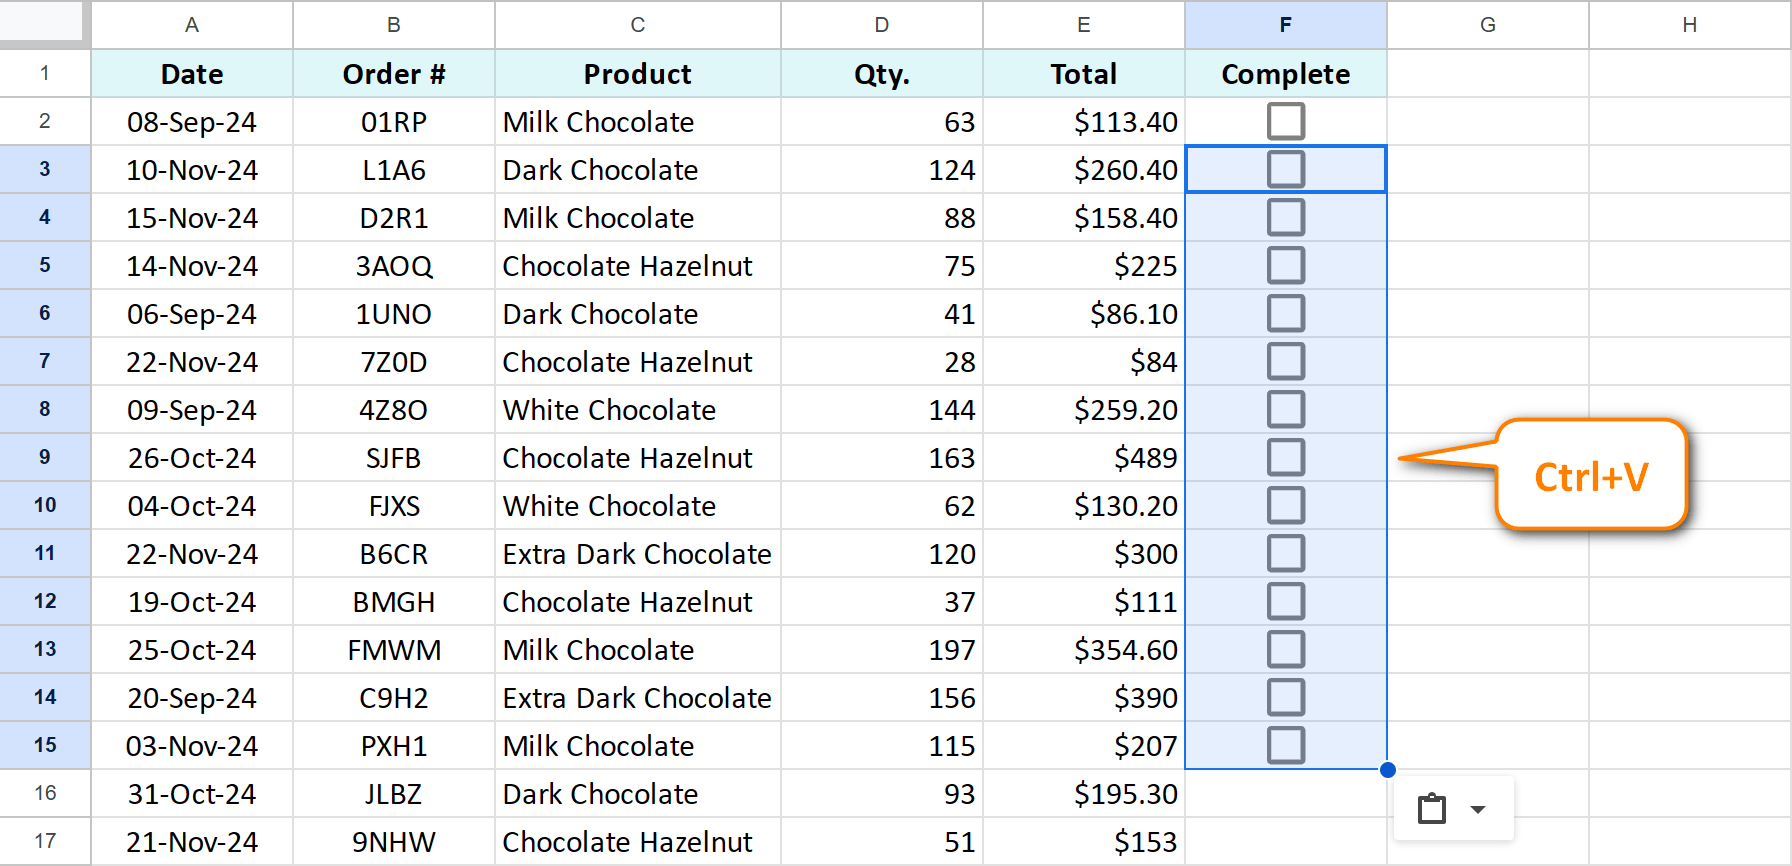
- Then select new cells and paste checkboxes with Ctrl+V:
In addition, Google Sheets makes it possible to copy and paste entire groups of cells, whether column or rows.
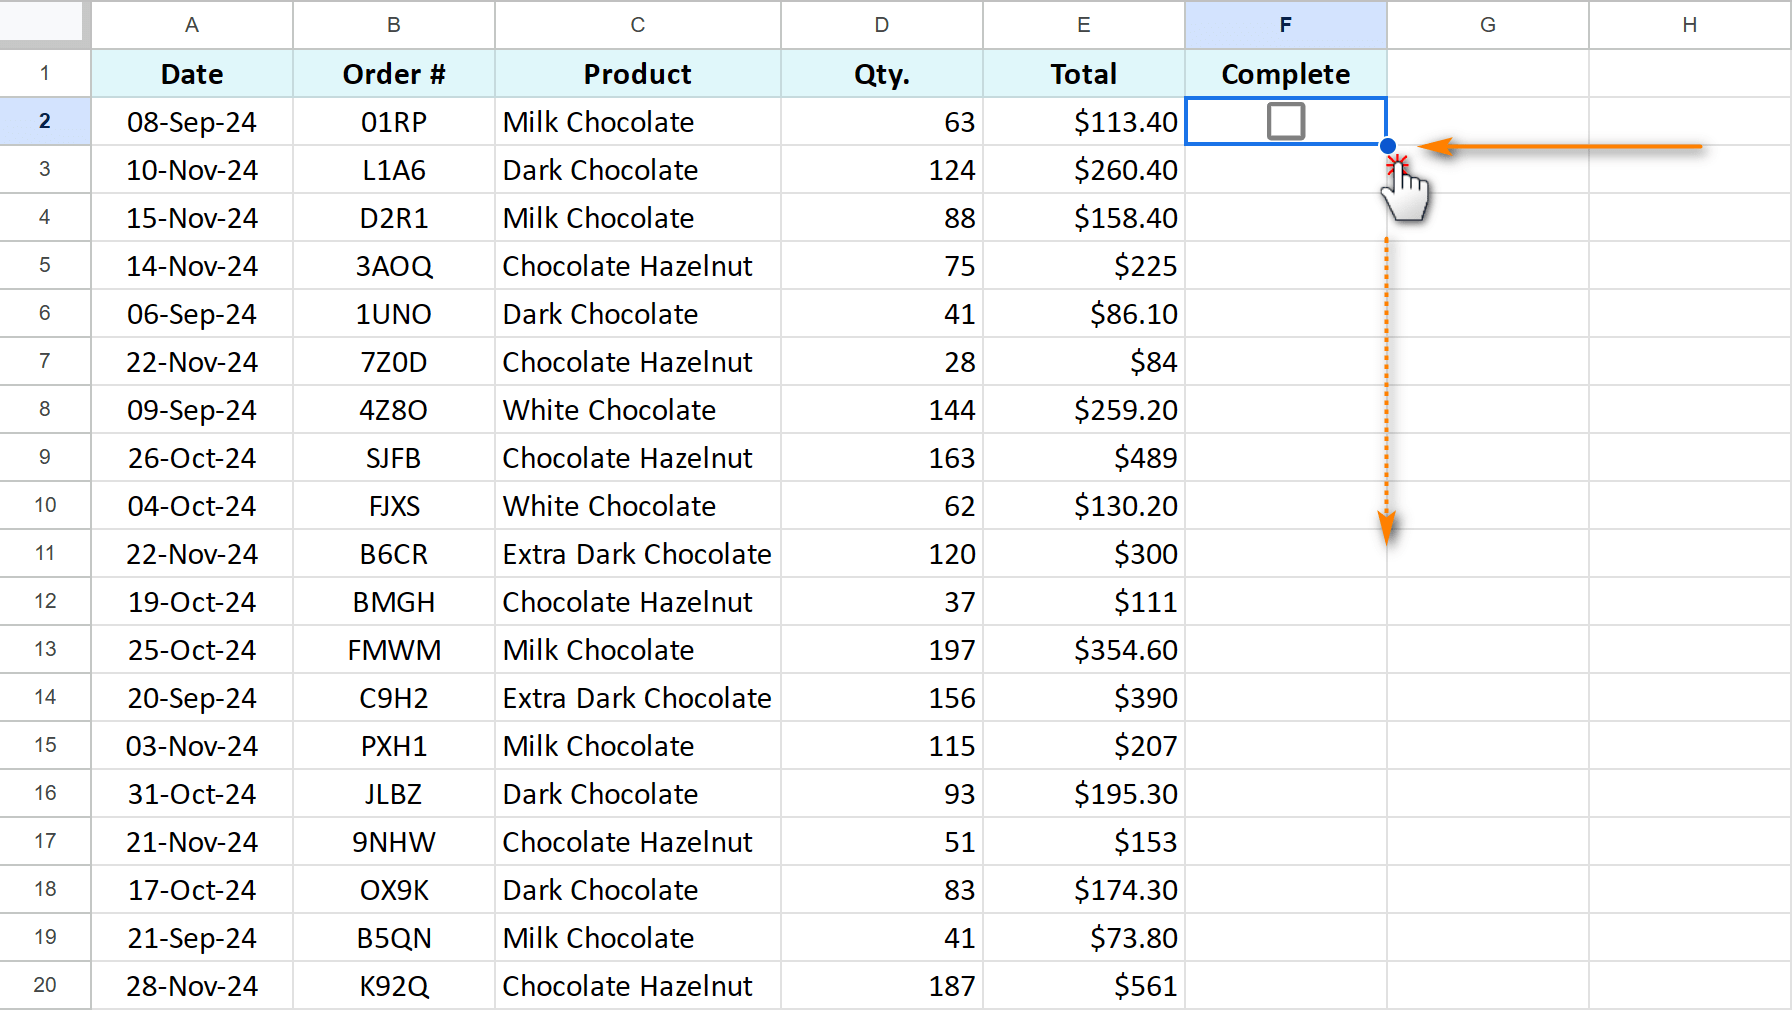
Another option would be to drag the fill handle (the small blue circle in the bottom-right corner of a selected cell) to copy checkboxes to other cells. And if you double-click that fill handle, this will autofill the whole column with checkboxes:
How to use checkboxes in Google Sheets
Checkboxes are extremely useful to track items in your sheets. You can mark tasks as complete, track inventory or approve data. This visual confirmation is simple but effective.
Besides, checkboxes return TRUE when checked and FALSE when unchecked which makes them perfect for formulas.
Below I'll show you some useful ways to handle checkboxes that you can immediately implement in your workflow. I'll be using a dataset where I manage orders and check them off as they’re completed.
How to count checkboxes in Google Sheets
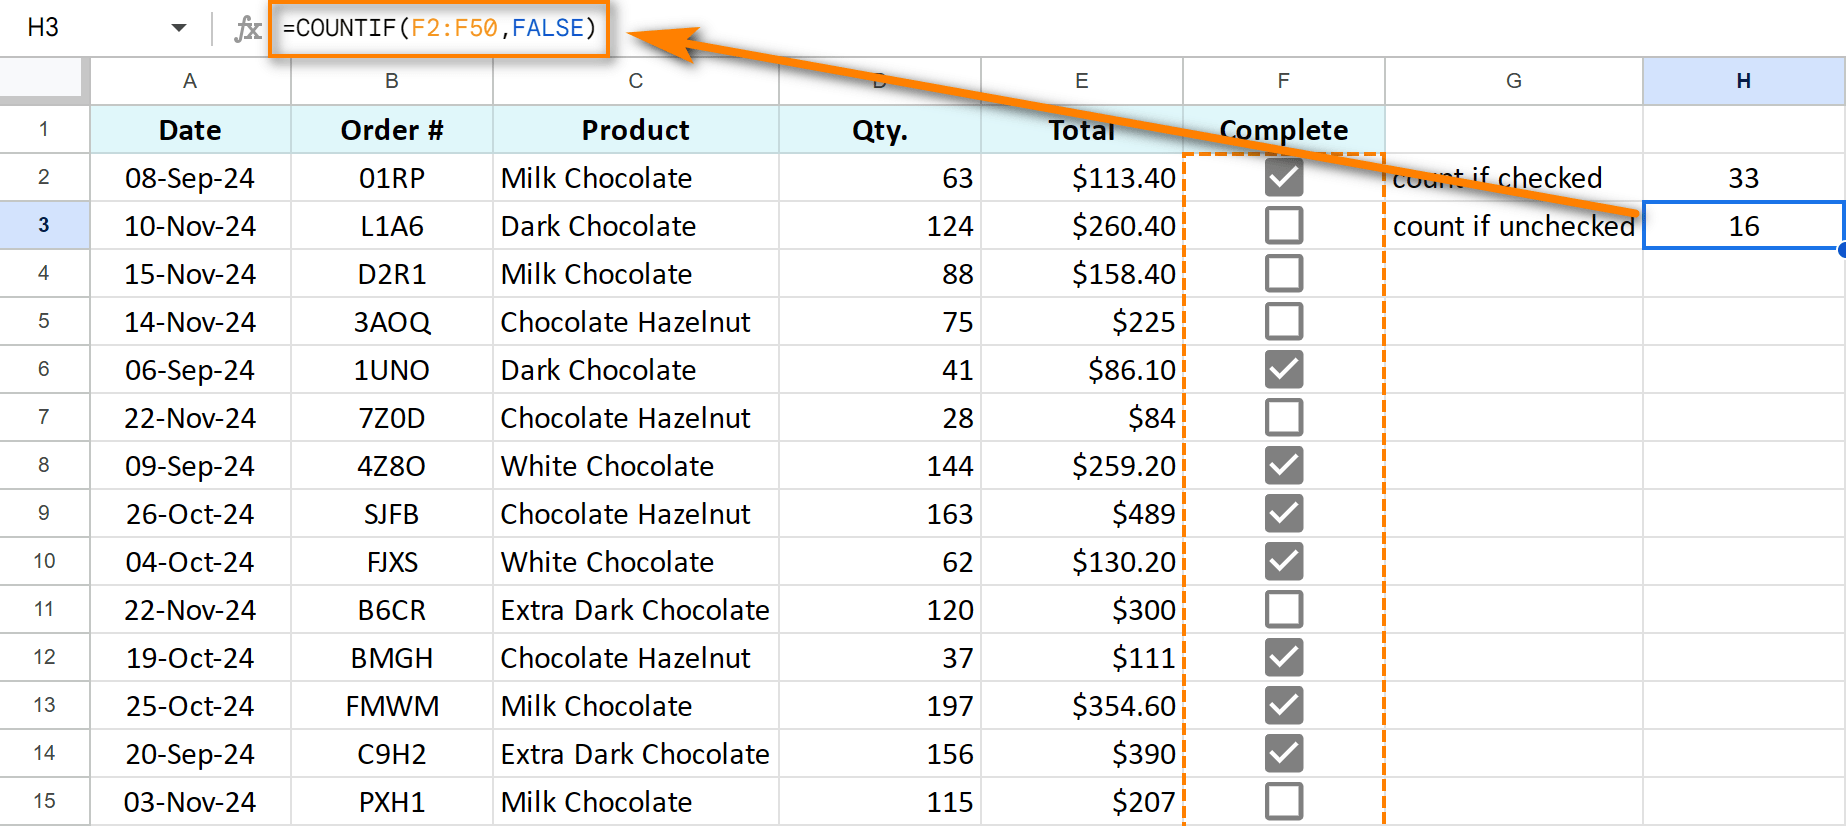
You can easily count how many checkboxes are checked in Google Sheets using the COUNTIF formula:
=COUNTIF(F2:F50,TRUE)
This will count all checked boxes in the range by looking for cells marked as TRUE.
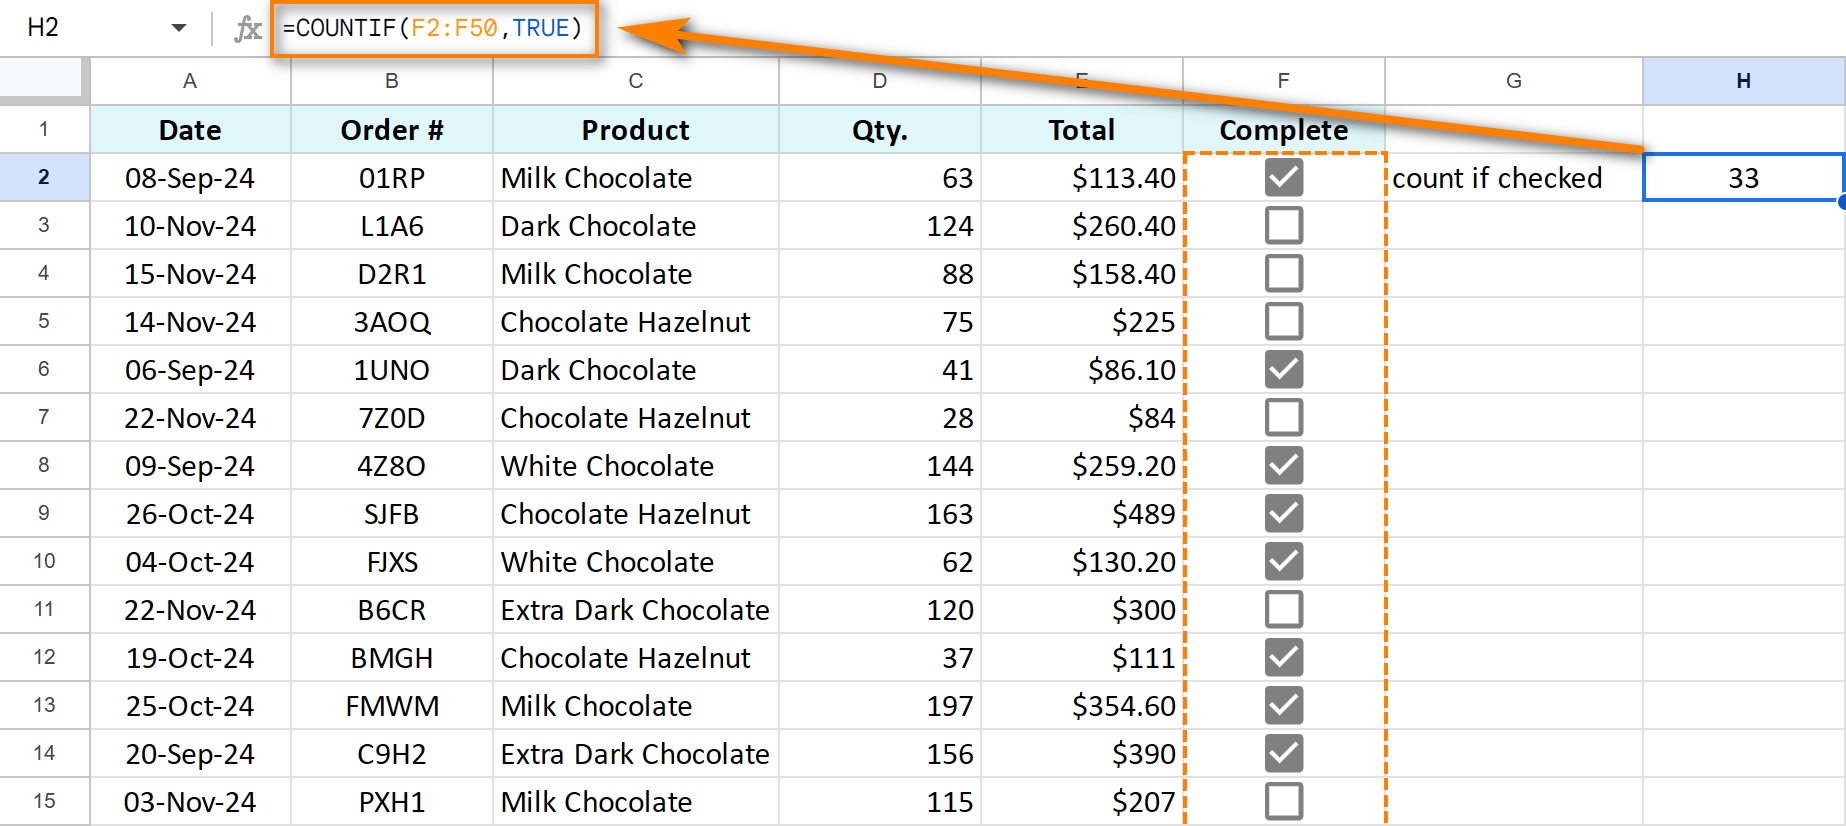
To count if checkboxes are not checked, use the same COUNTIF formula, only replace TRUE with FALSE:
=COUNTIF(F2:F50,FALSE)
How to sum checkboxes in Google Sheets
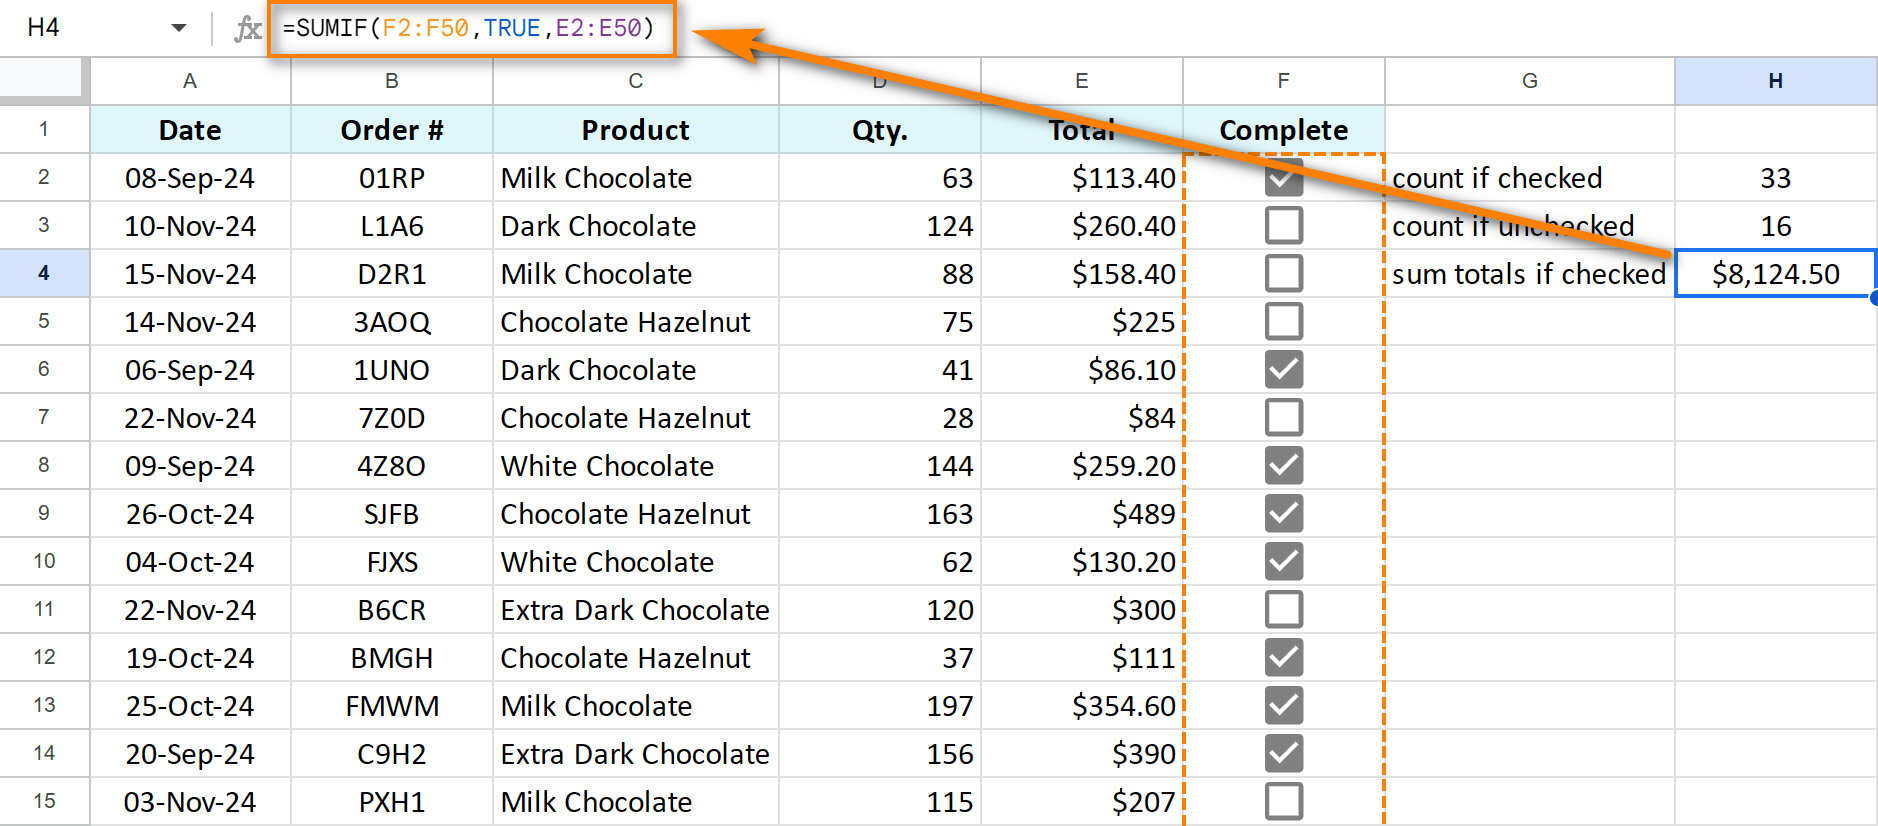
If you want to sum numbers in one column based on checkboxes in another, you need to use the SUMIF function:
=SUMIF(F2:F50,TRUE,E2:E50)
This Google Sheets formula sums totals in column E if checkboxes in column F are checked (or finished (TRUE)).
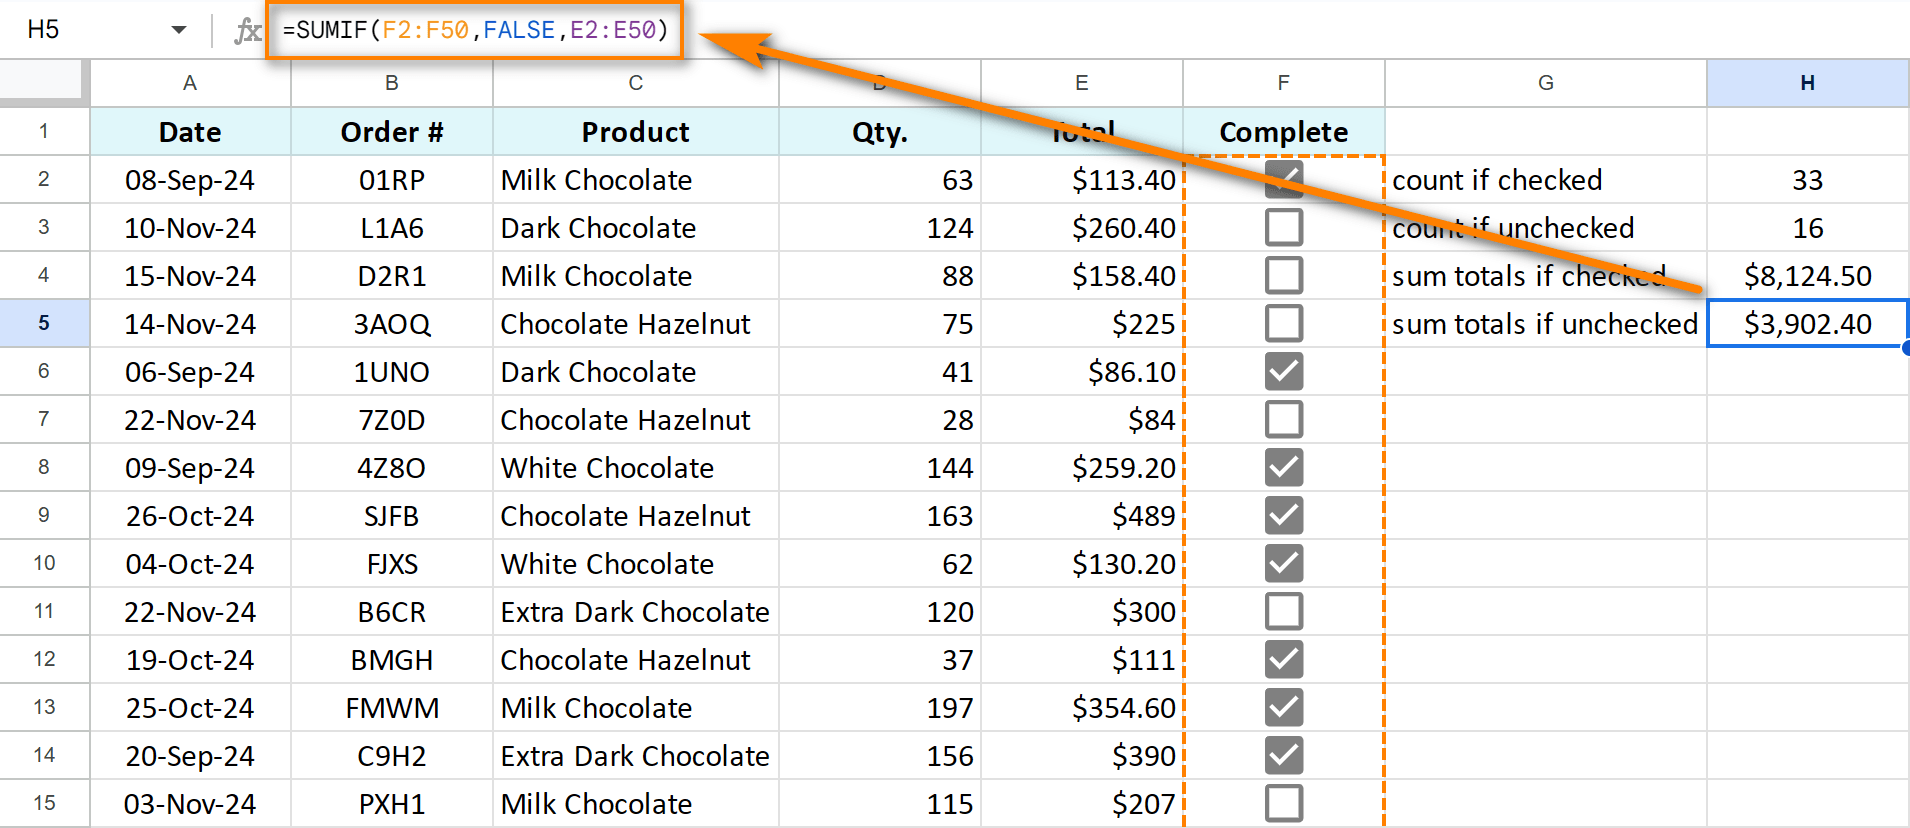
To sum those values that belong to unfinished orders (unchecked boxes), you switch TRUE to FALSE in the formula:
=SUMIF(F2:F50,FALSE,E2:E50)
Google Sheets formula: IF checkbox is checked THEN
You can use IF function in Google Sheets with checkboxes to return different values whether the box is checked or not.
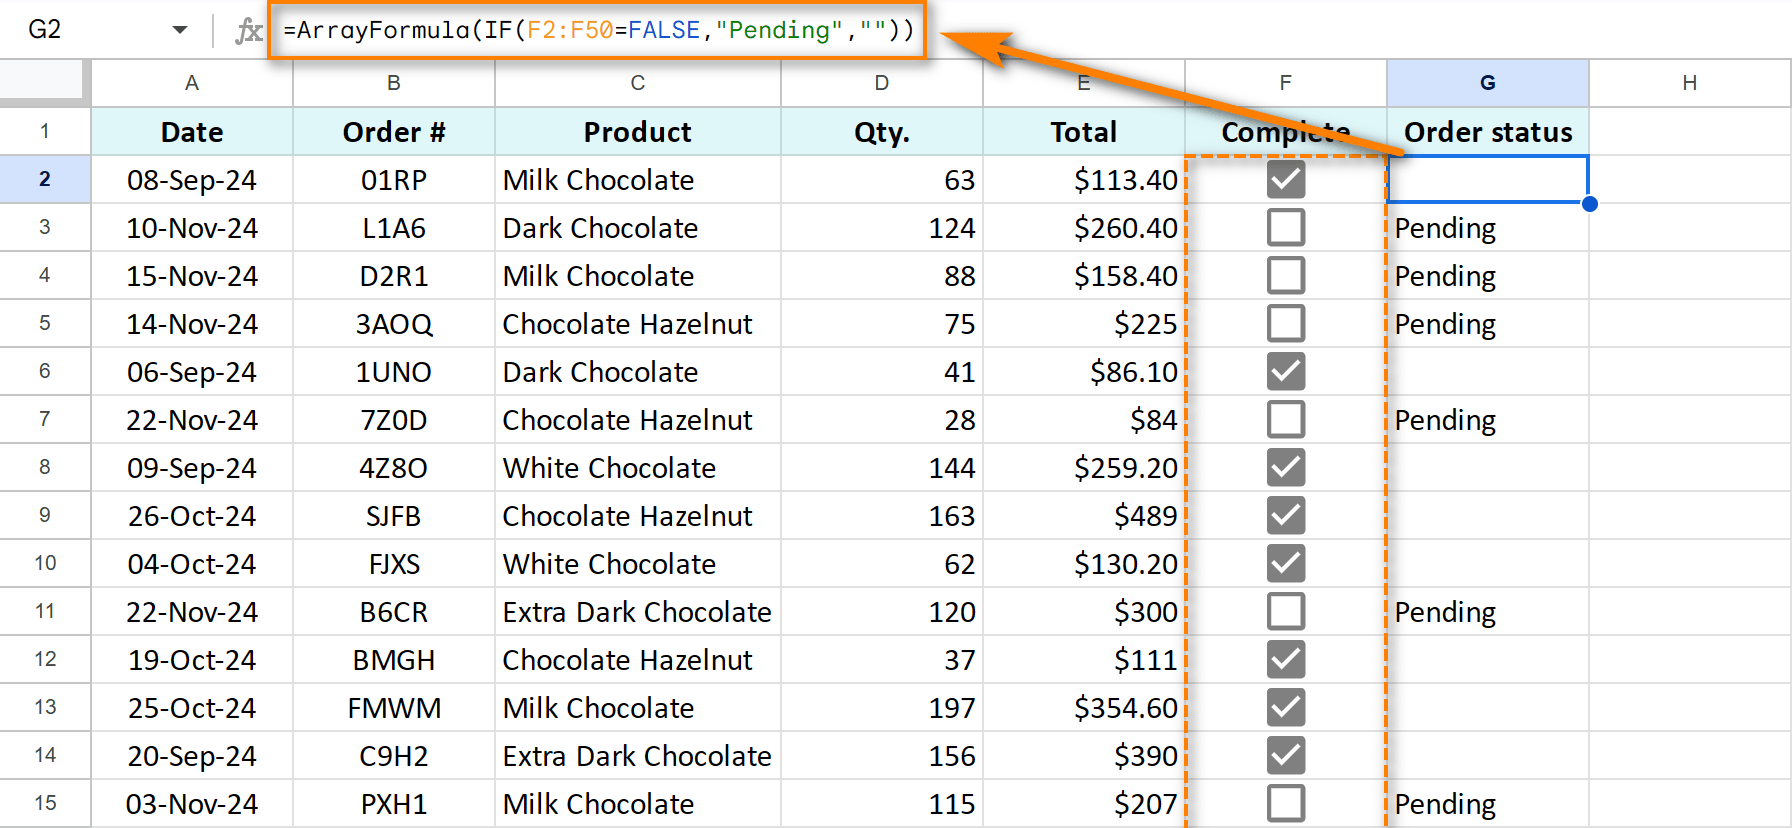
For example, put the order status in an extra column and say Pending if the box is unchecked, but turn blank once it's checked. Here's a formula for the task:
=ArrayFormula(IF(F2:F50=FALSE,"Pending",""))
- Google Sheets IF checks whether checkboxes in column F are not checked (FALSE).
- If so, it enters the Pending status to cells.
- Otherwise, cells remain empty ("").
- ArrayFormula lets the IF function process the whole checkbox column at once.
Conditional formatting based on checkbox in Google Sheets
You can use IF statements with checkboxes in conditional formatting to show messages in cells, format cells or entire rows based on the checkbox status, and even add strikethrough when the checkbox is checked.
You will find formula examples with screenshots in this article devoted to conditional formatting in Google Sheets.
Google Sheets timestamp when checkbox is checked
Adding a timestamp alongside a checkbox in Google Sheets is a handy way to track progress or mark when tasks are completed. For instance, you can manage a project, keep track of daily to-dos, or monitor the progress of a single task completed by different students.
Unfortunately, there’s no built-in formula or setting in Google Sheets to solve this task. Instead, you’ll need to use a custom script, which I’ll guide you through below.
In my example, each time a checkbox is marked for a student, the date and time of that action will automatically appear on the neighbouring column.
Here’s how you set up Google Sheets Apps Script to add a timestamp when checkbox is checked:
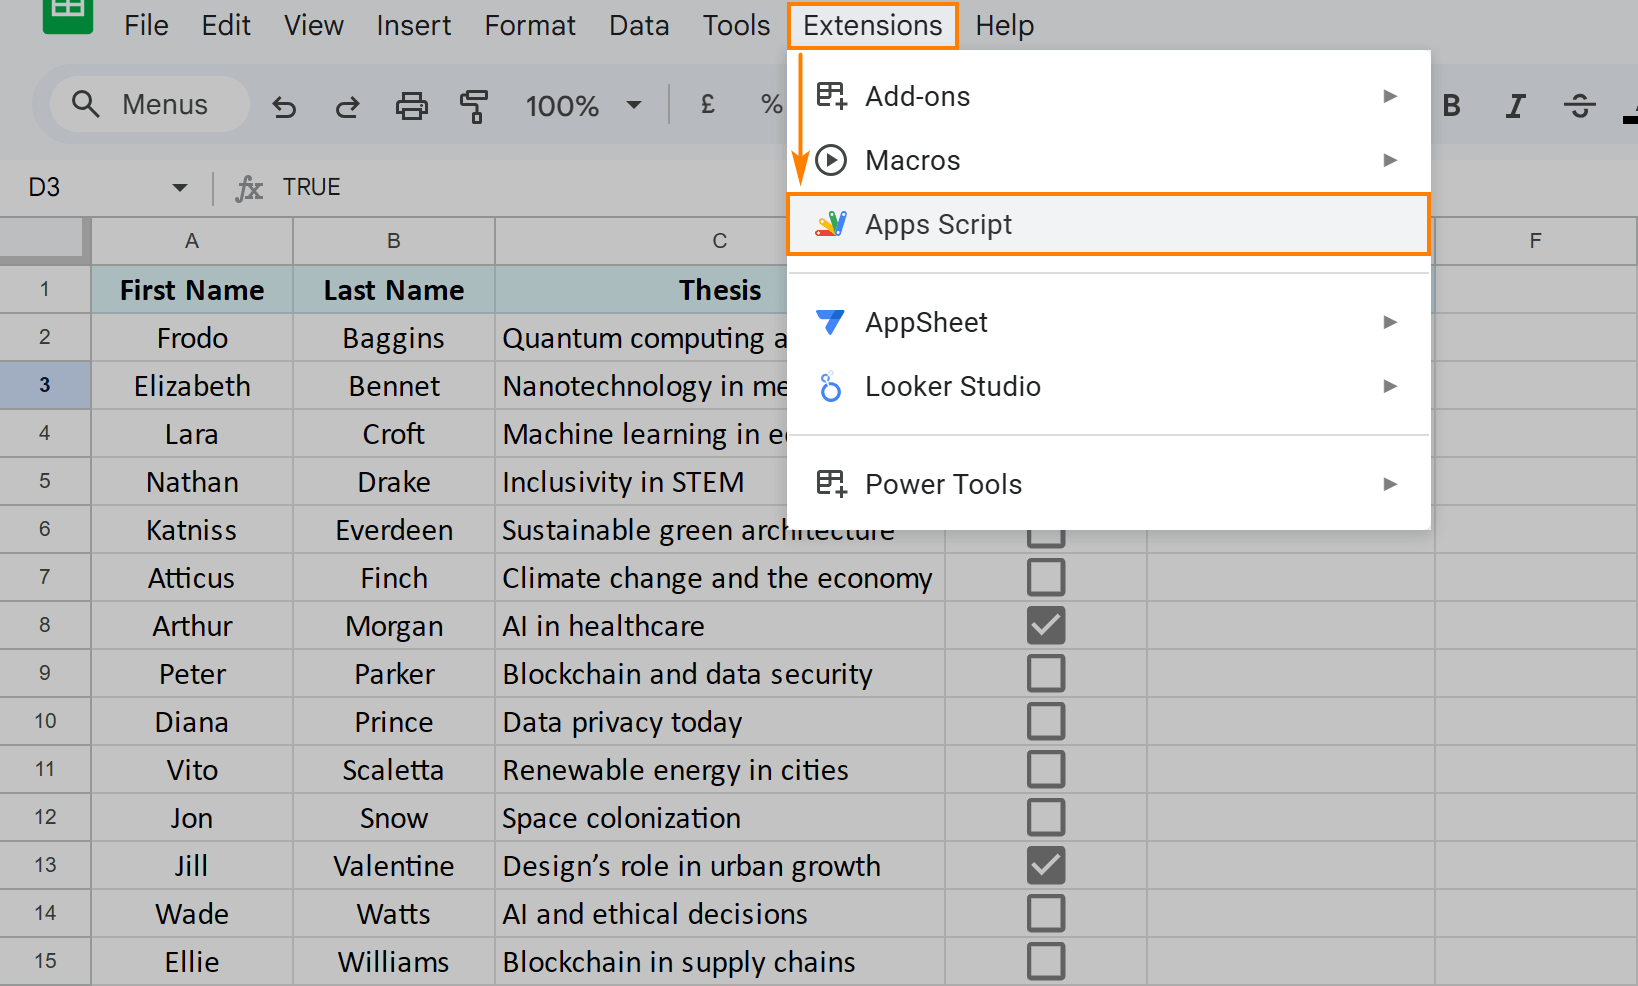
- Open Apps Script Editor via Extensions > Apps Script:
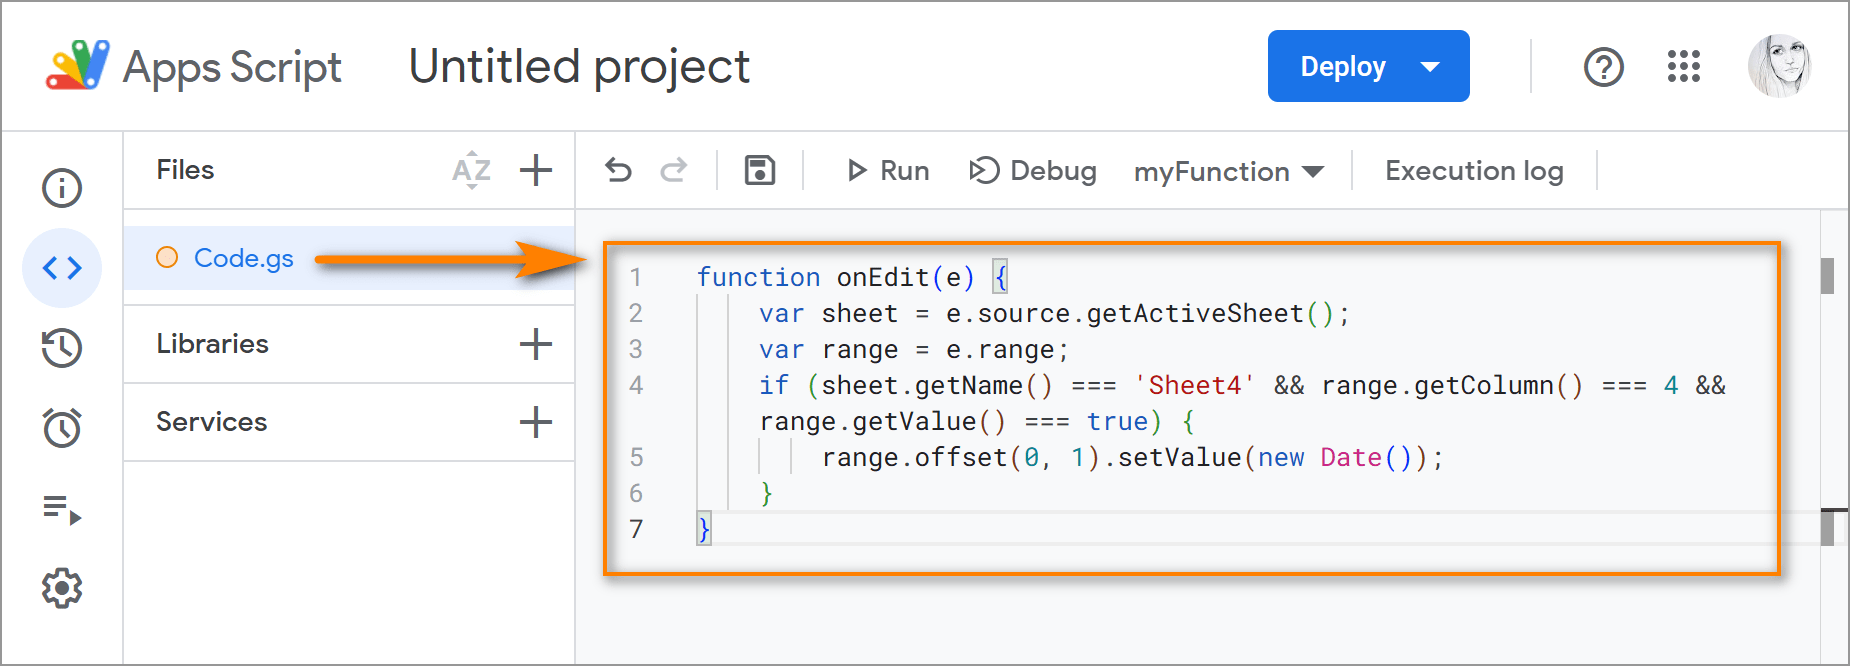
- Copy the following script:
function onEdit(e) {
var sheet = e.source.getActiveSheet();
var range = e.range;
if (sheet.getName() === 'Sheet4' && range.getColumn() === 4 && range.getValue() === true) {
range.offset(0, 1).setValue(new Date());
}
} - And paste it to your untitled project of the Apps Script:
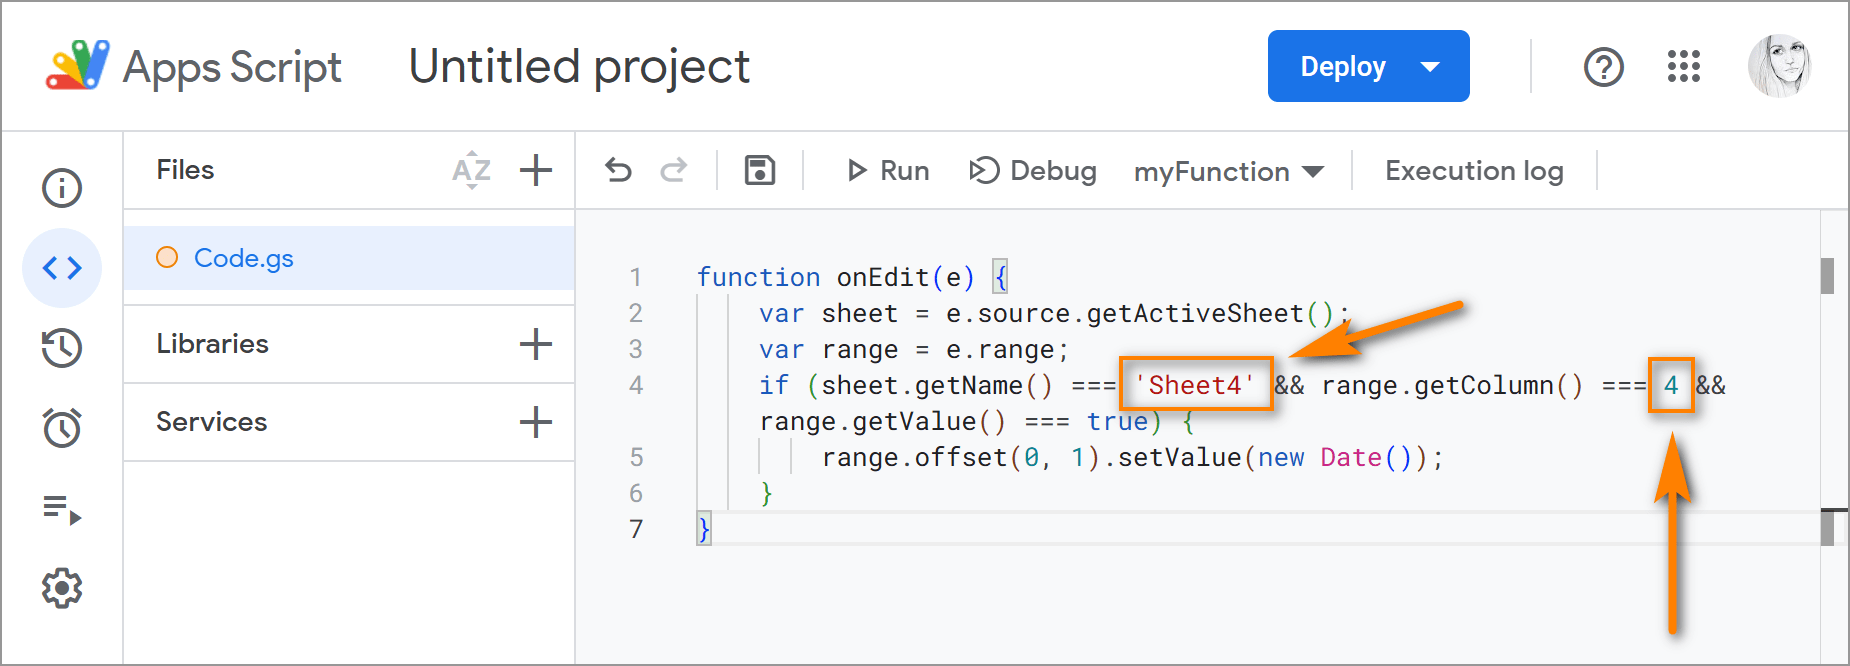
- To make the script work with your sheet, find Sheet4 in row 4 and replace it with your actual sheet name that contains checkboxes.
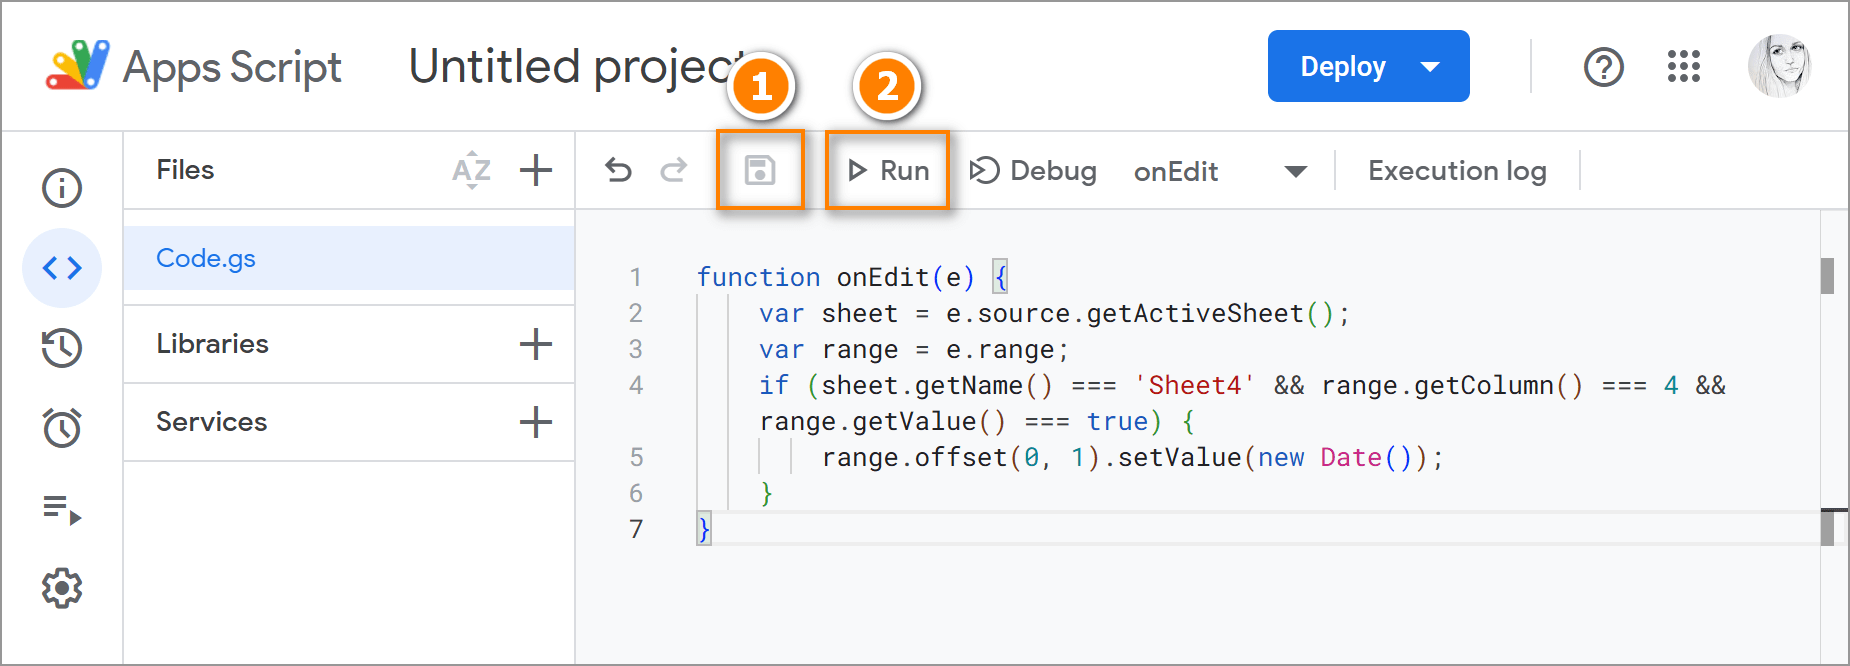
- Click Save to save the changes and then Run to enable the Google Sheets script to add timestamps when the checkbox is checked:
- Return to your data and try it out.
To make the script look at the columns with checkboxes, find this string: range.getColumn () === 4, and replace number 4 with a serial number of your column with checkboxes.
Google Sheets will automatically add timestamps in the next column when you tick off checkboxes:
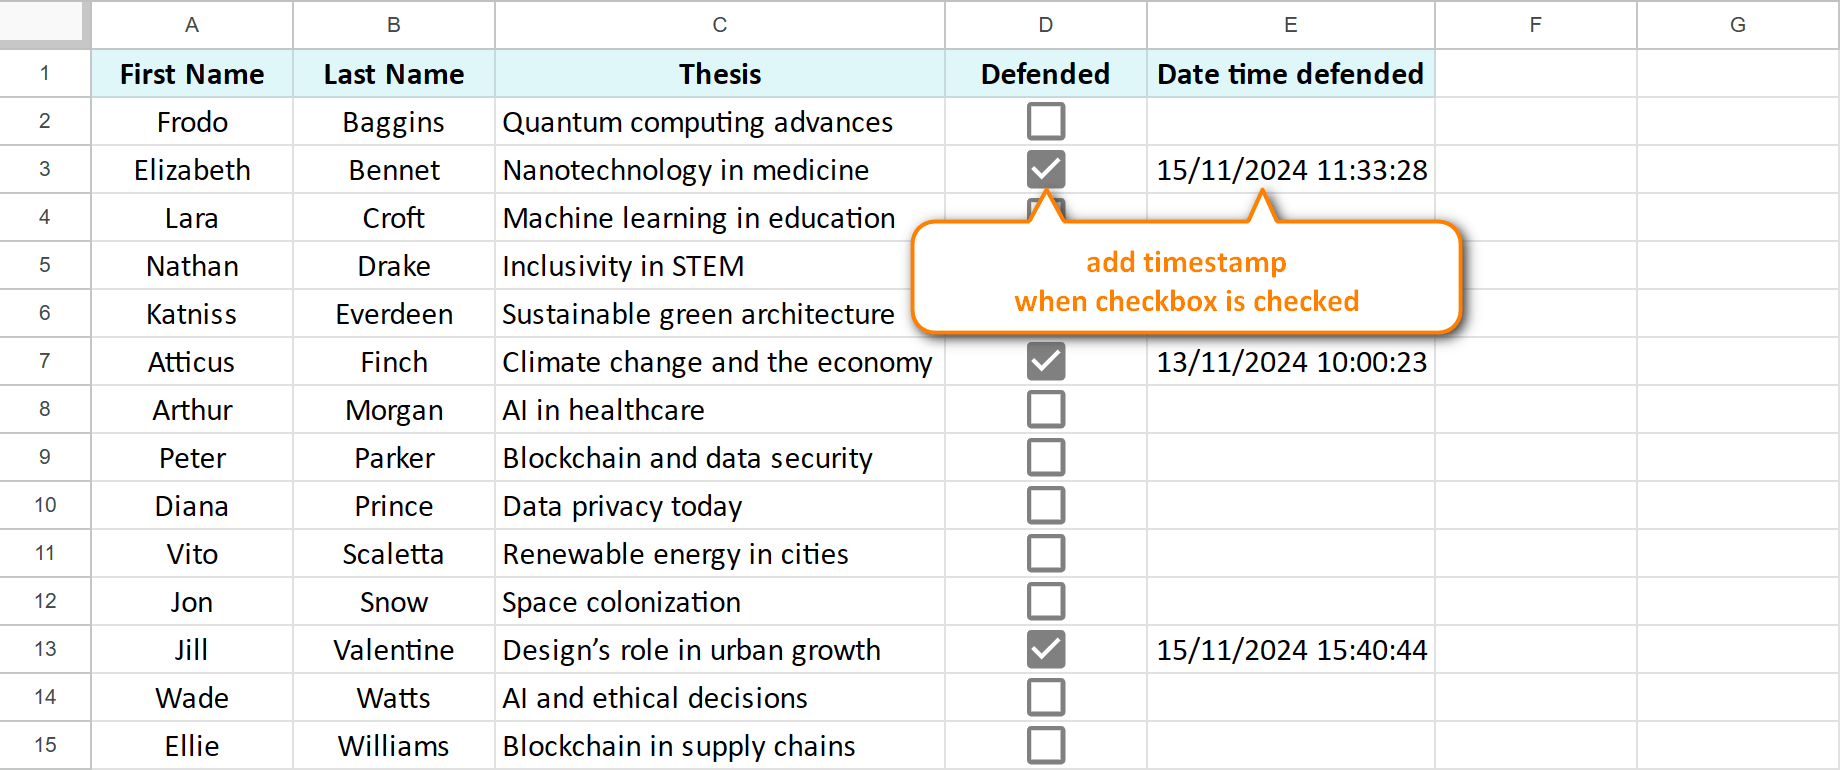
Tip. If you see only the date, without the time unit, apply the Date time format to cells with timestamps manually. We described how to do that in this article.
Note. Unchecking the box back won't remove the timestamp — you'll have to clear cells manually.
How to check/uncheck all checkboxes in Google Sheets
Managing multiple checkboxes doesn't have to be difficult. There's a simple way to check or uncheck them all (or only a selected portion) in Google Sheets:
- Select all checkboxes that you want to check or uncheck.
- Press Space on your keyboard.
This will toggle all the selected cells, checking or unchecking all selected checkboxes in Google Sheets in one go. It’s simple, fast, and perfect for bulk updates.
Tip. As often, there's an alternative. You can create one "master" checkbox that will control all other checkboxes. You won't need to select anything — ticking off this one box will be enough. We've covered this technique in detail in this article.
How to remove checkboxes in Google Sheets
When it comes to checkboxes that you inserted into Google Sheets via the spreadsheet menu, simply select these cells and press Delete on your keyboard. All checkboxes will be cleared away immediately, leaving empty cells behind.
If your Google Sheets contains Data validation checkbox rules, you can still remove such checkboxes by pressing Delete.
You can also remove the rules themselves but there's a nuance:
- Select the cells with checkboxes.
- Go to Data > Data validation:
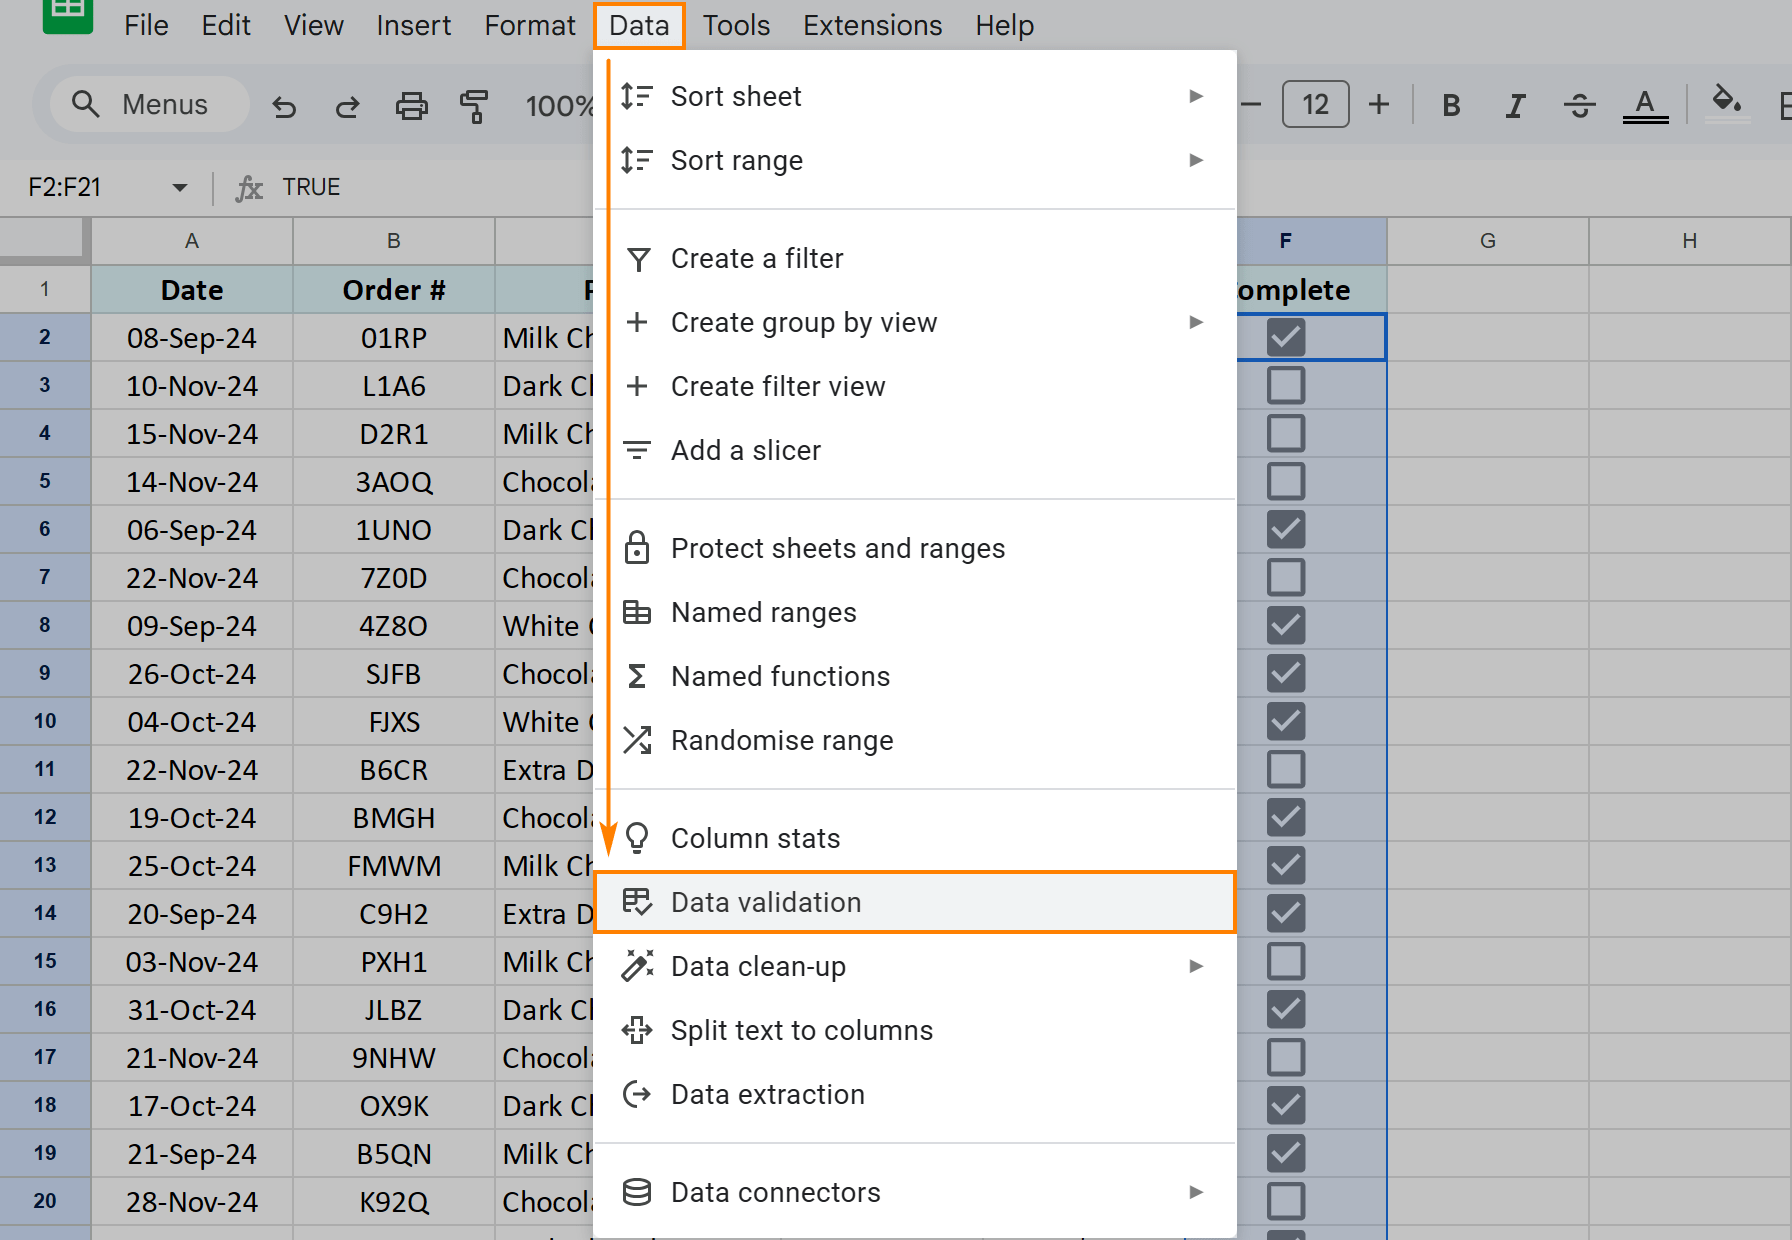
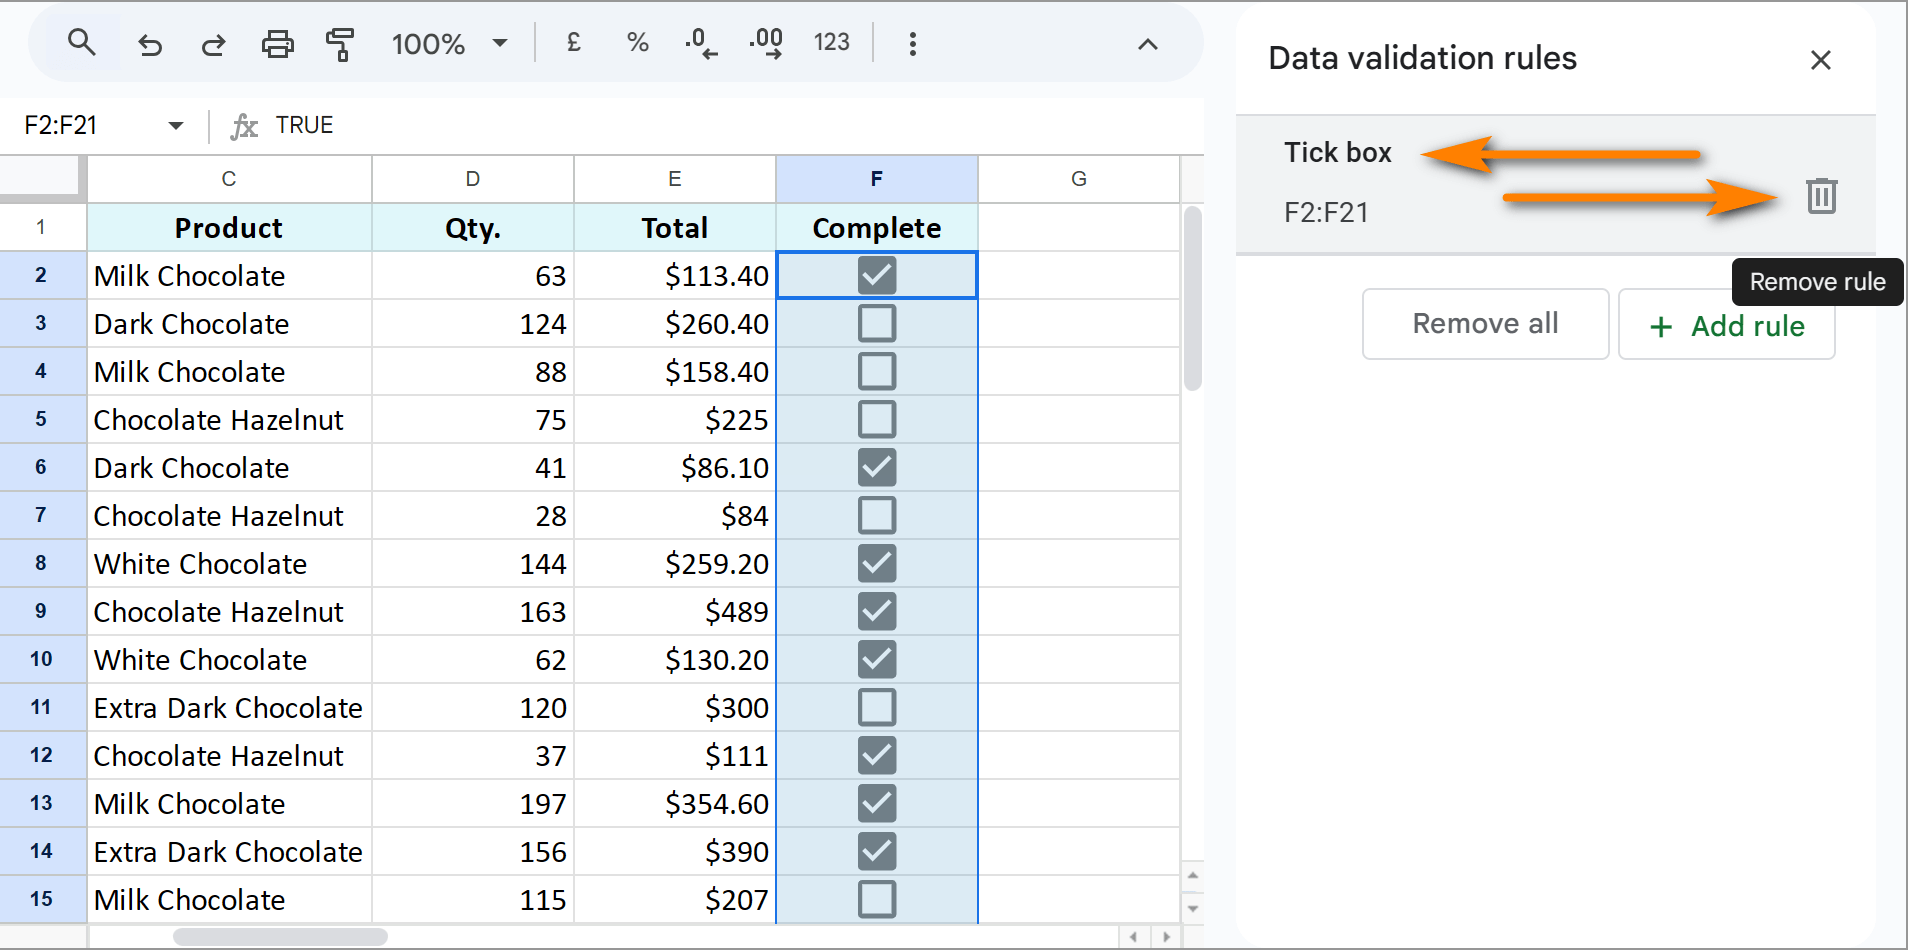
- Find the rules with tick boxes and clicking the trash icon to remove them:
This will remove checkboxes from Google Sheets, but the TRUE/FALSE booleans that stand behind every checkbox will remain:
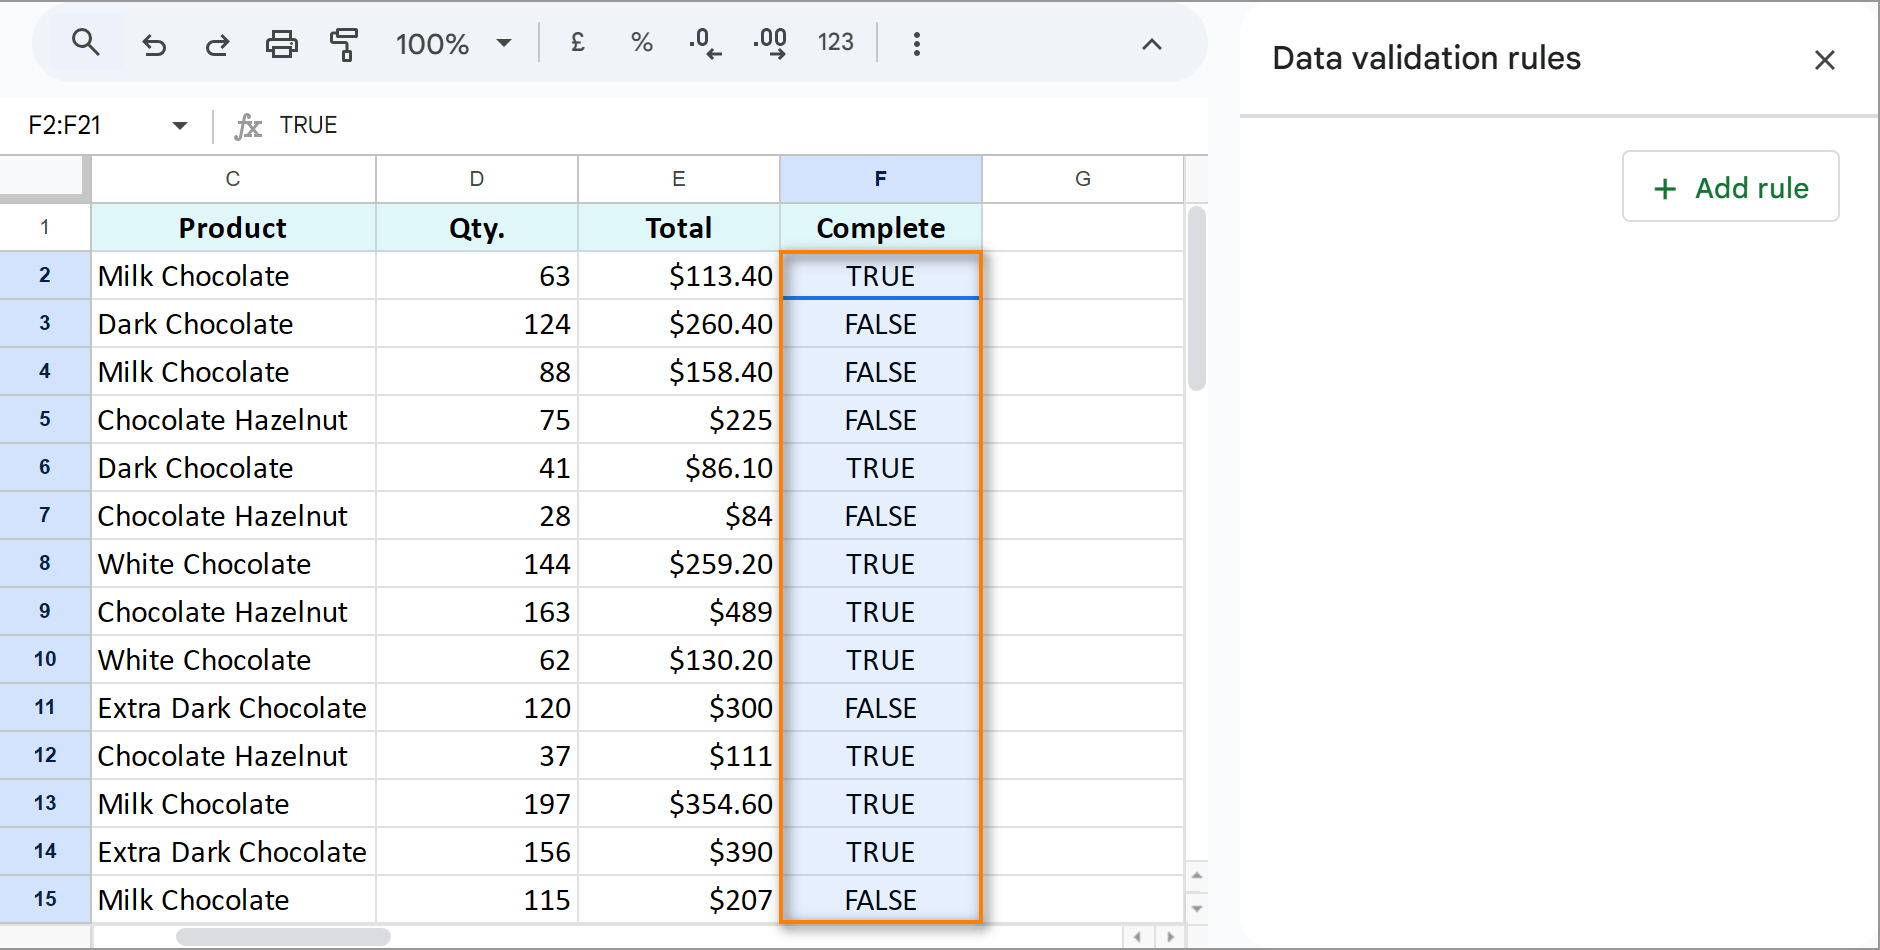
Press Delete on your keyboard to clear these values as well.
Tip. Learn other ways to remove certain characters or the same text in Google Sheets.
Now you're well-equipped to use checkboxes in Google Sheets. Tracking tasks, to-do lists, orders, calculating and formatting data based on checkbox statuses — all is possible and easy in Google Sheets. Good luck!
 by
by
8 comments
Is there a way to make a function that once you select a certain text in the drop down, that it can automatically check off a certain check box?
Hello!
Automatic change of the checkbox can be done using Scripts. Here's an overview of Google Apps Script with a lot of helpful content and links:
https://developers.google.com/apps-script/overview
In section "Remove multiple checkboxes in Google Sheets from entire table", it only talks about removing Data Validation, not checkboxes. Same in the previous section.
After trying what you outlined, I see that it does remove the checkboxes. The graphic only shows the data validation going away, not the checkboxes. Very confusing.
Hello Jack,
Thank you for pointing that out. We'll update the article with the new info asap.
Hi--
I accidentally misspelled one of the drop-down options. Is there a way to globally edit that so that anything already entered is corrected, along with future entries for that option?
Thanks,
KM
Hi, KM,
Could you please specify if you used a list from a range/ a list of items/ or something else (from the options available in Google Sheets) as a criteria for your data validation?
I would love to find a way to select multiple checkboxes within a dropdown menu in Google Sheets. For instance, I upload designs to be printed on various products. Right now I need a separate column to check off for each product with a yes/no option to fill that field. I would LOVE to be able to do multiple selections within the field.
Like this, where it is a dropdown, and some items are selected:
(X) T-shirt - short sleeve
(X) T-shirt - premium
(X) T-shirt - longsleeve
( ) Sweatshirt
( ) Hoodie
(X) Mug - 11 oz
( ) Mug - 15 oz
(X) Tote - canvas flat
( ) Tote - gusseted
( ) Baseball Cap
Checkboxes are good, radio buttons would be fine - ANYthing where there is the ability to select multiple items.
Is this possible with Google Sheets?
Thanks In advance.
Hello, Susan,
I believe that since Google Sheets doesn't provide any specific option to do that, you need to use a Script. You can try the one offered here:
https://gist.github.com/arthurattwell/aa5afc178624bdd6f46c2d0d28d06136
There's also a video that illustrates how it works.
Hope this helps!