Discover simple and effective techniques to block and unblock specific senders or domains in Microsoft Outlook.
If you're getting unwanted emails from certain people, a good way to stop them is by blocking those irrelevant and annoying senders. This helps to get rid of harmful messages and keeps your inbox clutter-free. The steps can be slightly different depending on which version of Outlook you're using. In this article, we'll guide you on how to block someone in different Outlook apps, making it easy for you to keep your email space clean and safe.
How to block a sender in Outlook
To stop receiving emails from a specific sender in the classic Outlook desktop app, follow these steps:
- Open your Inbox and right-click on the unwanted email.
- In the context menu that appears, click Junk, and then choose Block Sender. You can also click Junk on the Home tab of the ribbon and select Block Sender from there.

- A confirmation message will appear, and you click the OK button to close it.

This action will have the following effects:
- The sender will be added to the blocked senders list and the email will be moved to your Junk folder.
- From now on, any emails from that sender will be automatically moved to the Junk folder.
Tips:
- To stop receiving messages from any specific email address or domain, you can add it to the blocked senders list manually.
- In some situations, you may also block emails from specific countries or with certain words.
Where is Blocked Senders list in Outlook?
To view or manage the email addresses that are restricted from reaching your inbox, you need to access the Blocked Senders list. This is a feature that allows you to prevent unwanted messages from reaching your inbox.
Here are the steps to get to the Blocked Senders list:
- On the Home tab, in the Delete group, click on Junk, and then select Junk E-mail Options. Alternatively, you can right click any message, and choose Junk > Junk E-mail Options…

- In the Junk E-mail Options dialog box, switch to the Blocked Senders tab.

Here you can view the list of blocked senders and domains. You can also add, edit, and remove items from the list, or import/export the list as a file by clicking the corresponding buttons.
How to add email or domain to blocked senders list
To add a specific email address or domain to the blocked senders list, follow these steps:
- On the Home tab, click on Junk and select Junk E-mail Options… from the menu.
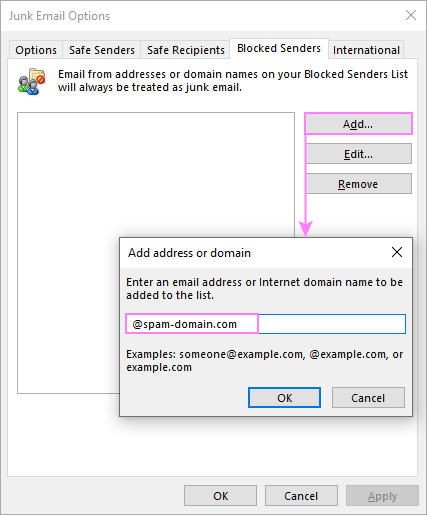
- On the Blocked Senders tab, click the Add button.
- A dialog box will appear where you can enter an e-mail address or domain name that you want to restrict. Click OK after typing it.
- Click OK again to apply the changes and close the Junk Email Options dialog box.
How to unblock a sender in Outlook
If you find an email from someone you know and trust in your junk folder, you can easily move it back to your inbox by following these simple steps:
- Right-click on the email.
- In the context menu, click Junk > Not Junk.
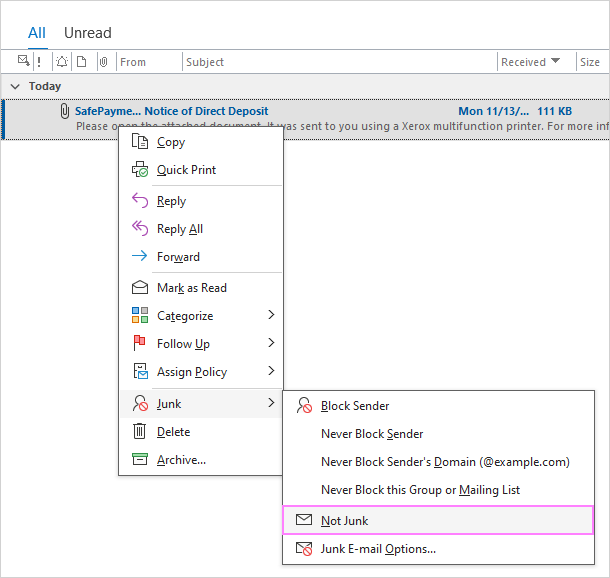
Outlook will then notify you that the message will be moved back to the inbox folder. If you always want to trust emails from that sender, ensure the corresponding box is checked and click OK. This action will add the sender to your Safe Senders list, ensuring their emails land directly in your inbox moving forward.

If you have accidentally blocked a legitimate sender, or you want to receive messages from someone you have previously blocked, you can easily unblock them by following these steps:
- Open the Blocked Senders list (Home tab > Junk > Junk E-mail Options…).
- Select the email address or domain name that you want to unblock and click the Remove button.
- Click OK to save your changes and close the window.
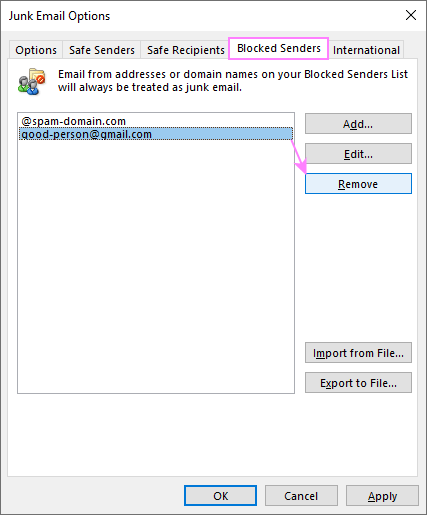
That’s it! You have successfully unblocked a sender in Outlook. You should now be able to receive messages from that person in your inbox.
Never block sender in Outlook
To prevent legitimate emails from a particular sender from going to your Junk email folder, this is what you need to do:
- Open the folder where the email is located, such as Inbox or Junk.
- Right-click the email and select Junk from the context menu.
- Choose either Never Block Sender to allow all emails from that specific address, or Never Block Sender Domain to allow any emails from the entire domain.

- Outlook will confirm that the email address or domain has been added to the Safe Senders list. Click OK to close the message.
Tips:
- If you cannot find any email from that sender in your Outlook, you can manually add it to the Safe Senders list by going to Home > Junk > Junk Email Options > Safe Senders and clicking Add.
- To make sure that Outlook is not blocking any legitimate emails, you can also check if the sender's email address or domain is on the Blocked Senders list and remove it from there.
Blocking a sender in new Outlook
To stop receiving emails from a specific sender in the new Outlook, you can easily block them with a few clicks. Here are the steps to follow:
- Right-click an email from the unwanted sender.
- In the context menu, choose Block > Block Sender.
- You will see a pop-up window asking you to confirm your action. Click OK to block the sender and move their messages to the Junk Email folder.
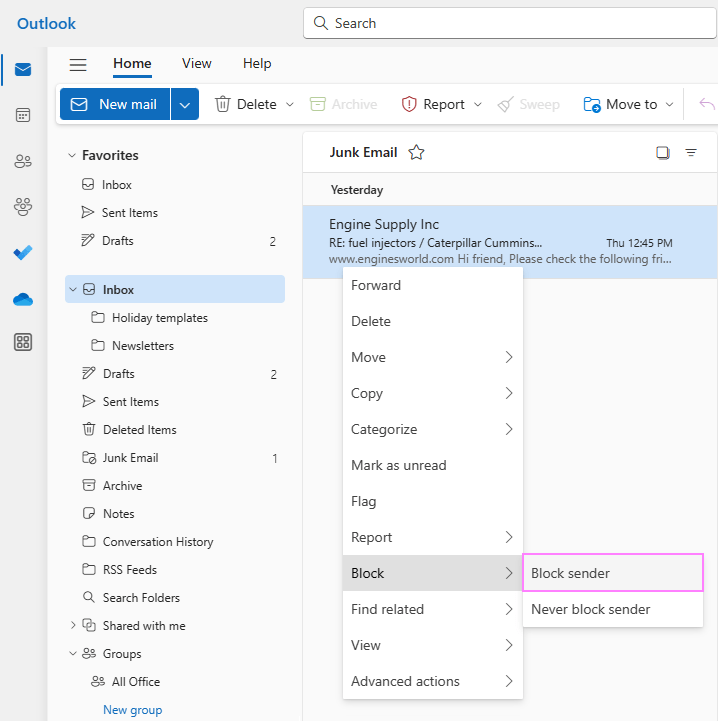
Alternatively, you can open an email, click the More options button (three-dots) in the upper right corner, and select Block > Block Sender name:

Note. In the new Outlook, the Block Sender option is only available for Exchange accounts, not for POP3 / IMAP accounts.
Blocked Senders list in new Outlook
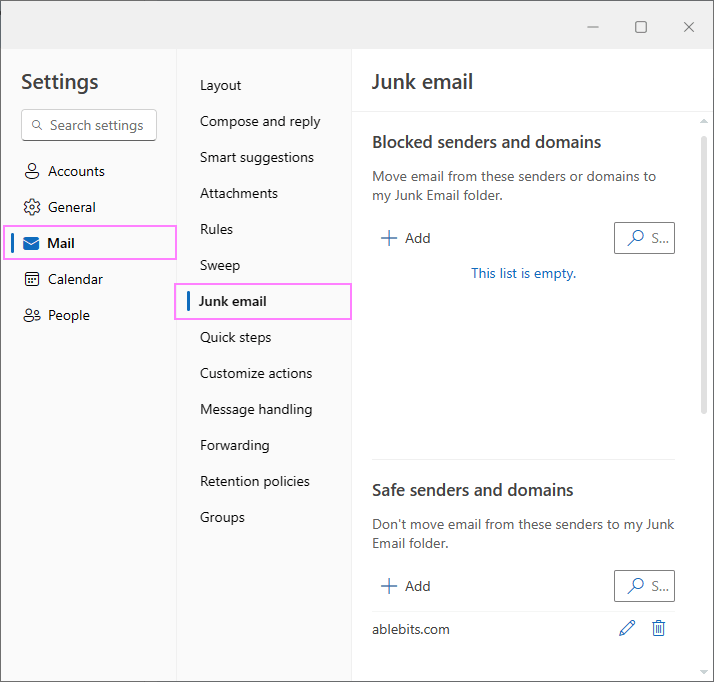
To access the blocked senders list in the new Outlook, follow these steps:
- On the View tab, click View Settings.
- In the Settings menu, go to Mail, and then select Junk email.
- Under the Junk email settings, you'll find options to view and edit your blocked senders and domains, as well as your safe senders.
- To add a new sender or domain to the blocked list, click on the plus icon, and then type the email address in the text box. To remove a sender from the blocked list, select it and click the trash icon.
- After making the changes, click the Save button in the lower-right corner of the dialog window.
Blocking a sender in Outlook web app
Blocking a sender in Outlook on the web is very much like in the new Outlook. The process is very easy and straightforward:
- In the Outlook web app, find an email from the unwelcome sender.
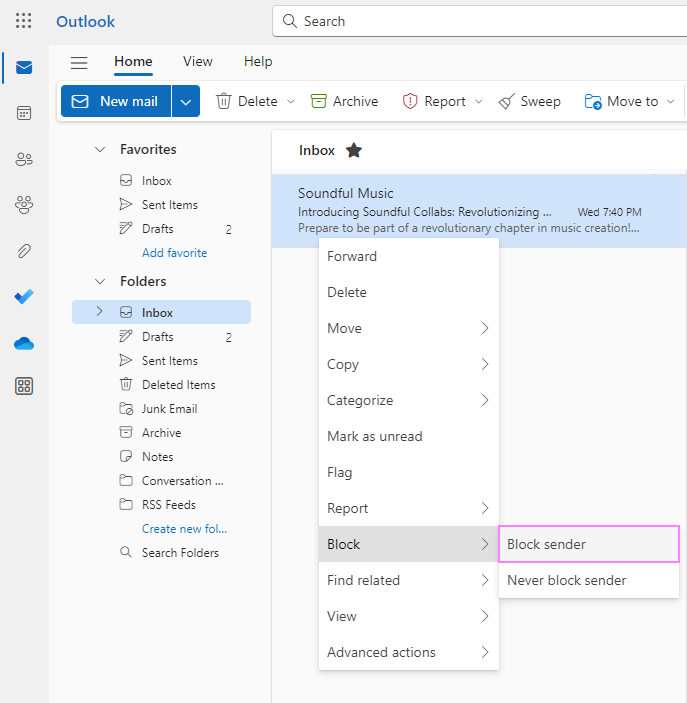
- Right-click on the email to open a context menu.
- In the context menu, hover over the Block option, and then click Block Sender.
- Confirm your choice by clicking OK in the pop-up window.
Another way to block a sender in the Outlook web app is this:
- Open any email from the sender.
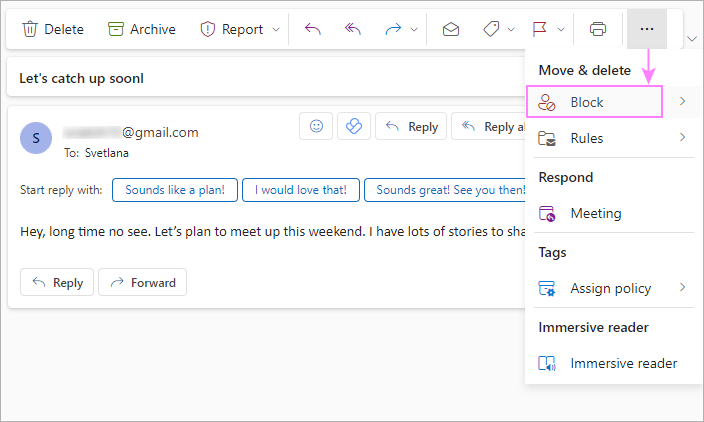
- Click on the three dots icon in the upper right corner of the email or the top menu.
- Select Block from the drop-down menu.
- In the pop-up confirmation message, click OK.
This action will move the selected email to the Deleted Items folder and prevent any future messages from that sender from reaching your inbox.
Manage blocked senders in Outlook web app
To manage blocked senders and other junk email settings in the Outlook web app, follow these steps:
- In the Outlook web app, click on the gear icon in the top-right corner to open the Settings menu.
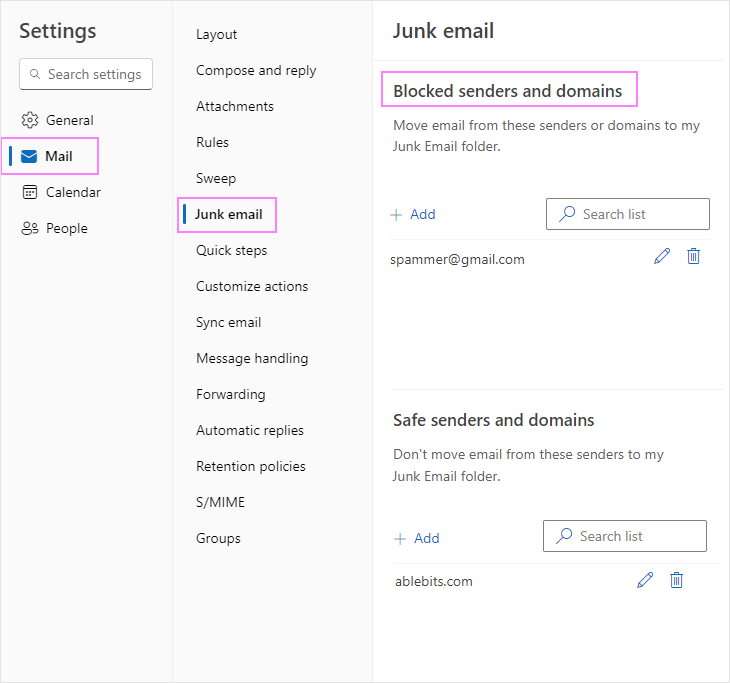
- In the Settings menu, go to Mail, and then select Junk email.
- Under the Junk email settings, you'll find the options to add or remove addresses from the blocked list.
- After making any changes, be sure to click the Save button to apply your settings.
Blocking malicious senders in Outlook online is an effective way to safeguard against phishing attempts and malware when accessing your email on the go or using a browser. The process may vary slightly depending on updates and changes to the Outlook web app interface, but these general steps should guide you in managing your email preferences.
Blocking a sender in Outlook: pros and cons
Blocking a particular correspondent is a quick and easy way to reduce the amount of spam from specific sources. However, this option has some drawbacks that you should be aware of before using it. First, blocking a sender does not stop their emails from reaching your Outlook. It only redirects them to the Junk Email folder, where they still take up space and clutter your email account. Second, spammers often use different email addresses to evade detection and filters. Third, Microsoft Exchange Server accounts have a limit of 1024 addresses for the Blocked Senders list, Safe Senders and Safe Recipients lists combined.
Therefore, you may want to explore other alternatives to deal with unwanted or spam emails in Outlook. You can report them as junk or phishing, permanently delete them, or create rules to organize them into different folders. In many cases, these methods may be more reliable and efficient.
For more information, see Why blocking senders isn't effective against spam.
Now you know how to shield your inbox from unwelcome or potentially harmful messages. This can help you avoid spam, minimize distractions, and focus on the emails that matter to you.
 by
by
6 comments
Anyone know how to export the blocked sender list from the new outlook? There is a function in the classic desktop version.
Hello Tom!
In the new Outlook (Outlook on the web), there isn't a direct feature to export the Blocked Senders list like there is in the classic desktop version. However, you can manually copy the addresses from the Blocked Senders list and save them in a text file. Here's how you can do it:
1. Open Outlook on the web and go to the Settings menu in the top right corner.
2. Select View all Outlook settings.
3. Go to Mail and then Junk email.
4. Under Safe senders and domains, click on Manage.
5. You'll see a list of blocked senders. You can manually copy these addresses and paste them into a text file (e.g., Notepad) on your computer.
6. If you need to import this list back into new Outlook, you can manually add these addresses back into the Blocked Senders list.
when i am in the blocked senders list and i click the trash icon for a particular sender does it remove the sender completely or just puts them back in a safe sender 'mode'?
Hi Joe,
Clicking the trash icon removes the sender from the blocked senders list.
My e-mail comes in as an IMAP account and none of the "block" dropdowns or menu choices appear in NEW Outlook.
I'm being overrun with junk e-mail from .edu domains using the same domain but different name/numbers.
Thanks
Russ
Hello Russel,
Unfortunately, in the new Outlook, the Block Sender option is not available for POP3 / IMAP accounts. I've added this note to the article.