 by
Want to keep the original files attached to an email in your replies? Here are 5 easy ways to do it, from simple drag-and-drop to a custom Reply with Attachments button.
When you reply to an email in Microsoft Outlook, the original attachments are automatically removed from your response. Most of the time, this makes sense: the sender already has those files, so there's little reason to send them back. But what if you're replying to several people, adding comments to a document, or simply want to keep all the files together in the conversation?
Unfortunately, Outlook doesn't have a built-in Reply with Attachments option. However, there are several easy ways to carry over attachments when responding to an email.
Can Outlook automatically include attachments when replying?
Unfortunately, Outlook doesn't have a built-in option to keep original attachments in replies.
When you click Reply or Reply All, Outlook includes the original message text but leaves out the attached files. This behavior is intentional. Since the sender already has those files, sending them back would unnecessarily increase the message size and consume additional mailbox storage.
Obviously, attachments remain in the original email in your Inbox. Replying doesn't delete or modify them.
On the other hand, when you use Forward to share an email with someone else, all the attachments from the original email are preserved, assuming new recipients may not have those files.
This behavior is the same in classic Outlook, new Outlook for Windows, and Outlook on the web.
If you need to reply with attachments in Outlook, there are a few alternatives:
- For occasional replies, you can copy or drag attached files from the original email into your response, or save them to your computer and then attach in the normal way.
- For frequent replies, a VBA macro in classic Outlook can do the job automatically. Third-party Outlook add-ins may also provide similar functionality.
Below, we'll walk through five methods for replying with attachments in Outlook, so you can choose whichever suits your needs best.
Tip. Classic Outlook lets you control how the original message is included in your responses. You can find these settings under File > Options > Mail > Replies and forwards > When replying to a message. One of the available options, named Attach original message, lets you include the entire original email as an attachment, along with any files it contains. However, it doesn't add those files as separate attachments to your reply.
How to reply with attachments in Outlook: 5 easy ways
Although Outlook doesn't have an in-built option to keep attachments when replying, there are several ways to get around this limitation. Let's explore five methods, from simple drag-and-drop technique to a one-click solution using a VBA macro.
Method 1: Drag and drop attachments in an Outlook reply
If you only need to carry over a few files from the original message, dragging and dropping them into a reply takes just a few seconds.
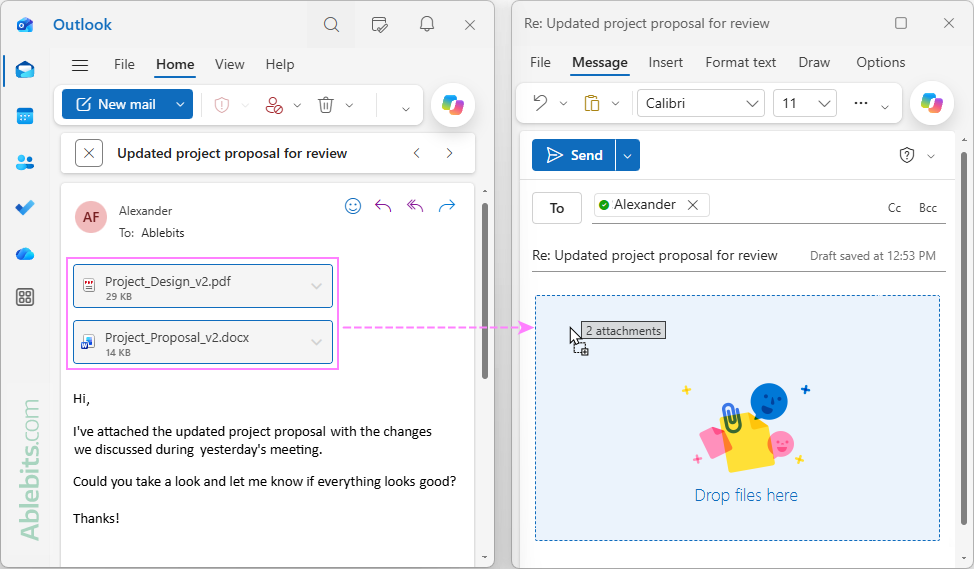
- Open the message in a separate window. Double-click the email you want to reply to, so it opens in its own window instead of the Reading pane.
- Reply to the email. Select Reply or Reply All in that separate message window. A new reply draft will open.
- Arrange the windows side-by-side. Resize and position the original email and the reply so both are visible on your screen.
- Drag the attached files into your reply. Click the attachment in the original email to select it, then drag and drop it directly into the body of your reply. To include multiple attachments, use the Ctrl key to select the files, then drag them all at once.
Your reply will now contain the original attachments along with your response.
Works in: Classic Outlook 365 – 2010, new Outlook for Windows.
Advantages: Quick and convenient, especially when you only want to keep certain attachments.
Drawbacks: Currently, this drag-and-drop method does not work in Outlook on the web.
Note. Dragging attachments between messages may not be supported in all Outlook versions or configurations. If it doesn't work for you, download the attachments and add them to your reply manually.
Method 2: Copy and paste the attachments
If you prefer keyboard shortcuts over dragging, you can copy the attachments from the incoming email into your response.
- Open the original email with the attachments.
- Select the attachment you want to include.
- Copy the attachment. Right-click the selected file and choose Copy. Alternatively, use the shortcut Ctrl + C to copy the files.
- Start your reply. Click Reply or Reply All to start your response.
- Paste the attachment. Click inside the reply message body and press Ctrl + V to drop the attachments right into your draft, or right-click and select Paste.
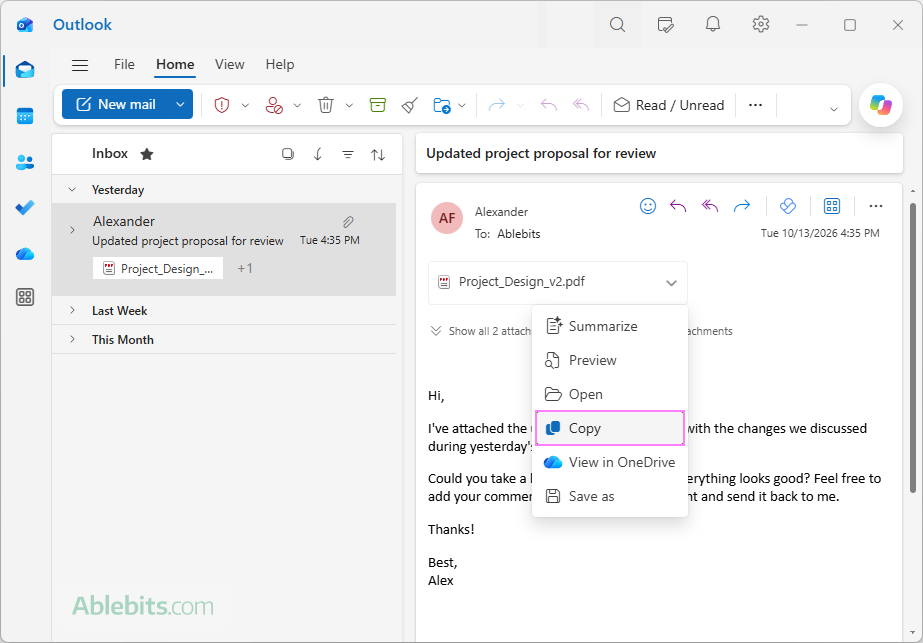
To copy multiple attachments:
- In new Outlook, you can copy only one attachment at a time. To include multiple files, repeat the copy-and-paste process for each attachment.
- In classic Outlook, you can copy several attachments at once. To select all attached files, click the first attachment and press Ctrl + A. To select specific files, hold down Ctrl while clicking each one. Then press Ctrl + C to copy the selection and Ctrl + V to paste all the files into your reply.
Works in: Classic Outlook 365 – 2010, new Outlook for Windows.
Advantages: Quick and easy.
Drawbacks: Doesn't work in Outlook on the web. Currently, new Outlook allows coping only one attachment at a time, making this method less convenient when you need to include many files.
Method 3. Save and reattach the original files
If neither dragging nor copying attachments directly into your reply works, you can save the files to your computer first and then attach them as you normally would. This is the most reliable method for keeping original attachments in any Outlook app.
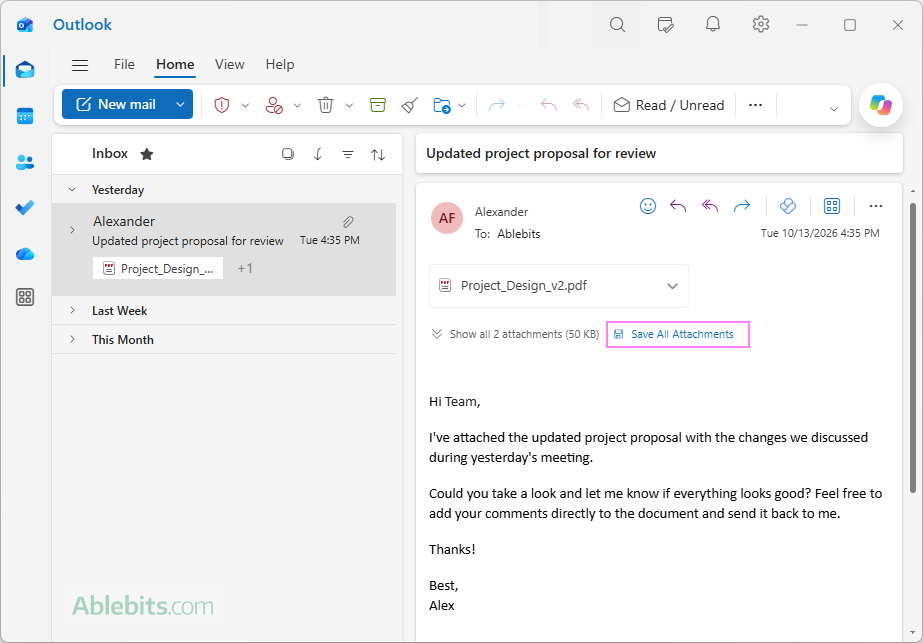
- Save the original attachments. In the received email, right-click the attached file or click the attachment's drop-down arrow, and choose the option corresponding to your Outlook version:
- In classic Outlook, select Save As.
- In new Outlook, right-click the attachment and click Save As to save only that file. Or, click Save All Attachments at the top of the message to save all attached files at once.
- In Outlook on the web, select Download.
- Start your reply. Depending on whether you want to respond to the sender only or everyone in the conversation, click Reply or Reply All.
- Attach the files. In the reply window, click Attach File (paperclip icon) and select the files you've just saved.
- Send your response. Type your message and click Send.
Works in: All Outlook versions, including classic Outlook 365 – 2010, new Outlook, and Outlook on the web.
Advantages: Universally supported method.
Drawbacks: Takes more time because you need to save the files first. It also creates temporary copies on your computer that you may want to delete afterward.
Method 4: Keep attachments using Forward
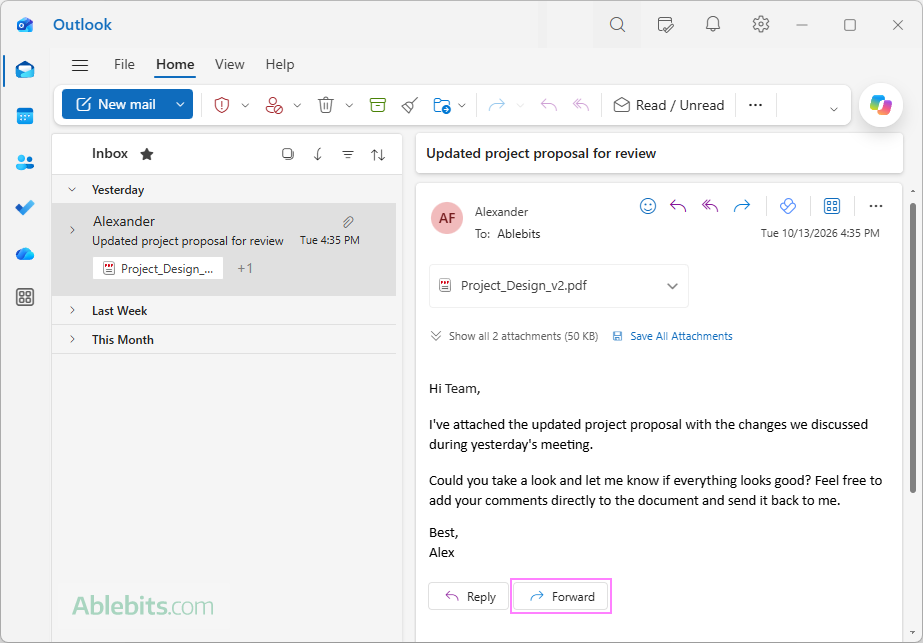
A clever workaround for keeping original attachments in Outlook is to use Forward instead of Reply. Unlike a regular reply, a forwarded message automatically includes all the original attachments, so you don't have to copy or reattach them manually.
- Forward the message. Select the message with attachments you want to respond to and click Forward instead of Reply.
- Add the original sender. In the To field, enter the email address of the person who sent you the message.
- Include other recipients if needed. If you're responding to multiple people, add their addresses to the To, Cc or Bcc field as needed.
- Change the subject prefix. In the Subject line, replace FW: with RE: to make the message look like a reply.
- Write and send your response. Type your reply above the forwarded message and click Send.
All the original attachments will be included automatically, without any extra effort.
Works in: All Outlook versions, including classic Outlook 365 – 2010, new Outlook, and Outlook on the web.
Advantages: The quickest way to include all original attachments, especially when there are many files. No copying, downloading, or reattaching required.
Drawbacks: Technically, the message you are sending is a forward, not a reply. Changing FW: to RE: doesn't guarantee the email will stay in the original conversation thread.
Method 5: Reply with attachments using VBA macro (in classic Outlook)
If you often need to reply to emails with the original attachments included, copying, dragging, or forwarding files every time can become a nuisance.
If you are using classic Outlook 365 – 2010 with the ability to run VBA code, you can create a simple Reply with Attachments or Reply All with Attachments macro that does everything for you automatically. Here's how:
- Press Alt + F11 to open the Microsoft Visual Basic for Applications editor.
- In the left pane, double-click Project1 > Microsoft Outlook Objects > ThisOutlookSession.
- Copy and paste the code below into the ThisOutlookSession code window.
- Press Ctrl + S to save the code, then close the VBA editor.
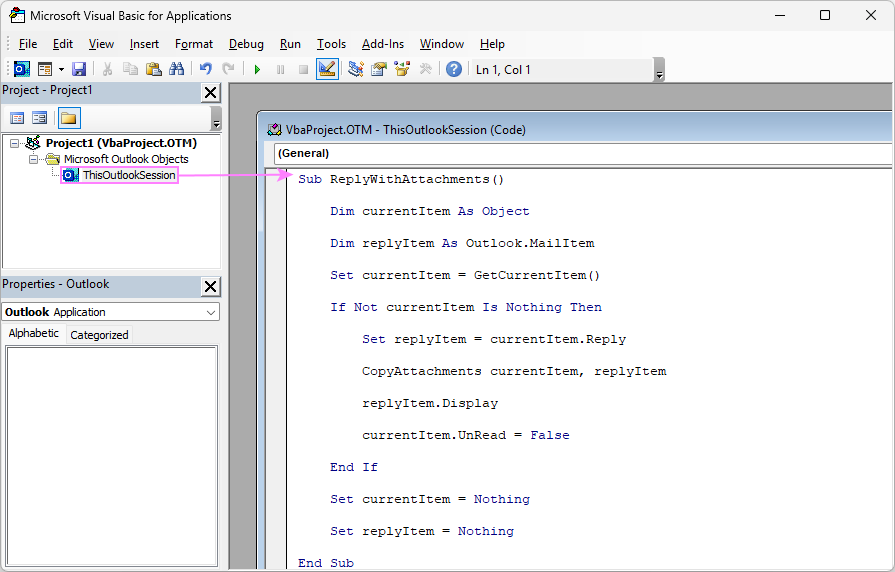
VBA code to Reply or Reply All with attachments in Outlook
The following code creates a normal Outlook reply, copies all attachments from the original email, and opens the response for you to review and send.
Note. There is one limitation of this code you should be aware of. The CopyAttachments procedure saves files directly into the Windows temporary folder using their original file names. If a file with the same name already exists there, an error may occur. Although the chances of this happening are quite slim, you can eliminate this risk by modifying the code to create a unique temporary subfolder for each reply and deleting it after the attachments have been copied.
How to use the Reply with Attachments macros
The code contains two macros:
- ReplyWithAttachments – creates a reply to the original sender and includes all attachments.
- ReplyAllWithAttachments – creates a reply to the sender and other recipients, keeping all original attachments.
There are three ways to run these macros, depending on how often you need them.
Option 1. Run the macro from the Macros dialog
This is the simplest way to run the macro without customizing Outlook.
- Select the email you want to reply to.
- Press Alt + F8 to open the list of available macros.
- Select ReplyWithAttachments or ReplyAllWithAttachments.
- Click Run.
Outlook will open a reply with the original attachments already included.
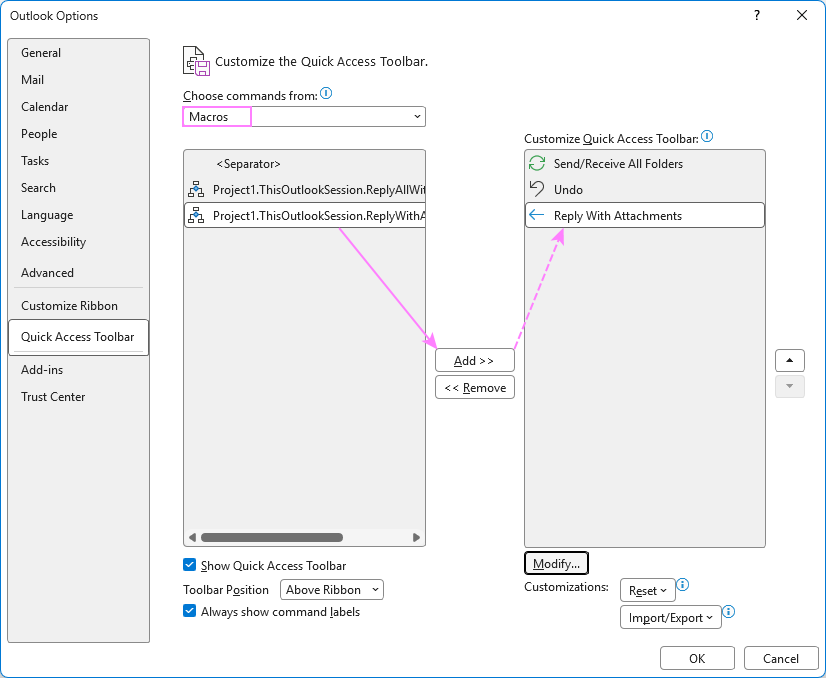
Option 2. Add the macro to the Quick Access Toolbar
For easier access, you can add your macros to Outlook's Quick Access Toolbar.
- Go to File > Options > Quick Access Toolbar.
- From the Choose commands from drop-down list, select Macros.
- Select the ReplyWithAttachments or ReplyAllWithAttachments macro from the list and click Add to move it to the right-hand column.
- Optionally, select the added macro and click Modify to choose an icon and give the button a friendly name, for example Reply with Attachments.
- Click OK to save your changes.
You'll now have a dedicated button for replying with attachments, just a click away.
Option 3. Add the macros to the Outlook ribbon
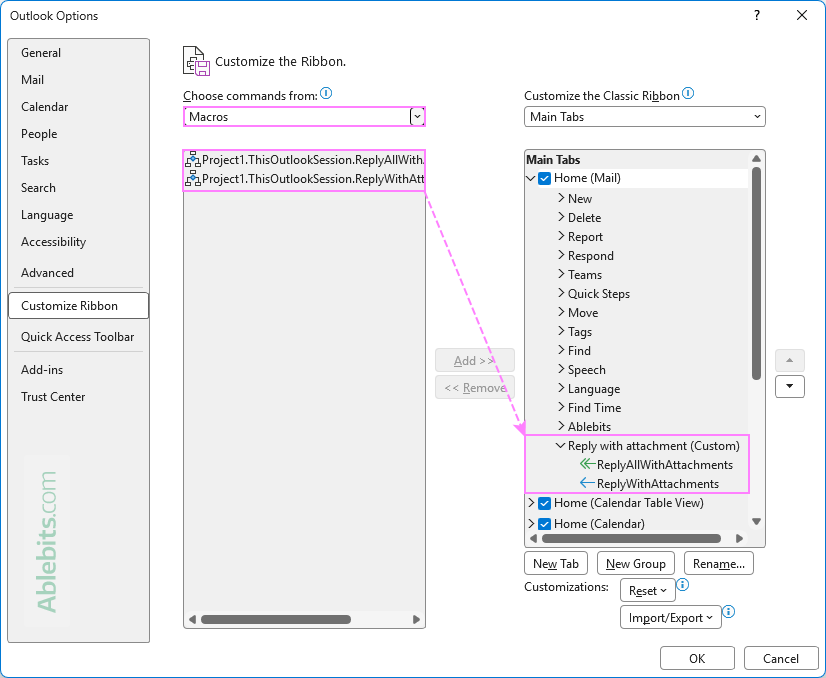
If you'd rather have the buttons directly on the Home tab, you can add them to a custom ribbon group.
- Go to File > Options > Customize Ribbon.
- On the right, select the Home (Mail) tab and click New Group.
- Click Rename and give the group a descriptive name, e.g. Reply with attachment.
- On the left, choose Macros from the Choose commands from list.
- Select ReplyWithAttachments or ReplyAllWithAttachments and click Add to place it in your custom group.
- Optionally, use Rename to assign each button your preferred name and icon.
- Click OK to save the changes.
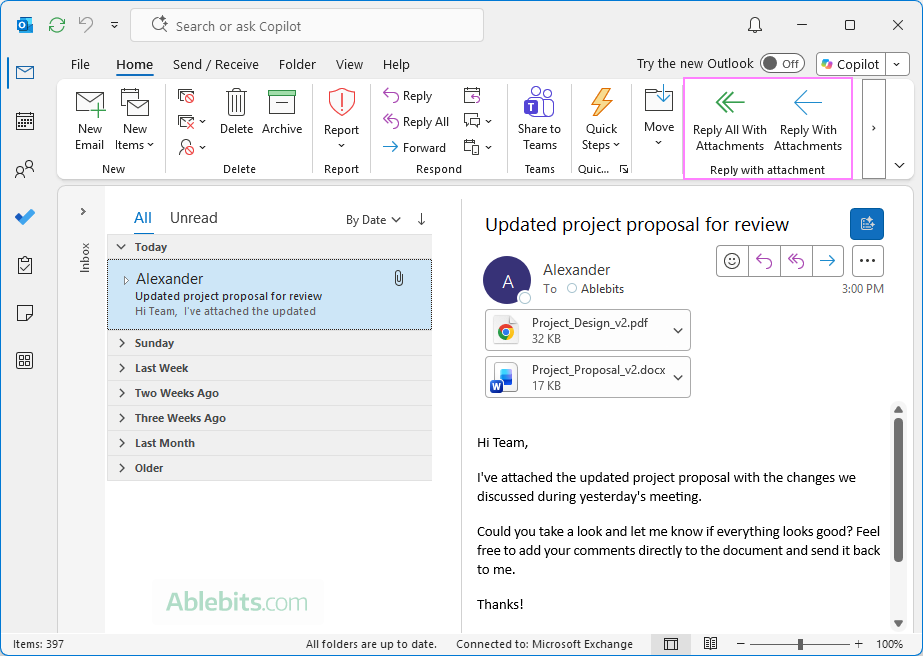
As a result, you'll have two custom commands on your Outlook ribbon: Reply with Attachments and Reply All with Attachments.
Simply select an email, click the appropriate button, and Outlook will create a reply with all the original attachments included. All that's left is to type your response and click Send.
Works in: Classic Outlook 365 – 2010, provided VBA macros are permitted.
Advantages: A convenient one-click solution for frequently replying with attachments.
Drawbacks: Requires initial VBA setup and permission to run macros. May need adjustments for inline images, embedded objects, or special attachment types.
Outlook reply attachments not working: troubleshooting
If you're having trouble adding attachments to your Outlook reply, here are a few things to check.
Copy-pasting or dragging attachments doesn't work
Currently, these methods are supported only in desktop versions of Outlook, including classic Outlook 365 – 2016 and new Outlook for Windows. They may not work in Outlook online.
In desktop Outlook, try opening both the original message and your reply in separate windows, and then copy or drag the attachments between messages. If it still doesn't work, save the files to your computer and attach them to your reply manually.
Outlook won't let you attach a file
Check whether the file exceeds your account's attachment size limit or belongs to a blocked file type (like .exe or .bat). If the attachment is too large, consider uploading it to OneDrive and sharing a OneDrive link instead.
Attachments are missing from the original message
Make sure you're viewing the original email rather than a later reply in the conversation. Outlook's conversation view groups related messages together, but each message has its own attachments. Expand the conversation and select the email that originally contained the files.
That's how you can include attachments when replying in Outlook. Choosing the right method depends on how often you need this feature. For occasional messages, a quick drag-and-drop is usually fastest, while a VBA macro offers a convenient hands-off solution for heavy workflows. Whichever method you choose, don't forget to double-check the attached files before hitting Send 😊