 by
by Here is a comprehensive, step-by-step guide to setting up and running spellcheck across every version of Outlook.
A typo in an email can be harmless, embarrassing, or shockingly confusing. Luckily, Outlook can highlight spelling mistakes as you type, check an entire message before you send it, and even spot writing-style issues.
This guide explains how to check spelling and grammar in your Outlook emails, configure automatic spell checking, and change the proofing language.
How to spell check in Outlook: quick summary
The way Outlook checks your outgoing emails depends on which version you use.
Classic Outlook for Microsoft 365 includes Microsoft Editor, which checks spelling and grammar and can also suggest improvements to clarity, conciseness, vocabulary, and writing style.
Classic Outlook 2024 – 2016 provides the traditional Spelling & Grammar checker. You can run it manually on each outgoing email and set Outlook to check every message automatically before it goes off.
New Outlook and Outlook on the web use Microsoft Editor. Potential problems are marked automatically while you type. Also, you can open the Editor pane to review spelling, grammar, punctuation and other suggestions.
Tip. Spell checking and AutoCorrect are related but different features. Spell check flags possible mistakes, while AutoCorrect automatically replaces misspellings from a predefined list as you type.
How to check spelling in classic Outlook 365 – 2010
In classic Outlook, you can check a message manually whenever you want. The exact interface depends on whether your version includes Microsoft Editor.
Outlook 365 spellcheck
To check spelling in Outlook for Microsoft 365, you can use Microsoft Editor:
- Create a new email or reply to an existing one.
- On the Message tab, click Editor. If you use the simplified ribbon and don't see the command, open the three-dot menu and select Editor.
- In the Editor pane, review the detected issues grouped into categories and apply the necessary corrections.
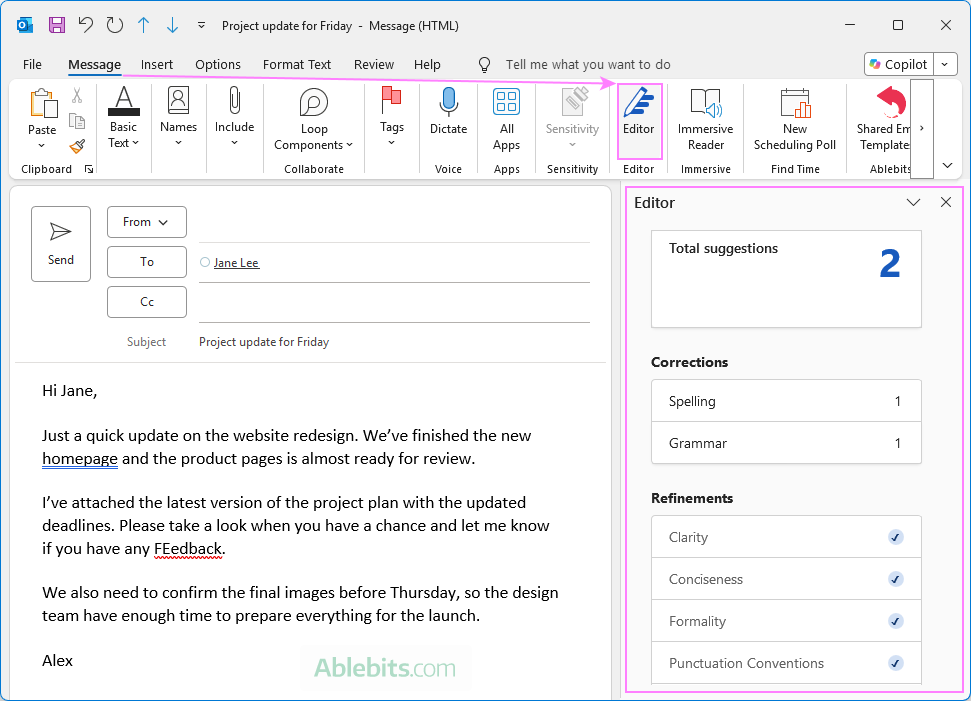
Tip. Although Microsoft Editor is accessed differently in classic and new Outlook, the proofreading process is essentially the same. For detailed guidance on reviewing and applying suggestions, see the Spell check in new Outlook and web section.
Check spelling in Outlook 2024 – 2010
In non-subscription Outlook versions without Microsoft Editor, use the traditional spelling checker:
- While drafting your email, go to the Review tab > Proofing group > Spelling & Grammar. You can also use the F7 hotkey to start spellcheck from the keyboard.
- The Spelling and Grammer dialog window pops up and guides you through the detected errors one by one. Choose a suggested correction or ignore the word if it is already correct.
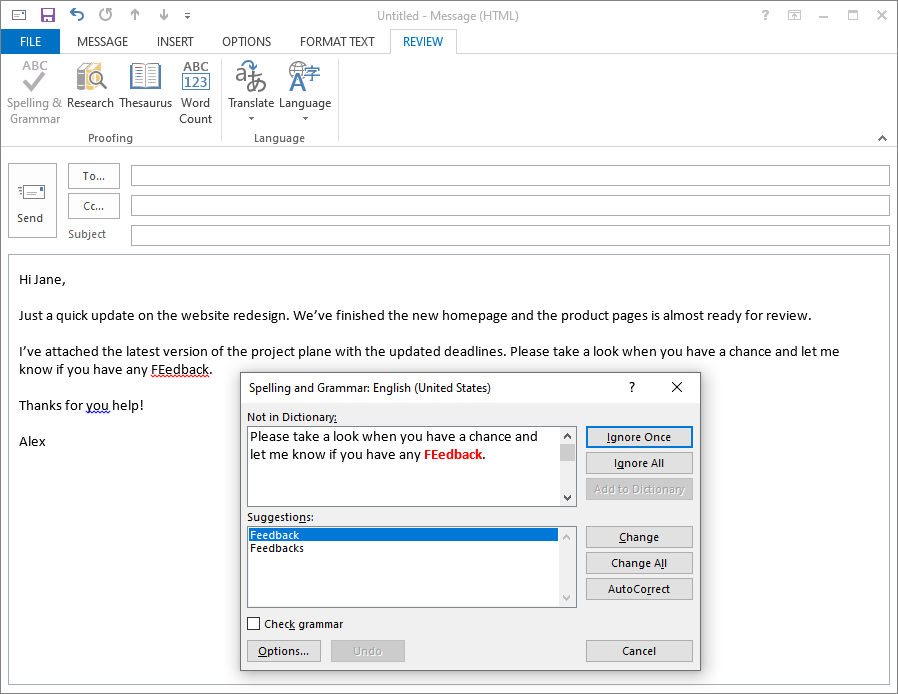
Note. In Outlook 365, selecting Spelling & Grammar on the Review tab opens the Editor pane instead of the traditional pop-up dialog used in earlier Outlook versions.
How to spell check in new Outlook and web
New Outlook for Windows and Outlook on the web use Microsoft Editor to check spelling, grammar, and writing style as you compose a message.
Editor can do more than catch typos. Depending on your settings and language, it can also suggest improvements related to clarity, conciseness, formality, inclusiveness, punctuation, etc.
Editor provides real-time suggestions directly in the message body and also lets you review all detected issues in the Editor pane.
To check spelling and grammar in new Outlook and Outlook on the web emails with Microsoft Editor:
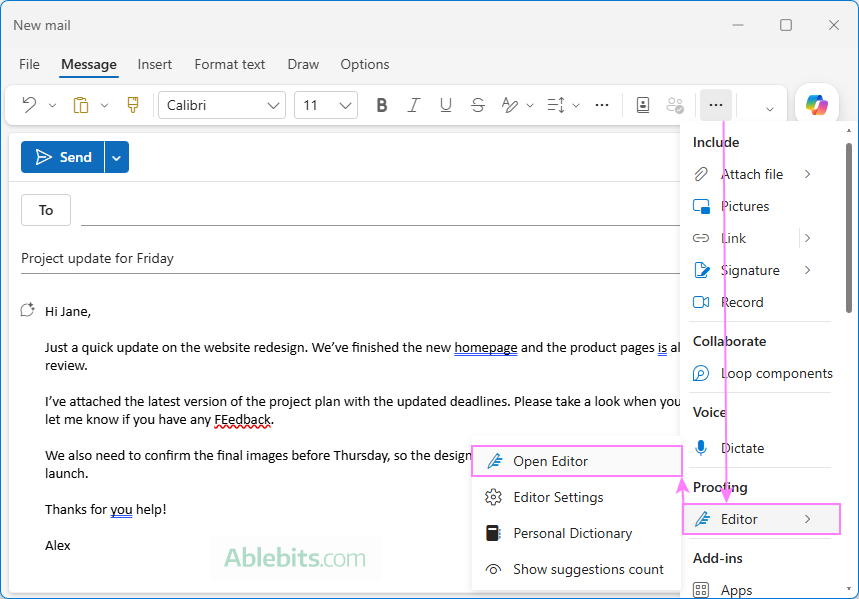
Step 1. Open Editor. On the Message tab, select Editor. If the command is not visible on the ribbon, click the three dots at the right end, and under Proofing, choose Editor > Open Editor.
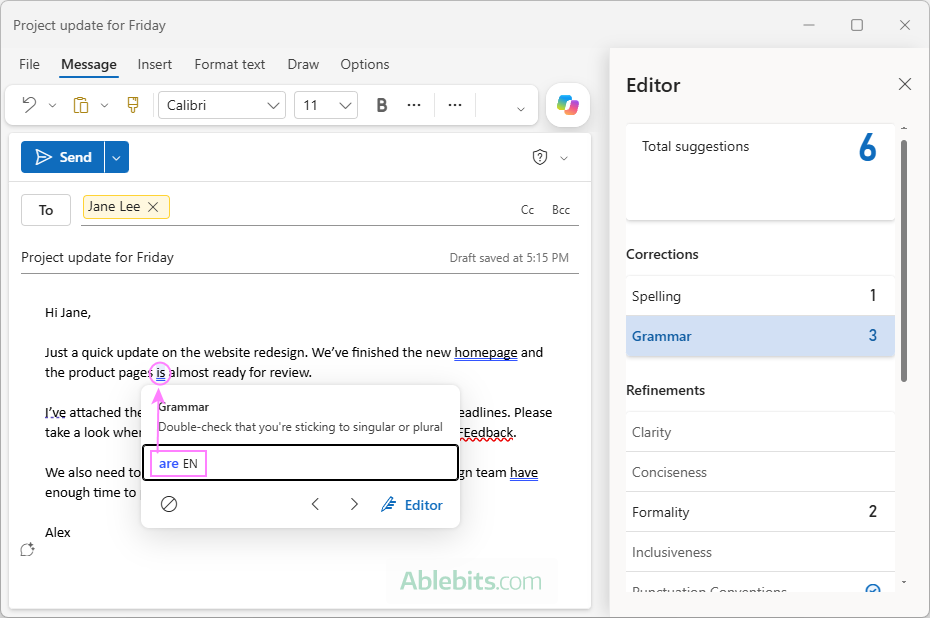
Step 2. Choose what to review. The Editor pane opens on the right side of the message and groups detected issues into categories such as spelling, grammar, and stylistic refinements. Select a category to review the corresponding suggestions.
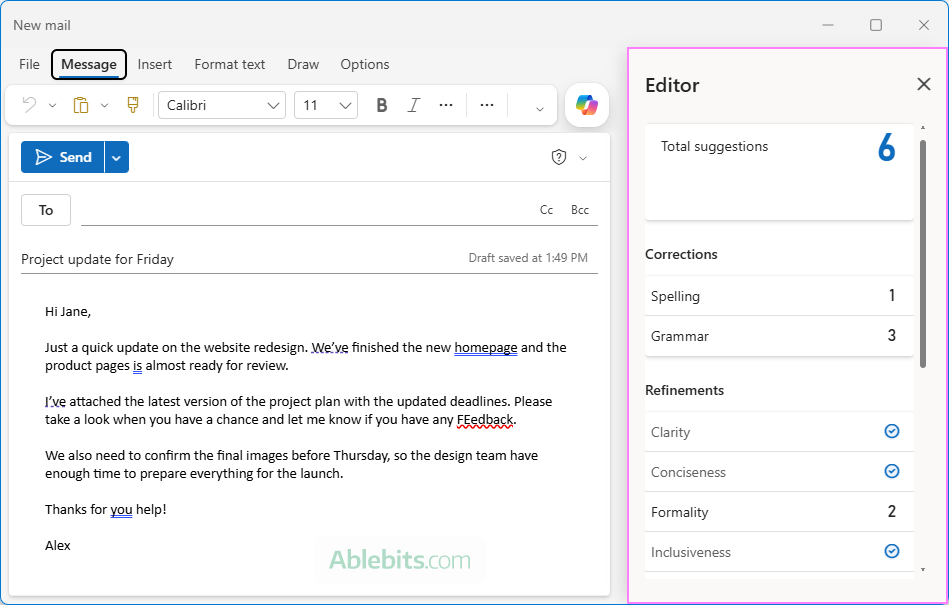
Step 3. Review suggestions and correct errors. Microsoft Editor displays suggestions both in the Editor pane and directly in the message body.
To choose which issues to review in Editor:
- To go through all detected issues one by one, click Total Suggestions.
- To focus on a particular type of issue, select a category under Corrections or Refinements.
Once you select an option in the Editor pane, a small pop-up appears next to the corresponding text in the message body. From there:
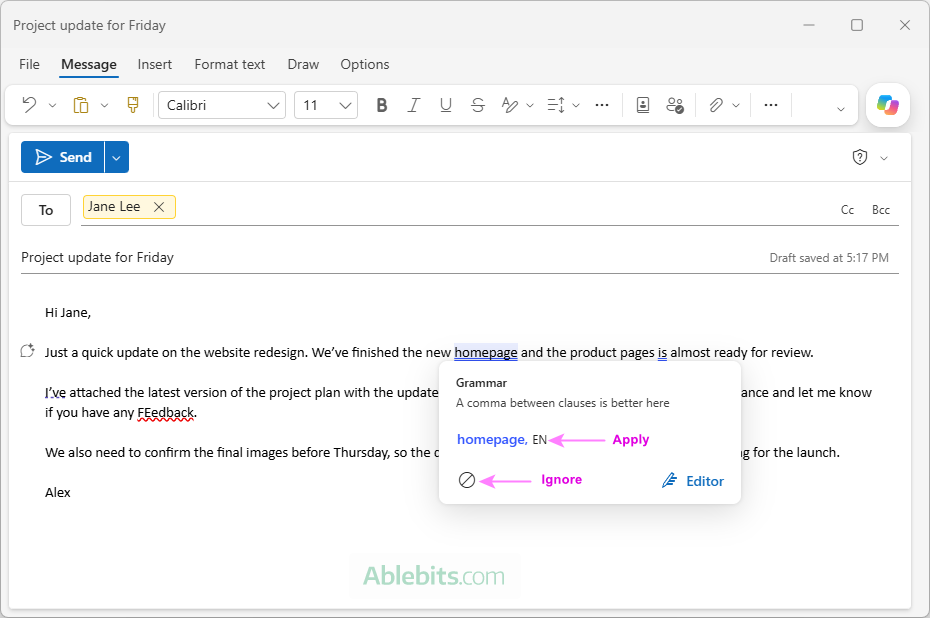
- To accept the change, click the suggested correction.
- If you do not want to apply it, choose Ignore (a circle with a diagonal line through it).
- Use the arrows to move between detected issues.
You do not have to open the Editor pane every time. Outlook checks the message text while you compose a message and underlines potential problems directly in the message. Left-click the underlined word or phrase to see the suggested correction and apply it if needed.
Automatically check spelling before sending emails in Outlook
If you tend to hit Send first and spot the typo two seconds later, classic Outlook has a useful safeguard: it can run spell check automatically every time you send a message.
By default, this option is turned off. Here's how to enable it in Outlook 365 - 2016:
- Go to File > Options > Mail.
- Under Compose messages, select Always check spelling before sending.
- Click OK to save the setting.
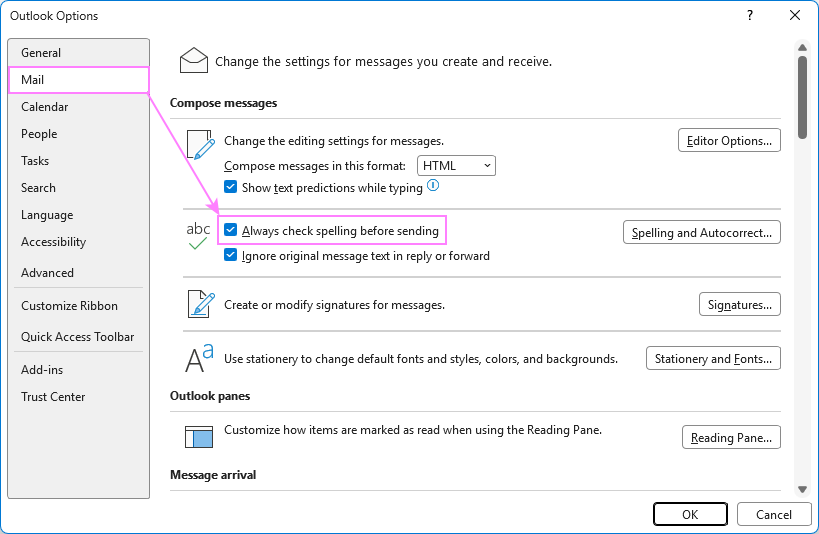
From now on, when you click Send, Outlook checks the message first. If it finds a possible spelling error, you can correct or ignore it before the email leaves your Outbox. If no errors are found, the message is sent immediately.
Note. This particular Always check spelling before sending setting applies to classic Outlook. New Outlook and Outlook on the web use Microsoft Editor to provide proofreading suggestions while you compose a message.
How to configure spellcheck settings in Outlook
For most emails, you don't need to run a separate spell check. Outlook can flag possible mistakes as you type, so you can correct them right away. The available proofing settings and how you access them depend on your Outlook version.
Customize spell check in classic Outlook 365 – 2010
In classic Outlook, you can customize spell check options in this way:
- Navigate to File > Options > Mail.
- Under the Compose messages section, click Editor Options.
- In the Editor Options window, select Proofing from the let menu.
- Under the When correcting spelling in Outlook section, define how Outlook should check and corrects spelling and grammar in your emails.
The screenshot below shows the default proofing settings in Outlook 365.
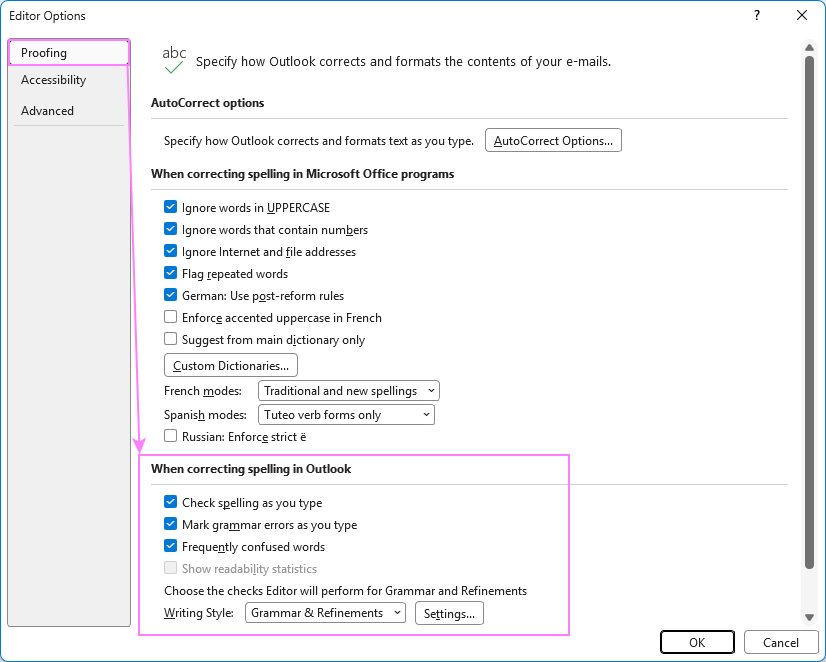
Tip. If your emails contain words in all caps or words with numbers that you also want to spellcheck, clear these options under When correcting spelling in Microsoft Office programs:
- Ignore words in UPPERCASE
- Ignore words that contain numbers
Change Editor settings in new Outlook and web
In new Outlook and Outlook on the web, Microsoft Editor handles real-time proofreading. To adjust its settings while composing a message:
- Create a new blank email.
- Click the overflow menu (…) on the ribbon, and then select Editor > Editor Settings.
- Depending on the language, you may be able to enable or disable different spelling, grammar, AutoCorrect, capitalization, and other writing suggestions.
- To discard your customizations and revert to the original Editor settings, select Reset to default.
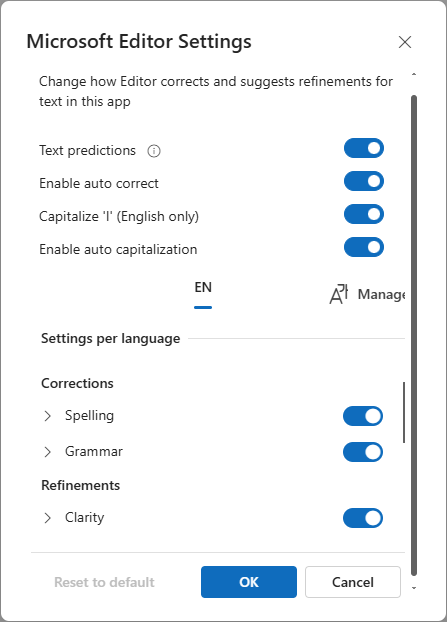
The available options let you handle everything from basic spelling checks to style and wording improvements of your Outlook messages:
- Text predictions – suggests words or phrases while you compose a message to help you write emails faster.
- Enable auto correct – automatically fixes common spelling mistakes while you're writing.
- Capitalize 'I' (English only) – automatically changes a lowercase i to uppercase I when used as the personal pronoun.
- Enable auto capitalization – automatically capitalizes words where appropriate, for example the first word of a sentence.
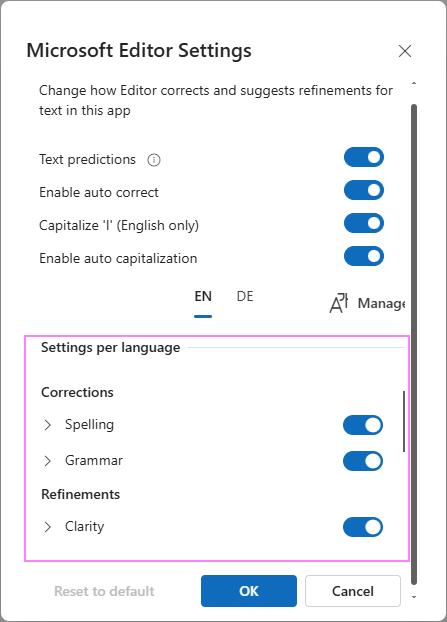
Under Settings per language, you can turn individual Corrections and Refinements on or off for the selected language:
- Spelling – flags misspelled words and suggests corrections.
- Grammar – identifies grammatical errors and shows how to correct them.
- Clarity – flags wording that may be difficult to understand and suggests clearer alternatives.
- Conciseness – identifies wordy expressions that could be shortened.
- Formality – suggests wording more appropriate for a formal writing style.
- Inclusiveness – flags potentially biased wording or language that unnecessarily exclude certain groups.
- Punctuation Conventions – checks punctuation according to the conventions of the selected language.
- Sensitive Geopolitical References – flags certain geopolitical terms or references that may require careful wording.
- Vocabulary – identifies vague or less precise wording and suggests alternatives.
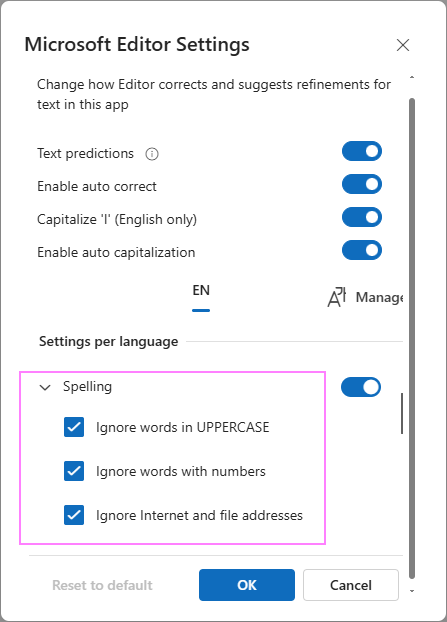
To see exactly which writing issues are covered by each category, click the arrow next to a category to expand it, and then select or clear individual options as needed.
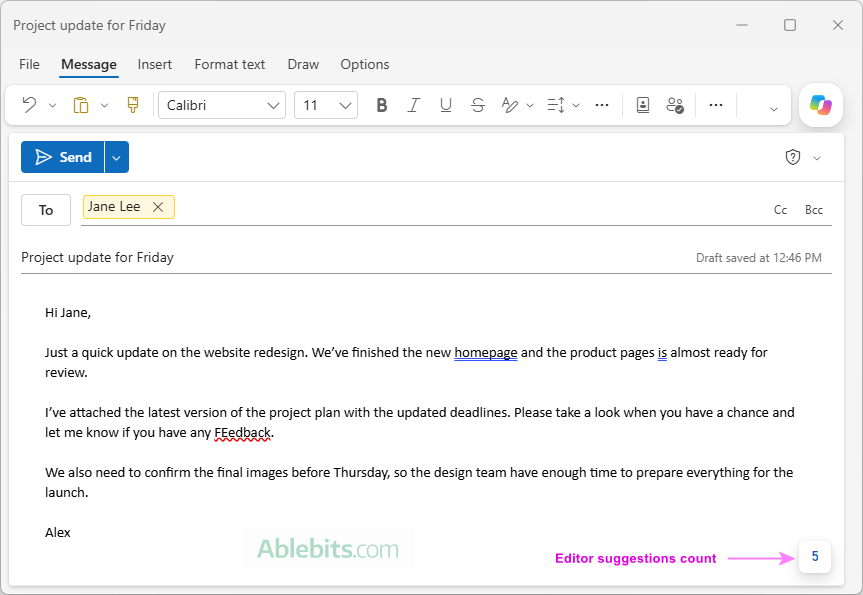
As you compose a message, Microsoft Editor displays the number of detected issues in the lower-right corner of the message body. If no issues are found, you'll see the Editor button instead. Clicking the count or button opens the Editor pane, where you can review suggestions.
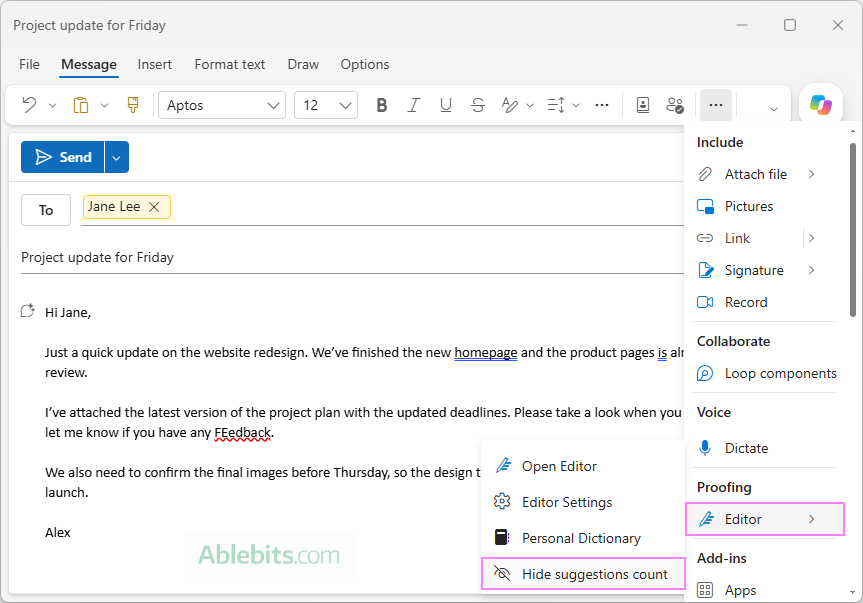
If you prefer a less distracting writing experience, you can hide the suggestions count without disabling spell checking. To show or hide the count: Tip. Microsoft is rolling out a new Spell check before sending feature in new Outlook and web, starting in October 2026 for targeted release and November 2026 for general availability. Because Microsoft rolls out updates gradually, the spell-check options in your Outlook may differ from those described here as new features are released. See the Microsoft 365 announcement for details.
Show or hide Editor suggestions count in Outlook email
How to change spell check language in Outlook
If Outlook keeps marking correctly spelled words as mistakes, it may be checking your email in the wrong language. For example, if an English message is checked using a German dictionary, Outlook may flag almost every word even though the spelling is perfectly correct.
Changing proofing language in Outlook 365 - 2010
In classic Outlook, you can choose the spellcheck language for selected text, the entire message, or change the default proofing language.
- Highlight the part of the message you want to check. To select the entire email, press Ctrl + A.
- On the Review tab, select Language > Set Proofing Language.
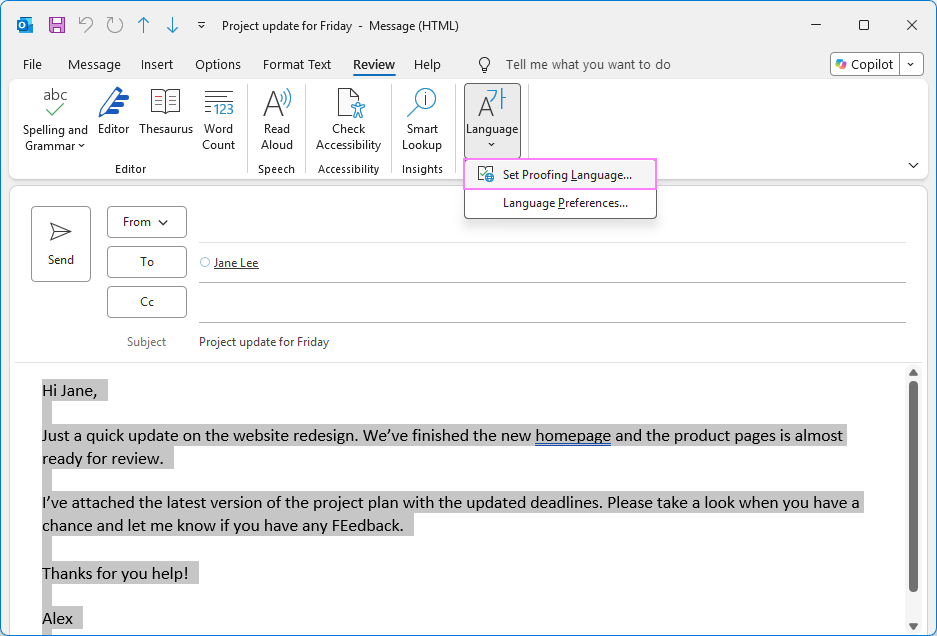
- To change the spellcheck language for this email: In the Language dialog box, select the language to use for proofreading, and click OK.
- To change the default spellcheck language: Select the language and click Set As Default to use it as the default proofing language for future messages.
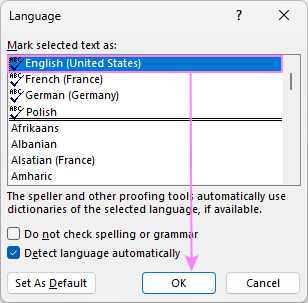
At the bottom of the Language dialog, you'll also find two useful options:
- Do not check spelling or grammar – excludes the selected text from spell check. This can be useful for code, product names, or text in a language you don't want Outlook to check.
- Detect language automatically – lets Outlook determine the proofing language based on the text you type. This can be handy if you regularly write emails in different languages, though automatic detection may not always choose the language you expect.
Changing spellcheck language in new Outlook and web
New Outlook for Windows and Outlook on the web manage proofing languages through Editor Settings. You can add multiple languages, switch between them, and configure proofreading options separately for each one.
To add another language
- While composing a message, open the overflow menu (…) and select Editor > Editor Settings.
- Next to the current language, click Manage spellcheck languages.
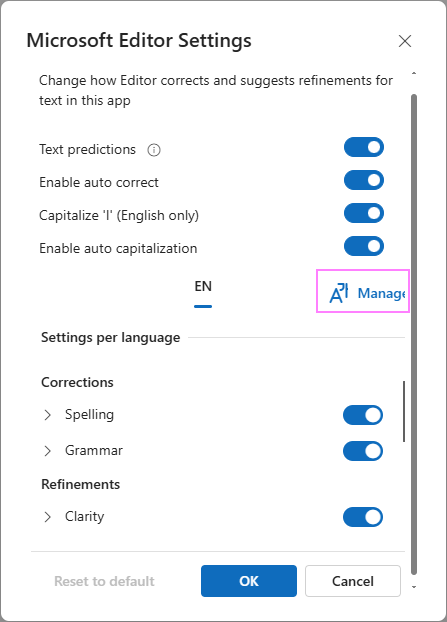
- In the Proofing languages dialog box, select the language you want to use and click Add.
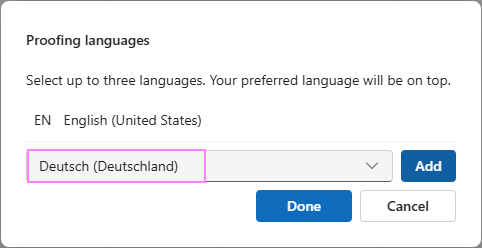
- After adding another language, make sure your preferred one is at the top of the list. If it isn't, click the three dots next to it and select Move up.
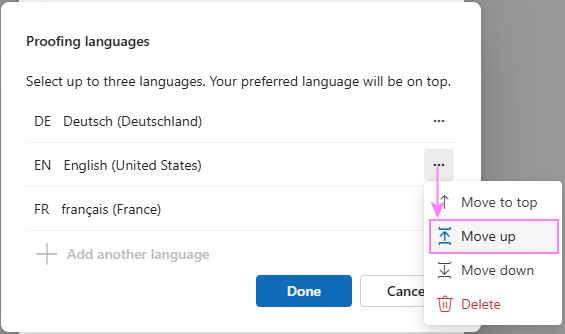
- Back in the Microsoft Editor Settings window, click OK to save your changes and return to the message.
Currently, Microsoft Editor lets you add up to 3 proofing languages in new Outlook and Outlook on the web.
To switch between languages
In Microsoft Editor Settings, select the language abbreviation, such as EN or Ge for the language you want Editor to use.
To review and fine-tune settings for each language
In Microsoft Editor Settings, select the language first, then scroll through Settings per language. Here, you can turn individual Corrections and Refinements on or off and expand a category to choose exactly which types of issues Editor should check.
Note. The available spelling, grammar, and writing refinements vary by language. Your language may support spell checking without offering all the grammar or style suggestions available for English.
Frequently asked questions about Outlook spell check
Finally, let's clear up a few common questions about how spell check works in Outlook.
Is there a shortcut for spell check in Outlook?
Yes. In classic Outlook, press F7 to run the spelling and grammar checker.
Does Outlook automatically check spelling when writing emails?
Yes. Outlook automatically highlights possible spelling errors while you type. In classic Outlook, you can additionally enable Always check spelling before sending so that a spelling check runs when you click Send.
Can Outlook check grammar too?
Yes. Outlook can check both spelling and grammar. Depending on your version, make sure the appropriate grammar option is enabled:
- Traditional spell checker in Outlook 2024 – 2010: When checking a specific email, select the Check grammar checkbox at the bottom of the Spelling and Grammar dialog box.
- Classic Outlook 365 – 2010: To have Outlook highlight grammar errors while composing emails, select Mark grammar errors as you type under File > Options > Mail > Editor Options > Proofing.
- New Outlook and web: In Editor Settings, make sure the Grammar category is turned on under Corrections.
Why does Outlook spell check in the wrong language?
The message or selected text may have a different proofing language assigned to it. Set the correct proofing language and run the check again.
Now you know your way around Outlook's spelling and grammar tools. Spend a minute setting up the proofing options that suit the way you write, and Outlook will do most of the proofreading for you.