Want to insert dates quickly in Outlook? Whether you're composing a one-off email, meeting invite, or reusable template, this guide shows you how to add a clickable date picker (pop-up calendar) that saves you time.
Adding a calendar popup to Outlook emails can help users select a date quickly without typing – perfect for scheduling meetings, confirming deadlines, or collecting availability. While Microsoft Outlook doesn't offer a built-in date picker for emails, you can use VBA macros or add-ins as practical workarounds. This guide walks you through the main options, with simple steps to follow, so you can choose the method that fits your needs.
Insert a date picker in Outlook emails with VBA code
If you're looking for a quick way to insert specific dates into your Outlook emails, you can use a simple VBA script to add a date picker. This lets you, the sender, select a date from a pop-up calendar and automatically insert it into your message in the desired format, saving time and reducing errors. Follow the steps below to set this up.
Note. This method works only in the classic desktop version of Outlook. Macros are not supported in the new Outlook or the web version.
Step 1. Add DatePicker VBA code to Outlook
First, you'll add the VBA code of the macro that enables the date picker.
- Launch the classic desktop Outlook app.
- Press Alt + F11 to open the Microsoft Visual Basic for Applications window.
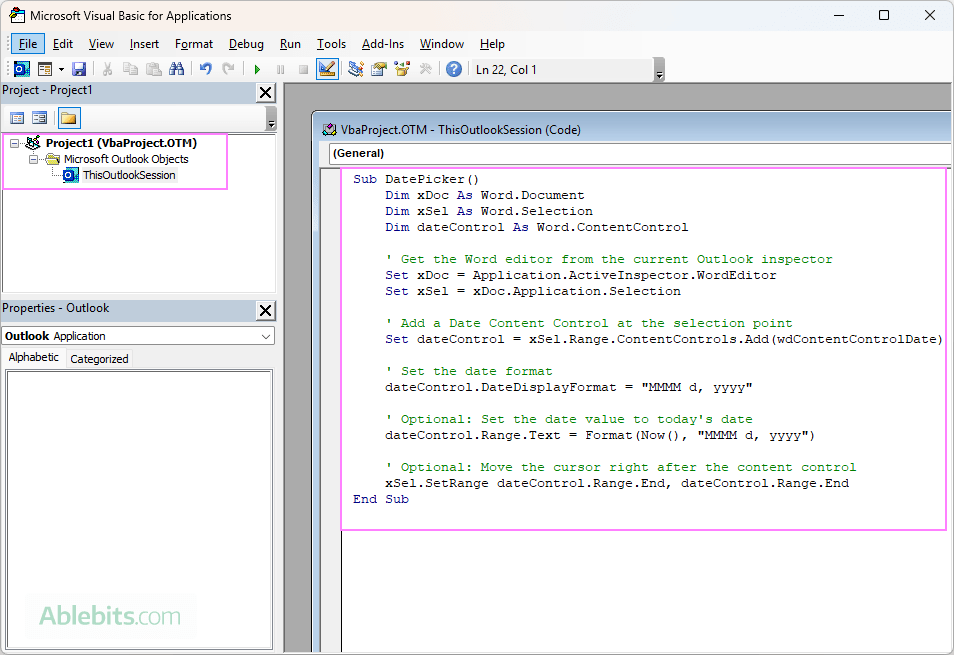
- In the left pane, double-click Project1 > Microsoft Outlook Objects > ThisOutlookSession.
- Copy and paste the VBA code into the ThisOutlookSession code window.
Step 2. Enable Microsoft Word Object Library
To allow the macro to run properly, you need to enable the Word Object Library as a reference.
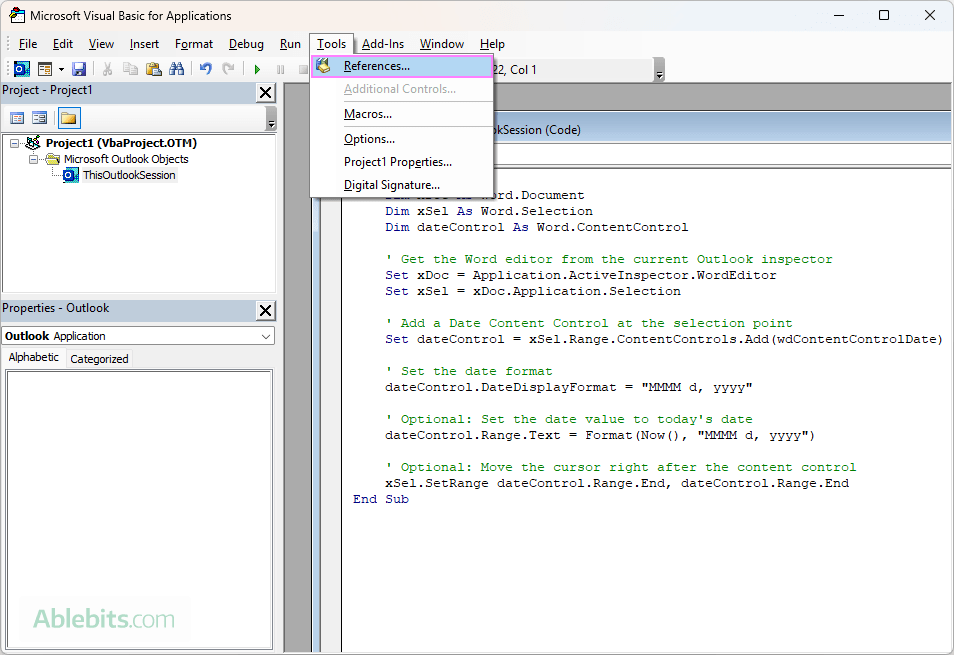
- While still in the VBA editor, go to Tools > References.
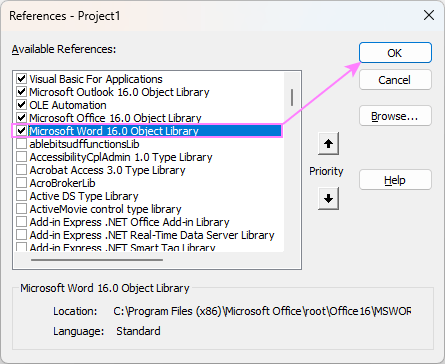
- In the dialog box that appears, check the box for Microsoft Word 16.0 Object Library (or the version that matches your Office install), and click OK.
- Press Ctrl + S to save the changes.
- Press Alt + Q to close the VBA editor.
Note. The Word Object Library version number may vary:
- 16.0 for Microsoft 365, Office 2024, 2021, 2019, or 2016
- 15.0 for Office 2013
- 14.0 for Office 2010
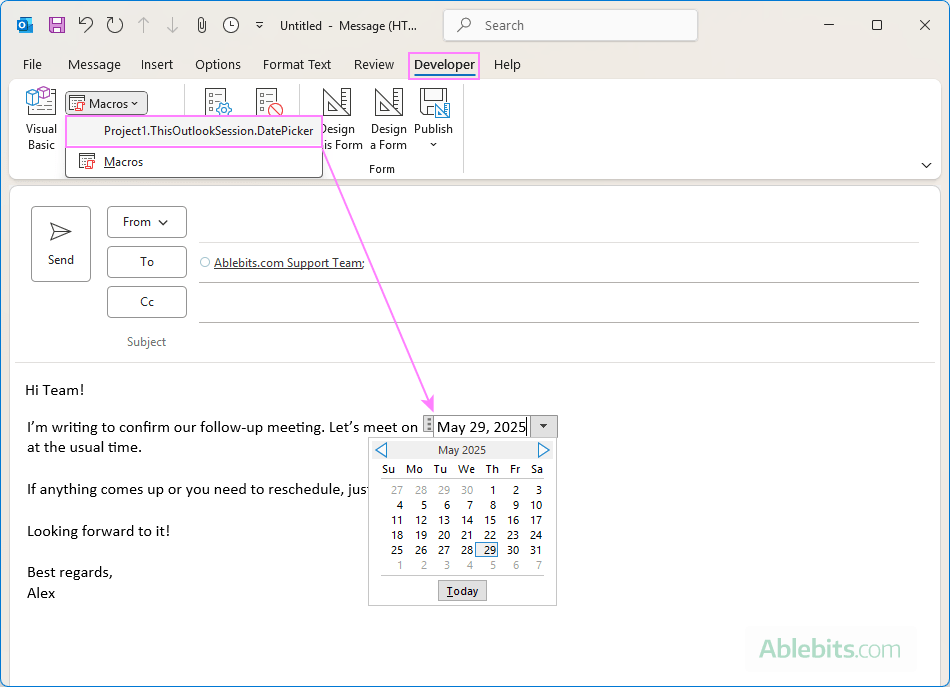
At this point, the macro is already available in Outlook under the Developer tab > Macros. You can test it right away by selecting from the Macros dropdown menu.
To make the macro more comfortable to use while composing emails, you can add it to the ribbon, the Quick Access Toolbar, or both – whichever fits your workflow best.
Step 3. Add Date Picker button to Outlook email ribbon
Adding the Date Picker button to the message ribbon lets you access it with a single click while composing emails. Here's how you can do this:
- Create a new message. Click New Email on the Home tab (or press Ctrl + N) to create a new email. As Outlook has different ribbons for the main window and the message compose window, this step is essential.
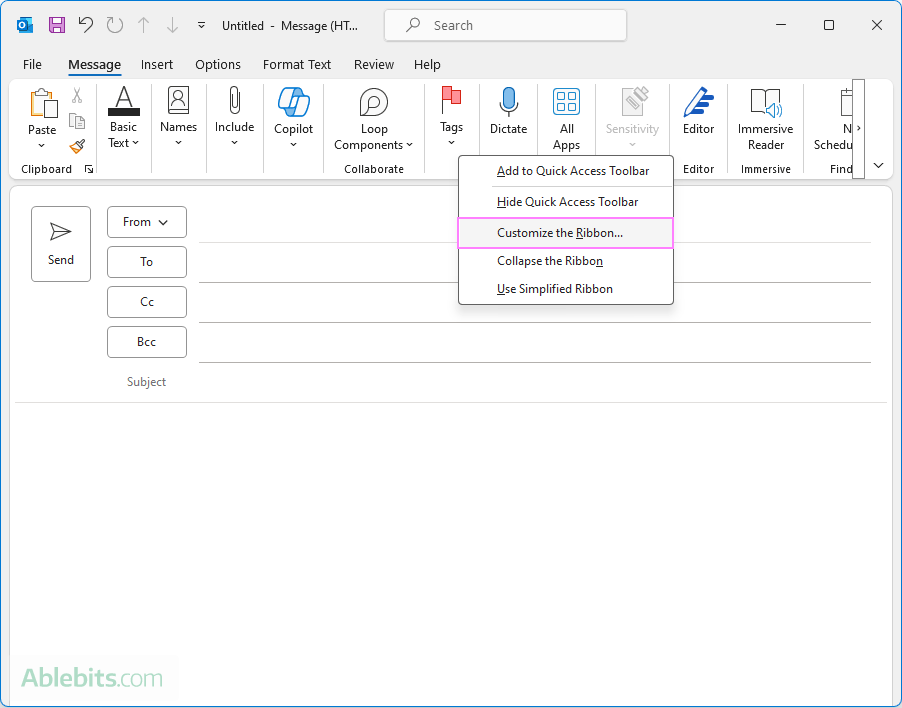
- Open the ribbon customization menu. Right-click anywhere on the ribbon in the message window and choose Customize the Ribbon…
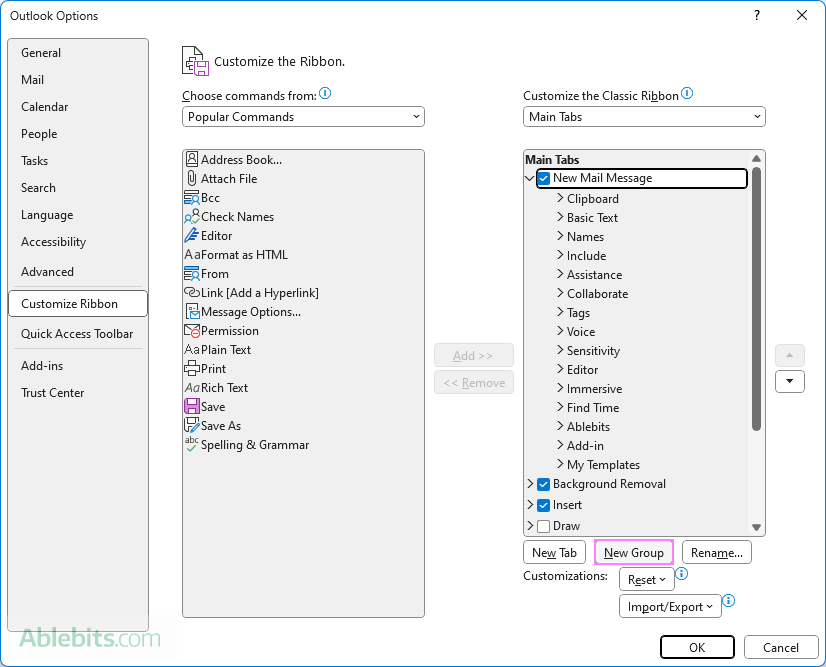
- Add a custom group. Outlook only allows custom commands (including macros) to be added to custom groups, so you'll need to create one if you haven't already. In the right box, select the New Mail Message tab (or another tab like Insert), then click New Group.
If you already have a custom group set up, you can skip this step.
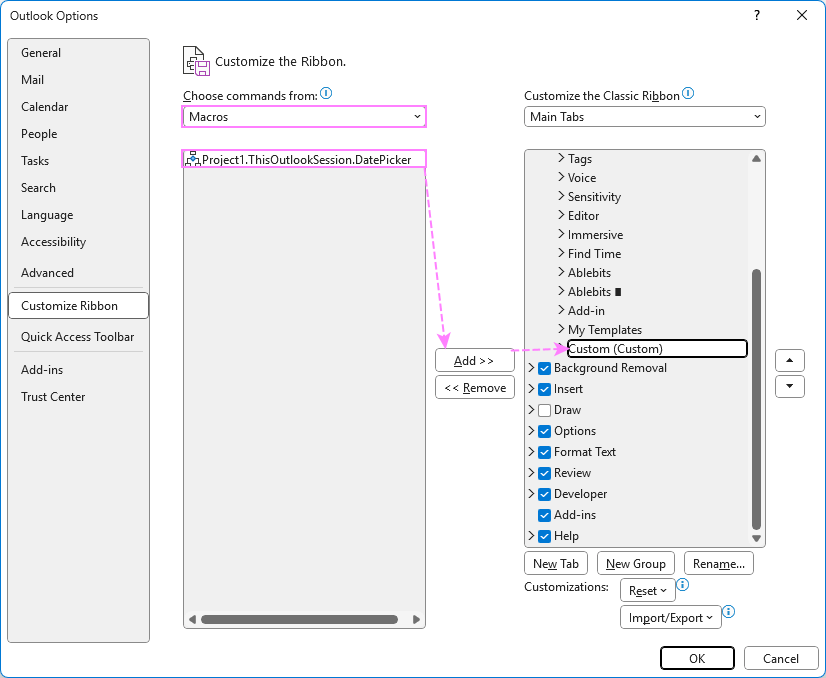
- Add Date Picker button to custom group.
- Under Choose commands from, select Macros.
- Select the macro named Project1.ThisOutlookSession.DatePicker.
- Make sure your custom group is selected on the right.
- Click the Add button.
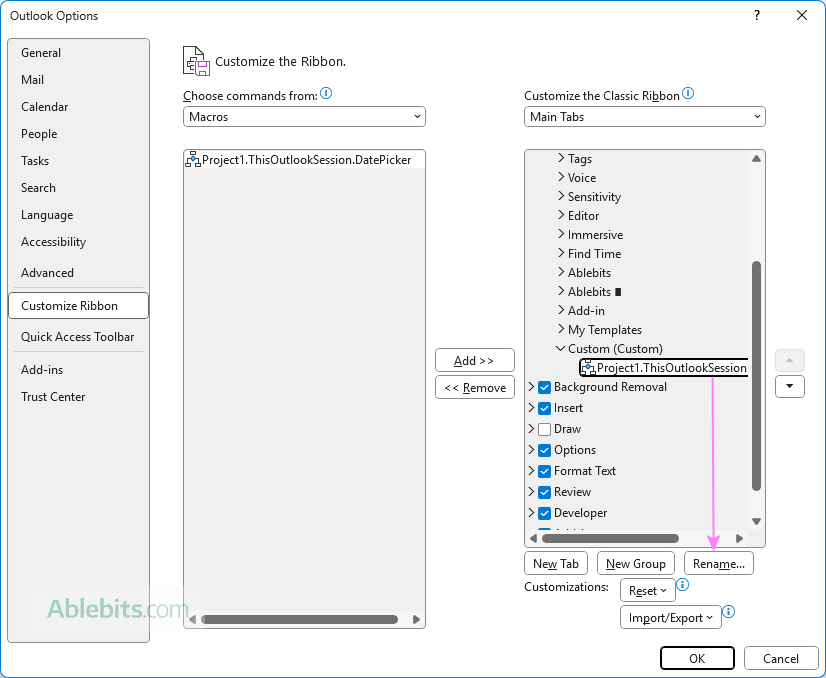
- Rename and assign an icon. With the DatePicker command selected, click Rename.
In the Modify Button dialog, pick an icon and enter a clear user-friendly label such as Insert Date or Date Picker, then click OK.
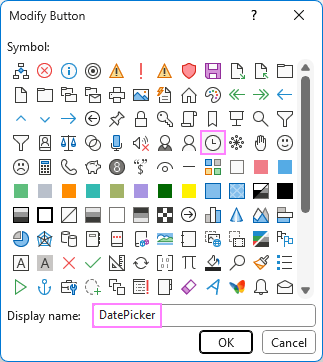
- Save the changes. Click OK to save the changes and close the Outlook Options window.
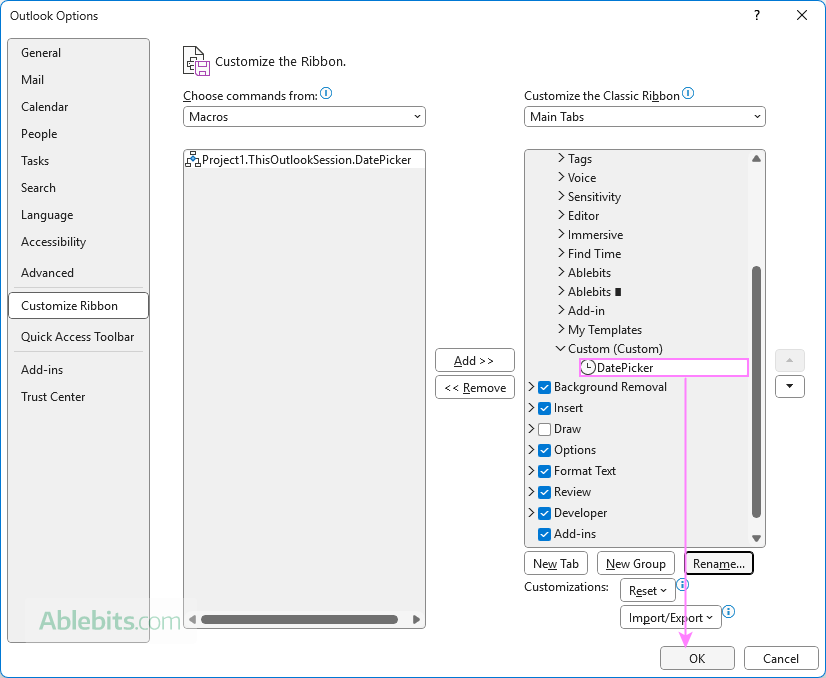
Your Date Picker button will now appear in the ribbon whenever you compose a new email or reply to someone's message.
Step 4. Add DatePicker macro to Outlook Quick Access Toolbar
Another way to run the macro easily while composing an email is adding it to the Outlook Quick Access Toolbar (QAT) in the message window.
- Click New Email to open a new message window. This is necessary because, just like the Outlook ribbon, the QAT differs between the main window and the message window.
- In the message window, click the Customize Quick Access Toolbar button (small arrow in the toolbar), then choose More Commands.
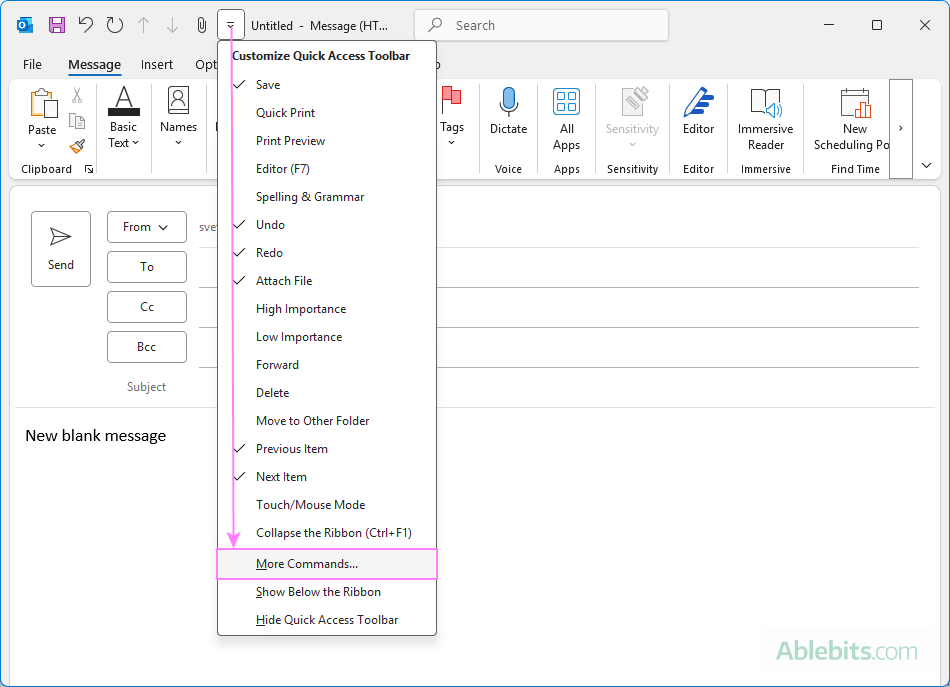
- In the Outlook Options window:
- From the Choose commands from dropdown, select Macros.
- In the left box, select the macro you added.
- Click Add to move it to the right box.
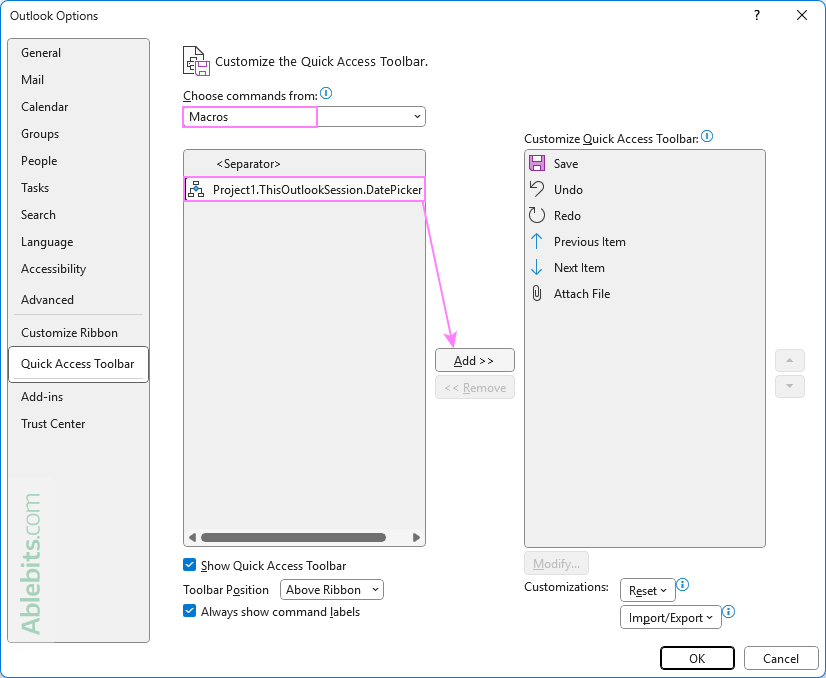
- Customize the button. With the macro selected in the right-hand list, click Modify to choose a custom icon and optionally give it a shorter, more descriptive name. When you're done, click OK to confirm your changes.
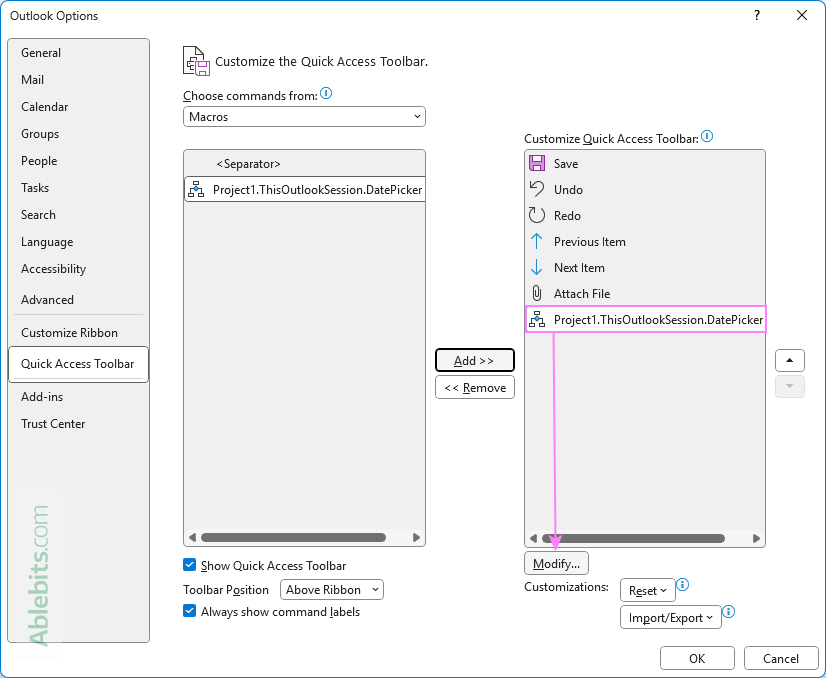
- Back in the Outlook Options window, click OK to save your new QAT button.

Now that the macro is added, you'll see its icon on the Quick Access Toolbar whenever you compose a new message or reply to one.
For more information, see How to customize Outlook Quick Access Toolbar.
VBA code to insert a date picker in Outlook
Here's the code for the macro you can use to insert a date picker (calendar popup) directly into the body of an Outlook email, meeting, or appointment:
How the code works:
- It uses Word's editor (which Outlook relies on) to access the current message body.
- A Date Content Control is inserted at the cursor location.
- The format "MMMM d, yyyy" is set to display dates as May 9, 2025.
- By default, it inserts today's date into the control.
- Finally, the cursor is moved just after the inserted date for convenience.
Customizing the date format:
You can adjust the date format code in this line:
dateControl.DateDisplayFormat = "MMMM d, yyyy"
Here are a few common examples:
| Format code | Displays as |
| d-MMM-yyyy | 9-May-2025 |
| M/d/yyyy | 5/9/2025 |
| MMMM d | May 9 |
| dddd, MMMM d | Friday, May 9 |
Feel free to use any other date format that suits your message style or regional preferences.
Using date picker in Outlook emails
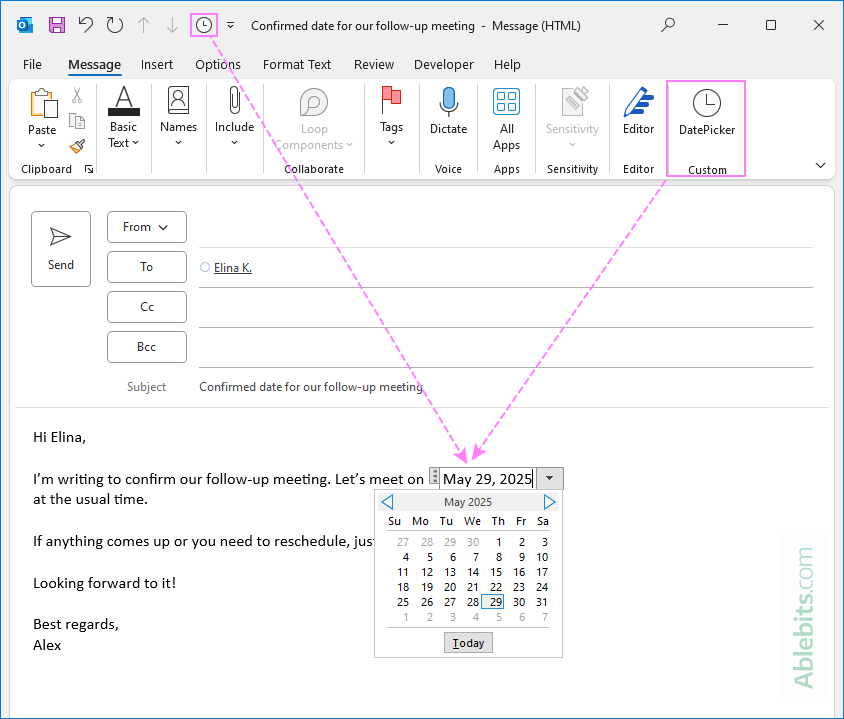
While composing an email, click the date picker icon on the ribbon or Quick Access Toolbar to insert a calendar popup into the message body. Then simply select the date you want to include.
Using date picker in Outlook meetings and appointments
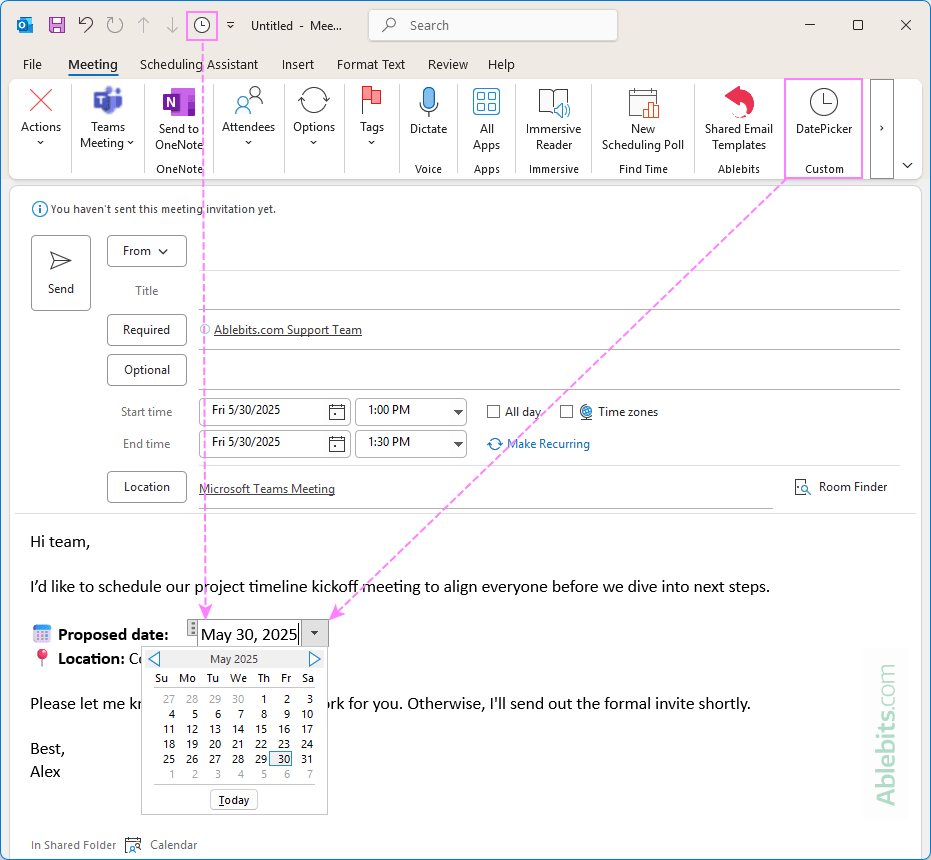
To insert the date picker into the body of Outlook calendar items, you can add its button to the ribbon or QAT of the meeting/appointment window, just as you did for email messages.
Tips:
- Need more than one date? You can insert multiple date pickers into your email or calendar item, just run the macro again wherever you want a new date field.
- To change a selected date, simply click the inserted date field to reopen the popup calendar, then pick a different date.
DatePicker macro not working in Outlook
If the date picker doesn't work after restarting Outlook – nothing happens when you click its button – it's likely that macros have been disabled. You'll need to re-enable them using the steps below:
- Click File > Options.
- In the Outlook Options window, go to Trust Center > Trust Center Settings.
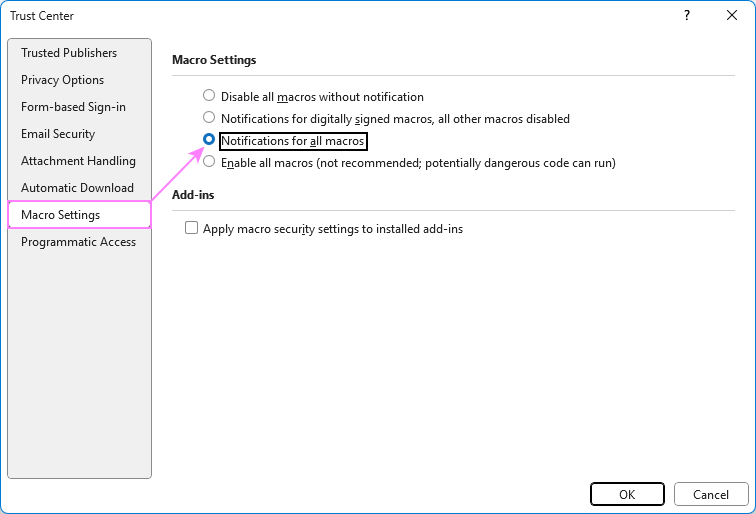
- In the Trust Center dialog, select Macro Settings from the left pane.
- Choose one of these options:
- Notifications for all macros: More secure, but less convenient. Outlook will ask each time you restart whether to enable the macro.
- Enable all macros: More convenient, but less secure. The macro will run automatically, but this option also allows any potentially dangerous code to be executed, so use with caution.
- Click OK in both windows to save your settings.
- Restart Outlook again.
Tip. If you find that macro settings are grayed out or you can't change them, your organization may have restricted macros through administrative policy. In that case, reach out to your IT team to request access.
Add a date picker to shared Outlook email templates
If you regularly send emails that include a variable date, you can save time by creating a reusable Outlook template. With Shared Email Templates, you can easily insert a date picker that prompts you to choose a date each time you use the template in Outlook classic, new and web.
Follow these steps to set it up:
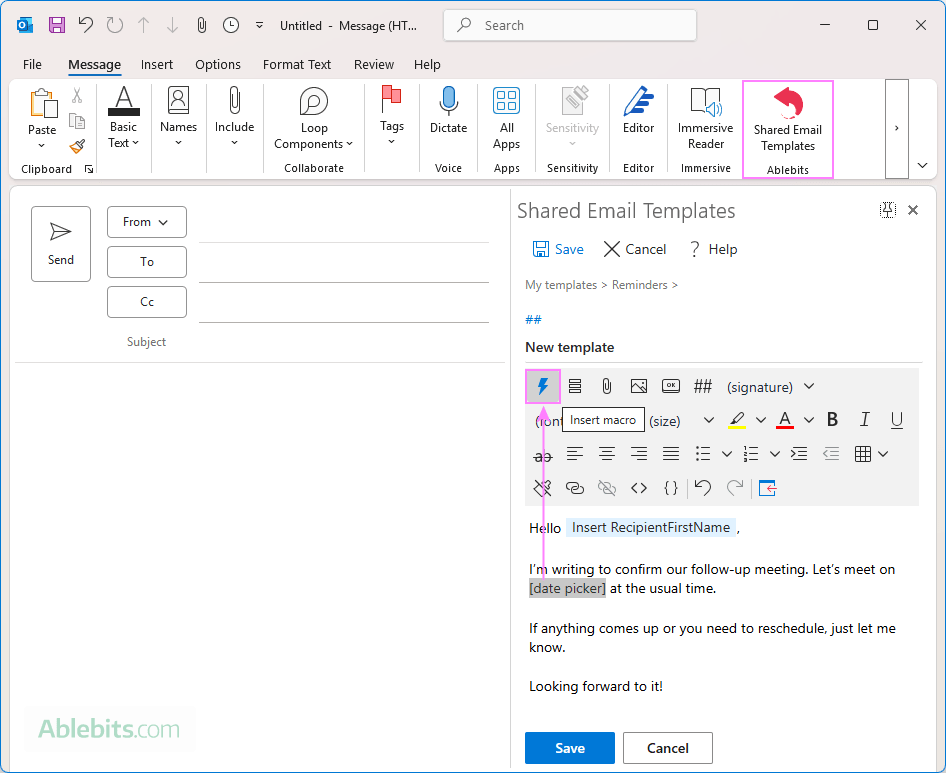
- Choose the date picker location. In the shared email template that you are creating or editing, place the cursor where you want the date to appear, then click the Insert Macro button.
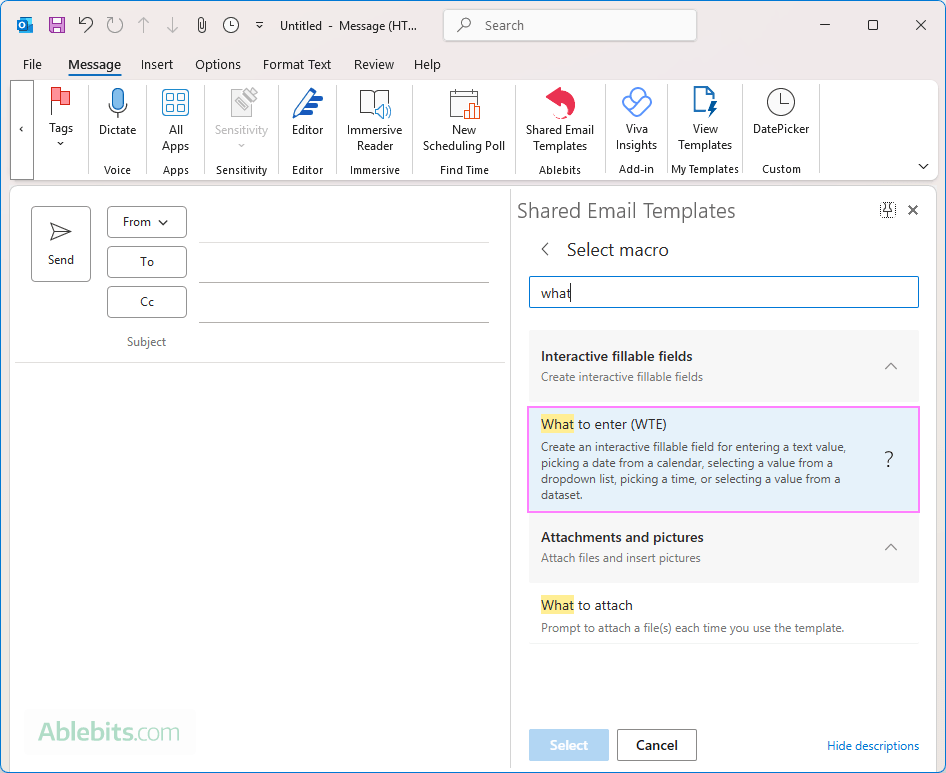
- Select What To Enter macro. In the list of available macros, find What to enter and click on it to insert into your template.
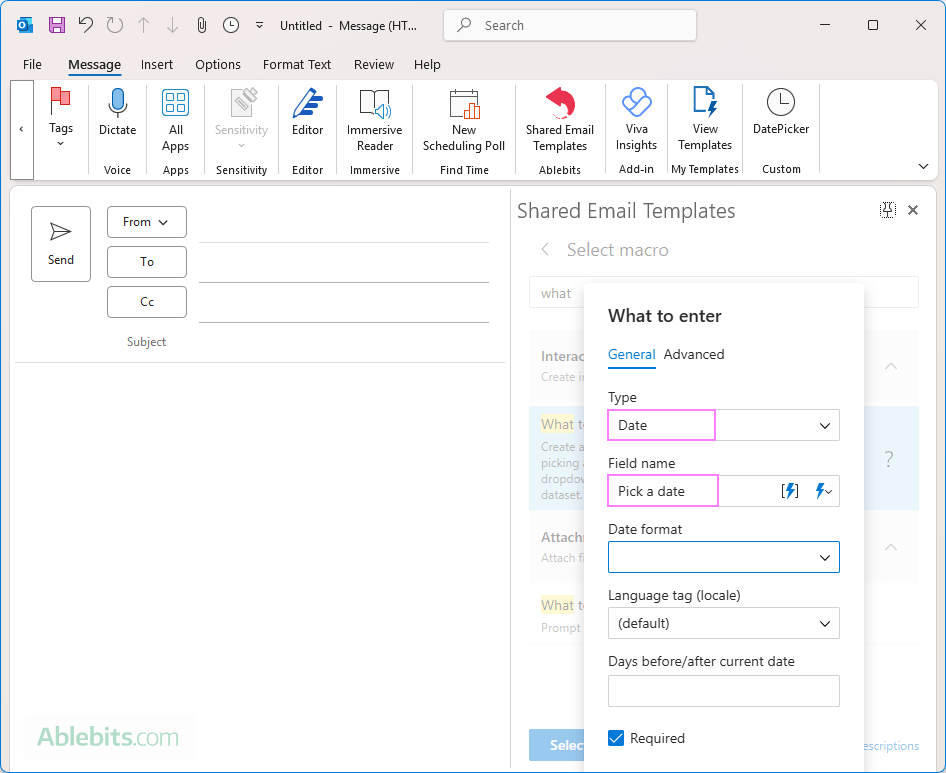
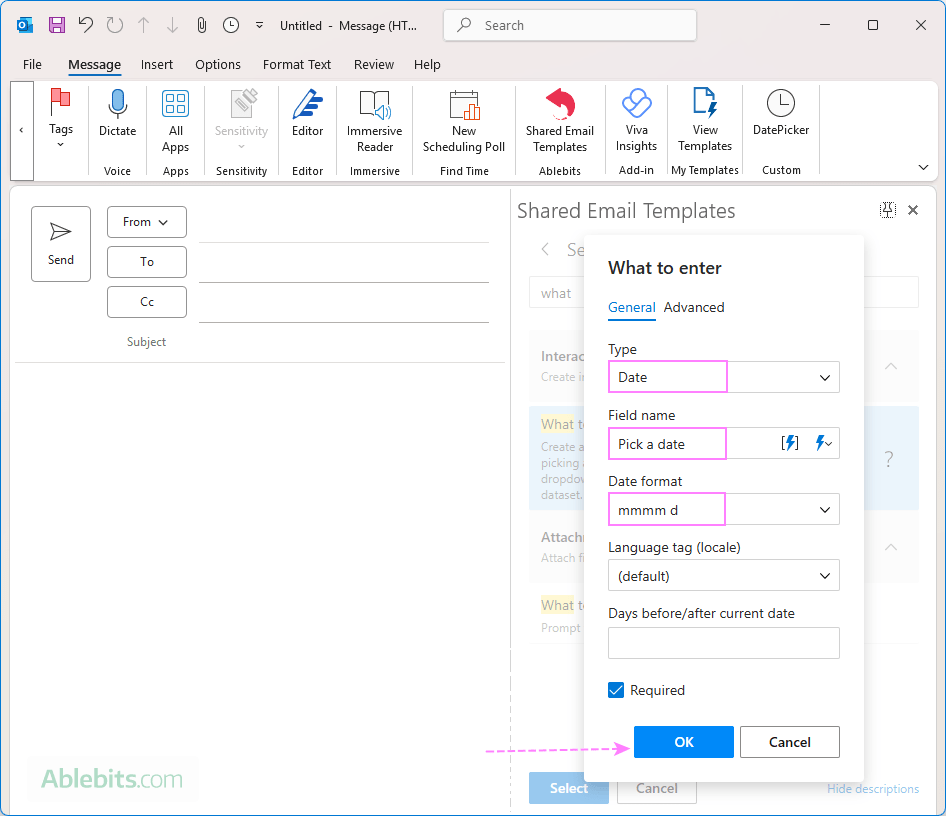
- Add a date picker to the template. In the pop-up window, set the field type to Date, and enter a label, for example, Pick a date. This will appear as the title of the date picker prompt.
- Set the date format. Choose a date format from the list that best suits your needs.
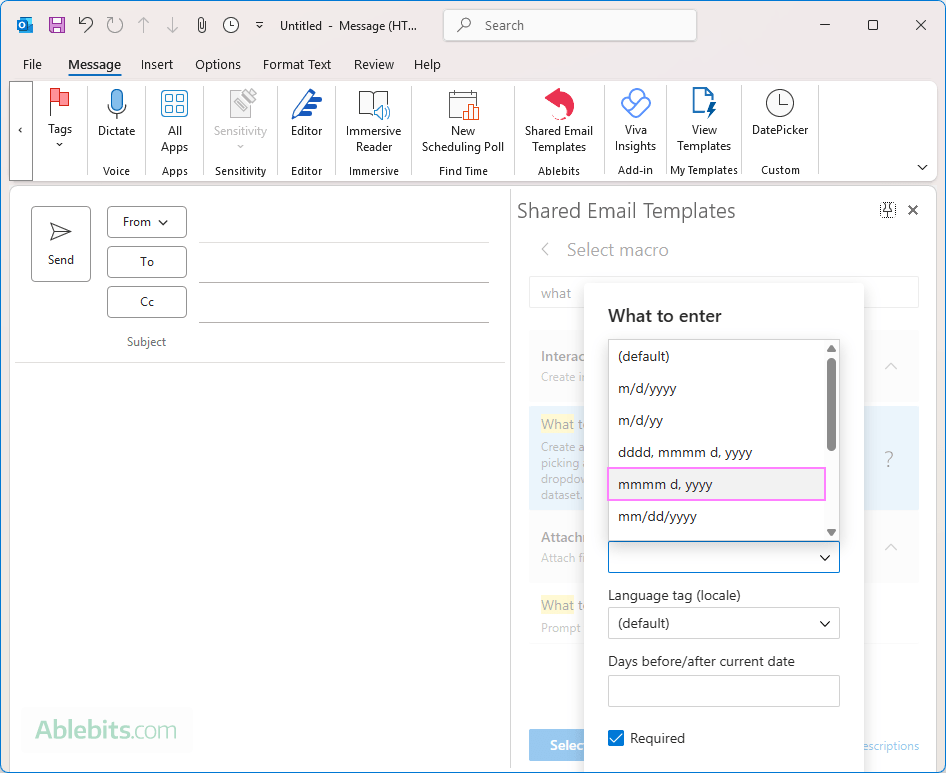
Can't find the exact format? No problem. Choose the closest one and customize it directly in the format field. For instance, you can use the format "mmmm d" to display only the month and day without the year like May 9.
- Finish and save the template. Click OK to insert the configured date picker into your email template. Then, save the template as usual.
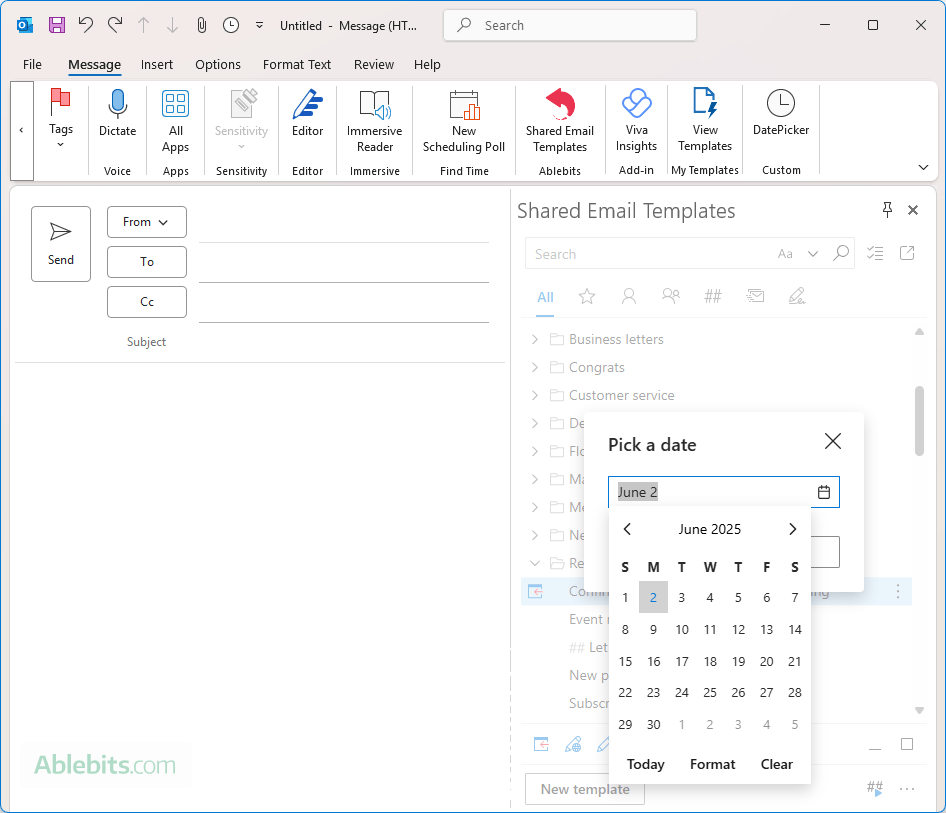
Now, each time you use this template in Outlook, a small calendar will pop up, allowing you to select a date:
The selected date will be inserted into your Outlook message right where you placed the date picker in the template. Want to highlight it? You can open the template's HTML and format the date using bold, italics, or even a specific font color to make it stand out.
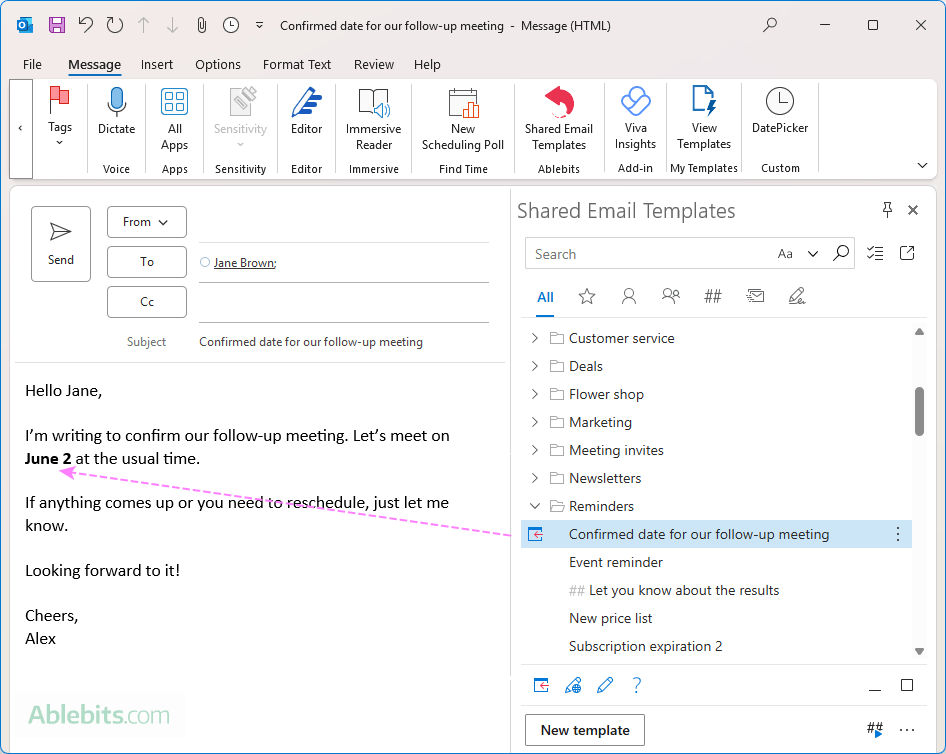
To better understand how it works, take a look for yourself:
Interested in adding popup calendars to your Outlook messages? Download the free version of Shared Email Templates from Microsoft Marketplace.
That's how you can add a fully functional date picker to your Outlook emails, meetings, and templates with a VBA script or the Shared Email Templates add-in. Now, you can choose dates from a pop-up calendar instead of typing them manually, making your messages more accurate and professional.
 by
by