This tutorial will teach you to safely back up Outlook emails, contacts, appointments and tasks automatically or manually in all versions of Outlook 365 – 2010.
If you are using Microsoft Outlook for your email communications, it's needless to say how important it is to safely store, import and export all that data.
Whilst Outlook emails (as well as calendars, contacts, tasks, and notes) are stored within the Outlook Data File, some other important elements such as account settings, signatures, and templates are stored in different places. This means that if you are moving to a new computer, backing up just the .pst file may not be enough for a complete transfer.
In this tutorial, you will find detailed instructions on how to back up Outlook mails and other items and learn which method is best to be used in which scenarios.
Note. This tutorial covers the classic desktop Outlook application, not the new Outlook.
How to backup Outlook emails by exporting
There are different situations when you might want to back up Outlook messages, for example, when you are moving to a new computer or recovering from a system crash. In the latter case, having a healthy backup can significantly alleviate the pain. So, it's a wise strategy to make a full Outlook backup once in a while, especially if you are using email for work.
Microsoft Outlook provides a built-in option to export your data to a new .pst file automatically. Apart from emails, this will also save contacts, calendars, tasks, and notes.
To back up emails in modern versions of Outlook 365 - 2013, perform the following steps.
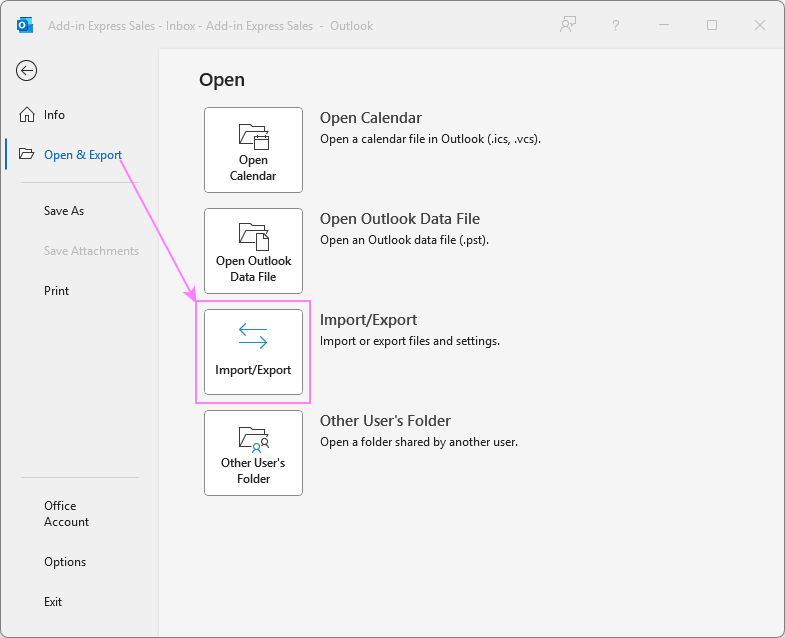
- Open your Outlook and click File > Open & Export > Import/Export.
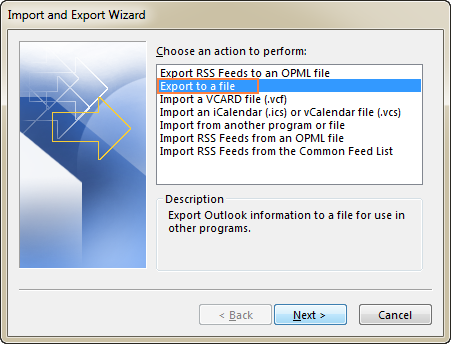
- In the dialog box that opens, select Export to a file and click Next.
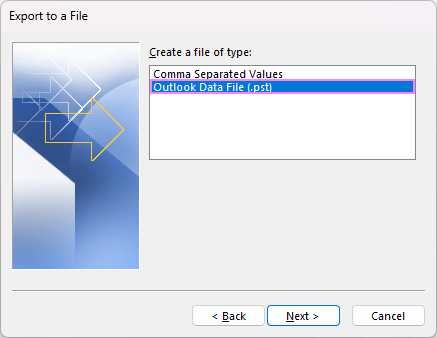
- Select Outlook Data File (.pst) and click Next.
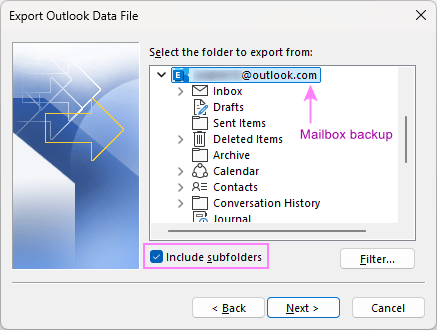
- Specify what you want to export, and then click Next to proceed:
- To back up an entire mailbox, select the top-level folder for the account. Normally, it's either your email address or a custom account name. This will export the contents of all folders, including mail (Inbox, Outbox, Drafts, etc.), contacts, calendar, tasks, notes, and Journal.
- To back up a certain mail folder like Inbox, first expand the corresponding mailbox, and then select the folder you want to export.
- Make sure the Include subfolders checkbox is selected if you wish to back up all subfolders within the selected account or folder.
- Choose where to save the backup.
- By default, the wizard will suggest saving a copy to the below location. If you have no objections, simply click Finish.
C:\Users\<UserName>\Documents\Outlook Files
- To save your backup to another place, click the Browse button and select the desired location.
- Additionally, choose how to handle duplicate items. The default Replace duplicates with items exported works fine in most cases.
- Click Finish to complete the process
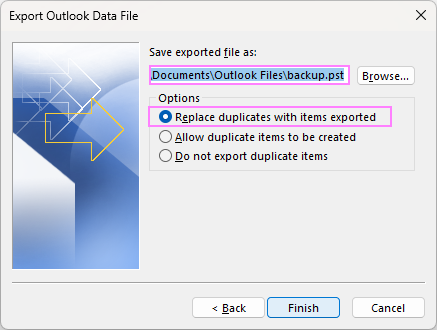
Note. If you've exported your Outlook data before, the previous file name will appear in the box. To prevent overwriting the earlier backup, type a different file name before clicking Finish.
- By default, the wizard will suggest saving a copy to the below location. If you have no objections, simply click Finish.
- Set a password (optional). If you are creating a new .pst file, Outlook will suggest protecting it with password, which does make sense if your Outlook items contain sensitive information, and you want to ensure that no one but you can access them. In this case, enter and confirm a password, and then click OK. If you don't want to password protect the backup, leave both fields empty, and click OK.
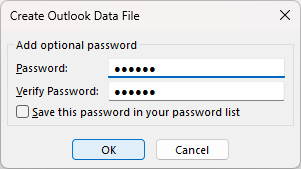
- When exporting to an existing .pst file that is password protected, type the password that you previously used.
- When exporting to an existing non-protected .pst file, Outlook will begin the export process immediately without showing the password dialog box.
You are all set! Just keep in mind that exporting a big data file file may take a while, and the progress bar will stay on the screen until the export is completed. So, please be patient :)
Note. It's not possible to export multiple folders at a time, so if you want to back up a few different folders, you will have to repeat the process for each one individually.
Email backup in older Outlook versions
Earlier versions of Outlook also have an inbuild export feature, which can be accessed from here:
- In Outlook 2010, go to the File tab, and click Options > Advanced > Export.
- In Outlook 2007, click the File menu, and then click Import and Export…
Now that your Outlook emails and other data are exported to a separate .pst file, you can move or copy the file in a safe location.
Error: The file name is not valid
If Outlook refuses to export your emails, saying that "the file name is not valid", it's usually due to the following issues:
- Invalid characters in the file name. Remove any special characters from the file name, so it only contains letters and numbers.
- File path is too long. The path to your backup file, including the file name, exceeds 219 characters. Try saving to another folder or give a shorter name to the file.
- Destination folder doesn't exist. When you are saving to the default location (Documents/Outlook Files), but that folder is moved or deleted, the same error occurs. Simply, re-create an empty folder named Outlook Files inside your Documents folder.
Advantages:
- Exporting a .pst file is an intuitive and safe way to backup Outlook emails that can be easily accomplished even by unexperienced users.
- It lets you make a selective backup, i.e. export only relevant data leaving out unimportant folders like Junk or Deleted items.
- It lets you start fresh, without carrying over any metadata or custom settings from your previous .pst file (useful if you've been experiencing issues with broken rules, etc.).
Drawbacks:
- Exporting a .pst file is not a complete backup. This method copies the most essential items such as messages, contacts, appointments, tasks, and notes. Some Outlook meta data is lost during export. Among others, exporting does not save Quick Steps, message rules, signatures, custom forms, custom views, and folder properties. See What Outlook data is exported and what is not?
- If you aim to backup Outlook data to the maximum extent possible, consider using one of the third-party backup tools, or make a copy of the .pst file manually.
Tips:
- To back up only the messages that matter to you, rather than your entire mailbox, you can export specific emails by criteria.
- It may be a good idea to clean your mailbox first to get rid of old items you no longer need.
Backup all emails in Outlook by copying .pst file
For experienced users, manually copying the .pst file is the fastest way to back up Outlook emails. You can restore it just as easily by pasting it back. The main challenge is that different Outlook versions store .pst files in different locations.
Step 1. Find .pst file on your computer.
Start by checking the default PST file location. In modern versions of Outlook 365 – 2013, it's either:
C:\Users\<username>\AppData\Local\Microsoft\Outlook
or
C:\Users\<username>\Roaming\Local\Microsoft\Outlook
If the file isn't there, there is a quick way to determine the PST file location on your computer.
Step 2. Copy the PST file.
Before copying, close Outlook as an open app won't let you copy the .pst file. And then:
- Right-click the PST file and select Copy, or
- Press Ctrl + C to copy it.
That's it! You now have a full backup of your Outlook data.
Advantages:
- Making a direct copy of the .pst file rather than using the export feature allows you to save more data. After a proper restore, your Outlook rules as well as some other customizations will be still there.
Drawbacks:
- You need to know where the Outlook Data File is stored or be able to locate it accurately on your computer.
- If you have several Outlook accounts, each linked to a different .pst file, you should be 100% confident that you backed up the correct file.
How to backup Outlook 365 emails
Normally, you don't need to back up Microsoft 365 mailbox (outlook.office.com) because it is stored in the cloud and you can access your messages from any place in the world. In some cases, for example when changing jobs and moving to another Office 365 work account, you may want to have a local copy of your emails. Here's how to do it:
- Add your Microsoft 365 account to classic desktop Outlook (the instructions are here).
- Export all or selected folders to a .pst file, see the guidelines for Outlook 365 - 2013.
- Import the backup to your new Outlook account.
Note. When exporting an Exchange-based account (including Microsoft 365) with Cached Exchange Mode enabled, only the items currently stored in your cache are exported. By default, the cache period is set to 12 months. To back up earlier mails as well, adjust this setting as explained in How to export all emails from Outlook.
How to backup Outlook Exchange mailbox
Exchange accounts keep all data on the server, and your computer stores the Offline Outlook Data File (.ost), which is a synchronized copy of your Exchange account. As a rule, Exchange accounts archive data automatically, and backing up emails is your administrator's job.
If you want to local backup as well, the AutoArchive feature can automate the process. Alternatively, you can export your emails to a .pst file as described earlier in this article.
Also, you can copy an OST file manually, the same way as PST. In Outlook 365 – 2013, OST files are stored in one of the following locations:
- C:\Users\<username>\AppData\Local\Microsoft\Outlook
- C:\Users\<username>\Roaming\Local\Microsoft\Outlook
For older versions, see Where Outlook OST file is stored.
How to restore Outlook backup by importing
The most reliable and safe way to restore Outlook backup is to let the built-in Import and Export wizard walk you through the process.
To import the backup in Outlook 365 - 2013, the steps are:
- Start the import wizard by clicking File > Open & Export > Import/Export.
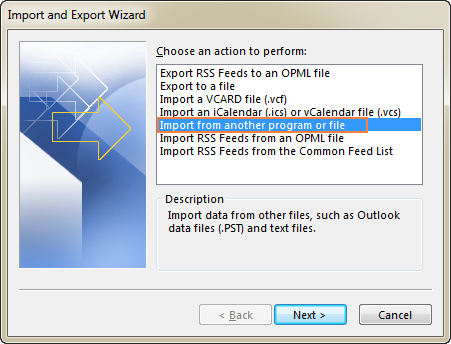
- Select Import from another program or file and click Next.
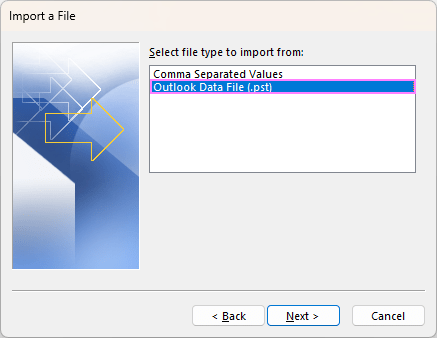
- Select Outlook Data File (.pst) and click Next.
- Browse for your backup.pst file that you saved earlier and decide how to handle duplicates. In most cases, it makes sense to go with the default Replace duplicates with imported items option.

- If your Outlook backup is password protected, enter the password, and click OK.
- In case you have multiple accounts in Outlook, select the Import items into the same folder in option and pick the account from the dropdown list. If you have just one account, you can leave the default selection, whichever it is. When done, click Finish.
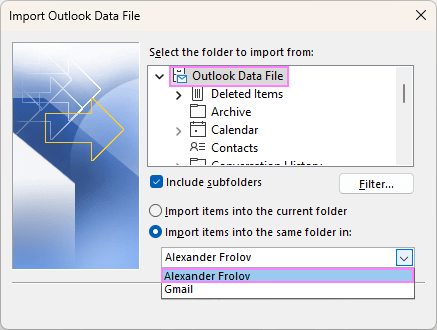
Tip. If you want to restore the contents of one specific folder, say Inbox, expand the folder tree under Select the folder to import from, and choose the desired folder.
Outlook will start importing the contents of your .pst file, and the progress box will stay on the screen until it's finished.
Restore email backup in older Outlook versions
If someone still uses an Outlook version older than 2013, you can restore your emails from backup in this way:
- In Outlook 2010, click File > Open > Import.
- In Outlook 2007, click File > Import and Export.
When the wizard starts, follow the steps described above to import your backup.
Restore Outlook emails from backup by copy-pasting PST file
As you have just seen, importing a .pst file in Outlook is quick and straightforward. But direct copying/pasting is even faster. Just be careful: this method replaces your current Outlook data entirely.
Note. Copying / pasting a backup.pst file will delete all current data in your account. If you want to keep both your existing and backup emails, then import the .pst file rather than paste it. Importing will merge all data into a single .pst file.
Fast method: Replace the PST file right away
If you've have just set up a new Outlook account (which automatically creates a new empty .pst file) and you are absolutely confident that your backup is complete and uncorrupted, you can simply copy/paste the backup into the location of the current .pst file, and save it there under the same name, overwriting the current file. Otherwise, it might be reasonable to test the backup first as described below. Knowing you can always go back to your current data file will definitely make the process less stressful :)
Safe method: First test, then replace
Here is a reliable and safe way to transfer the backup.pst file to an existing Outlook account:
- Open your Outlook, and check the exact name and location of your current .pst file.
- Close Outlook.
- In File Explorer, go to the folder with your current .pst file and rename it by adding the "old" postfix, e.g. Outlook-old.pst.
- Paste the backup .pst file into the same folder and save it under the original / default .pst file name. So, at this point you have two files:
- Outlook-old.pst – your current Outlook Data File that you want to replace with the backup.
- Outlook.pst – the backup file.
- Start Outlook and test the restored backup.
- If everything goes well, you can delete the Outlook-old.pst file to free up space on your hard drive.
This method lets you make sure that your backup is working properly before permanently removing your current Outlook data.
Tips and notes:
- Instead of saving the .pst file to the default location, you can store it on another drive, so in the worst case of C:\ reformatting, you won't lose your Outlook data. In this case, on Outlook start (step 5 above), you will get a warning message prompting you to locate the .pst file. You click the Browse button, go to where you saved the .pst file, and select it.
- If you are restoring Outlook after a crash, the original pst file might be missing or beyond repair. In this case, Outlook will also display a warning prompting you to specify the pst file location. You close Outlook and follow the above steps to replace the damaged .pst file with the backup.
- When restoring a pst file for an account configured to leave a copy of messages on the server, emails for the specified period will be re-downloaded.
Back up Outlook contacts
Backing up Outlook contacts is similar to emails – just run Outlook's Import / Export wizard and follow the guidance.
When it comes to selecting the folder to export, highlight the Contacts folder under an appropriate email account:
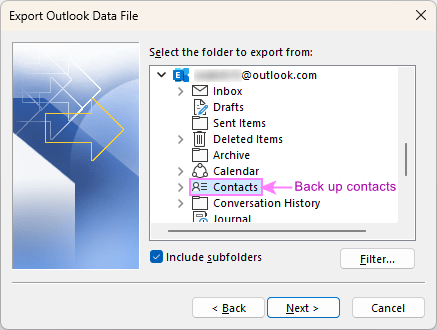
For step-by-step instructions, check out this tutorial: How to export contacts from Outlook.
Back up Outlook rules
In Outlook 365 - 2003, email rules are stored in a .pst file. However, the built-in Outlook Export wizard does not include them in a backup. To save the rules, copy the .pst file and then paste it into the appropriate location on your new computer.
Alternatively, you can export your Outlook rules to a separate .rwz file.
Other Outlook backups
Apart from emails, you may also want to back up other items and settings. Below is a list of where Outlook stores them. To make a backup copy, just use a good old copy-paste technique.
Note. Be sure to close your Outlook before copying any of the below files.
Back up Outlook signatures
For each signature, Outlook stores 3 files (.rtf, .txt, .htm) and a subfolder with images and other assets. The most reliable backup method is to copy the entire Signatures folder:
- C:\Users\<username>\AppData\Roaming\Microsoft\Signatures
- C:\Documents and Settings\<username>\Application Data\Microsoft\Signatures
For more information, see How to backup Outlook signatures.
Back up Outlook templates
In classic Outlook, OFT email templates are stored here:
- C:\Users\<username>\AppData\Roaming\Microsoft\Templates
- C:\Documents and Settings\<username>\Application Data\Microsoft\Templates
Back up Outlook stationery (theme)
To keep your Outlook stationaries (pre-designed templates containing background images, patterns, styles, and other elements), copy the Stationery folder or any specific .html files in it:
- C:\Users\<username>\AppData\Roaming\Microsoft\Stationery
Back up custom forms
If you've created some custom forms in Outlook, it may be a good idea to save a backup in a reliable location, so you won't have to recreate them from scratch on your new PC.
- C:\Users\<username>\AppData\Local\Microsoft\Forms
That's how to backup emails, contacts, appointments, tasks and other items in Outlook. With the steps you've learned in this tutorial, you can save your important Outlook data, restore it when needed, and avoid those stressful "I wish I had a backup" moments 😊
 by
by
2 comments
How do i just backup a particular folder in the mailbox , i have tried it severally and it seem its not working because there is no feedback after clicking on the finish button and also the backup file size is very small compared to wat was expected , its like empty folders where backed up without the mail contents
Hello Ayo,
We have just tested exporting a selected folder in Outlook 365 (classic application) and it worked just fine. Did you use the built-in Import/Export wizard? To check if all mail contents was exported, you can try importing that folder back to Outlook using the same wizard.