The tutorial explains different ways to convert .xls to .jpg including built-in tools that allow saving an Excel worksheet as an image file as well as free Excel to JPG converters online.
Converting an Excel sheet to an image sounds like something that can be useful in many situations such as designing a whitepaper or tutorial, creating a presentation, or safely sending your spreadsheet data via email.
Whilst you can easily save an Excel file to several formats including PDF by using the standard "Save As" dialog, surprisingly, .jpg is not in the list. Luckily, there exist a handful of different ways to convert Excel to JPEG, both desktop and online, and in a moment you will learn the most useful ones.
Convert Excel to JPG by using Print Screen feature
It is the most popular technique to convert the currently visible on-screen part of your Excel sheet to JPG or any other image format. Here's how:
- Zoom in or out the worksheet so that all data of interest is visible on the screen.
- Press the PrtSc key on your keyboard while holding the Alt key.
- Open a graphics editor of your choosing, Microsoft Paint works just fine for this purpose.
- Paste the copied screen by clicking the Paste button or pressing the Ctrl + V shortcut.
- Click the blue drop down arrow in the upper left corner of the Paint window, and then click Save As to save the pasted image. Or, simply press Ctrl + S (a shortcut to save a file that works in most programs).
- In the Save as window, type the desired file name, and choose one of the following image formats:
- JPEG (.jpg) - right choice for complex pictures and photos.
- GIF - great for creating low-resolution images, which is best suited for simple drawings.
- PNG - allows creating low-resolution files that load quickly but look crisp and beautiful, it's suitable for almost anything.
- Click Save and you are done!
Here's what my sample Excel table exported to Paint looks like:
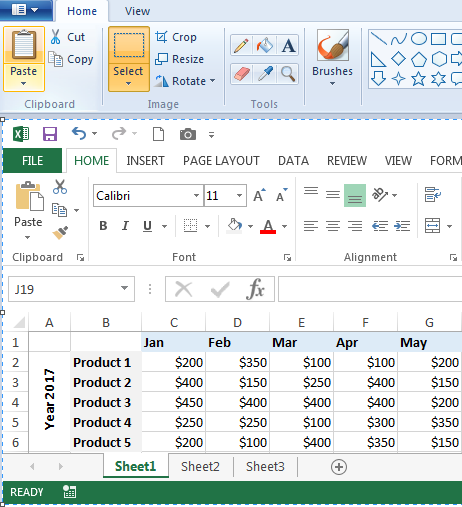
Tip. The Print Screen feature captures everything on the screen, including the ribbon, top menu, scrollbar and sheet tabs. If you want to export only the data, use the Crop function to cut off extra parts before saving an image.
Convert .xls to .jpg (.xlsx to .jpg) with Snipping Tool
It is another amazingly simple way to get an image of your Excel sheet that very few people know about. Snipping Tool is specially designed to take a snapshot of the screen and is included with all modern versions of Windows, from Windows 7 to Windows 10.
Unlike the Print Screen feature, Snipping Tool gives you the following choices as to what to capture:
- Free-form snip - you can draw any shape on the screen and only that part of your Excel sheet will be included in an image.
- Rectangular snip - the default option that captures rectangular snips.
- Window snip - allows capturing a dialog box or a resized Excel window.
- Full-screen snip - captures the entire screen, the same as Print Screen.
To locate Snipping Tool on your computer, click the Start button, type "snipping tool" in the search box, and then click on Snipping Tool in the list of results. If you don't want to capture a snip immediately, click the Minimize button to send it to the task bar, switch to Excel and open the spreadsheet of interest.
To convert an Excel sheet to JPG (or another image format), perform the 3 quick steps outlined below:
- Choose what kind of snip you want to capture. For this, click the little arrow next to the Mode button (in older versions, click the arrow next to New), and select one of the options described above.

- Select the area of your sheet that you want to capture. This will immediately copy the selected area to the Snipping Tool window.
- Click the Save button, type the file name, choose your preferred image format (.jpg, .png and .gif are supported) and click OK. That's all there is to it!
Tip. To make some edits to the captured image, use the Pen, Highlighter and Eraser tools shown in the screenshot below.
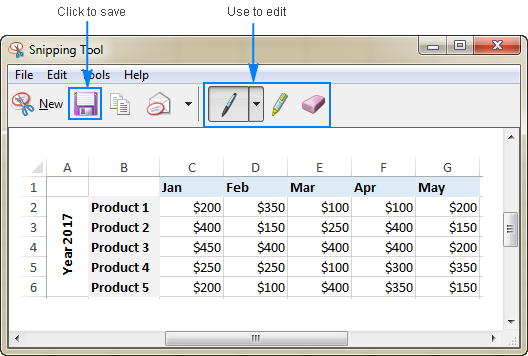
Save Excel data as image (.jpg, .png or .gif)
Whatever simple and straightforward the previous methods are, they have one significant limitation - they can only capture the part of a worksheet that is visible on the screen. In some situations, zooming out might help, but not when it comes to capturing a really big table that contains tens or thousands of rows. To get around this limitation, use the good old copy/paste technique, which allows copying any part of an Excel sheet including beyond the scroll areas, and then pasting the copied contents to wherever you want.
To save your Excel worksheet as a .jpg image, perform the following steps:
- Select a table, chart, shape or any other Excel data that you want to save as an image.
Tip. To select a big table, select the first cell and press Ctrl + Shift + Enter to extend the selection of the last used cell.
- Press Ctrl + C to copy the selection to the clipboard.
Alternatively, on the Home tab, in the Clipboard group, click the little arrow next to Copy, and then click Copy as Picture…

This will give you the choice of whether to save the copied data As shown on screen or As shown when printed:

- Open Microsoft Paint or any other graphics editor.
- Press Ctrl + V to paste the copied data.
- Save the newly created file as GPEG, GIF or PNG image. Done!
Visually, an Excel table saved as an image is indistinguishable from the original one. If you copy the image back to Excel, it's almost impossible to spot the difference unless you try selecting the data :)
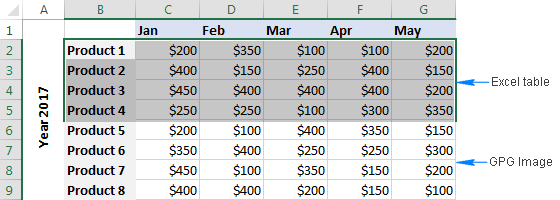
Tip. If you'd rather not have gridlines in the image, switch to the View tab and clear the Show gridlines check box before copying the data.
Export Excel to JPG with Camera tool
One more way to quickly take a snapshot of your Excel data is using the Camera tool. A really cool feature of Excel Camera is that it creates a dynamic image that syncs with the original dataset and gets updated whenever the original data changes.
In order to use the Camera tool, you must add it to the ribbon or Quick Access Toolbar manually because it does not show up by default. To have it done, perform these steps:
- Click the small drop-down button in the upper-left corner of your Excel and select More Commands…. This will open the Options dialog box.
- On the right pane, under Choose commands from, select Commands Not in the Ribbon.
- Scroll down the list until you find the Camera command, select it and click the Add button to move it to the right-hand section.
- Click OK.
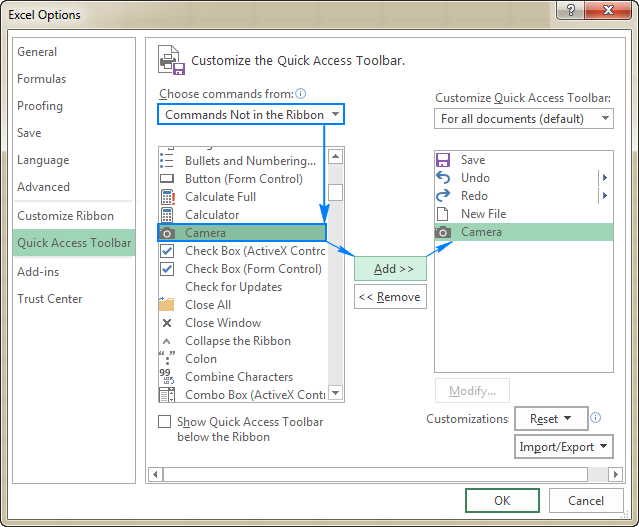
Now, you have the Camera button on the Quick Access Toolbar:

To save an Excel table as image using Camera, just do the following:
- Select a range of cells you want to capture. To make a photo of a chart, select the cells surrounding it.
- Click on the Camera
- Click anywhere in the worksheet where you want to place a snapshot. Bingo!
Now, you can make the image bigger or smaller by dragging the sizing handles. Or, you can apply different Picture Styles by using the Picture Tools tab that appears as soon as you select the image. For example:
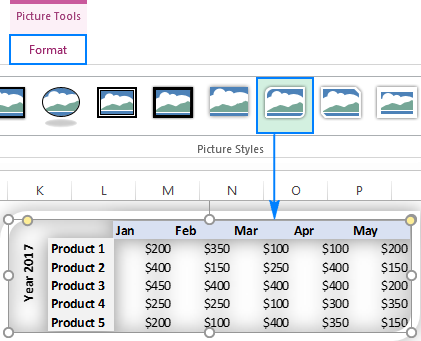
Tip. By default, Microsoft Excel adds a border to the image, if you don't want it, click Picture border > No outline on the Format tab, in the Picture styles group.
When you are happy with the image design, you can export the Excel camera output to anywhere. For this, simply select the picture and press Ctrl + C to copy it (or right-click and then click Copy). After that, open another application, say Paint, Word or PowerPoint, and press Ctrl + V to paste the copied image. Or, you can assemble bits from several worksheets onto one page, and then save it as image by using any of the methods described above. Just remember that only a linked picture on the sheet is "live". When copied outside of Excel, it becomes a regular image and it won't update when the original data in the worksheet changes.
Excel to JPG converters online
If you have a lot of Excel files to be exported to images, you can save time by committing the job to some online Excel to jpg converter. Below you will find just a couple of many free converters available on the web.
Convertio - Convert XLS to JPG online & free
It is my favorite online converter that supports a great variety of document and image formats including Excel to JPEG conversion.
Here's how you can convert Excel to JPG online:
- Select the source .xls or .xlsx file from your computer, Google Drive, Dropbox or drag it on the page using the mouse.
- Choose "to JPG" or select another image format (over 20 different formats are supported such as JPEG, PNG, TIFF, BMP, GIF, etc.)
- Download the converted JPG file or save it directly to your Dropbox or Google Drive (the best bit is that they do not ask for an email address to send the output to).

Note. When using a free version of Convertio, the maximum file size is 100 MB.
To give it a try, please follow this link: Convertio Excel to JPG.
Zamzar - free online Excel to JPG conversions
It's another popular online service that can convert your Excel files to JPG as well as to many other formats. With Zamzar, it's not possible to download the converted files directly from the web-site, they send the output by email, which is not my personal preference. Apart from that, it's a nice free XLS to JPG converter with an intuitive user interface:
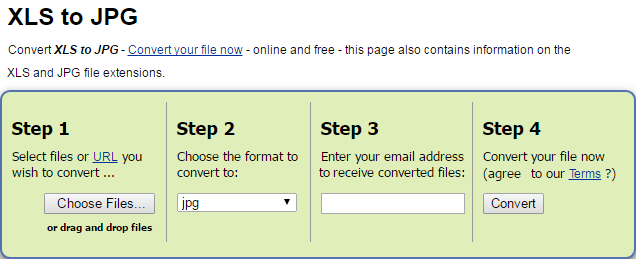
To see it in action, please follow this link: Zamar XLS to JPG.
If for some reason neither of the above tools suits you, you can find plenty more similar services by typing something like "convert xls to jpg online" or "xlsx to jpg online" in your preferred search engine.
This is how you can convert Excel to JPG online and desktop. I thank you for reading and hope to see you on our blog next week!
 by
by
4 comments
i think that you mean is Convertio not Convertino
You are right, it's Convertio. Fixed, thank you!
Hi, no need for a response, just wanted to add to your list the "send to one note tool".
The shortcut: windows logo + s
this will freeze the screen and give you a cursor to select the area you want to clip.
Then it will be pasted in One Note as an image that you can, then, export or save, but only as a .png. Of course you can always paste it on word and change the format there.
Thank you for your list.
Hi Alex,
Thank you for this useful information. It has never occurred to me to use OneNote to make an image of Excel, but it works beautifully!
BTW, on Windows 10, the OneNote screen clipping shortcut is Windows + Shift + S.