Transferring Outlook emails to Gmail doesn't have to be tricky. This guide shows you how to do it step-by-step, whether you want to import everything or just a few folders.
Moving your emails from Microsoft Outlook to Google Gmail can be helpful if you're switching accounts, consolidating messages, or just want access to everything in one place. While the process might seem technical at first glance, it's actually easy manageable with the right steps.
Things to know before you start
There are a few different ways to convert Outlook email to Gmail, depending on whether you want to move everything or just specific folders. Before you dive in, here are a few things to keep in mind:
- Clean up your Outlook mailbox. Take a moment to delete old or irrelevant emails you no longer need. It'll make the export faster and your Gmail account easier to manage. See how to clean Outlook mailbox for full details.
- Avoid using Outlook and Gmail during the transfer. Opening or sending emails while the export is running might interrupt the process or cause delays.
- Consider what you actually need to move. If you only need certain folders or types of emails, you might not need to transfer everything.
- Double-check your Gmail storage. Make sure you have enough space in your Google account before starting. Gmail gives you 15 GB, but that's shared with Drive and Photos too.
- Expect it to take some time. If you have a large inbox with attachments, the export can take a while, so be patient 😊
Feel good about the prep? Then let's dive in. Review the four methods below and choose the one that best fits your setup.
How to transfer Outlook emails using Gmail import feature
Gmail makes it pretty easy to import messages from Outlook or any other IMAP-supported mail client such as Yahoo or Hotmail.
Follow these steps to import Outlook emails to Gmail:
- Sign in to your Gmail account.
- Click the gear icon in the top right, then select See all settings.
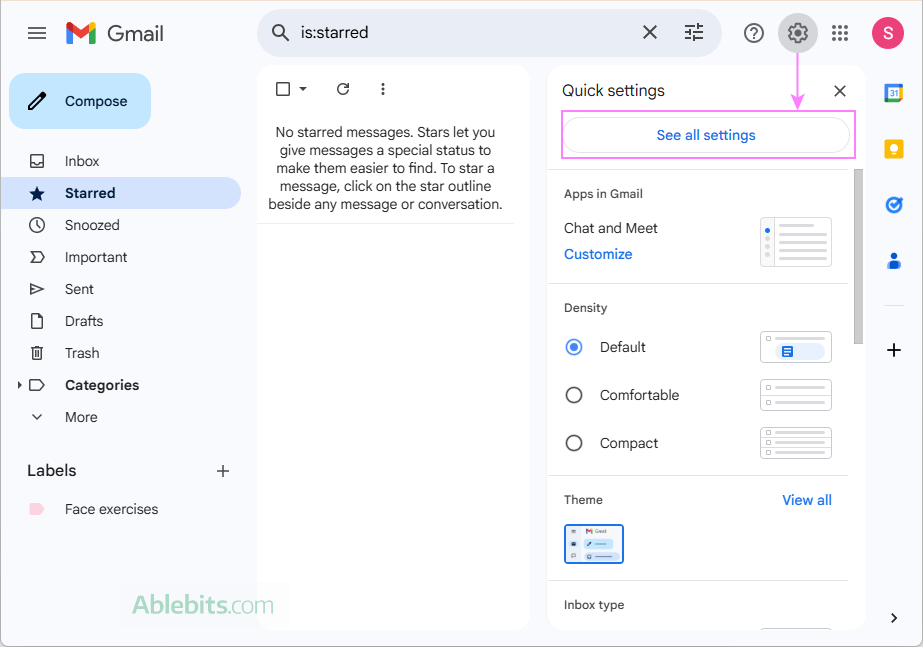
- Go to the Accounts and Import tab and click Import mail and contacts. If you've already imported from a third-party account before, then click the Import from another address link that will appear in this section.

- Enter your Outlook email address and click Continue.
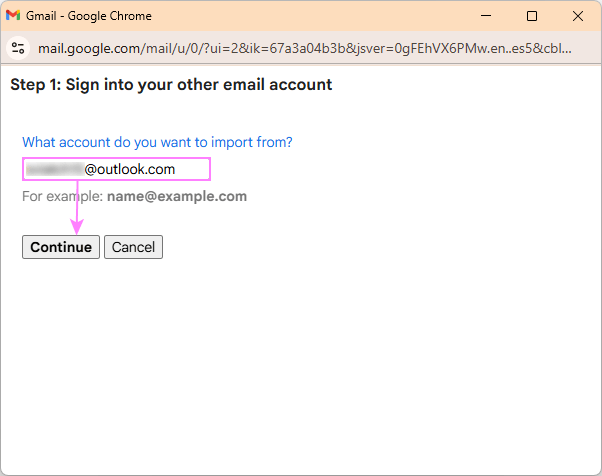
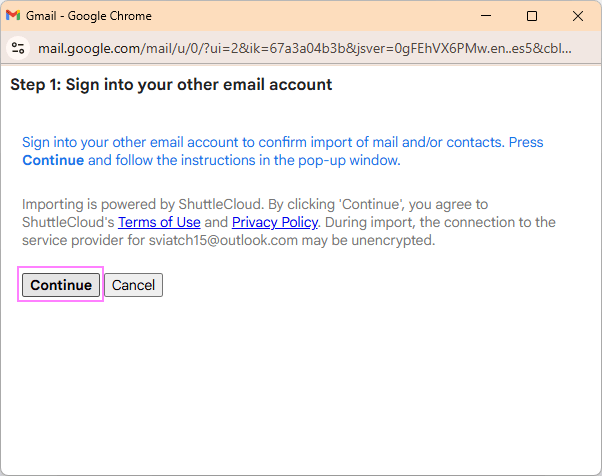
- When prompted to sign into your Outlook account, confirm by clicking Continue again.
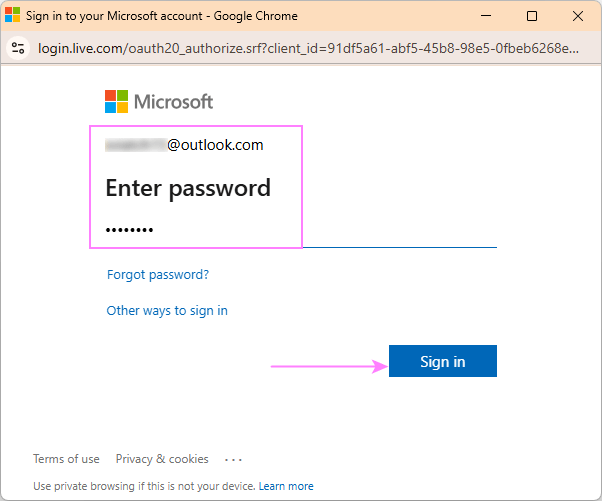
- A new window will pop up, asking you to enter your Outlook login credentials. Do this and click the Sign in button.
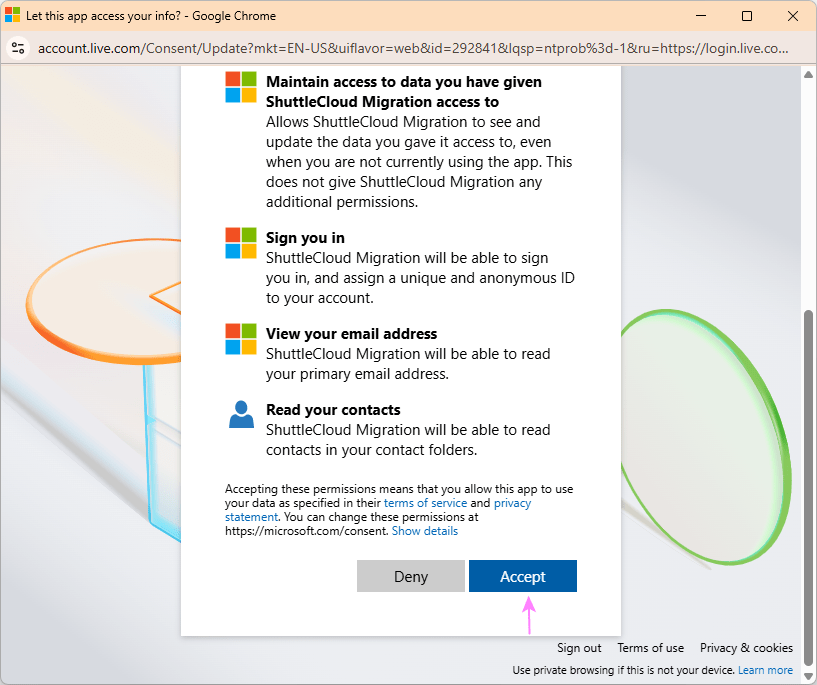
- Review and accept the permissions, allowing Gmail to access your Outlook data.
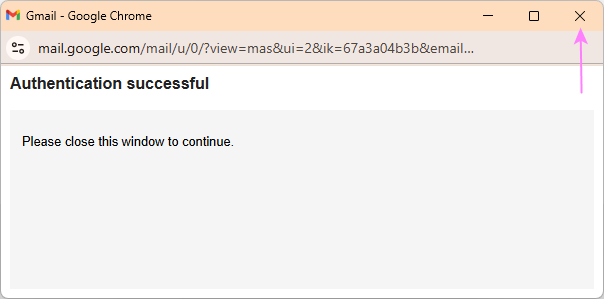
- Once authentication is successful, you'll see a confirmation message. Close this window to continue.
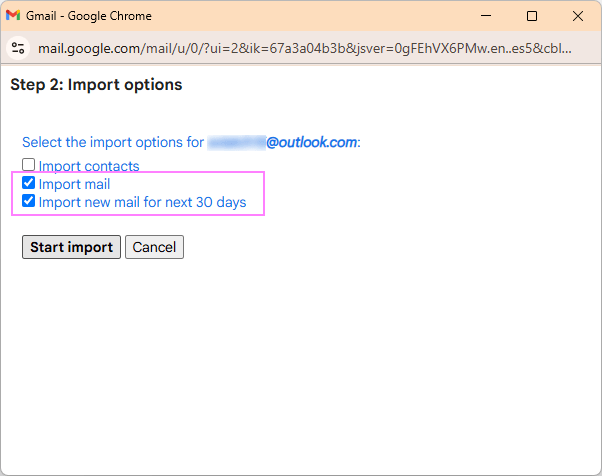
- Choose what you want to import, and then click Start import:
- Import contacts – select it if also want to import your Outlook address book.
- Import mail – select this to transfer your Outlook messages.
- Import new mail for the next 30 days – this will forward any new messages that arrive in Outlook during that time.
- In the final step, click OK to start the import.
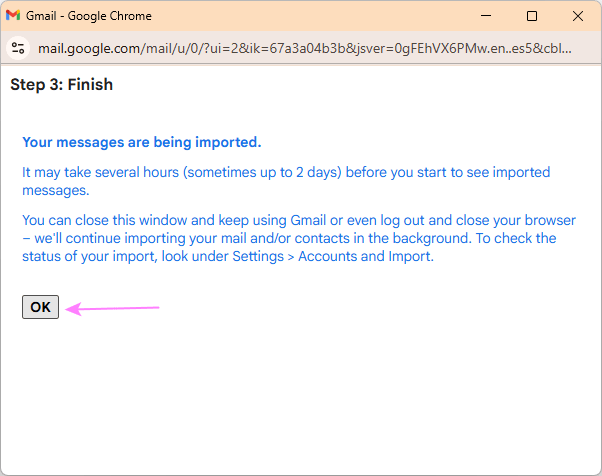
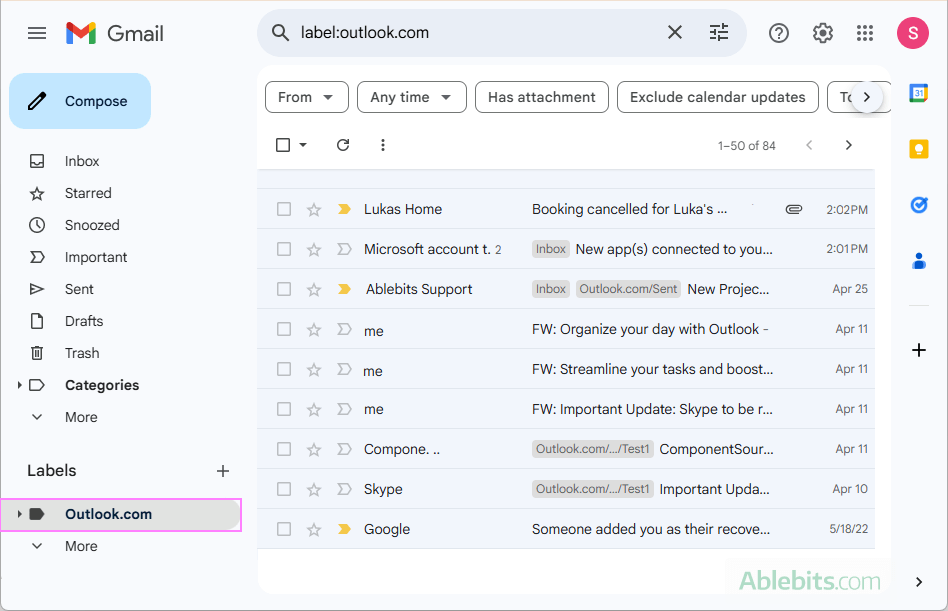
Gmail will now begin pulling in your Outlook emails. The process may take a while depending on how many messages you have. Once finished, your imported emails will appear under a label named after your Outlook address – you can rename it anytime to something that works better for you.
Security note. Google uses a third-party service called ShuttleCloud to transfer emails and contacts from external accounts, such as Outlook, or even another Gmail account. You might see this name when granting access permissions. If you'd rather not share your Outlook data with a third party, consider using an alternative migration method.
Importing email from Outlook to Gmail does not work
If an authentication window does not show up, making it impossible to sign into your Outlook account, most likely it's because pop-ups are disabled in your browser. Check your browser settings to allow pop-up notifications.
For example, to disable the pop-up blocker in Chrome, do this:
- Go to Chrome Settings > Privacy and security > Site settings > Pop-ups and redirects.
- Either allow pop-ups from all sites or add mail.google.com as an exception.
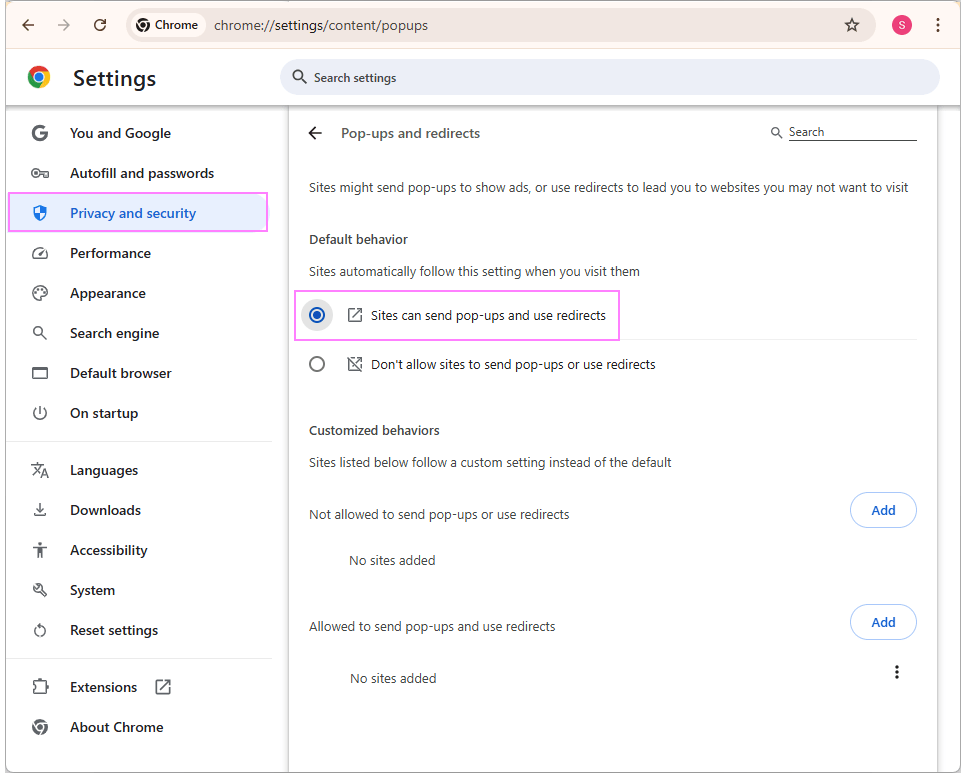
After enabling pop-ups, return to Gmail and try the import again. Once it's finished, feel free to turn your browser's pop-up blocker back on.
How to export emails from Outlook to Gmail
If you're using the classic desktop version of Outlook and already have your Gmail account added there, you can take advantage of Outlook's built-in Import/Export wizard to transfer messages.
The process includes three main steps:
Step 1. Add your Gmail account to Outlook
If you haven't already, add your Gmail account to the Outlook desktop app. This lets you import messages into Gmail using Outlook's interface.
For instructions, see the end-to-end tutorial: How to add Gmail account to Outlook.
Step 2. Export Outlook emails to a PST file
To create a copy of your emails from your Outlook mailbox, do this:
- In classic Outlook, go to File > Open & Export > Import/Export.
- Choose Export to a file and click Next.
- Select Outlook Data File (.pst) and click Next.
- Choose whether to export your entire Outlook mailbox or just a specific folder.
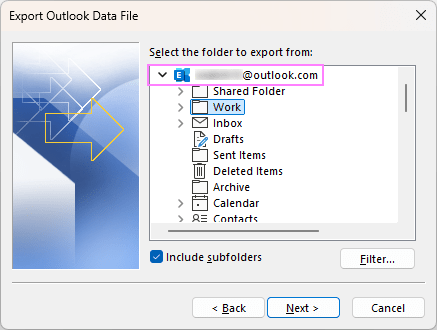
- Select a location to save the file and click Finish.
Once complete, your messages will be saved in a separate .pst file. You can now import that file into your Gmail account within Outlook.
Need more detail? See the full guide on How to export Outlook emails.
Step 3. Import Outlook PST file into your Gmail account
With the .pst file ready, follow these steps to bring the emails into Gmail:
- In classic Outlook, go to File > Open & Export > Import/Export.
- Select Import from another program or file and click Next.
- Choose Outlook Data File (.pst) and click Next.
- Browse for the .pst file and decide how to handle duplicates.
- Choose to import the whole file or select specific folders.
- Select the option labeled Import items into the same folder in and pick your Gmail account.
- Click Finish to start the import.
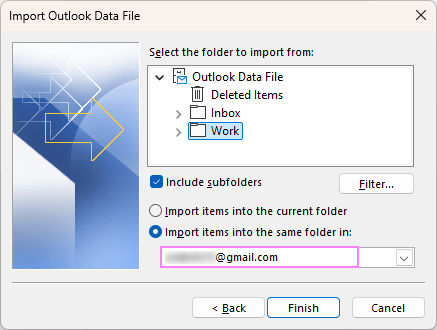
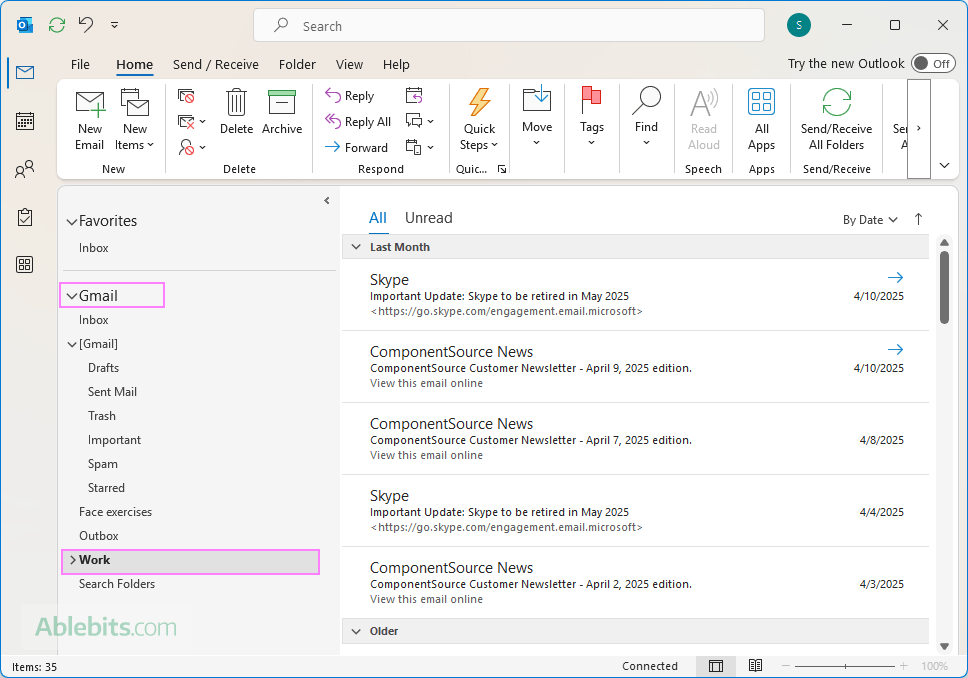
Once imported, your Outlook messages will appear alongside your Gmail folders in Outlook.
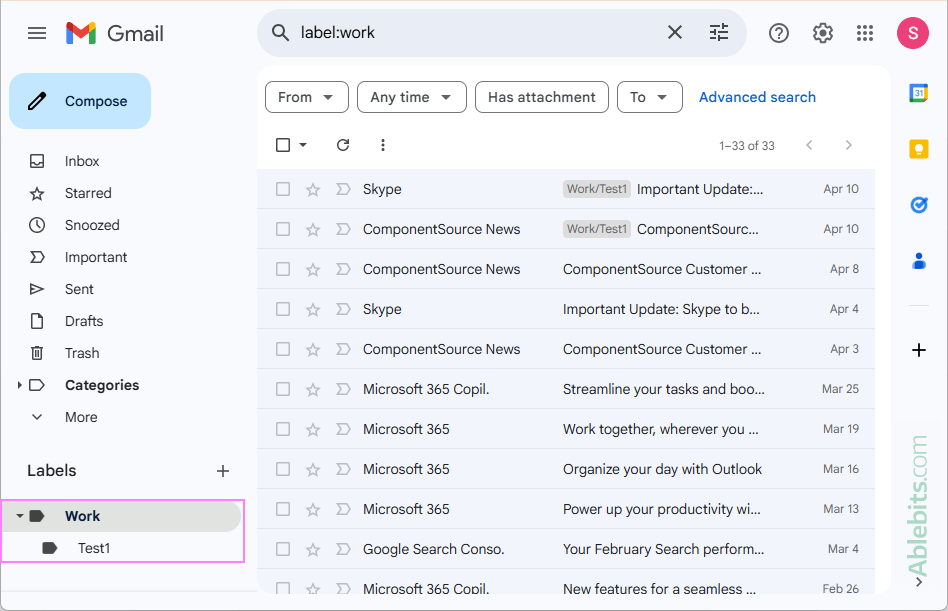
If you want to check Outlook emails in Gmail in a browser, you will find them under the Labels section – just like any other mail folders brought in from external accounts.
Why this method is worth considering
- Keeps more than just emails: It preserves read/unread status, flags, follow-up reminders, color categories, and other metadata.
- Flexible options: You can export your whole Outlook mailbox or only specific folders.
- Advanced filtering: Export just what you need based on sender, category, date, or other conditions. For practical examples, see How to export Outlook emails by criteria.
Can't see your imported emails in Gmail?
If the imported Outlook messages don't appear right away in your Gmail web account, try this:
- Make sure you selected the Import items into the same folder in option and chose your Gmail account during the import.
- Open Gmail in a browser and check the Labels section underneath all other folders – your Outlook folders may be listed there.
- It may take a few minutes for large imports to fully sync. Give it a bit of time, especially if you're working with thousands of messages.
Still nothing? Try restarting Outlook and refreshing Gmail in browser.
How to copy or move Outlook emails / folders to Gmail
If you only need to move a few specific folders from Outlook to Gmail, there's a simple way to do it – just copy them directly from one mailbox into the other. This method works as long as your Gmail account is already added to your desktop Outlook app.
Here's how it works:
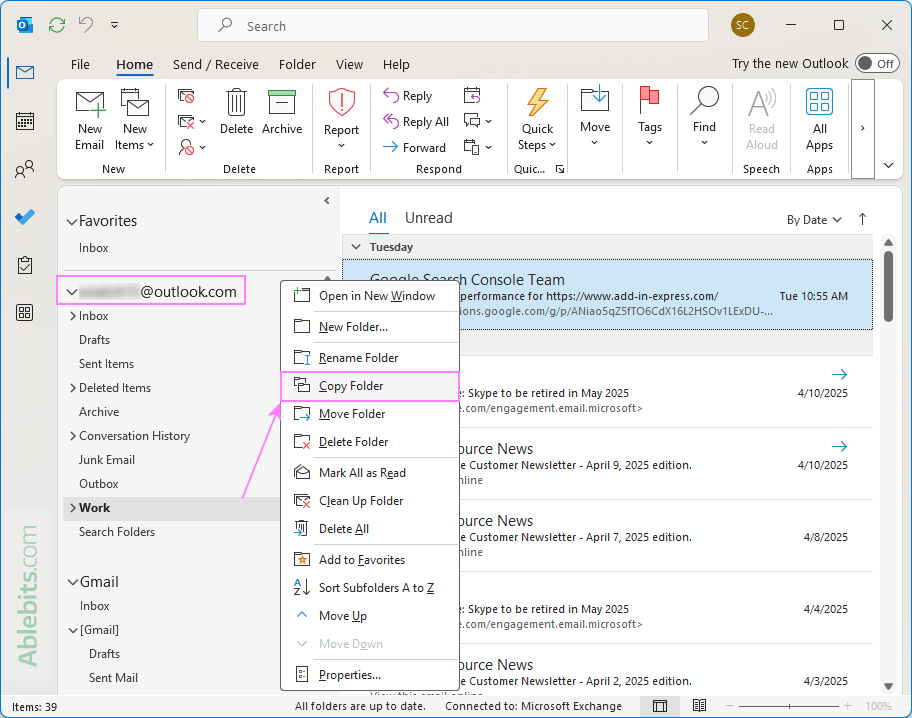
- In Outlook, right-click the folder you want to transfer to Gmail and then choose one of the following:
- Copy Folder – to keep the original in Outlook and create a copy in your Gmail account.
- Move Folder – to transfer the folder entirely from Outlook to Gmail.
- In the pop-up window, choose your Gmail account or any specific folder within it where you'd like to place the copy. For example, you can create a new folder in Gmail named Outlook Emails and move everything there for easy access.
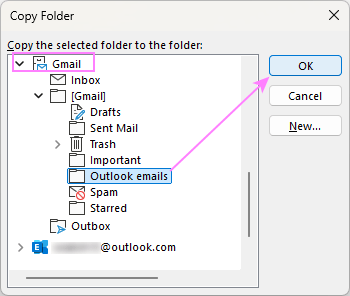
- Click OK to start copying or moving. Outlook will begin transferring the selected messages to your Gmail account.
This approach is fast, straightforward, and doesn't require any extra tools. Best of all, it gives you control, so you can move only what you need, exactly how you want it.
Note. This method only works in classic Outlook for Windows. If you're using the new Outlook (the modern version based on the web interface), the option to copy folders between accounts isn't currently available.
How to forward email from Outlook to Gmail
If you'd like your Outlook emails to land in your Gmail inbox automatically, you can set up a forwarding rule. It's a handy option if you want to monitor all your messages from one inbox.
Forward email to Gmail from classic Outlook
You can create a forwarding rule using the Rules and Alerts feature. Here's how to set it up:
- Go to File > Manage Rules & Alerts.
- In the Rules and Alerts dialog, select your Outlook account under Apply changes to this folder.
- Click New Rule.
- Select the Apply rule on messages I receive option.
- For the condition, check through the specified account, then select your Outlook account.
- For the action, check forward it to people or public group and enter your Gmail address.
- Add any exceptions if needed.
- Name your rule and choose whether to run it on messages already in your inbox.
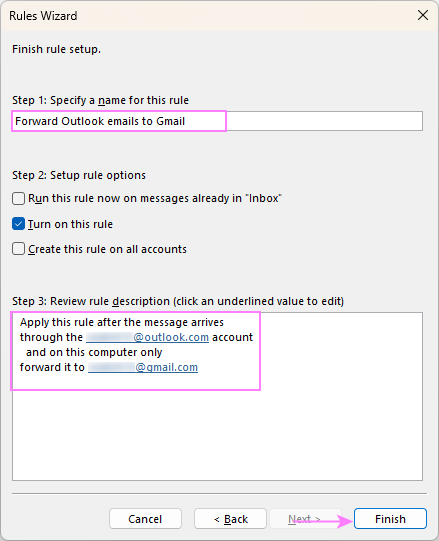
That's it! Incoming messages to your Outlook account will now be forwarded to Gmail automatically.
For more information, see:
Auto forward email to Gmail from new Outlook
In the new Outlook app, forwarding is done through the built-in Rules option in Settings. Just follow these quick steps to get started:
- Click the gear icon in the upper right corner.
- In the Settings window, go to Mail > Rules.
- If you have more than one account, choose the one you'd like to set up forwarding for.
- Click Add new rule.
- Define the rule details:
- Give your new rule a name.
- Under Conditions, choose Apply to all messages or set any specific criteria.
- Under Actions, select Forward to and type in your Gmail address.
- Click Save.
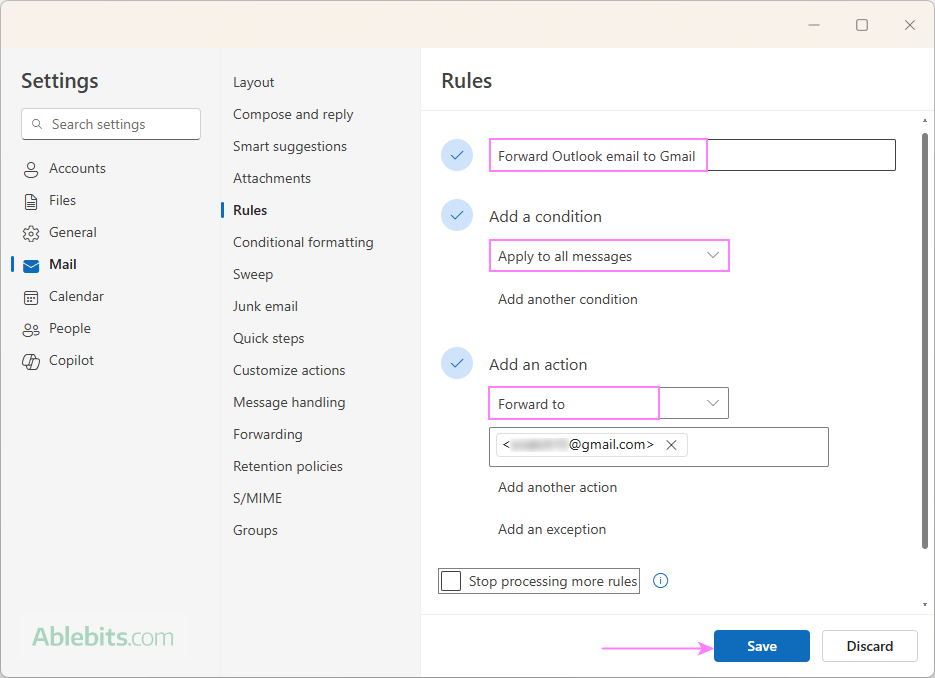
Your Outlook emails will now be automatically forwarded to your Gmail inbox.
For more details, please refer to How to create email rules in the new Outlook.
Tip. The new Outlook also includes a dedicated Forwarding feature, designed specifically for redirecting messages to another address, such as Gmail, without creating a rule. To learn how it works and how it's different from a forwarding rule, see: Automatic forwarding (redirecting) in new Outlook.
How to remove imported Outlook emails from Gmail
If you no longer need your Outlook messages in Gmail, you can remove them in two simple steps:
- Unlink your Outlook account from Gmail to stop future imports (necessary if you used the inbuilt import feature).
- Delete the emails that were already imported to clear space.
Step 1. Unlink your Outlook account from Gmail
Here's how to disconnect the link between Gmail and your Outlook account:
- In your Gmail account, go to Settings > See all settings.
- Switch to the Accounts and Import tab.
- Under the Import mail and contacts section, find your Outlook account and click Remove next to it.
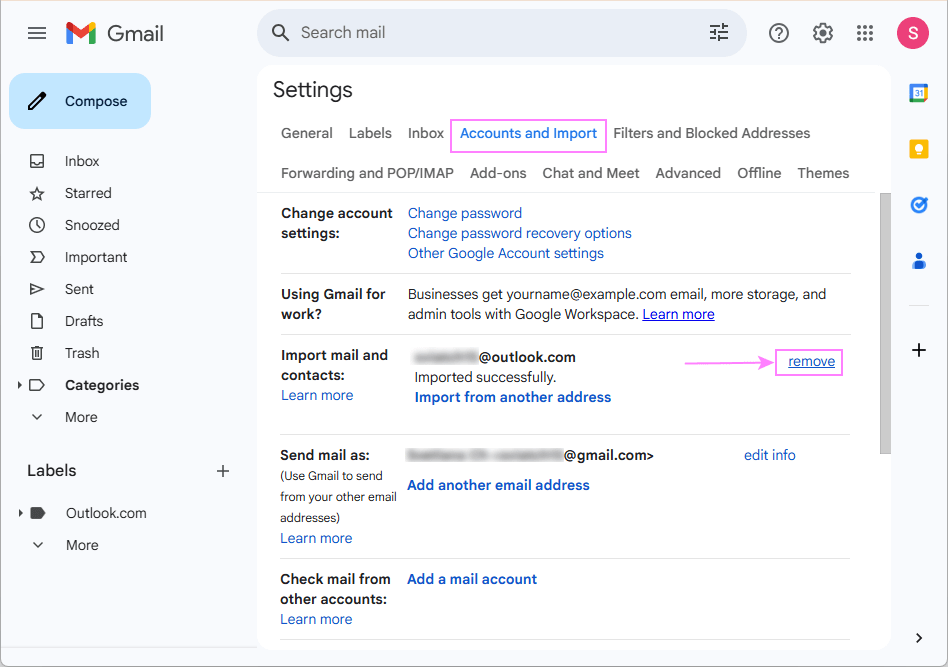
Once removed, Gmail will no longer transfer new messages from Outlook.
Note. This step is only required if you utilized Google's Import tool. If you converted your Outlook emails to Gmail using another method, you can skip it.
Step 2. Delete imported Outlook emails from Gmail
Unlinking the account doesn't remove the emails that were already imported. To delete them:
- In the Gmail sidebar, find the label with your Outlook address (or whatever name you gave it).
- Click the label to view the imported messages.
- Select all the emails under that label and click the Trash icon to delete them.
- To permanently remove them, go to the Trash folder and empty it.
- If you want to clean up further, you can delete the Outlook label by clicking the three dots next to it and selecting Remove label.
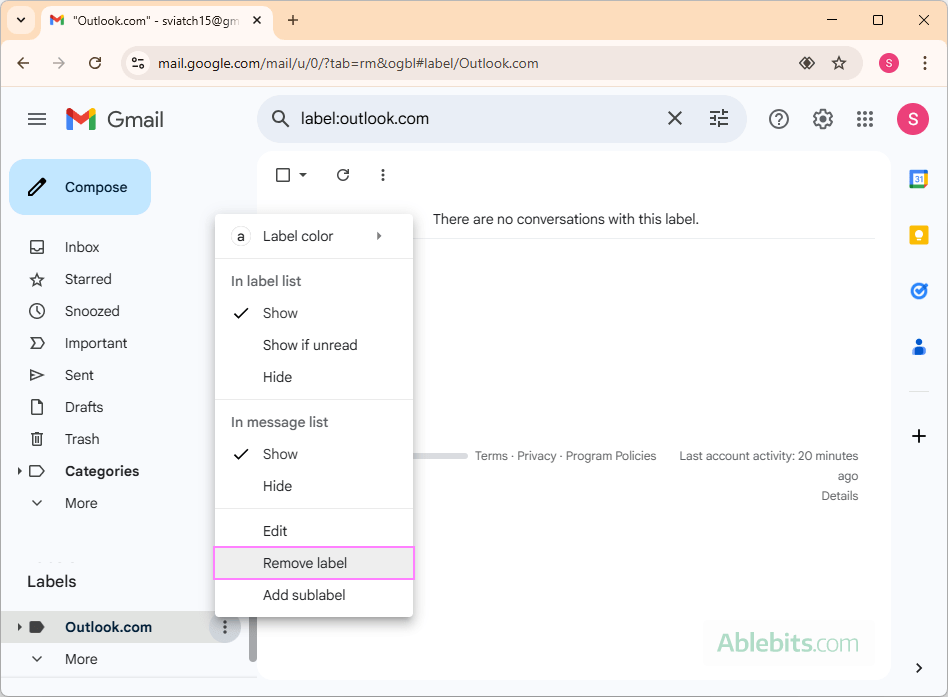
And that's it! Your Gmail will be Outlook-free.
Transferring emails from Outlook to Gmail: which method to choose?
The best way to transfer Outlook emails to Gmail depends on what you're trying to do:
- For a one-time move of all your emails, the Gmail import feature or Outlook's export/import wizard is a solid choice.
- To keep forwarding new messages as they arrive, setting up a forwarding rule works best.
- If you just need to move a few folders, try the manual folder copy method (in classic Outlook only).
No matter which option you go with, you'll have your Outlook messages right where you want them – in your Gmail mailbox.
Why export emails from Outlook to Gmail?
Moving your Outlook emails to Gmail can be a smart choice for several practical reasons. Here's why many users choose to make the switch:
- You're transitioning from a work or school account to a personal Gmail account and want to keep important messages.
- You prefer Gmail's interface and want your older Outlook messages there.
- You're consolidating multiple email accounts into one inbox.
- You want to access your emails from any device with an internet connection, without installing any additional apps.
- You'd like better integration with Google services like Google Drive, Calendar, Docs and Sheets, so you can manage your communications, schedules and documents in one place.
- You want more effective spam filtering. Gmail's advanced filtering keeps most unwanted messages out of your inbox, without mistakenly blocking legitimate senders like Outlook Junk Email Filter frequently does.
- You're looking for strong security features. Gmail supports two-factor authentication and offers built-in protections to help guard your account against unauthorized access.
- With each Google account, you get 15 GB of free storage shared across Gmail, Google Drive, and Google Photos, which is more than enough for most email users.
- And finally, Gmail is completely free to use – no subscription required.
Transferring your emails from Outlook to Gmail might seem like a big task at first, but with the right technique, it's totally manageable, even a bit satisfying. Give one of these methods a try and enjoy the peace of mind that comes with finally crossing this task off your to-do list 😊
 by
by