If you ever needed to split text from one cell into multiple columns in Google Sheets, this is your lucky day. Today I'm going to share a few quick tips on how to do that.
If your cells with data contain more than one word, you can split such cells into separate columns. This will let you filter and sort data in your table easier. Let me show you a few examples featuring two tools and a function.
1. Standard tool to split text to columns in Google Sheets
You can split cells in Google Sheets with the standard built-in tool. It's called Split text to columns. Though it won't do for complex tasks, it's useful enough to separate text in Google Sheets by one delimiter at a time.
- Select the cells you want to split.
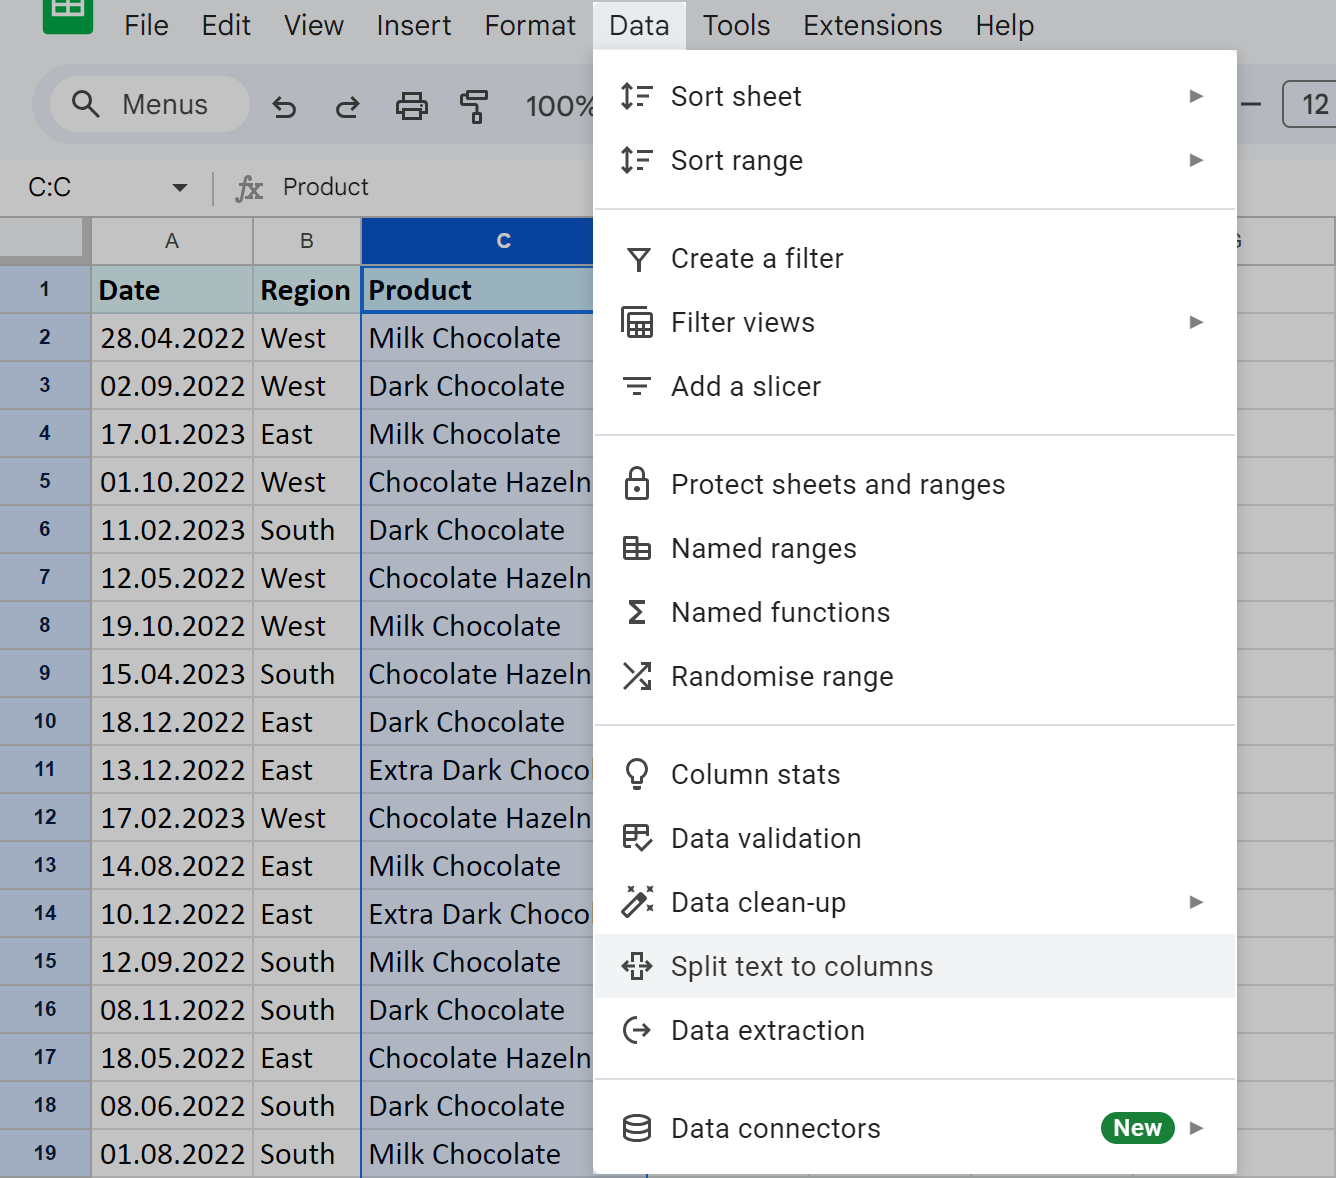
- Go to Data > Split text to columns:
- A floating pane will appear at the bottom of your sheet:
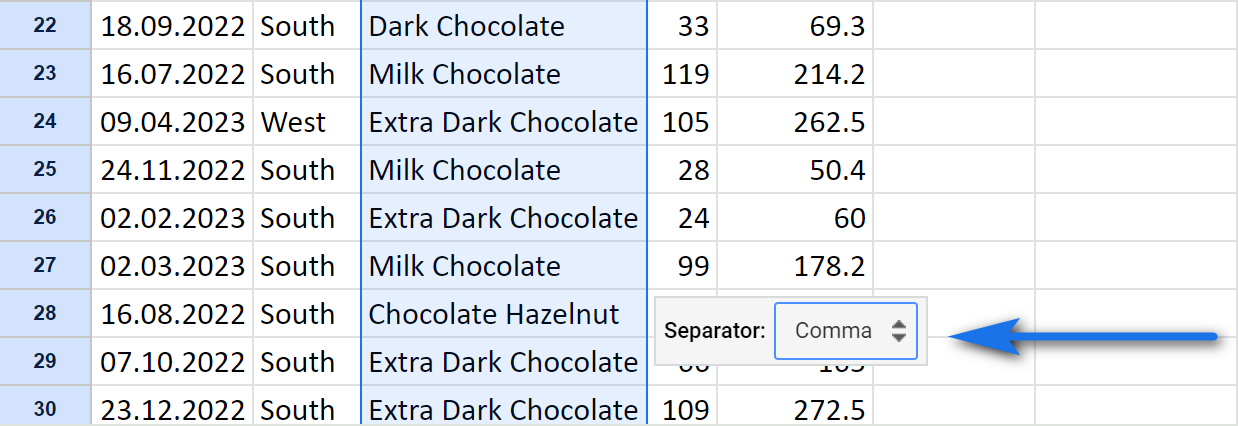
It offers some of the most commonly used separators: comma, semicolon, period, or space. But you can also enter a Custom one or have Google Sheets detect it for you automatically (Detect automatically).
- Pick the delimiter you have in your data, for instance space.
Google Sheets will immediately separate text into multiple adjacent columns by that space:
In my example above, there was some info in columns D and E: quantity and totals. But the standard tool overwrote them with split product names. Thus, if you're going to use this standard Split Text to Columns tool, be prepared. Insert a few empty columns to the right of your original data in advance to avoid losing it.
Luckily, there's another splitting tool that doesn't replace anything without you saying so. What's more, it splits your cells in Google Sheets by several separators in one go, even by the custom ones.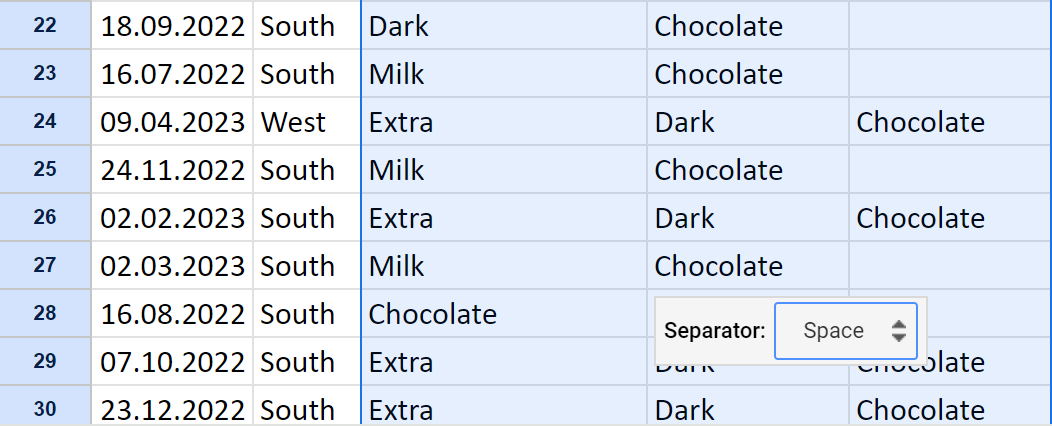
Two huge drawbacks of the standard Split Text to Columns tool

2. Split cells in Google Sheets by character
The next tool is the quickest and most convenient way to split cells in Google Sheets.
It's called Split text and you will find it in the Power Tools add-on for Google Sheets.
It splits your cells in Google Sheets at each occurrence of all delimiters. There are a whole lot of various separators available:
- standard ones: space, line break, comma, semicolon
- custom symbols (for you to enter)
- text strings & conjunctions like and, or, not, etc.
- even capital letters
Here's why this Split Text is better than the standard Google Sheets tool:
- In case one delimiter follows the other right away, the extension will treat them as one if you tell it. Something the standard tool from Google Sheets cannot do ;)
- You also control whether to replace your source column with the first part of the data. Another thing the standard splitting tool cannot do ;)
- And a cherry on top? You can even split to rows!
Having all these features doesn't mean that the add-on is complicated. On the contrary: it's beginner-friendly. Here's how you use it to split cells in Google Sheets:
- Select those cells you need to split in Google Sheets.
- Set up all characters to separate by.
- Adjust the settings at the bottom (it's just 2 checkboxes).
- And click the Split button:
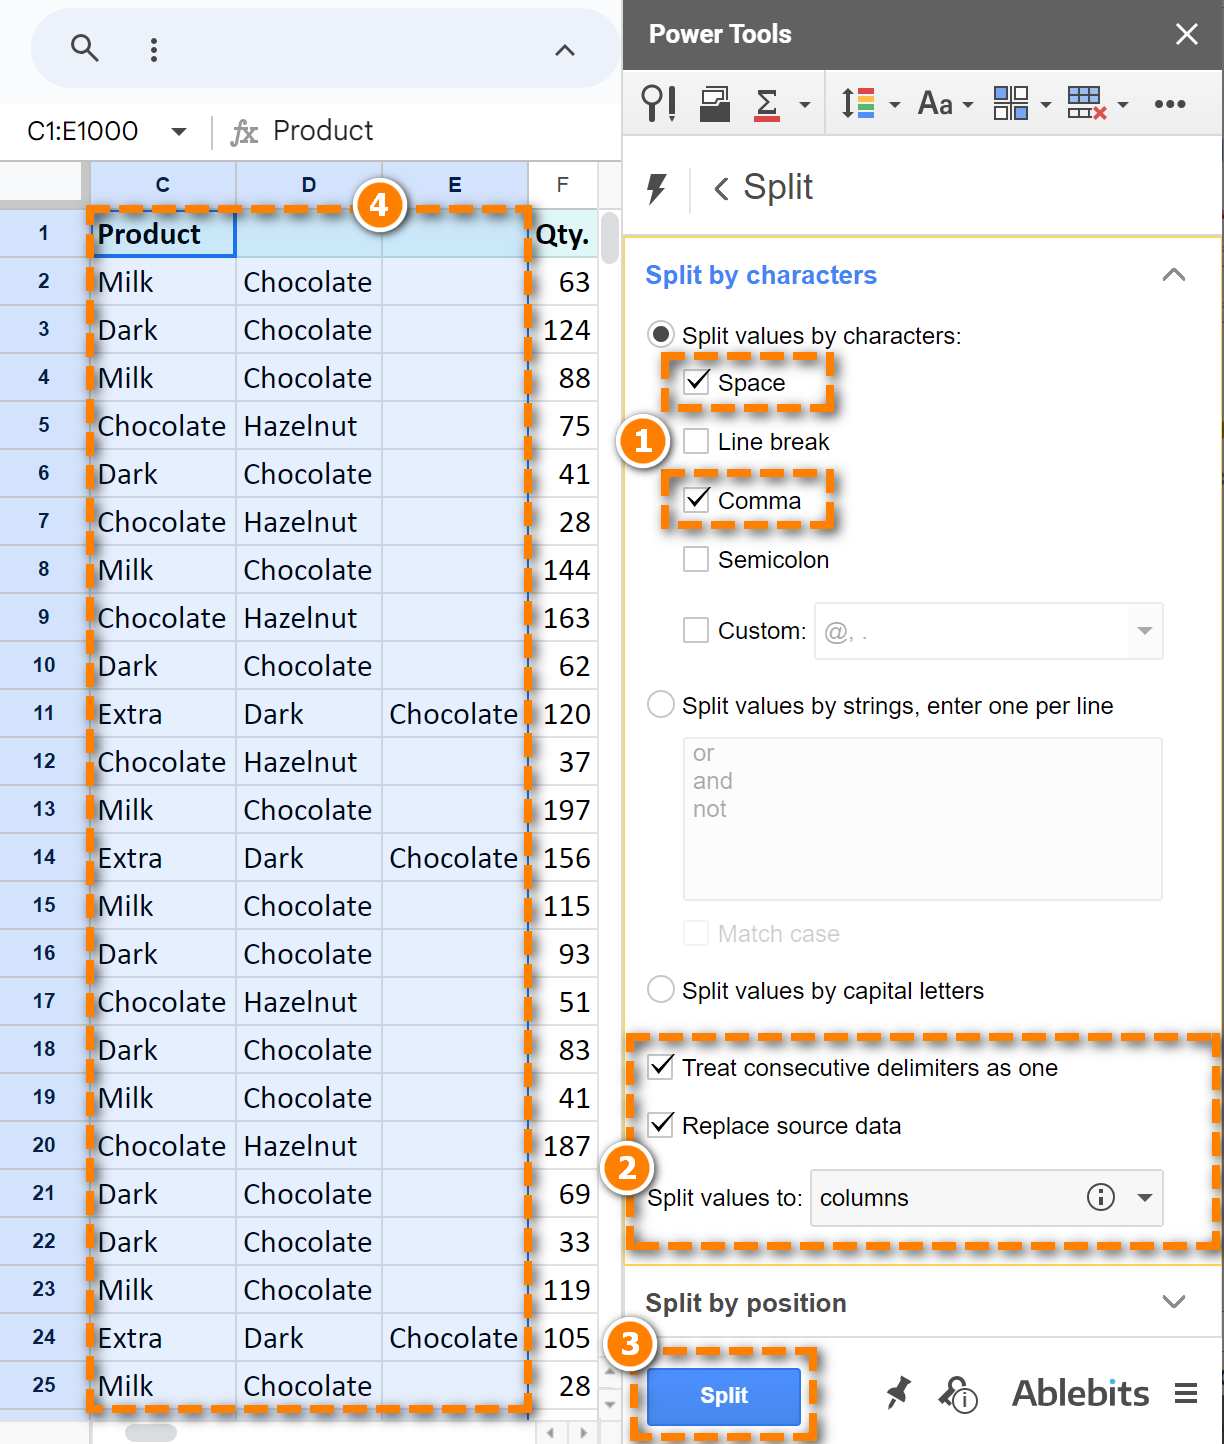
In my case, the add-on automatically inserts 2 new columns — D and E — and puts the results there. Hence, my columns with numeric data remain intact.
3. SPLIT function for Google Sheets
In your quest to master the art of splitting cells in Google Sheets, I cannot help but mention the SPLIT function. It also divides text into adjacent columns based on a chosen delimiter.
The function takes the following form:
- text is your cell (or cells, or simply text string) that you want to split. Required.
- delimiter is the character by which you want to separate the text. Required.
- split_by_each — controls whether you cut by each instance of the delimiter (TRUE) or only at the first one (FALSE). This one is optional and works as TRUE if you omit it.
- remove_empty_text is also optional. It determines whether to include or exclude empty values in the resulting cells. They may occur if there are consecutive delimiters in a cell. So basically this one is all about whether to treat consecutive delimiters as one (TRUE, the default one) or no (FALSE).
Let me take the same column with product names and split them into separate columns using the SPLIT function:
- Here's what I enter to D2:
=SPLIT(C2," ")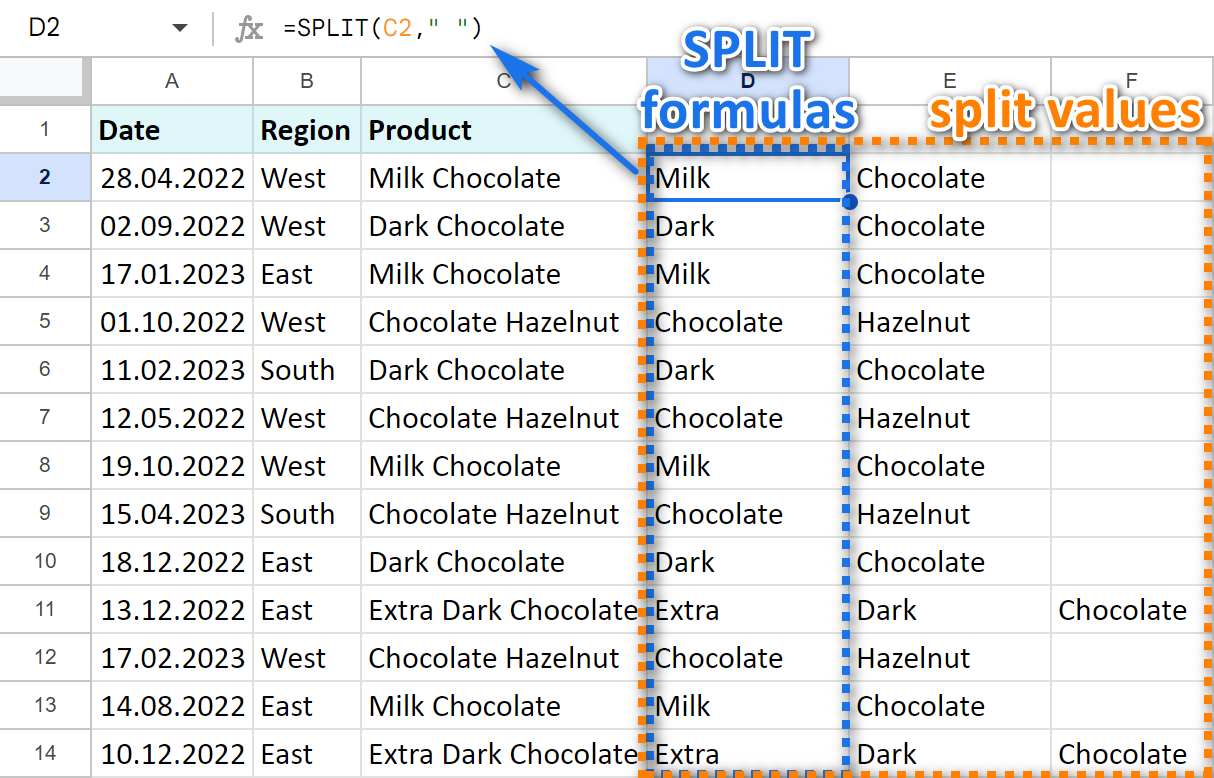
- I also copy the formula down column D to do the same for each row.
The function separates my product names by each space and places units to adjacent cells.
Note. Obviously, to use the function you need to have a few extra columns at hand.
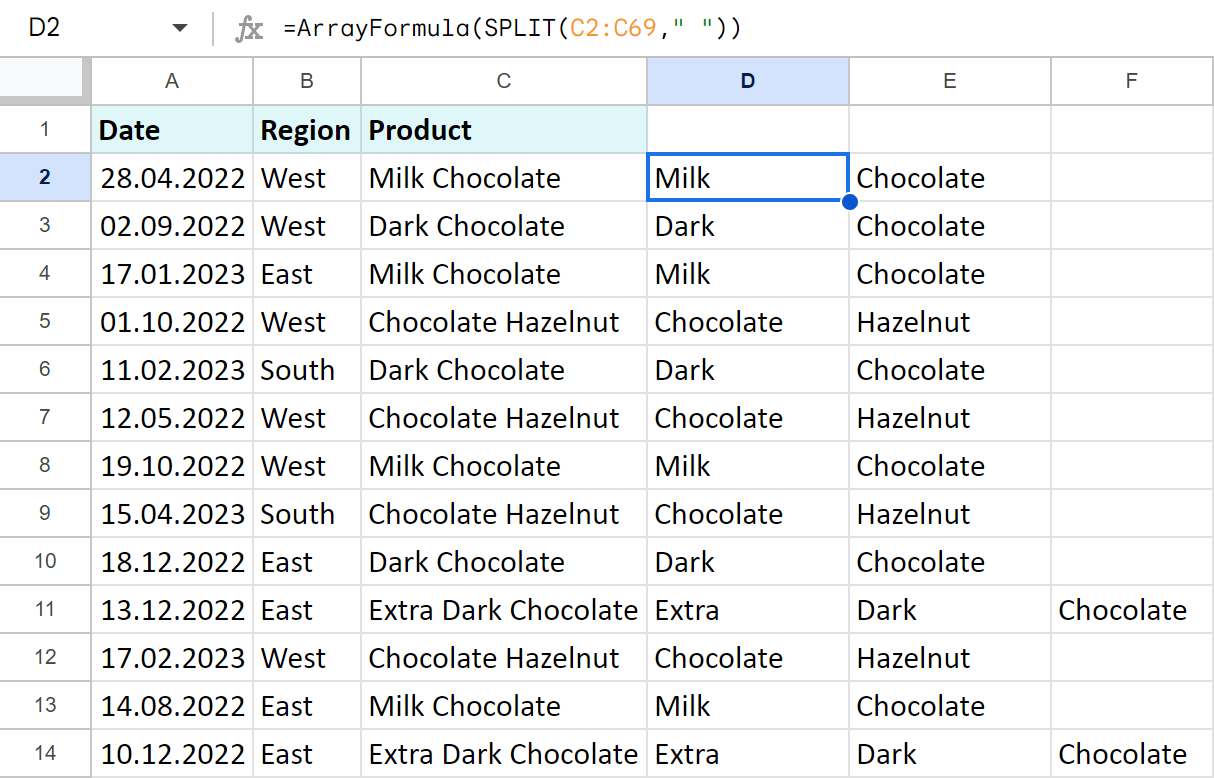
Tip. Use SPLIT in tandem with another function like ARRAYFORMULA for more advanced splitting formula. This one will split data in every row in the column at once:
=ArrayFormula(SPLIT(C2:C69," "))
4. Other Ablebits tools to separate text in Google Sheets
Apart from splitting text by characters, Power Tools from Ablebits contains other ways to split that data: by position, separate first and last name, and also split date and time!
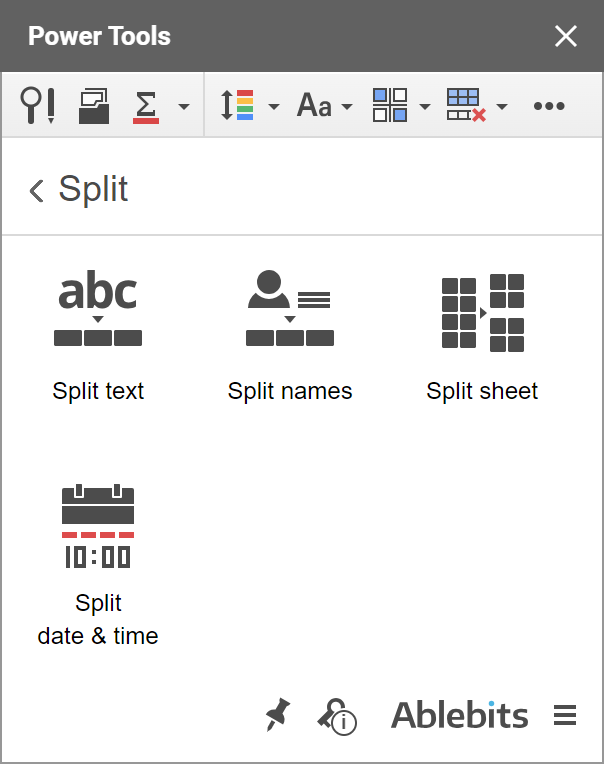
Click the button below to install Power Tools to your Google Sheets.
4.1 Split cells in Google Sheets by position
Sometimes it may be difficult to distinguish a delimiter. Other times, you may want to cut only a certain number of characters from the main text.
Here's an example. Suppose you have a product name and its 6-digit code as one record. These text strings don't have any delimiters, so the standard Google Sheets Split text to columns option won't pull one from another.
This is when Power Tools comes in handy since it knows how to cut by position:
- Just select the column with data to split.
- And set the position for splitting by the example of the first cell:
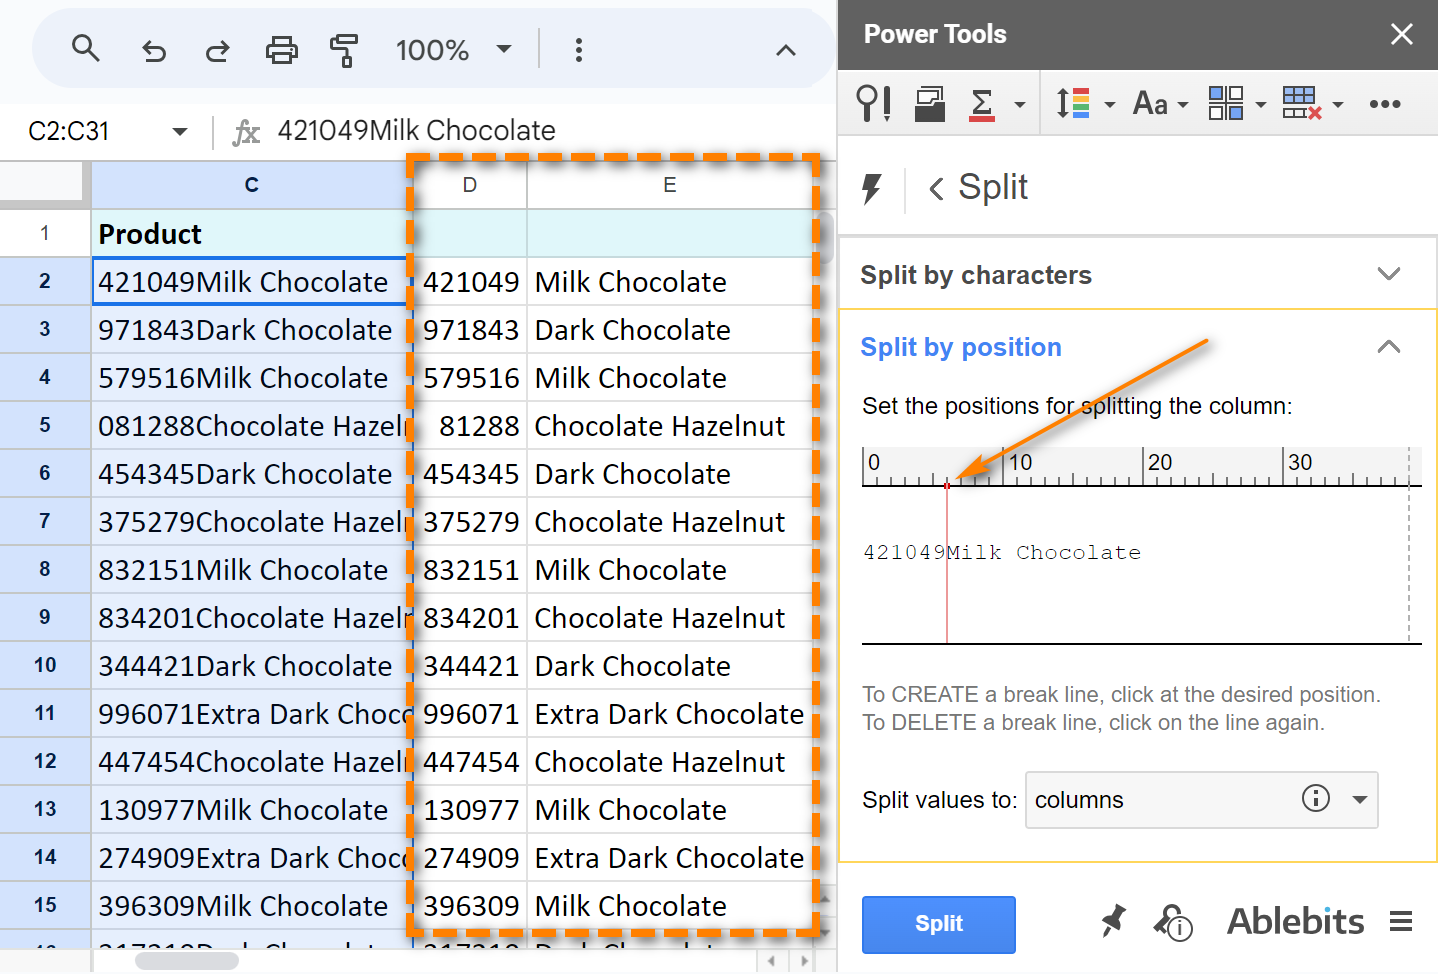
- Decide whether to split values to columns or rows.
- And click Split.
Video: How to split cells in Google Sheets
This 2,5-minute video will show you the whole Split Text add-on in action:
4.2 How to separate first and last names in Google Sheets
Power Tools also helps when you need to split names.
It will separate first and last names in Google Sheets, recognize middle names and lots of salutations, titles, and post-nominals.
- Select the column with names and go to Split Names this time:

- And check the boxes according to the columns you want to get:

Video: How to separate names in Google Sheets
Watch this 2-minute video to see how Power Tools separates first and last names, recognizes middle names and lots of salutations, titles, and post-nominals.
4.3 Split date and time
While none of the tools above process dates, Power Tools has an ace up its sleeve. It has one more little helper that separates time units from date units if they are both written in a celll, e.g. 6/9/2020 9:00:00:
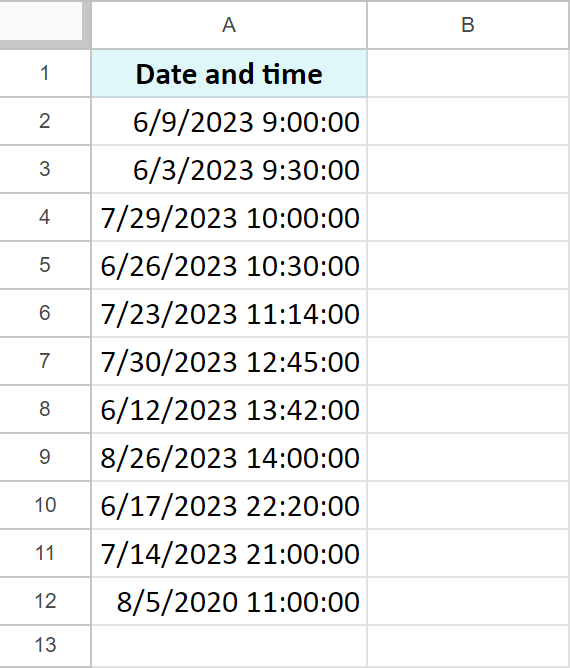
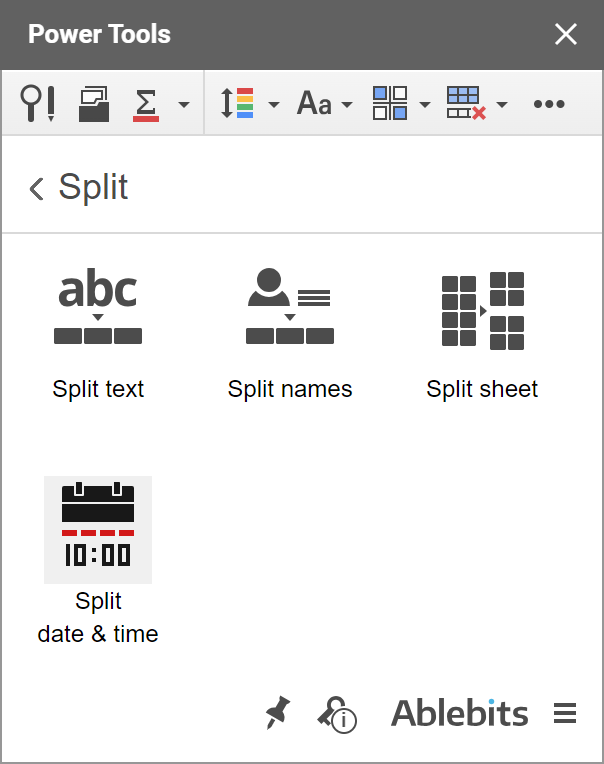
The tool is called Split Date & Time:
Here's how you split date & time in Google Sheets using this tool:
- Select the column with Date time values.
- Tick off those columns you want to get as a result: both date and time or only one of them to extract from the column.
- Click Split.
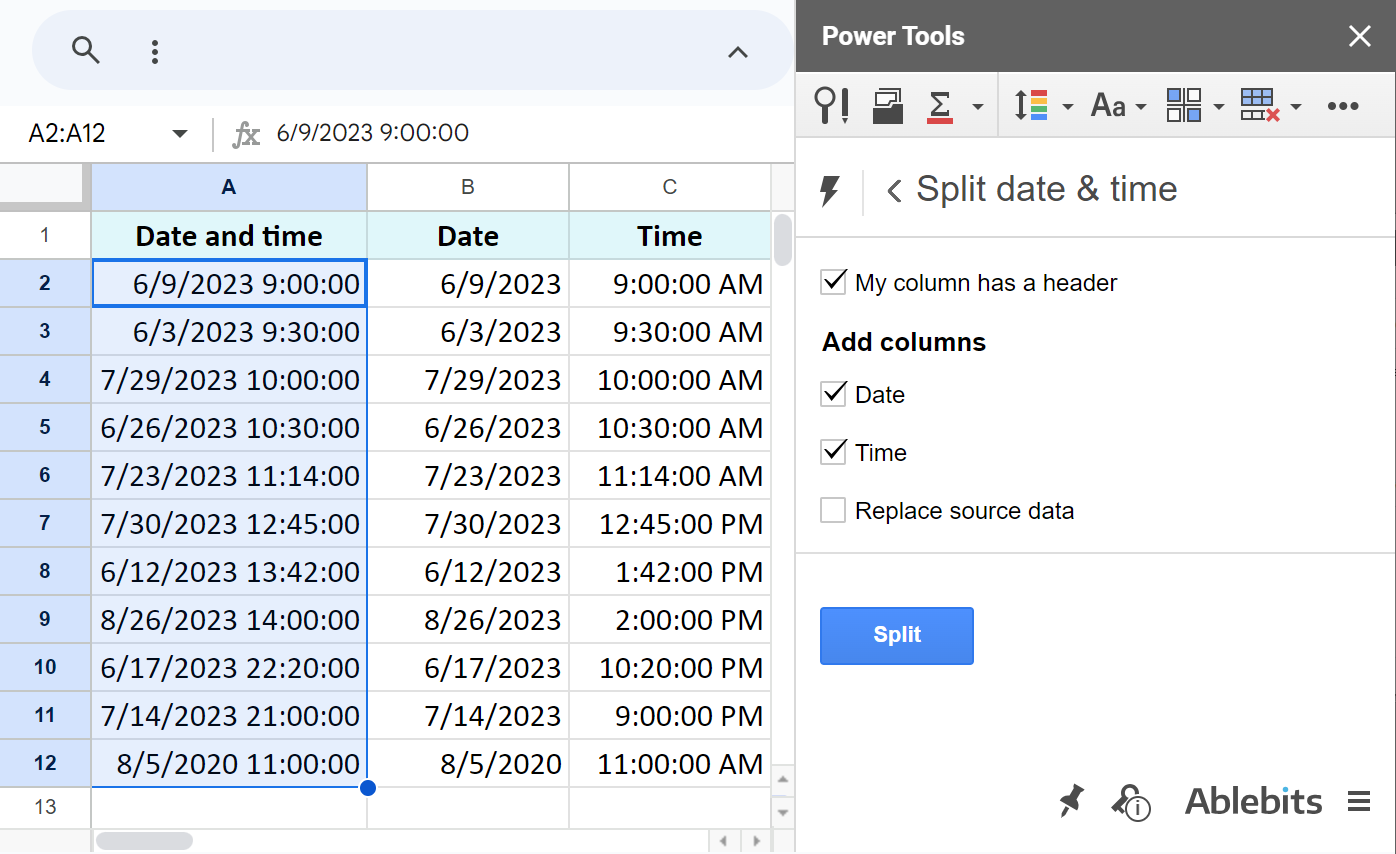
As you can see, Power Tools is a must-have add-on when it comes to splitting text to columns in Google Sheets. You can test its full capabilities for free and without registration simply by installing it from the Google Marketplace.
Have you had any difficulties separating text in Google Sheets? Share your case in the comments!
 by
by
8 comments
Hello, I work for a nonprofit COA that offers seniors lunch at $2 plate. I created a Google form to record a person's name and the days they would like to eat meals within 2 weeks period of the day they place an order. Participants can order 1 meal per day up to 2 weeks in advance. On the multiple choice question, they can pick any day from Monday-Friday or 2ndMonday-2ndFriday. I am trying to use the Split Tool to separate the days of the week into separate columns so that I have one column with Monday another with Tuesday and another with 2ndMonday etc... In this way, I can get a total of meals that are ordered for each those days. I have tried splitting by character and strings but still it does not divide the data correctly. It groups Monday, 2ndMonday and Thursday together. Can you let me know what I may be doing wrong?
Hello Jona,
For me to be able to help you, please share a small sample spreadsheet with us (support@apps4gs.com) with (1) your source data (2) the result you're getting (3) the result you expect to get. I kindly ask you to shorten the tables to 10-20 rows.
Please don't worry if you have confidential information there, we never disclose the data we get from our customers and delete it as soon as the problem is resolved. Or you can replace any important information with some irrelevant data, just keep the format of your days, dates and times.
Note. We keep that Google account for file sharing only and don't monitor its Inbox. Do not email there. Once you share the file, just confirm by replying to this comment.
I'll look into it and try to help.
I have benefited a lot from this website. I am grateful to the administrators.
Thank you for your feedback, Syed Rafiqul Islam!
I have an EXCEL sheet with over 10,000 rows. In one particular column there are groups, a cell with a text/number string in bold face followed by several cells with currency amounts (regular typeface). The row with the bold face has only the one non-blank cell. The pattern repeats itself except that the regular typeface cells vary in number. I would like to split the column with the second column containing the bold text (name only) repeated next to the currency amounts in its group.
Tom ($17)
$6
$4
$7
Fred ($1)
$1
$6 Tom
$4 Tom
$7 Tom
$1 Fred
Hello Walter,
Please visit one of the articles devoted to splitting cells in Excel: https://www.ablebits.com/office-addins-blog/search.php?search=split+cells+excel
The Transpose function was VERY helpful! However, after I got all the email addresses into one column, when I tried to delete the row with the emails, it deleted the content of the entire sheet. How do I delete the row with the original data without deleting the data in the new column?
Hello Pamela,
did you try to delete the first row that the function returned? If so, you simply deleted the formula itself.
Anyway, your formula fetches whatever lies in the source range. To disconnect the ranges, you should convert your formula to values. We have a special tool for the task that you can trial for 30 days for free, please read more here: Convert formulas to values.