 by
Learn why Outlook spell check may stop working and how to fix spelling and grammar checking in different Outlook versions.
Outlook's spell checker is supposed to catch typos and grammar mistakes before your emails reach their recipients. But sometimes it stops highlighting misspelled words, uses the wrong language, or doesn't offer any corrections at all.
If spellcheck is not working in Outlook, don't worry. In most cases, the problem is caused by incorrect settings or a missing proofing language. This guide explains the most common reasons and shows how to fix spelling and grammar checking in classic Outlook 365 - 2016, new Outlook for Windows, and Outlook on the web.
Why is spellcheck not working in Outlook?
Outlook may stop checking spelling for several reasons. Some affect all versions, while others are specific to classic desktop Outlook or the new app. Here are the most common causes:
- Automatic spellcheck is disabled. Outlook may not highlight misspelled words because spelling or grammar checking has been turned off.
- Incorrect proofing language. If the selected language doesn't match the language you're writing in, Outlook will miss errors and flag correctly spelled words.
- Missing proofing tools. In classic Outlook, spelling and grammar checking may not function properly if the necessary language tools aren't installed.
- Certain words or text are excluded. Outlook can be configured to ignore uppercase words, words containing numbers, or specific text marked as not requiring proofing.
- Custom dictionary issues. If an incorrectly spelled word was previously added to the dictionary, Outlook will treat it as correct.
- Microsoft Editor settings. In Outlook versions that use Editor (Microsoft 365, new Outlook and Outlook on the web), some types of spelling, grammar, or writing suggestions may be disabled.
- Disabled connected experiences. In Outlook versions with Microsoft Editor, disabled Connected Experiences may limit spelling, grammar, and writing suggestions.
- Application or browser problems. Outdated software, conflicting add-ins or browser extensions, and temporary application errors can interfere with spellchecking.
The good news is that most of these issues can be resolved without reinstalling Outlook. The exact steps depend on which version you're using.
How to fix spellcheck in classic Outlook 365 – 2016
If spelling and grammar checking isn't working in classic Outlook, start by reviewing the proofing settings. The following solutions apply to Outlook 365 through 2016, though some menus may differ slightly in older versions.
Enable automatic spellcheck
The first thing to check is whether Outlook is set to detect spelling and grammar errors while you compose emails.
- In Outlook, go to File > Options > Mail.
- Under Compose messages section, click either Editor options or Spelling and Autocorrect (both open the same dialog window).
- In the Editor Options window, select Proofing from the left menu.
- Under When correcting spelling in Outlook, make sure these options are turned on:
- Check spelling as you type – automatically detect and highlight misspelled words as you compose an email.
- Mark grammar errors as you type – flag grammatical mistakes in your text.
- Frequently confused words – detect words that are spelled correctly but may be used incorrectly in context, for example "their" instead of "there".
- Click OK to save the changes.
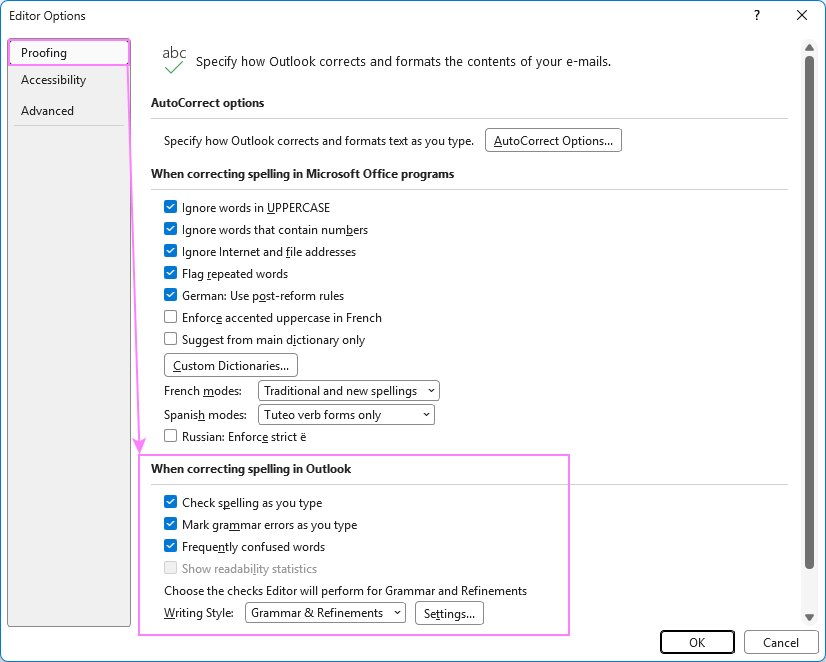
With these options enabled, Outlook should underline all misspelled words in your emails in red.
Enable spelling check before sending emails
If you want Outlook to check your emails for spelling mistakes and alert you to any errors before sending, you can enable an additional proofreading option:
- Go to File > Options > Mail.
- Under Compose messages, select Always check spelling before sending and click OK.
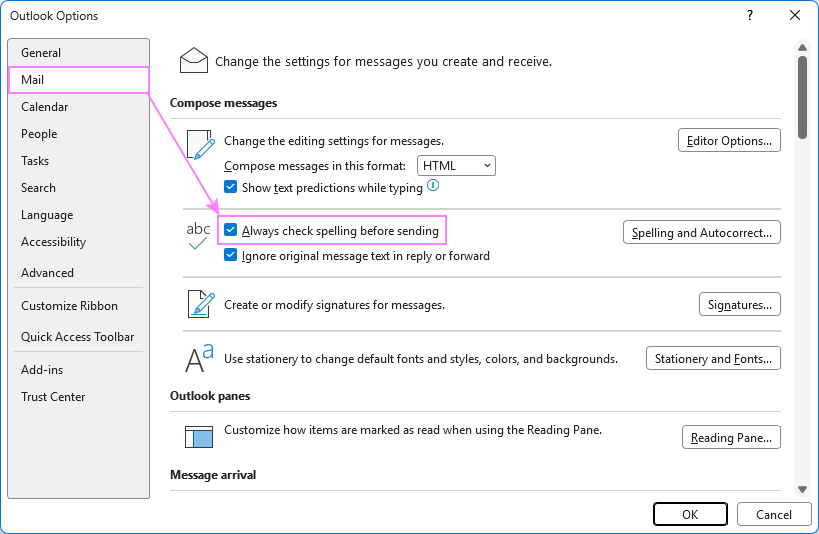
Think of it as an extra safeguard, even when automatic spellcheck is enabled. After all, it's easy to overlook mistakes underlined while you're typing, and this final check gives you another chance to catch them before your message reaches the recipient.
Tip. If you also want Outlook to check spelling in the original message that you are replying to or forwarding to someone, clear the Ignore original message text in reply or forward option in the same settings section.
Check the default language and install proofing tools
If spell check isn't working correctly in classic Outlook, the wrong default language or missing proofing tools may be the cause. Even regional variations matter: for example, British and American English spell certain words differently (colour vs. color).
To check your language settings in Outlook:
- Go to File > Options > Language.
- Under Office authoring languages and proofing, check which language is marked as <preferred>.
- If your main language isn't at the top of the list, select it and click Set as Preferred.
- Check the proofing status next to the language. If it says Proofing available, click the link to install the missing proofing tools. If it says Proofing installed, everything is ready.
- Add a missing language. If the language you need isn't listed, click Add a Language, select the desired language, and click Add.
- Click OK to save your changes.
- Restart Outlook for your new language settings to take effect.
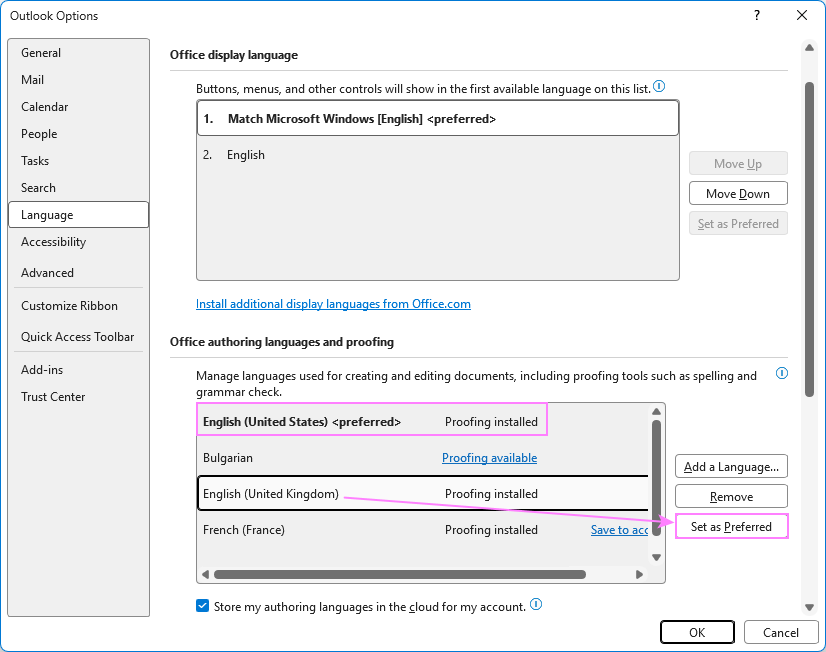
Tip. Select Store my authoring languages in the cloud for my account to save your language preferences to your Microsoft account and share them across Office apps on Windows and the web.
Review spelling exceptions and custom dictionaries
Sometimes Outlook checks spelling correctly but deliberately ignores certain words. To review the relevant options:
- Go to File > Options > Mail > Spelling and Autocorrect > Proofing.
- Under When correcting spelling in Microsoft Office programs, clear any options that prevent Outlook from detecting mistakes you want to catch such as:
- Ignore words in UPPERCASE
- Ignore words that contain numbers
For example, if Ignore words in UPPERCASE is enabled, Outlook may skip a misspelled word written entirely in capital letters.
- If the problem affects only a particular word, click Custom Dictionaries in the same section and review the entries in your dictionary. Remove any misspelled words that were accidentally added.
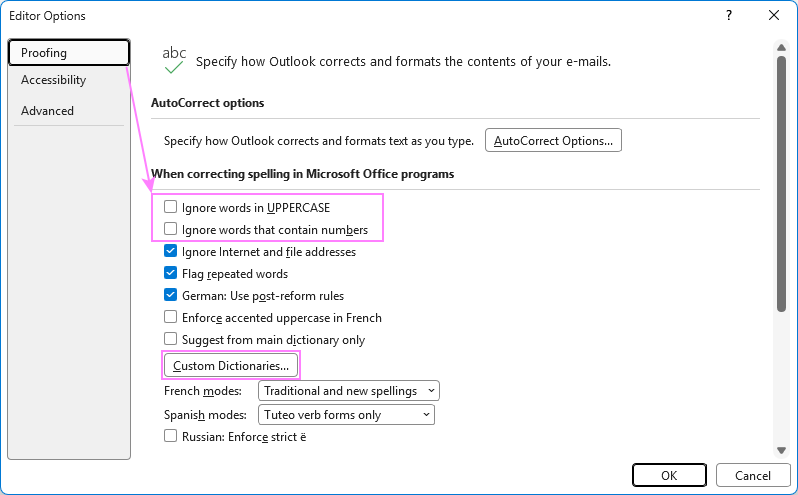
Note that these changes will affect spellchecking across all Microsoft Office applications, not just Outlook.
Tip. If Outlook has previously ignored certain errors, you can also use the Recheck Email option under Proofing > When correcting spelling in Outlook to have those issues checked again.
Choose the correct proofing language for a message
Outlook may not recognize spelling mistakes if your message or its specific part is assigned the wrong proofing language. For example, an English email might be checked against a French dictionary.
Select the affected text and make sure the correct language is used for proofreading:
- Click anywhere in the message body and press Ctrl + A to select all the text. If a particular part of your message is in a different language and isn't being checked correctly, select only that part.
- On the Review tab, click Language > Set Proofing Language.
- In the dialog box that opens, select the language you're writing in.
- Make sure Do not check spelling or grammar is unchecked.
- If you want Outlook to use this language for future messages, click Set As Default and confirm by clicking Yes.
- Back in the main Language dialog box, click OK to apply the updated settings.
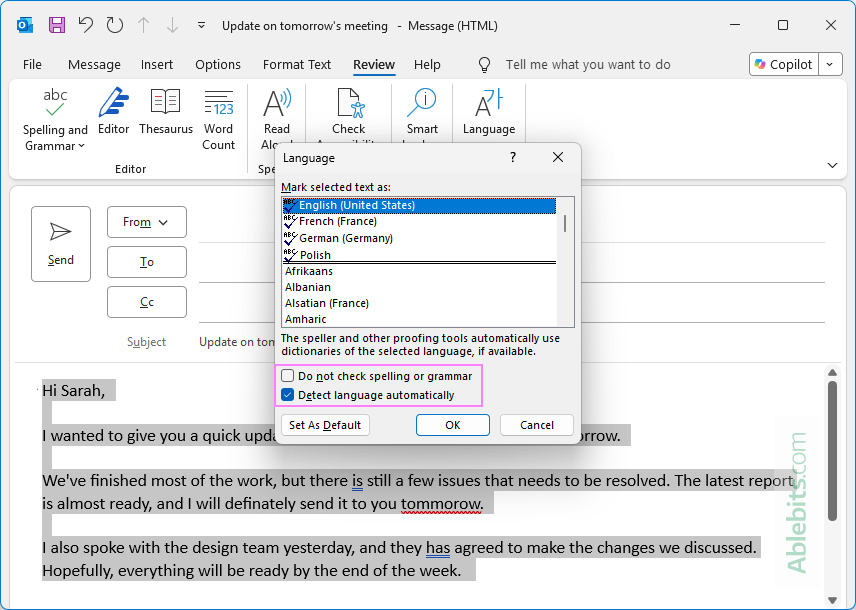
Tips and notes:
- If Do not check spelling or grammar is selected, Outlook will skip the affected text even when automatic spellcheck is enabled.
- If you regularly write emails in different languages, you can also enable Detect language automatically. However, automatic detection may be less accurate for short messages or text containing several languages.
Run spellcheck manually
If automatic checking still doesn't highlight errors, try launching it manually. This will help determine whether the problem affects the entire Outlook spelling checker or just the automatic detection feature in a particular email.
- In the email you are composing, go to the Review tab > Proofing group > Spelling & Grammar or press F7.
- Depending on your Outlook version:
- In classic Outlook 365, Microsoft Editor opens a pane with spelling, grammar, and writing suggestions.
- In Outlook 2024 – 2010, the traditional Spelling and Grammar dialog guides you through mistakes one at a time.
If manual checking detects errors but automatic checking doesn't, revisit the Automatic spellcheck settings.
How to fix spellcheck in new Outlook and web
New Outlook for Windows, Outlook on the web, and Outlook.com use Microsoft Editor for spelling, grammar, and writing suggestions. Unlike classic Outlook, these versions don't have the traditional File > Options > Mail > Spelling and Autocorrect settings.
If spellcheck isn't working, try the following solutions.
Check Microsoft Editor settings
Microsoft Editor lets you control the spellchecker settings as well as the languages used for proofreading. If these settings are incorrect, Outlook may miss spelling mistakes or stop showing suggestions altogether.
To check and adjust Editor settings:
- On the Message tab, click the three-dot menu and select Editor > Editor Settings.
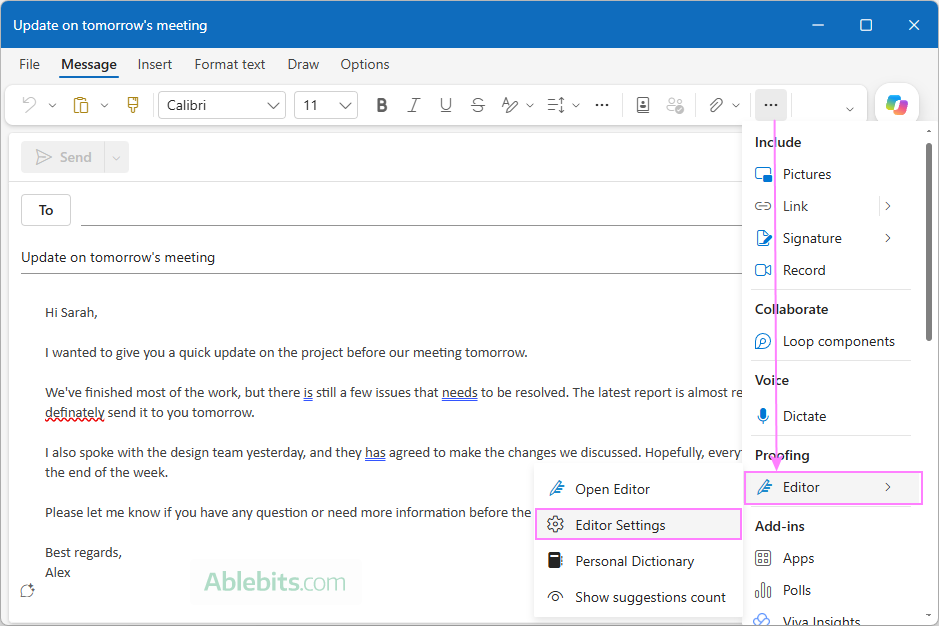
- In the Microsoft Editor Settings pane, review the following:
- Spelling and grammar corrections. Make sure the Spelling and Grammar categories are enabled so Editor can detect and highlight errors.
- Proofing language. Check that the selected language matches the language you're writing in. If your preferred language is missing, click Manage spellcheck languages to add it.
- Other writing suggestions. Review the available refinement options and enable those you want Editor to check, such as clarity, conciseness, or formality.
- If you're unsure which settings have been changed, click Reset to default to restore the original configuration.
- Click OK to apply the settings.
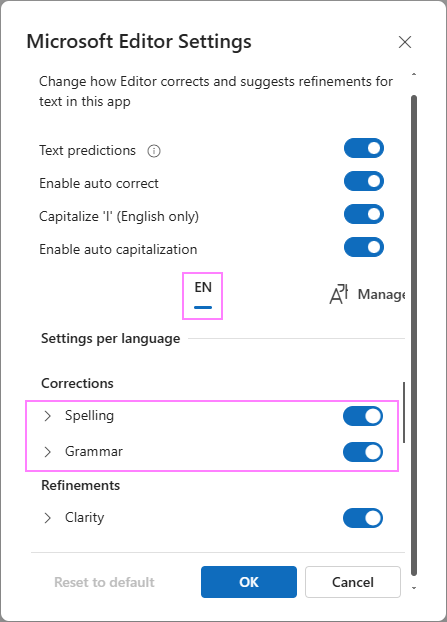
After updating the settings, type a few deliberately misspelled words in a new email to see whether Editor detects them.
Notes:
- Changing the proofing language while composing an email may affect only that particular draft. If the problem occurs in another message, check its language settings as well.
- If the issue persists after changing or resetting Microsoft Editor settings, try clearing new Outlook cache.
Open the message in a separate window
If spell check isn't working when you compose a new email inline or reply directly in the Reading pane, try opening the message in a separate window. Click Pop-out to a new window to force Editor to load properly. If spell checking works in the separate window, you can finish composing and send your reply from there.
Check your internet connection and browser
New Outlook and the web versions of Outlook rely on online services for some Microsoft Editor functionality. Connection problems or browser-related issues may interfere with suggestions.
Try these simple fixes:
- Check that your internet connection is stable.
- Refresh Outlook on the web or close and reopen new Outlook.
- If you're using Outlook in a browser, try opening it in a private window.
- Temporarily disable browser extensions that modify text or provide spelling and grammar corrections.
- Update your browser to the latest version.
If spellcheck functions correctly in a private browsing window but not in your regular browser session, a browser extension or stored website data may be responsible.
Additional fixes for spellcheck issues in any Outlook version
If none of the solutions above help, the problem may be related to Windows settings, outdated software, or a damaged Outlook installation. Here are a few more things you can try.
Change the email format to HTML
If Outlook isn't highlighting spelling or grammar errors in a specific email, check the message format. Automated Outlook proofing occasionally pauses if an email is set to Plain text. Try switching to HTML to see if that resolves the issue.
After changing the format, type a misspelled word to check whether Outlook detects it.
Note. Plain text formatting does not normally disable spell checking. If changing to HTML doesn't help, the problem is likely related to your proofing settings or another issue.
Check Windows spelling settings
Windows has its own spelling settings that may affect highlighting typing errors in certain applications. To check them:
- Open Windows Settings > Time & language > Typing.
- Make sure Highlight misspelled words is turned on.
- Optionally, enable Autocorrect misspelled words if you want common typos to be corrected automatically.
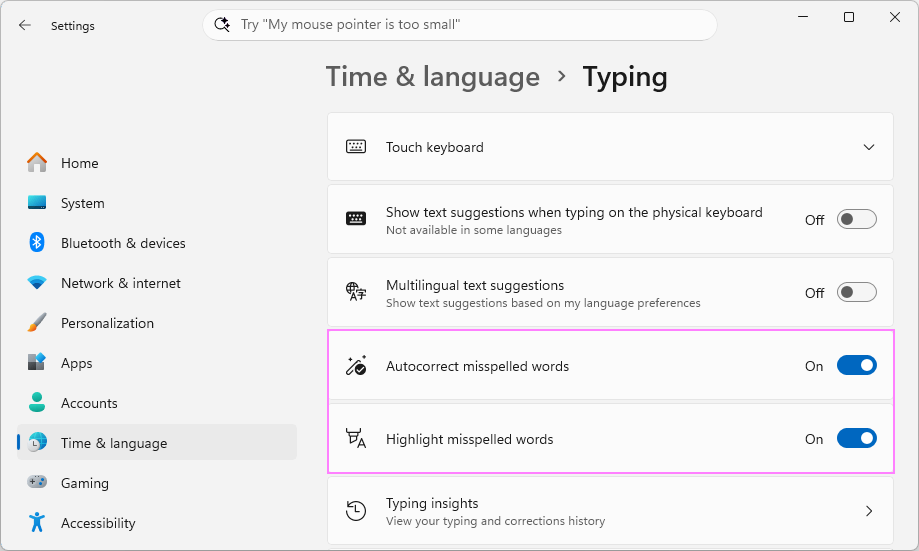
Note. This setting is mainly relevant to new Outlook for Windows. Classic Outlook uses Microsoft Office's own proofing tools, so changing Windows spelling settings generally won't affect its spellchecker.
Enable connected experiences for Outlook
In Outlook versions that use Microsoft Editor for spellchecking, Connected experiences settings can affect the availability of spelling, grammar, and styling suggestions. If this feature is disabled, some Editor capabilities may be limited or unavailable.
Here's how to check and enable the setting in classic Outlook for Microsoft 365 and new Outlook for Windows.
Turn on connected experiences in classic Outlook 365
To check whether Connected Experiences are enabled in Outlook for Microsoft 365:
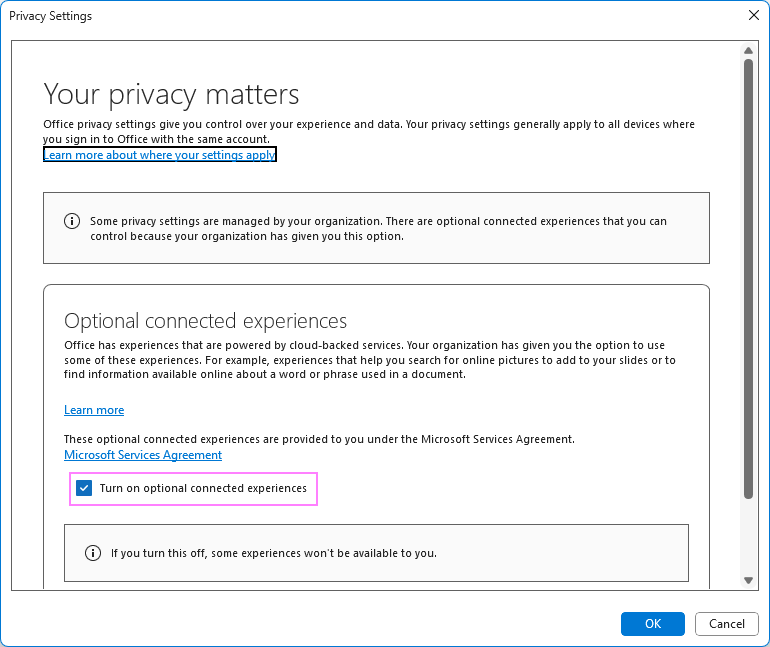
- Go to File > Options > General > Privacy Settings.
- In the Privacy Settings window, find the Optional connected experiences section.
- Make sure Turn on optional connected experiences box is selected.
- Click OK and restart Outlook.
Enable optional connected experiences in new Outlook and web
To manage connected experiences in new Outlook and Outlook on the web:
- Click Settings (gear icon) in the upper-right corner.
- Go to General > Privacy and data > Privacy settings.
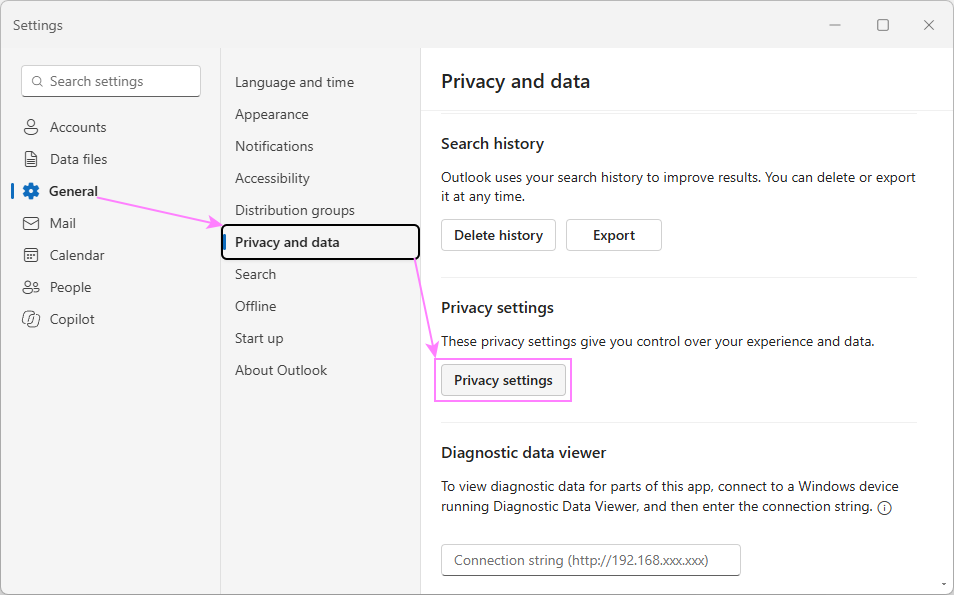
- Enable Turn on optional connected experiences, if available.
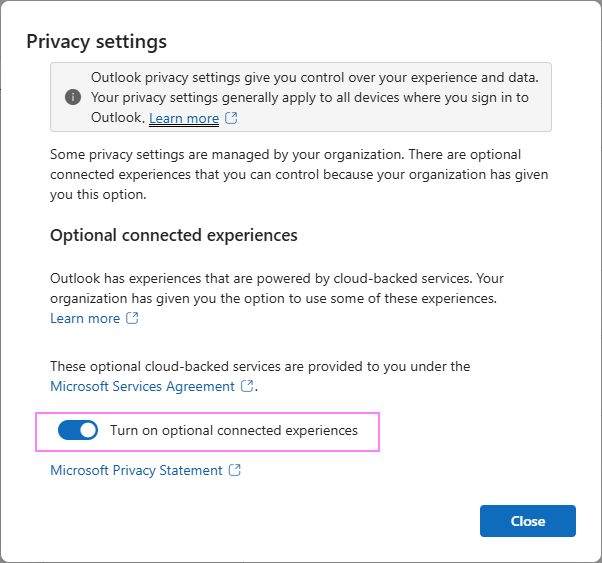
- Restart Outlook and check whether Microsoft Editor detects spelling and grammar mistakes.
Notes:
- Disabling connected experiences may limit advanced Editor suggestions, but basic spelling and grammar checking should still remain available.
- For Microsoft 365 work or school accounts, some privacy settings may be controlled by your organization's IT administrator. If the Connected experiences option is unavailable or blocked, contact your IT department for assistance.
Update Outlook
An outdated Outlook version can sometimes cause spell checking to malfunction. Installing the latest updates may resolve known issues and improve compatibility with Microsoft Editor and other proofing tools.
The update process differs depending on which Outlook version you're using:
Repair Outlook
If spellcheck still doesn't work, some application files or components may be damaged. Repairing Outlook can help restore its normal functionality without requiring a complete reinstallation.
The repair options depend on your Outlook version:
What to do if Outlook still doesn't check spelling
If you've tried the solutions above but Outlook continues to miss spelling mistakes, test the issue with a brand-new email containing several obvious errors. This can help you determine whether the problem affects all messages or just a particular draft.
If spelling works in a new message but not in an existing one, check the proofing language applied to that draft.
If the problem affects every message, your next step depends on the Outlook version:
- Classic Outlook: Check whether spelling works in another Office application, such as Word. If it doesn't, the issue may involve shared Office proofing settings or language tools. If spellcheck problems began after installing a specific add-in, try starting classic Outlook in Safe mode. If spelling checking returns to normal, a conflicting add-in may be responsible.
- New Outlook: Try Outlook on the web with the same account. If spellcheck functions there, the issue may be specific to the Windows application.
- Outlook on the web: Try another browser or Private browser mode to rule out browser-related problems.
- Microsoft 365 business accounts: If you use a work or school Microsoft 365 account and the problem persists, your IT administrator may also be able to check whether organizational settings or service issues are involved.
Once spelling and grammar checking are back to normal, Outlook will save you from embarrassing typos in your next important email. And remember, even the best spell checker can't always tell whether you meant "contact" or "contract", so a quick final read is still worth it 😊