This step‑by‑step guide shows you the fastest ways to search for an email in Outlook, plus a few handy extras. You'll learn how to use Advanced Find for more accurate results and Search Folders to save your most-used filters for the future.
Sorting through a busy mailbox can easily eat up a whole morning, but finding the right email in Outlook doesn't have to. Scrolling endlessly isn't the strategy. When your inbox is overflowing, Outlook's filters and search tools can help you cut through the noise and find exactly what you need.
How to search emails in Outlook
To find specific emails in Outlook, the search bar at the top of the window is your starting point. Here's how to use it effectively:
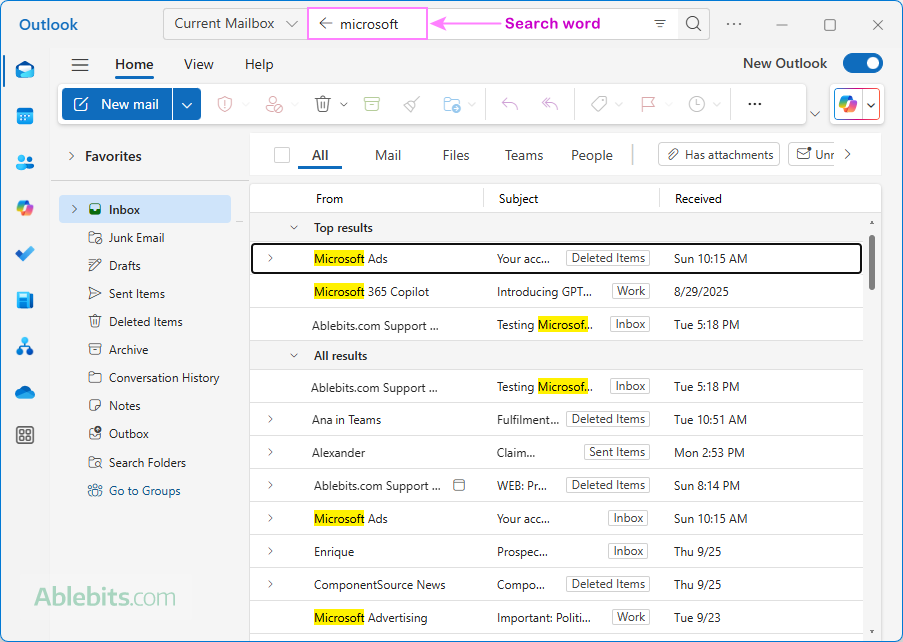
- Enter a search word or phrase. Click in the search bar at the very top of Outlook and type a keyword. This could be the sender's name, a phrase from the subject line, or a word in the message body. Press Enter to see all emails that match.
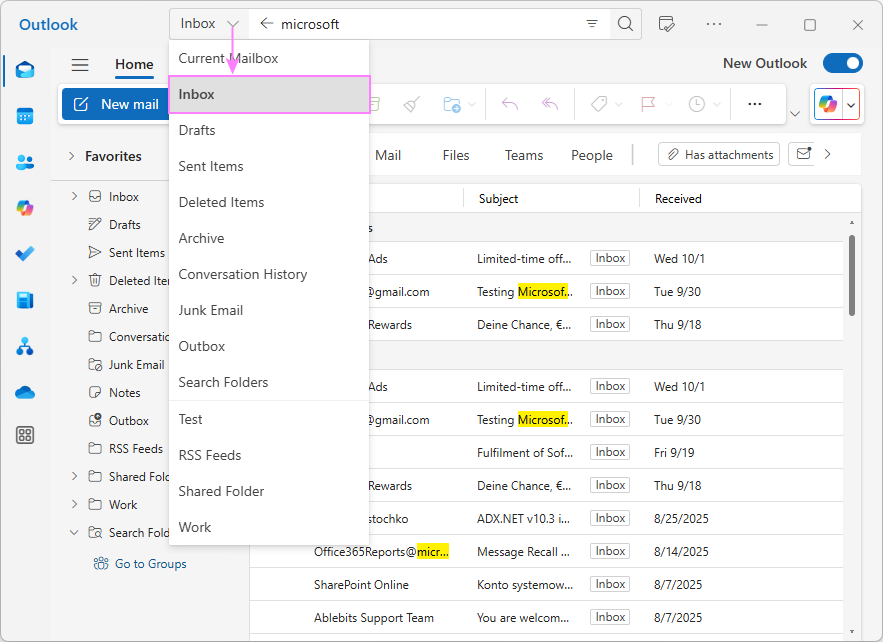
- Choose where to search. By default, Outlook searches your entire mailbox when you're in the Inbox. If you start a search from another folder, Outlook limits results to that folder. You can change this search scope at any time:
- Classic Outlook: All mailboxes, current mailbox, current folder, subfolders, or all items
- New Outlook and web: Current mailbox or a specific folder of the current mailbox
Use the dropdown menu to the left of the Search box to switch between these options.
- Refine results with filters. To narrow your search when you have too many matches, use inbuilt or custom filters. For example, you can specify whether to look at the body text, subject line, From field, or attachments. You can also set a specific date or date range to focus on when the email was likely to be received. To access filters:
- Classic Outlook: Use the Advanced Search button (downward arrow) at the right side of the search box.
- New Outlook and web: Click the Filters bottom at the right of the search bar.
- Exit the search. When you're done searching, close it to return to your regular mailbox view:
- Classic Outlook: Click the cross button (X) at the far right of the search box or select Close Search on the Search tab.
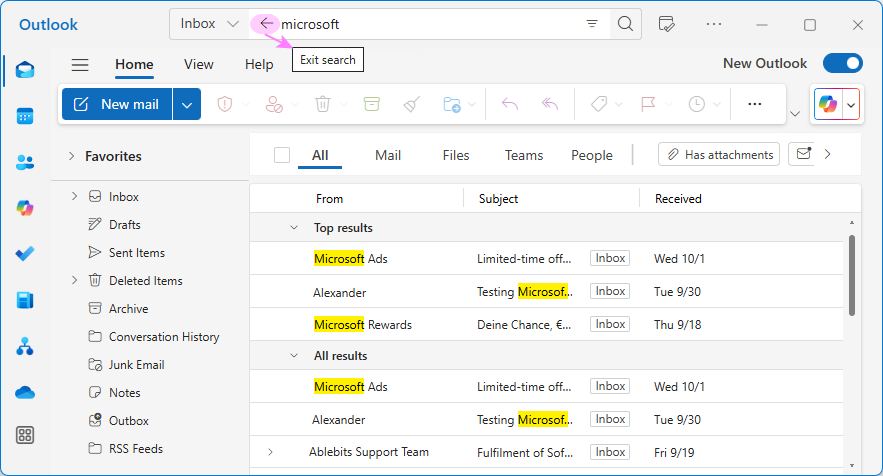
- New Outlook and web: Click the back arrow next to your search term.
These basic search options are available across all Outlook applications – classic desktop, new Outlook, and web. There are just slight differences in the interface.
Before you dive further into advanced filters, it helps to know how Outlook interprets your searches. Here are some key behaviors to keep in mind: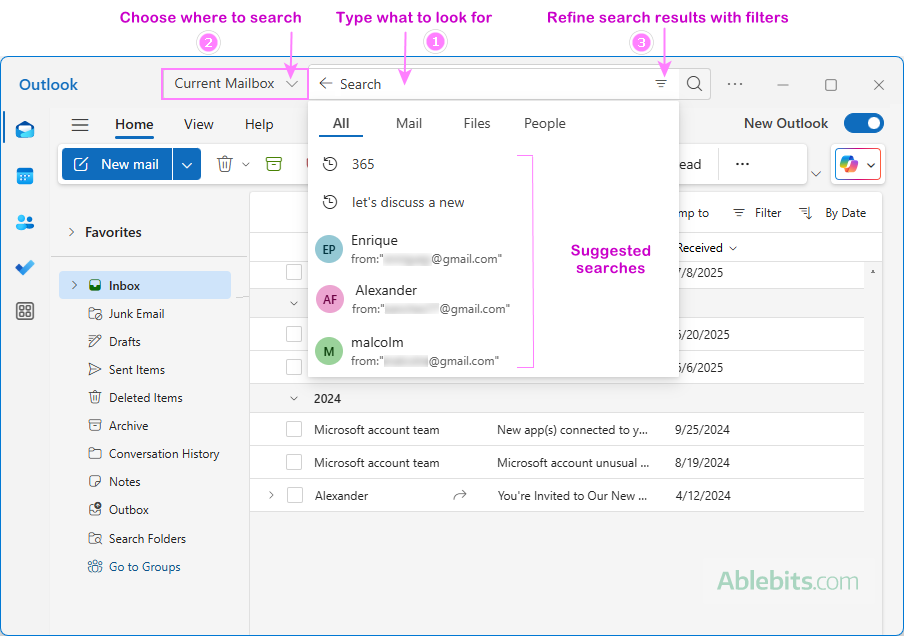
Tips for effective search in Outlook
How to filter emails in Outlook
Filtering helps you focus on the messages that matter most, whether that's unread mail, emails with attachments or from specific people. Outlook includes a number of built-in filters, but the way you access them depends on the app you're using.
Filter emails in Outlook 365 – 2010
In classic Outlook, there are several ways to filter your emails, from quick built-in options to more advanced search tools. The steps below will work well in most situations.
- Open the folder where you want to apply the filter (for example, Inbox or Sent Items).
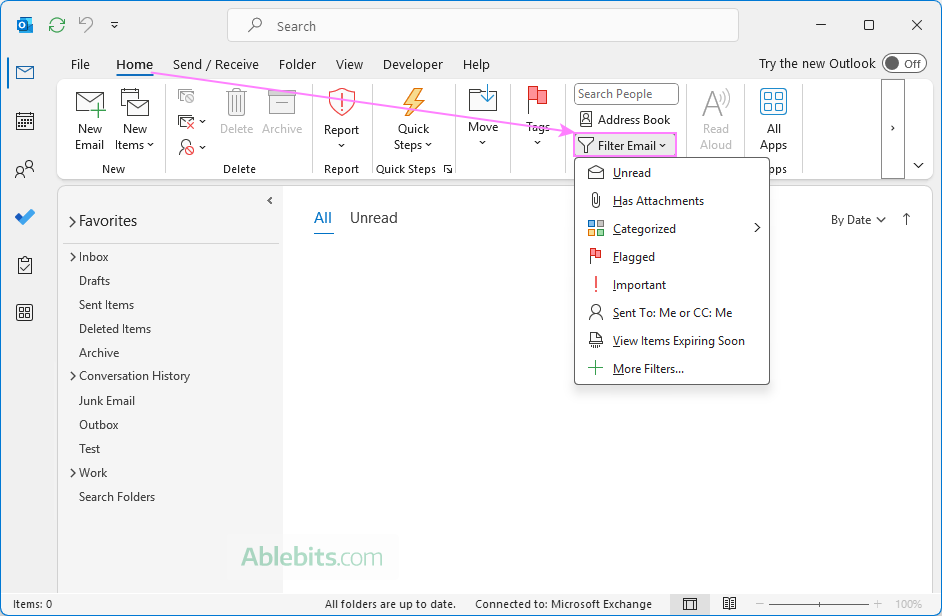
- On the Home tab, in the Find group, click Filter Email. Choose one of the predefined filters such as Unread, Has Attachments, Categorized, etc. Outlook will search your current folder based on that filter.
Advanced Search
If none of the predefined filters meet your needs, click More Filters at the bottom of the Email Filter dropdown menu. This will open Outlook's search box, where you can:
- Type a text filter directly into the search box, or
- Click the down arrow at the right side of the search bar to open the Advanced Search window, which lets you limit results by sender, recipient, subject, date, or whether the message has attachments.
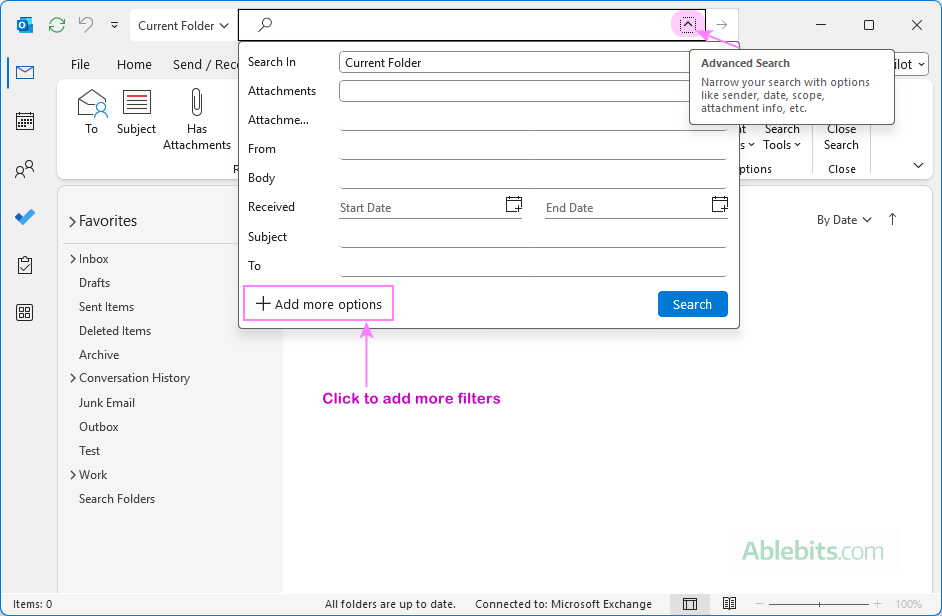
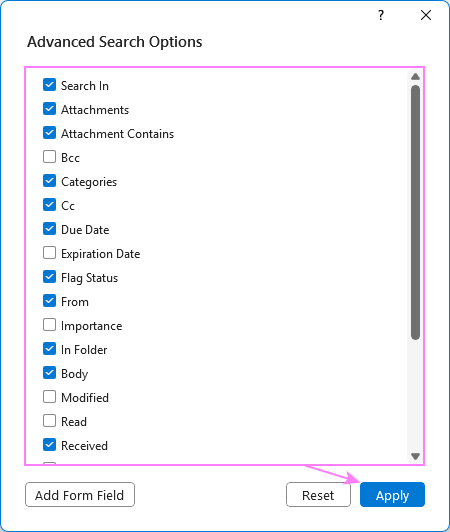
- For even more criteria, click Add more options at the bottom of the Advanced Search window. This opens a separate dialog where you can pick additional fields for filtering your emails. Once you've made your selections, click Apply, and the chosen fields will appear in the Advanced Search window, allowing you to refine your search further.
- To clear the filter and return to your normal view, click the X in the search box or select Close Search on the Search tab.
In addition to the basic filtering steps above, classic Outlook offers two more easy ways to narrow down your email searches.
Refine options on the Search tab
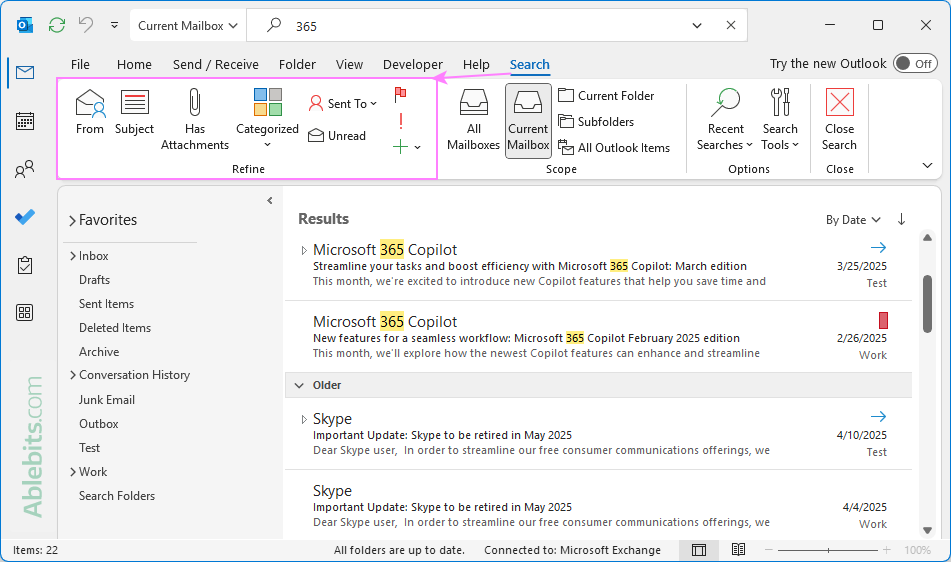
When you click in the search bar in Outlook, the Search tab appears, offering the following options in the Refine group:
- From – show results from a specific sender.
- Subject – limit results to the specified words in the subject line.
- Has Attachments – filter emails with attachments.
- Categorized – filter by assigned categories.
- Sent To – search for messages sent to you, not directly to you, or to another recipient.
- Unread – view only unread emails.
- Flagged – display emails you've flagged for follow-up.
- Important – show emails marked as Important.
- More – access extra options such as items expiring soon or filter by a custom form field.
Basic Filter options
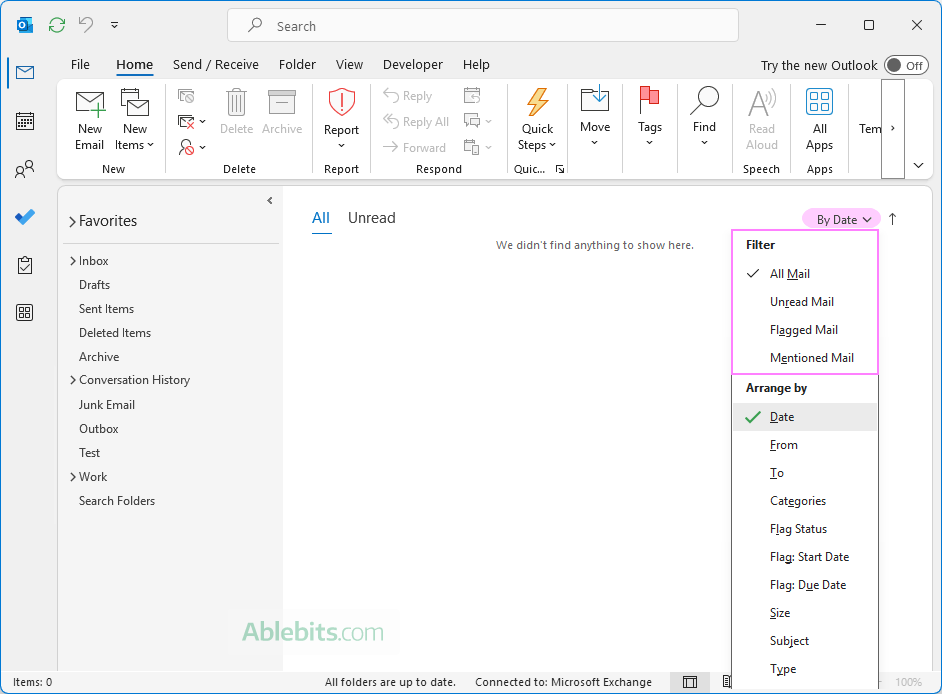
To access a few common filers, click the Arrange by button in the upper-right corner above the message list. Usually, it says By Date (the default arrangement) or shows your current sort option. From this menu, you can quickly filter by: All Mail, Unread, Flagged, and Mentions (emails where you are tagged with @YourName).
Filtering emails in new Outlook and web
In the new Outlook app and Outlook online, there are two main ways to filter emails.
Filter menu
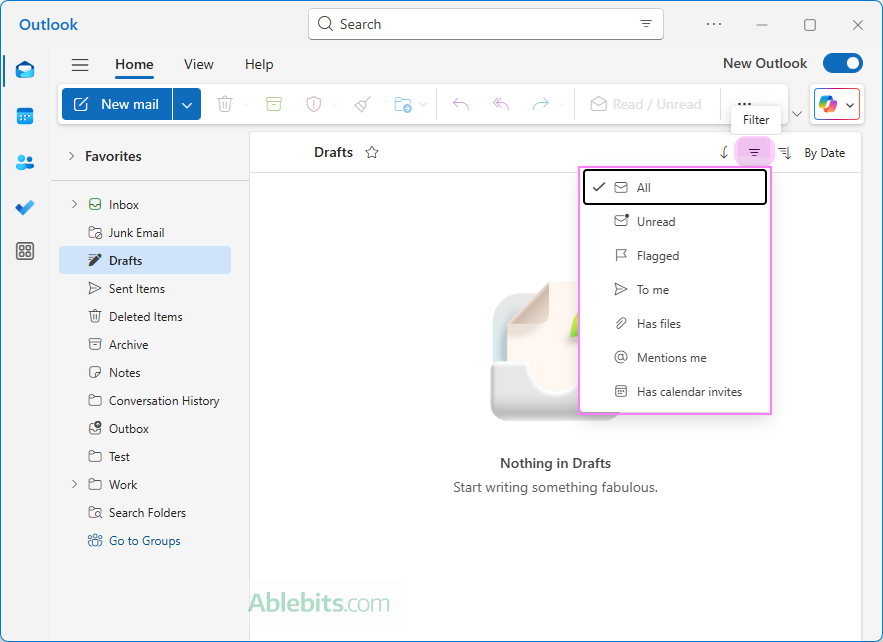
The Filter menu gives you quick, one-click options to view only certain types of emails.
- At the upper right of your mailbox, above the message list, click a small Filter button.
- Choose from the available options: Unread, Flagged, To me, Has files, Mentions me, or Has calendar invites.
- To clear the applied filter and return to your full mailbox view, click the Filter button again.
Search box filters
To access additional filtering options, do this:
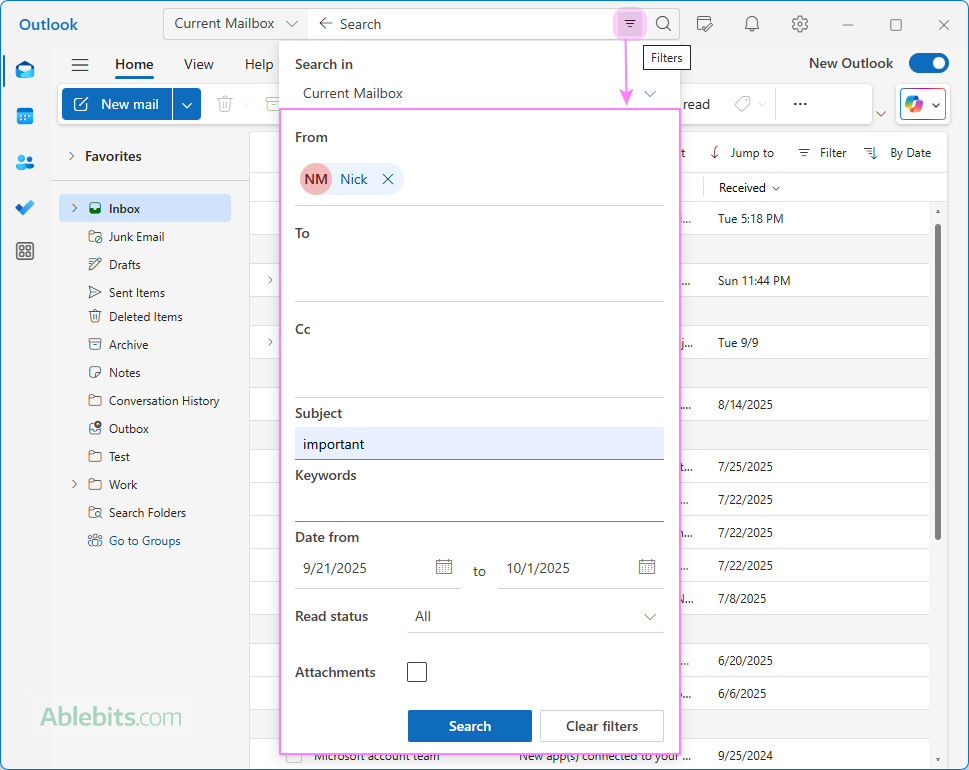
- Click the Filters button at the right side of the search bar.
- In the window that opens, you can set up filters such as sender, subject and body keywords, date range, attachments, or read/unread status.
- Click Search to apply the selected filters.
Tip. Whenever you select a predefined filter in Outlook, a shorthand version of that filter appears in the Search box. For example, if you search for flagged emails, Outlook automatically inserts: followupflag:followup. This can help you learn and reuse custom filters in the future.
Using Advanced Find in Outlook (classic)
If the basic search and filter options aren't enough, you can use Advanced Find to perform more precise searches.
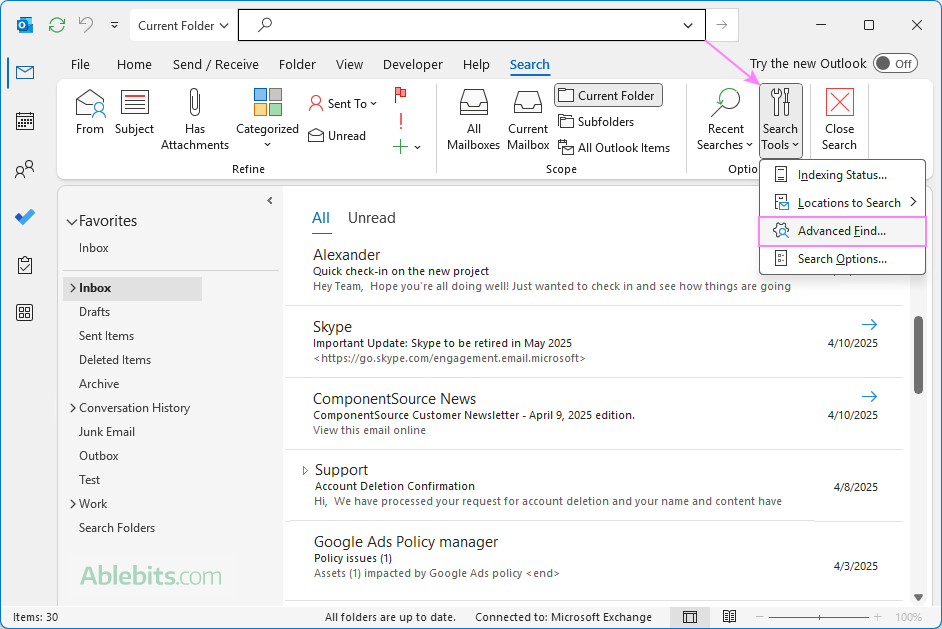
- Press Ctrl + Shift + F to open the Advanced Find dialog. Alternatively, click into the Search box to display the Search tab in the ribbon, and then click Search Tools > Advanced Find.
- Explore the three tabs in the dialog:
- Messages tab – the most commonly used tab, which lets you search by criteria such as:
- What items to look for (messages, contacts, appointments, or all items)
- Which folders to search in
- Keywords or phrases to search for
- Specific senders
- Your role on the email (only person on the To line, included with others on the To line, or on the Cc line)
- More Choices tab – lets you refine your search further by selecting categories, read/unread status, messages with attachments, importance, flagged items, or message size.
- Advanced tab – gives you the most flexibility by allowing you to select any field that exists in Outlook and define custom criteria for your search.
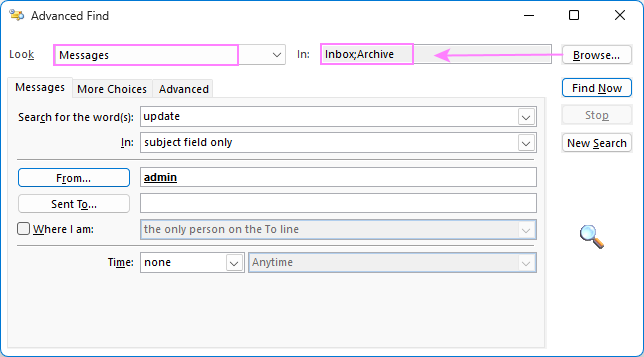
- Messages tab – the most commonly used tab, which lets you search by criteria such as:
Advanced Find is particularly useful when you need to combine multiple conditions or search across several folders at once.
Using search filters in Outlook
Outlook lets you go beyond simple keyword searches by using custom filters (also called Advanced Query Search or AQS). These filters help you pinpoint exactly what you're looking for, whether it's an invoice from last week, a message with a spreadsheet attached, or an email sent by a specific person.
To use a search filter in Outlook:
- Enter it in the Search box and press Enter.
- To clear the filter and return to the full message list, press Esc.
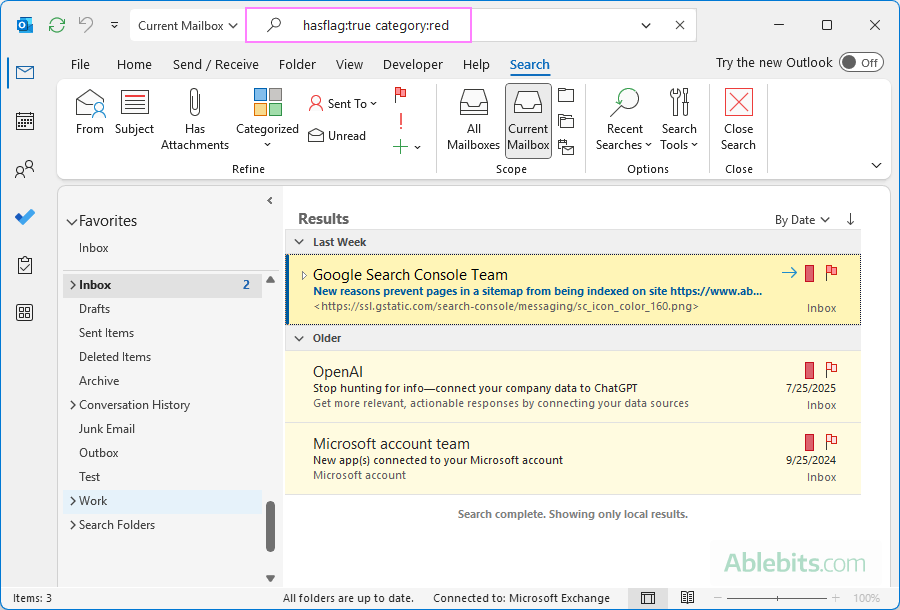
Below are the most useful Outlook search filters with practical examples.
Filter emails by content
| Filter | What it finds |
|---|---|
| report | Emails containing the word "report" in any field (From, Subject, Body, etc.), including variations such as reporting, reported, etc. |
| budget update | Items containing both budget and update, but not necessarily next to each other. |
| "quarterly report" | The exact phrase quarterly report, in that order. Quotation marks are required for exact phrase matching. |
| about:"weekly update" | Items where the phrase "weekly update" appears in the subject line, body, or attachment contents. |
Filter emails by sender (From field)
| Filter | What it finds |
|---|---|
| from:"Alex Johnson" | Emails sent by Alex Johnson. |
| from:alex | Messages sent by anyone whose name or email address includes Alex. |
Filter emails by subject
| Filter | What it finds |
|---|---|
| subject:invoice | Emails where the subject contains "invoice". |
| subject:"January invoice" | Only emails with the exact phrase "January invoice" in the subject. |
Filter emails by recipients
| Filter | What it finds |
|---|---|
| cc:"David Chen" | Emails where David Chen was CC'd, i.e. the display name "David Chen" is on the Cc line. |
| cc:david@company.com | Emails where the exact address appears in CC. |
| bcc:admin | Emails where admin was BCC'd. |
| to:david | Messages you sent to David (helpful when searching Sent Items). |
Filter emails with attachments
| Filter | What it finds |
|---|---|
| hasattachment:yes hasattachment:true | Items that include one or more attachments. |
| attachments:budget | Emails with an attachment named "budget", or an attachment that contains "budget" in the file name or anywhere within its contents. |
| hasattachment:no hasattachment:false | Items with no attachments |
Filter emails by date
| Filter | What it finds |
|---|---|
| received:2/15/2025 | Messages you received on a specific date (February 15, 2025 in this case). |
| received:today | Messages that arrived today. |
| received:"last week" | Emails from last week. |
| received:2/1/2025...2/28/2025 | Emails received within the specified date range (between February 1 and February 28). |
Note. Outlook supports relative dates such as today, yesterday, this week, last month, and last year. It does not support weekday names like Monday or month names like June.
Filter unread / read
| Filter | What it finds |
|---|---|
| read:no read:false |
Unread emails |
| read:yes read:true |
Emails that you've already read or marked as read. |
Filter emails by size
| Filter | What it finds |
|---|---|
| messagesize:<50 KB | Messages smaller than 50 KB |
| messagesize:>5 MB | Emails larger than 5 MB (often large attachments) |
| messagesize:tiny | Items smaller than 10 kilobytes |
| messagesize:small | Items between 10 and 25 kilobytes |
| messagesize:medium | Items between 25 and 100 kilobytes |
| messagesize:large | Items between 100 and 500 kilobytes |
| messagesize:verylarge | Items between 500 kilobytes and 1 megabyte |
| messagesize:enormous | Items larger than 5 megabytes |
Note. Size keywords such as small, medium, large, verylarge, enormous work only in classic Outlook. They are not supported in the new Outlook and Outlook on the web.
Filter messages by color category
| Filter | What it finds |
|---|---|
| category:green | Emails tagged with a category name containing "green", for example, Green Category or Green Milestone. |
| NOT category:=[] | Emails that have any category assigned. |
| category:=[] | Uncategorized emails |
Filter flagged emails
| Filter | What it finds |
|---|---|
| hasflag:true
hasflag:yes followupflag:follow up |
Items flagged for follow-up. |
| due:this week | Flagged emails that are due this week. |
Filter emails by multiple criteria
You can use several filters together to narrow results further.
| Filter | What it finds |
|---|---|
| from:harry hasattachments:yes | Message from Harry with attachments. |
| read:no subject:invoice attachments:budget.xlsx | Unread emails with "invoice" in the subject and an attachment named budget.xlsx. |
| from:"Alex Johnson" (received:2/1/2025 OR received:2/2/2025) | Emails from Alex Johnson received on February 1 or February 2, 2025. |
Logical operators in Outlook filters
You can use logical operators such as AND, NOT, OR, <, >, = as well as parentheses to perform complex searches.
| Filter | What it finds |
|---|---|
| invoice AND January | Emails containing both words "invoice" and "January". |
| invoice NOT January | Emails with "invoice" but not "January". |
| subject:project OR subject:proposal | Messages with the subject containing either "project" or "proposal" (along with their variations) or both words. |
| subject:invoice (received:10/27/2025 OR received:10/88/20255) | Messages with "invoice" on the subject line that arrived on October 27 or October 28, 2025. |
Key takeaways
- Use quotes for exact matches, for example "project update".
- Use logical operators (AND, OR, NOT) in uppercase to combine filters.
- Use parentheses to group conditions.
- Some size keywords (like messagesize:small) aren't supported in the new Outlook and web.
How to create search folders in Outlook
If you find yourself running the same searches often, you can save time by using Search Folders.
A Search Folder is a virtual folder that automatically gathers all messages matching specific criteria. It doesn't move or copy the emails anywhere; it simply shows them together for quick access.
To create a new Search Folder in Outlook, follow these steps:
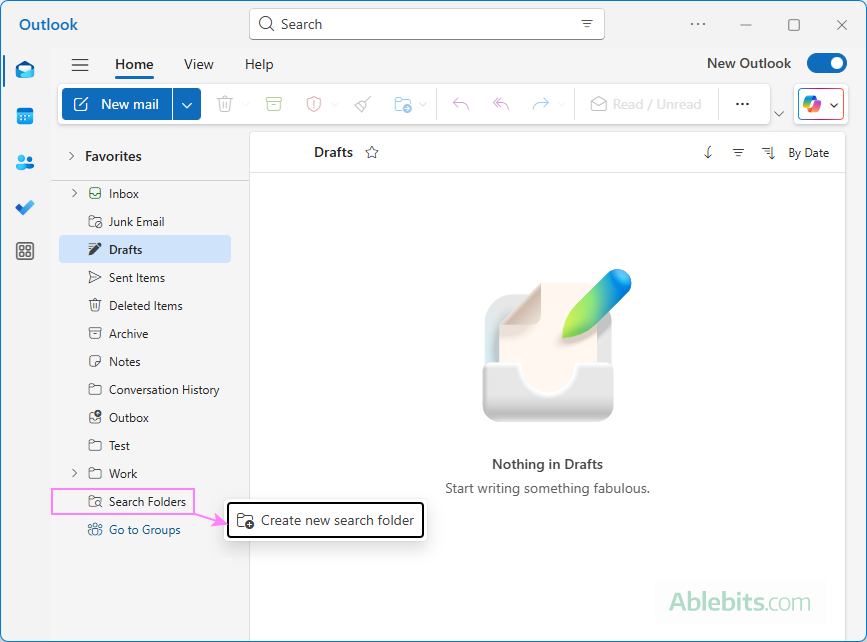
- In the folder pane, under your mailbox folders, right-click Search Folders, then choose New Search Folder.
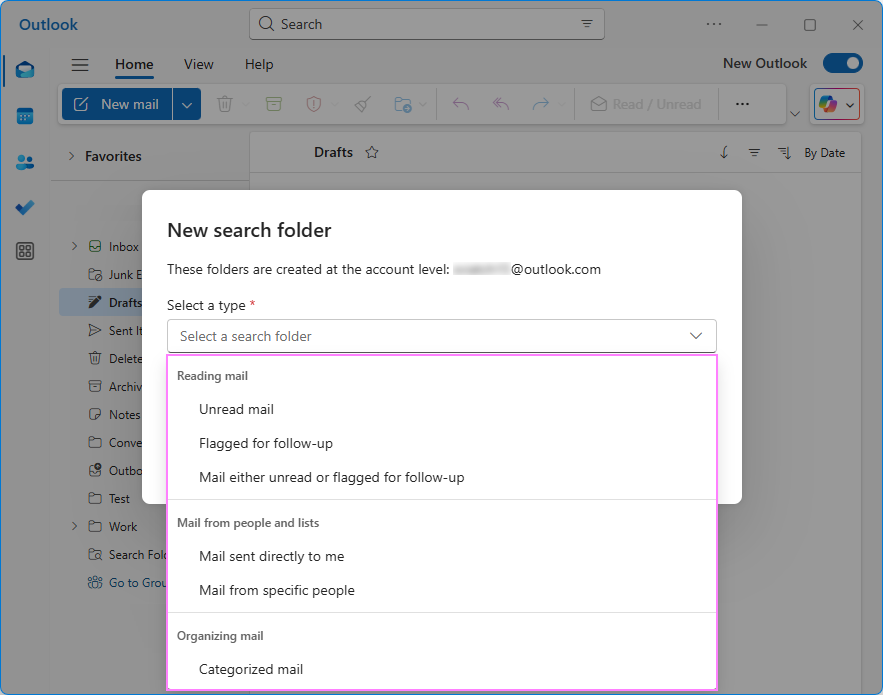
- In the New Search Folder window, choose one of the predefined options, grouped into three categories:
- Reading Mail – messages you read / haven't read yet or have flagged for follow-up.
- Mail from People and Lists – messages from specific contacts or sent directly to you.
- Organizing Mail – categorized messages (plus, large or older than a certain date in classic Outlook).
- Give your Search Folder a name, then click Create.
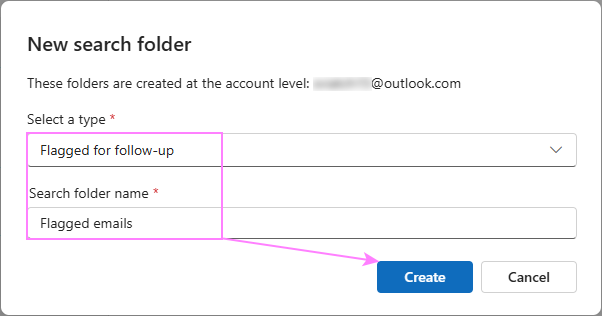
Your new Search folder now appears in the folder list and updates automatically whenever new matching emails arrive.
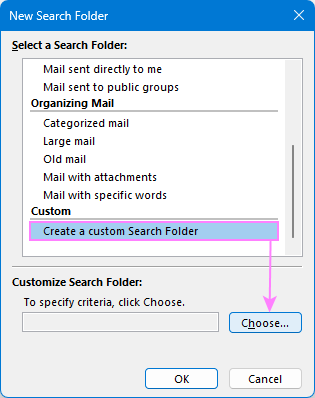
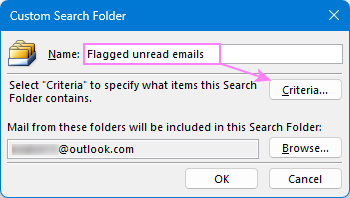
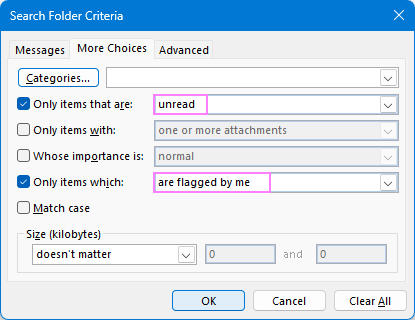
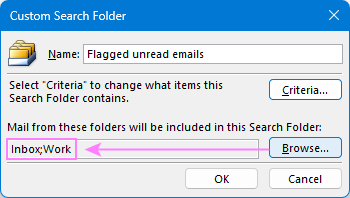
In addition to the predefined options, the classic desktop Outlook app lets you create a custom Search Folder with your own criteria. Here's how to do it: That's it! Outlook will immediately create your custom Search Folder and begin displaying all emails that meet your chosen conditions. Tips and notes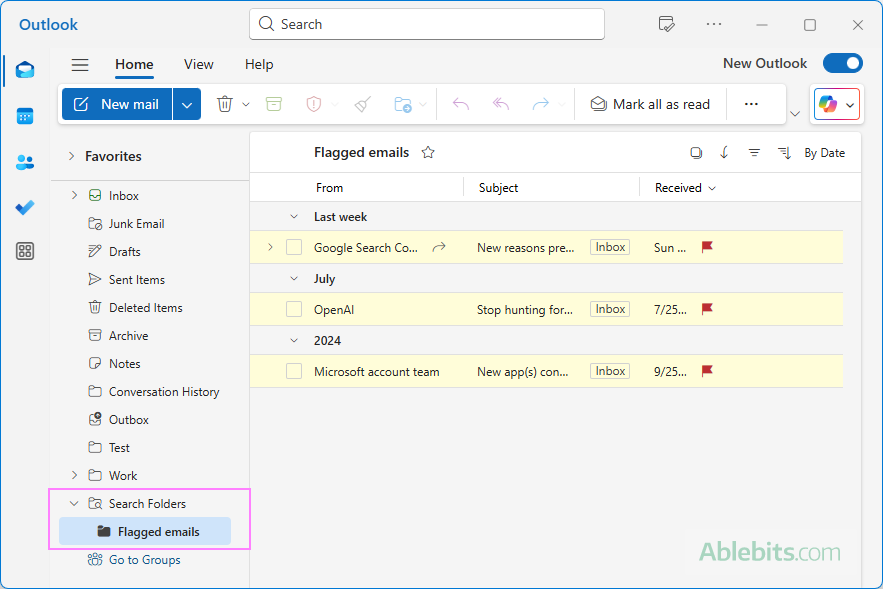
Create a custom search folder in Outlook (classic)
Keyboard shortcuts for searching emails in Outlook
If you search for emails frequently, keyboard shortcuts can save you a lot of clicks. Here are the most useful ones for both the classic and new Outlook apps, as well as Outlook on the web.
Common shortcuts (work in most Outlook versions):
| Go to Search box
Ctrl + E or F3 |
Quickly places the cursor in the Search box so you can start typing your query right away. |
| Cancel a search
Esc |
Stops the current search and returns you to your regular inbox view. |
Classic Outlook for Windows only:
| Open Advanced Find
Ctrl + Shift + F |
Opens the Advanced Find dialog where you can build complex, multi-criteria searches. |
| Create a new Search Folder
Ctrl + Shift + P |
Opens the New Search Folder window to save a search for repeated use. |
How to filter Outlook emails to folder automatically
You don't have to sort and filter every message yourself. If you often receive recurring emails, such as order confirmations or subscription updates, Outlook can file them for you. Simply, create rules to automatically move those messages into specific folders.
This guide explains how to set up these rules in Outlook classic, new and web: How to sort emails to folders.
In conclusion: Next time you catch yourself scrolling endlessly for that one email, remember that Outlook can find it faster than you can. With a few well-chosen filters or a saved Search Folder, you'll have what you need in no time – no detective skills required. 😊
 by
by