This guide explains how to check if the recipient has read your email and how to turn read receipts on or off in Outlook.
I sent it, but did they get it? When you send an important email, it's natural to wonder whether it reached the recipient and if they've viewed it. Outlook offers two tracking options that let you find out what happened after you hit the Send button: delivery notifications, which confirm that your message reached the recipient's mailbox, and read receipts, which indicate that the message was opened.
What is a delivery receipt in Outlook?
A delivery receipt confirms that your email was successfully delivered to the recipient's mail server. However, it doesn't mean the person has opened or read your message.
When you send an email in Outlook, it travels through several mail servers until it reaches the recipient's mail system. Once the message is accepted by that server, it can send you a notification confirming the email has reached its destination.
This notification is generated automatically, without any action from the recipient. However, it's not always guaranteed. In some cases, your organization's administrator (for Microsoft 365 or Exchange accounts) may disable delivery reports, or the recipient's mail server may refuse to send them.
In short, a delivery receipt only verifies that the message reached the recipient's mail server, not necessarily their Inbox. It could still be filtered, redirected by a rule, or deleted before the recipient ever sees it.
What is a read receipt in Outlook?
A read receipt confirms that an email was opened by the recipient. Unlike delivery notifications, which come from mail servers, read receipts are sent by the recipient's email program – if the user chooses to send it. Some email systems or privacy settings may block these requests.
When a recipient opens your message, Outlook prompts them to send a read receipt. If they approve, you'll receive a confirmation showing the date and time the message was opened.
However, even when you receive a read receipt, it doesn't always mean the person actually read the message. The request appears as soon as the recipient opens the email, and they might automatically click "Send receipt", and then get distracted before reading the message in full.
In other words, a read receipt confirms that the message was opened, but not necessarily read.
How to request a read receipt in Outlook (classic)
If you are sending an important email and want confirmation that it's been received and opened, you can request delivery and read receipts for that message. Here's how:
- Create a new email or reply to an existing one.
- On the Options tab, in the Tracking group, select Request a Read Receipt.
- If you also want to know when the message reaches the recipient's mail server, check Request a Delivery Receipt.
- Compose your message and send it as usual.
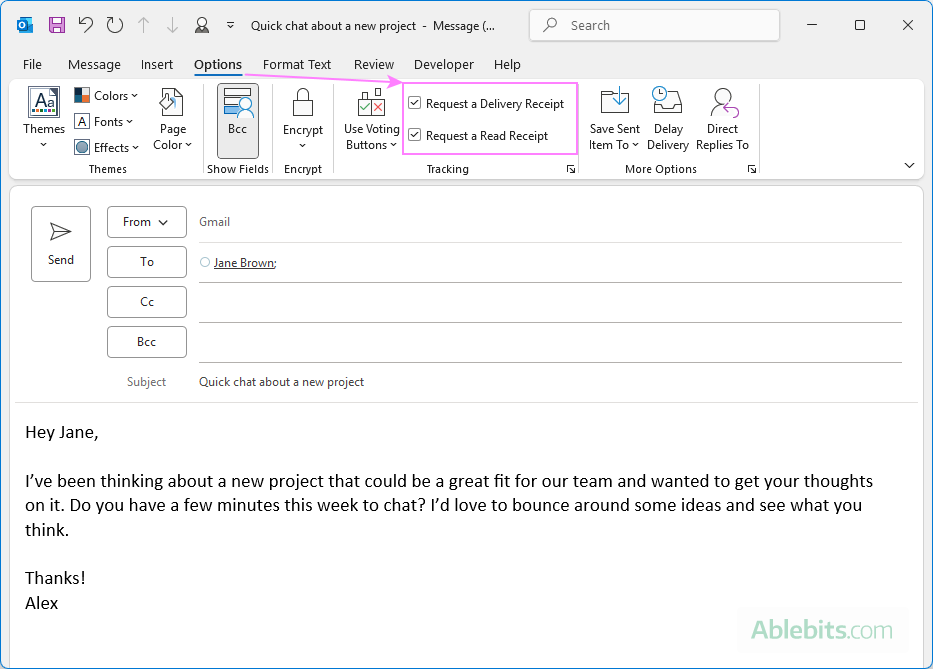
When your email is delivered or opened, depending on which options you selected, you'll receive a confirmation message (if the recipient's mail server or settings allow it).
Add a read receipt from the Reading pane
You can also request a receipt while replying to someone's email directly from the Outlook Reading Pane, without opening a full message window.
- On the ribbon, go to the Message tab.
- In the Tags group, click the small Message Options launcher (the arrow in the lower-right corner).
- In the Properties dialog box that opens, under Voting and Tracking options, select the type of receipt you want to get:
- Request a Delivery Receipt – to confirm that your email was delivered to the server.
- Request a Read Receipt – to be notified when the recipient opens your message.
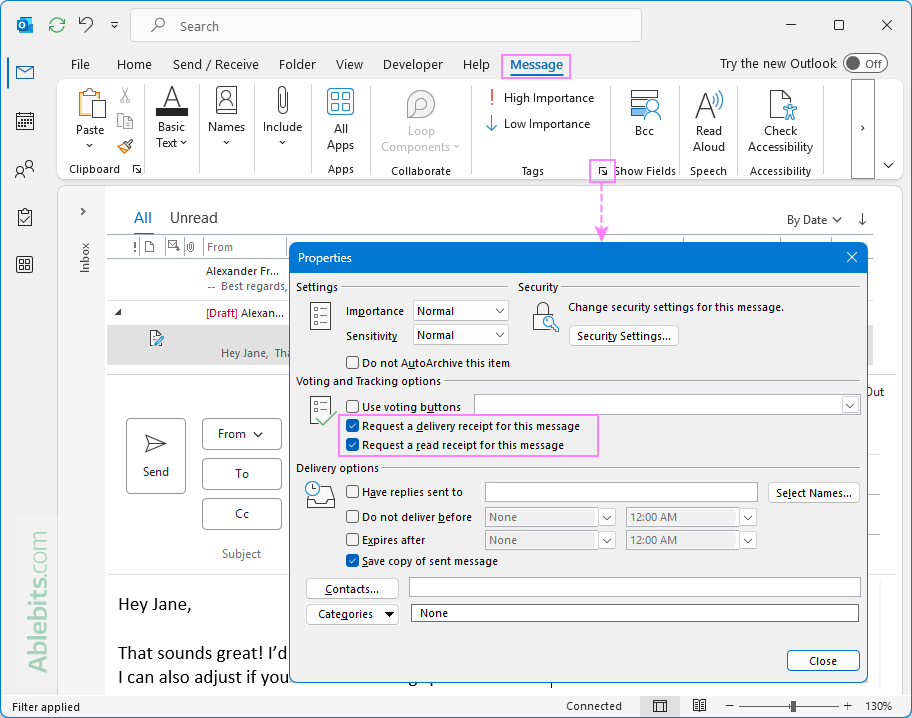
Once you choose the desired option and send your reply, Outlook will track it just like any other message with receipt requests enabled.
Tip. If after sending a message you you've found out that you forgot to attach a file or specify something really important, you can recall that sent message.
How to add read receipt request in new Outlook and web
In the new Outlook for Windows and Outlook on the web, tracking options are available directly within the message window. Follow these steps to request delivery and read receipts when composing an email.
- Create a new email or reply to an existing one in the Reading pane.
- On the Message tab, click More options (the three dots …) on the far right of the ribbon.
- Scroll down to Options and choose More options.
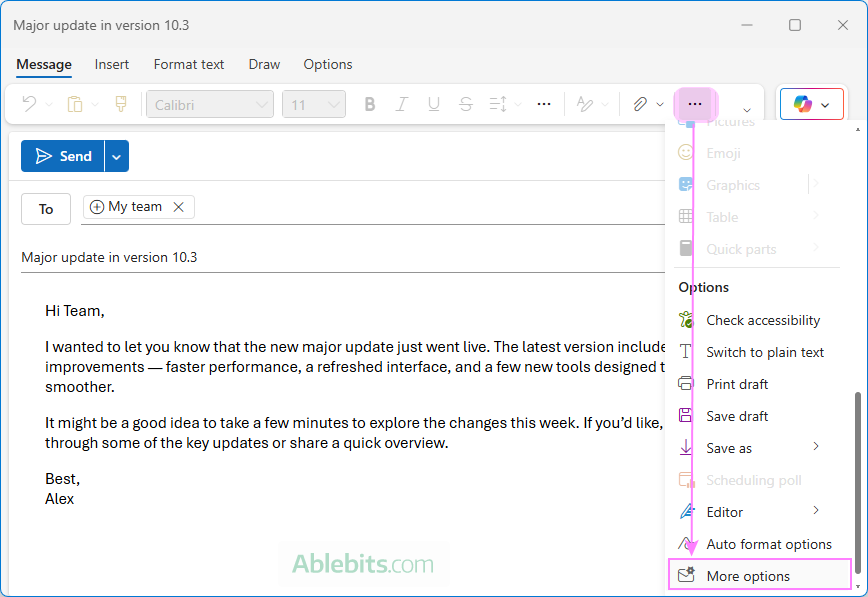
- In the window that appears, check Request a read receipt and/or Request a delivery receipt, then click OK.
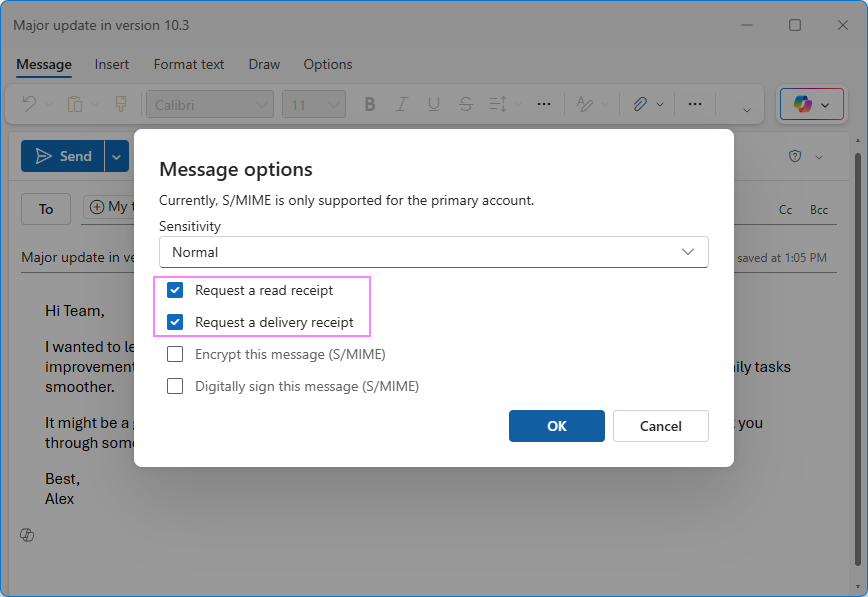
- Finish composing your message and send it.
You'll receive a notification once Outlook confirms that your email was delivered or opened.
Notes:
- In the new Outlook, these tracking options are currently available only for Microsoft email accounts. For third-party email accounts such as Gmail or Yahoo, this functionality is not supported.
- In Outlook.com, these options aren't available. But you can add your Outlook.com account to the desktop version of Outlook and request read receipts from there.
How to get read receipt or delivery notification in Outlook for Mac
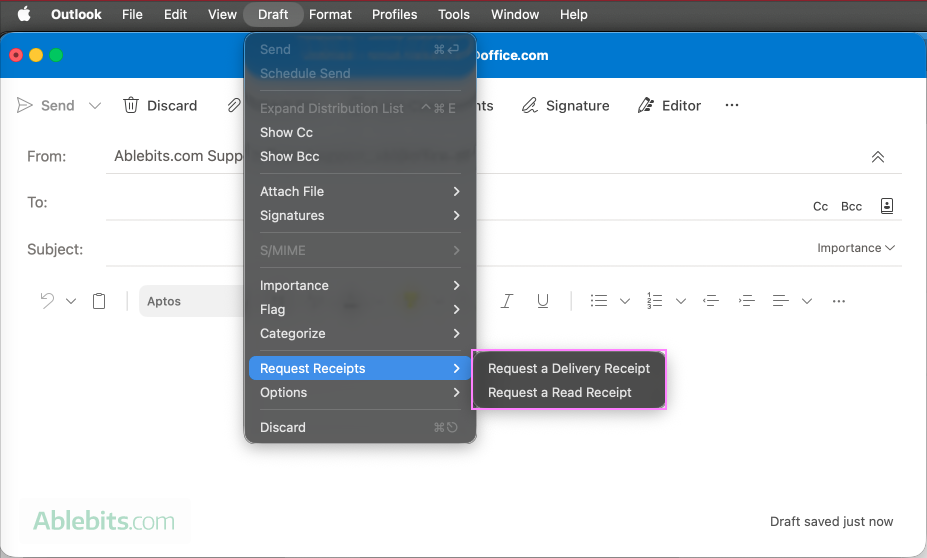
In Outlook for Mac, you can send read and delivery requests in this way:
- Compose your message.
- On the top toolbar, click Draft > Request Receipts > Request a Read Receipt.
- To confirm delivery to the recipient's mail server, select Request a Delivery Receipt.
- Send your message as usual.
That's it!
How to set read receipt for all emails in Outlook (classic)
If you'd like to get a delivery notification or read receipt for every message you sent from Outlook, you can set it up in this way:
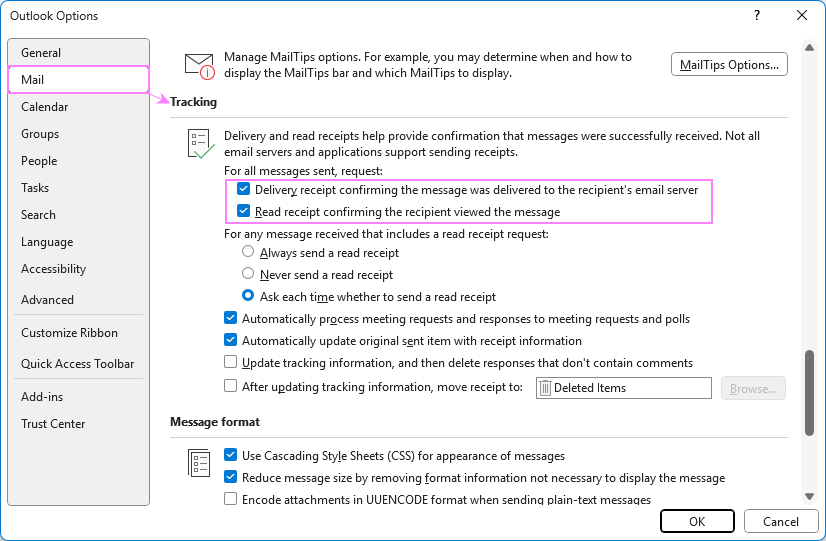
- Go to File > Options.
- In the Outlook Options dialog window, select Mail.
- Scroll down to the Tracking section.
- Under For all messages sent, choose one or both options:
- Delivery receipt confirming the message was delivered to the recipient's email server
- Read receipt confirming the recipient viewed the message
- Click OK to save your changes.
From now on, each message you send will include these tracking requests automatically.
Notes:
- This feature is only available in the classic desktop version of Outlook 365 – 2010. In the new Outlook, there's currently no option to auto-request receipts for all outgoing messages.
- Enabling read receipts for every message isn't always the best approach. Recipients who are asked to send receipts too often may start ignoring or blocking them altogether. As a best practice, request confirmations only for individual messages (as shown in the previous section) or track specific emails that meet certain conditions (covered in the next section).
Request read receipts automatically for certain emails in Outlook (classic)
By now, you know how to request confirmations for a single message or for all outgoing emails. But what if you only want them for certain messages, say, emails sent to your manager or those containing specific keywords? In that case, you can create a custom rule in Outlook to automatically request a read receipt or delivery receipt when certain conditions are met.
Follow these steps:
- In classic Outlook, go to the Home tab > Move group > Rules > Manage Rules & Alerts.
- On the E-mail Rules tab, click New Rule to open the Rules Wizard.
- Under Start from a blank rule, choose Apply rule on messages I send, then click Next.
- Select one or more conditions from the list (for example, sent to specific people or with specific words in the subject) and click Next.
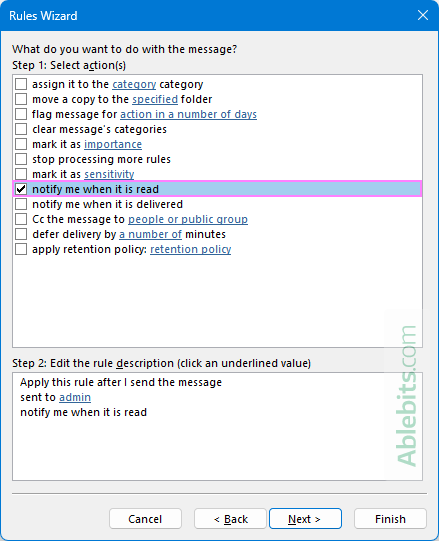
- In the actions list, select notify me when it is read and/or notify me when it is delivered, then click Next.
- Add any exceptions if needed or simply click Next to skip this step.
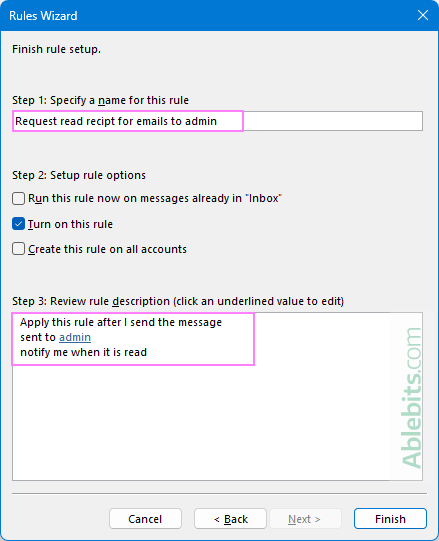
- Review your rule description, give the rule a name, and make sure Turn on this rule is checked. Then click Finish.
- In the Rules and Alerts window, click OK to save your changes and apply the rule.
Your new rule will now automatically request a read or delivery receipt whenever the specified conditions are met – helpful for tracking only the messages that matter most.
For more information, see show to set an Outlook email rule.
Note. Rules for automatically requesting delivery and read receipts are available only in the classic desktop version of Outlook. These options aren't currently available in the new Outlook or Outlook on the web.
How recipient sends read confirmation in Outlook
What happens on the recipient side depends largely on the email program they are using. Some mail clients or web services don’t support read receipts at all, while others handle them in different ways.
Let's see how it works specifically in Outlook when someone receives a message for which a read receipt was requested.
Send read receipt in classic Outlook
When the recipient opens a message in classic Outlook, a notification dialog appears asking whether they want to send a read receipt:
- Yes – sends the read receipt to the sender.
- No – declines the request.
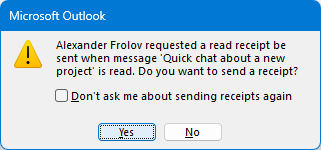
If the user selects the Do not ask me about sending receipts again checkbox, Outlook will automatically change their tracking setting to Never send read receipts in the future.
Note. The pop-up appears immediately when opening a message in a separate window. If the user views the email in the Preview pane, the notification won't appear right away – it shows up only when the user moves to another message in the list.
Send read receipt in new Outlook and web
In the new Outlook and Outlook on the web, there are no pop-up notifications. Instead, a subtle gray bar appears at the top of the message saying that the sender has requested a read receipt.
The recipient can click the Send receipt button to confirm that they've viewed the message.
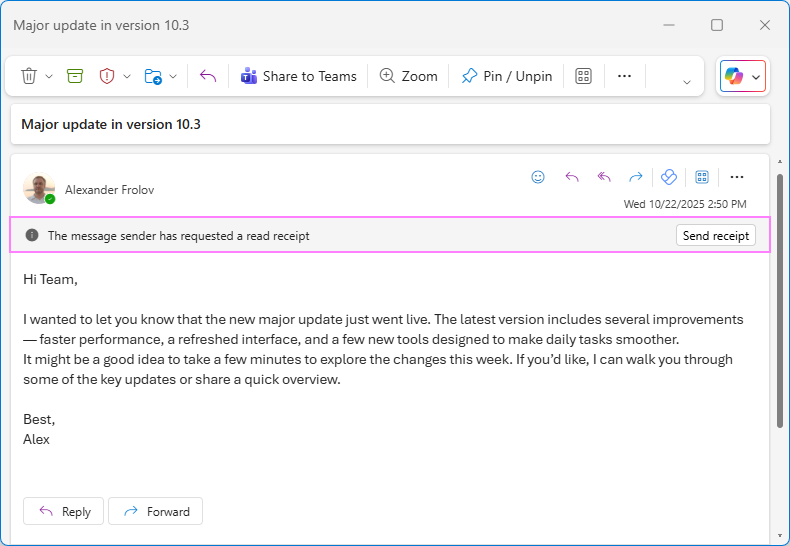
Unlike the classic app, where the pop-up appears only once, the gray bar remains visible until the user clicks the Send receipt button. After that, the bar's message changes to: A read receipt has been sent to the sender.
What does a read receipt look like in Outlook?
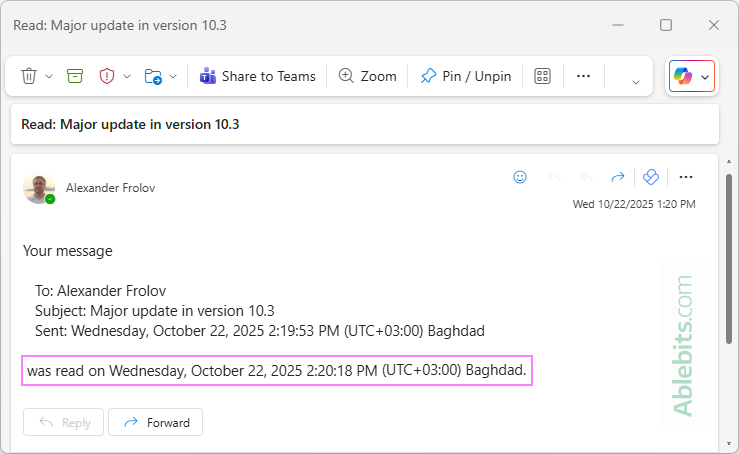
When your message is delivered and the recipient opens it, Outlook automatically sends you a notification message confirming that your email has been viewed.
The read receipt usually includes:
- The recipient's name and email address
- The subject of your original message
- The date and time the email was sent
- The date and time the recipient opened it
Here's what a typical read receipt looks like in Outlook:
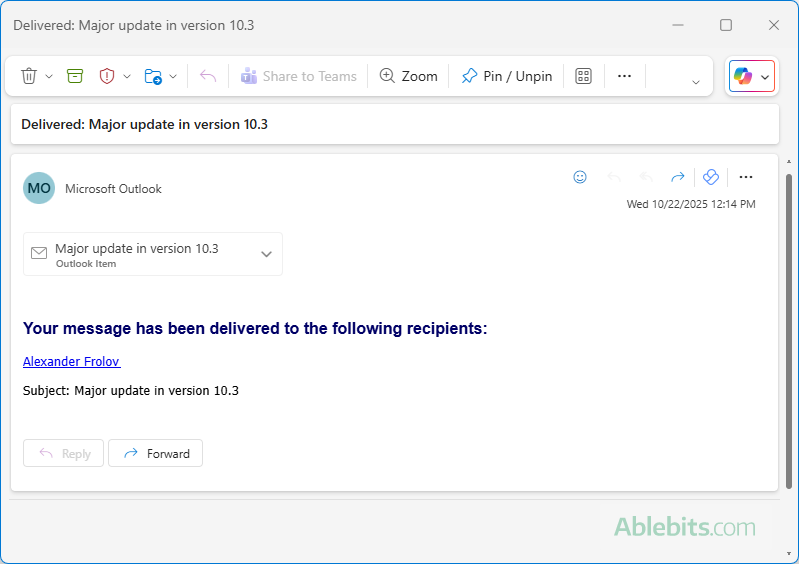
And here is an example of a delivery confirmation, which shows when your message reached the recipient's mail server:
How to turn ON or OFF read receipts in Outlook
Getting occasional read requests is no big deal. But if Outlook keeps prompting you to send confirmations for nearly every email, one day it may set your nerves on edge. The good news is that you can easily change this behavior by adjusting your read receipt settings: either to block them completely or send them automatically, depending on your preference.
How to disable read receipts in classic Outlook
If you don't want to send any receipts, you can turn them off completely in your Outlook.
- Go to File > Options > Mail.
- Under the Tracking section, select Never send a read receipt.
- Click OK to save your changes.
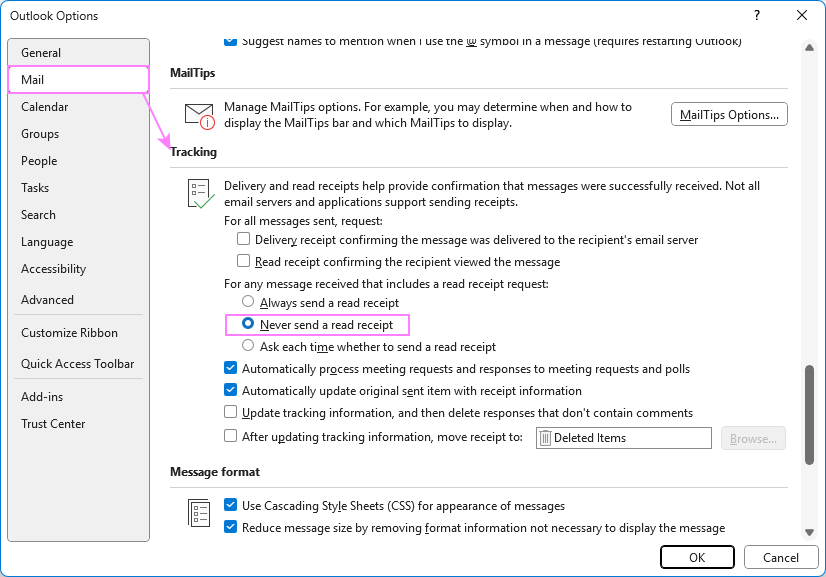
From now on, Outlook will never ask for a read receipt, even when a sender requests one.
If you change your mind later, you can re-enable the feature by choosing one of these options:
- Always send a read receipt – Outlook will automatically send receipts without asking.
- Ask each time whether to send a read receipt (default) – Outlook will prompt you with a confirmation dialog each time a receipt is requested.
Tip. If you select Do not ask me about sending receipts again in a read receipt prompt, Outlook automatically changes your tracking settings to Never send read receipts.
How to turn off read receipts in new Outlook and web
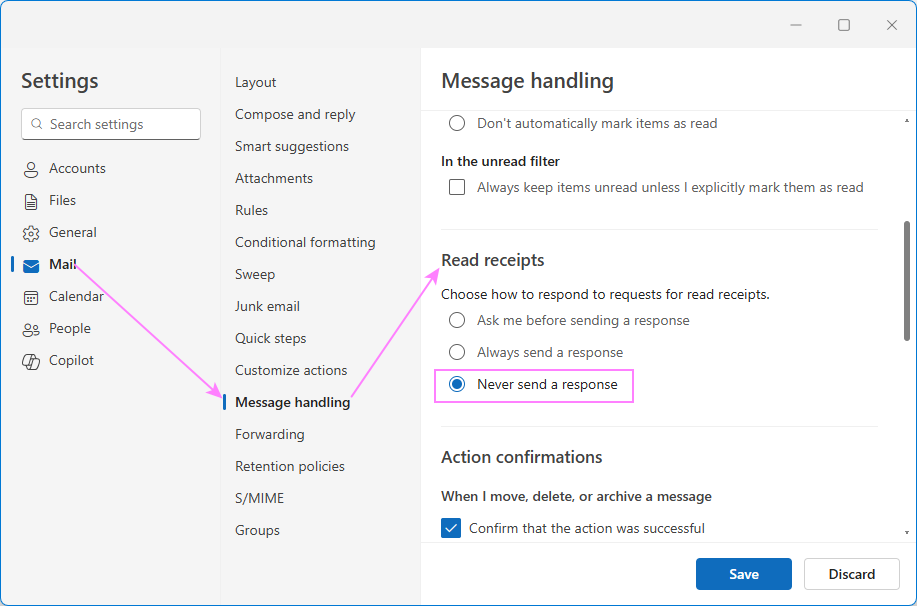
In the new Outlook and Outlook on the web, you can control how these requests are handled from the Settings menu.
- Click the Settings icon in the upper-right corner.
- Go to Mail > Message handling.
- Under Read receipts, choose your preferred option:
- Ask me before sending a response – You'll see a gray bar with a Send receipt button at the top of requested messages.
- Always send a response – Outlook will automatically send read receipts when requested.
- Never send a response – Outlook will block any read receipts requests.
- Click Save to apply your changes.
Frequently asked questions on read receipts
Here are some common questions about how email tracking works in Outlook.
Can you request Outlook read receipt without recipients knowing?
In most cases, no. By default, Outlook is set to ask the user whether to send a read receipt, meaning they'll see a prompt every time. However, if the recipient turned on automatic read receipts (by selecting the Always send a read receipt option), then Outlook will send a confirmation without asking and without the recipient knowing.
Can you request Outlook delivery receipt without recipient knowing?
Yes. Delivery receipts are generated automatically by the recipient's mail server when your message is successfully delivered. This process happens behind the scenes and doesn't involve the recipient.
What happens when you decline a read receipt in Outlook?
If the recipient clicks No when prompted, Outlook won't send the read confirmation, and the sender will never receive any notification that the message was opened.
Many users choose to decline read receipts for privacy or convenience. However, if you receive an important or time-sensitive email, it's courteous to approve the request. And if you prefer not to send a receipt, consider replying briefly to confirm you've seen the message.
Can I send a read receipt in Outlook after clicking No in the prompt?
The short answer is no. Outlook doesn't have an option to send a read receipt retroactively after declining one. If you've already chosen No in the prompt, the only alternative is to send a quick reply to the sender, letting them know you've read their message.
Outlook read receipts – things to remember
Read and delivery receipts can be helpful, but they don't always behave as expected. Keep these points in mind when deciding whether to use them.
- Not always supported. Read and delivery receipts work best within Outlook and Microsoft Exchange environments. They may not function reliably with recipients using other email systems. Some email programs automatically block such requests for privacy reasons.
- Recipients have control. Even if you request a read receipt, the recipient can choose to decline sending one.
- No guarantee they actually read it. Despite the name, a read receipt only confirms that the message was opened. A recipient could approve the request and then close or delete the email immediately.
- Use thoughtfully. Requesting read receipts for every message can feel intrusive. Use them only when it's really important and avoid tracking routine communications.
- Platform support. Read and delivery receipts are currently supported in desktop Outlook and the web app. Microsoft is gradually rolling out this functionality to the Outlook mobile app as well (Android and iOS). The feature is already available to Insiders and will soon be released to all mobile Outlook users.
Now that you know how to request read and delivery receipts in Outlook, apply them with care. Not every message needs tracking, and not everyone will choose to confirm they've opened your email. Think of it as a polite knock on the door, not a demand for attention. And when in doubt, a short follow-up message can do the job just as well 😊
 by
by