This tutorial covers two practical ways to add dynamic dates to Outlook email templates to automatically fill the subject line with today's date or the current month.
If you send many recurring messages in Outlook such as daily logs, weekly reports, or monthly summaries, adding the current date to the subject line can make them easier to track and reference. While Outlook doesn't directly support dynamic dates in email templates, there are two practical alternatives to work around that limitation.
Create Outlook email template with automatic date in subject using VBA
To insert a dynamic date into the subject line of your Outlook template, you can use a VBA macro.
Note. This method works only in the classic desktop version of Outlook since macros are not supported in the new Outlook and web app.
Step 1. Create email template
Your first step is to create a traditional .oft template. Here's how to do it in the classic desktop Outlook application:
- Compose a new email like you normally do. Type the message text and include links and images if needed. Leave the subject line blank.
- Go to the File tab > Save as.
- Select Outlook Template (*.oft) from the Save as type drop-down list.
- Name your new template.
- Save it to any folder you want. This does not necessarily need to be the default template folder as the path to the template is specified in the code.
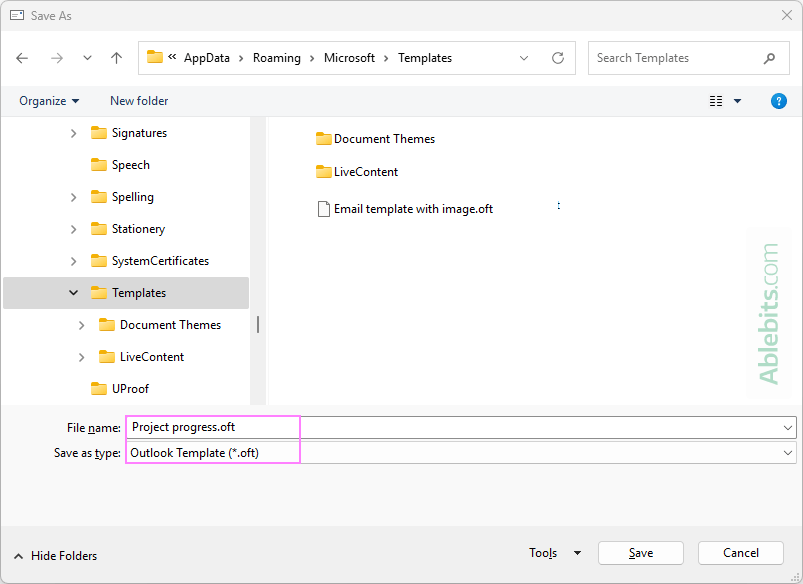
Your Outlook template is saved but not ready to use yet.
For more information, see How to create email templates in Outlook.
Step 2. Add dynamic date to subject line using VBA
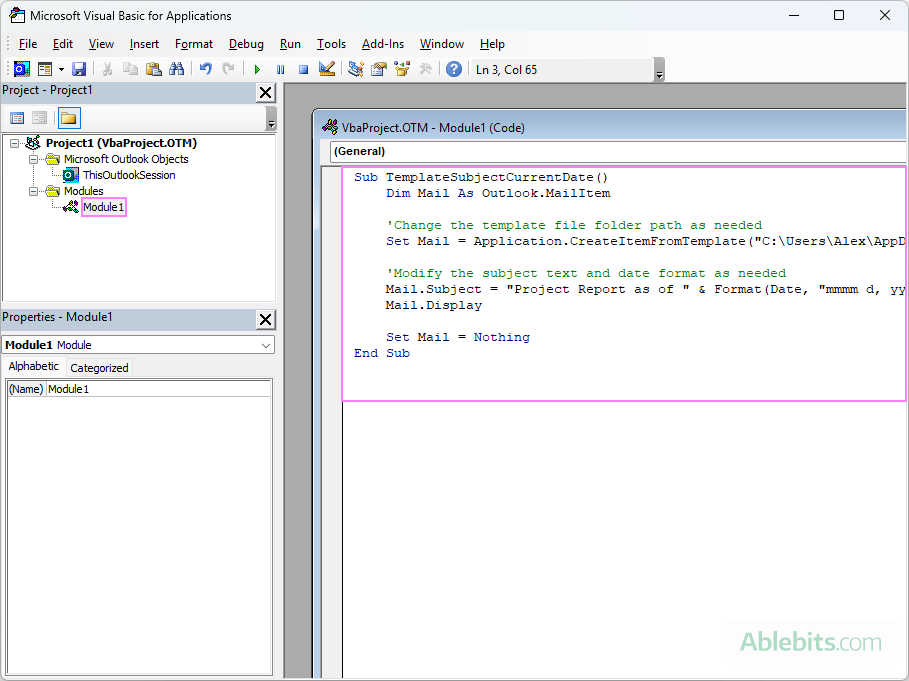
The next step is to add a VBA script that populates the subject line of the template with the predefined text and current date:
- Open the Visual Basic for Applications editor by using the Alt + F11 shortcut.
- In the top menu, click Insert > Module.
- In the module window that opens, paste this code.
- Save your macro by pressing Ctrl + S.
- Close the VBA editor by pressing Alt + Q.
Step 3. Test macro in Outlook
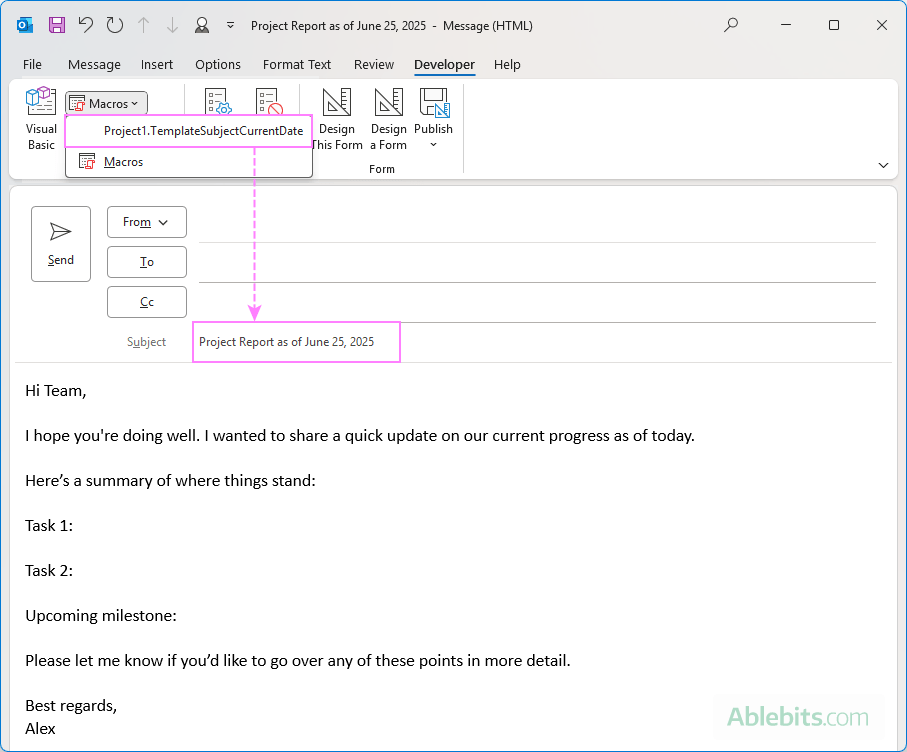
After adding the code to the VBA editor, the macro is ready to run in your Outlook. On the Developer tab under Macros, select the one named Project1.TemplateSubjectCurrentDate. Once clicked, the macro will create an email based on your template with today's date in the subject.
Step 4. Add macro to Quick Access Toolbar
For convenience, you can add the macro button to the ribbon or Quick Access Toolbar, so it's just one click away in your Outlook.
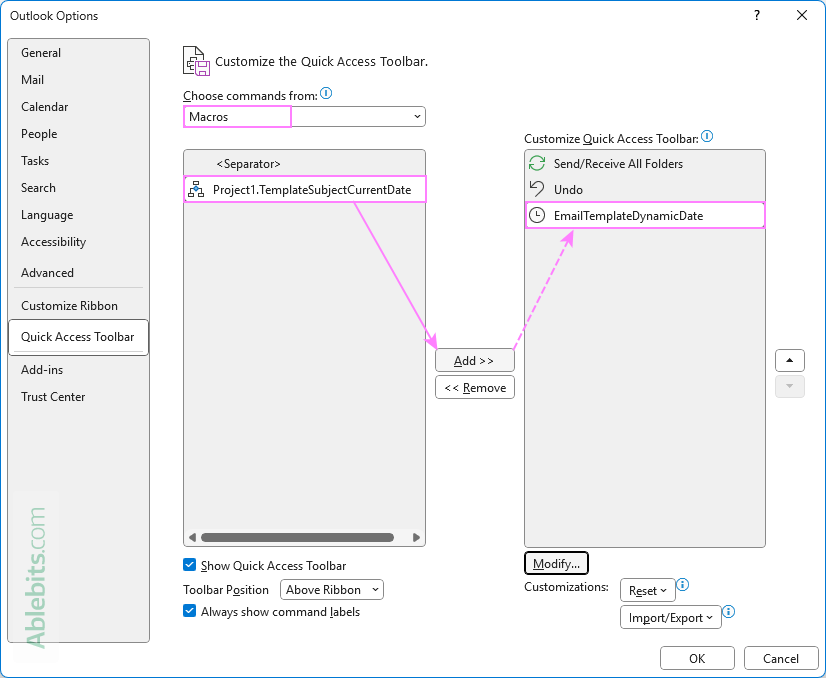
For the detailed steps, see How to add a custom command to Outlook QAT.
How to use email template with automatic date in Outlook
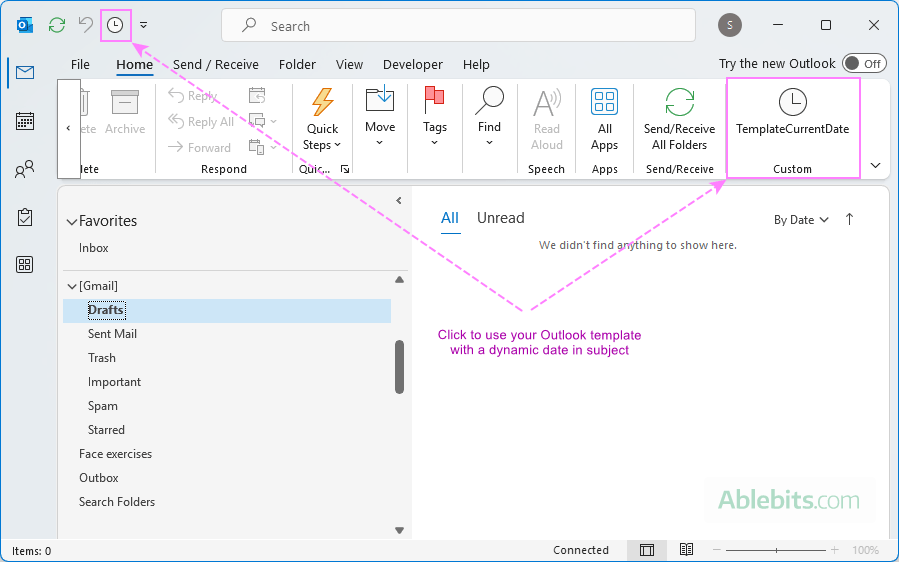
To use your email template with a dynamic date in the subject line, you simply click the macro button in the Outlook ribbon or QAT.
VBA code to auto-insert today's date into Outlook template's subject
Here is the code to automate inserting today's date in the subject line of an Outlook email template. Be sure to change the path to the folder where your own template is located.
How to customize path to template folder
For the code to work correctly in your Outlook, you need to specify the full path to your own .oft template in this code line:
Set Mail = Application.CreateItemFromTemplate("C:\Users\Alex\AppData\Roaming\Microsoft\Templates\Project progress.oft")
When updating, make sure the path is wrapped in double quotes.
How to customize email subject
You are free to customize the subject line of your email template by modifying this line of the code:
Mail.Subject = "Project Report as of " & Format(Date, "mmmm d, yyyy")
Change the Subject text:
Replace the string "Project Report as of " with any custom text that fits your message.
Customize the date format:
The Format(Date, "mmmm d, yyyy") part defines how the date appears in the subject. It can also be changed to your preferred style. Just make sure you use the date format that Outlook understands.
Here are some format examples supported by Outlook:
| Format code | Displays as |
| d-mmm-yyyy | 15-June-2025 |
| m/d/yyyy | 6/15/2025 |
| d mmmm, yyyy | June 15, 2025 |
| dddd, MMMM d | Sunday, June 15 |
Auto-fill month in subject line of Outlook template
If the subject of your email requires just a month instead of the full date, you can use a specific date format in the code. And then, add the code to your Outlook using the same steps as for a dynamic date.
Here is a sample code to add the current month to the template's subject:
The examples below show how to customize the code to automatically insert the current, previous or next month.
Insert current month in email subject
To auto-insert the current month in the subject of your email template, use one of the following date formats:
- "mmmm" - inserts the full month name (e.g. June).
- "mmmm yyyy" - inserts the month and year (e.g. June 2025).
The complete code line can look as follows:
- To include just the month:
Mail.Subject = "Project Report for " & Format(Date, "mmmm") - To include the month and year:
Mail.Subject = "Project Report for " & Format(Date, "mmmm yyyy")
Insert previous month in email subject
If your message refers to the prior month, you can calculate it by using the DateAdd function that subtracts 1 month from today's date.
- To include the previous month:
Mail.Subject = "Project Report for " & Format(DateAdd("m", -1, Date), "mmmm") - To include the previous month and year:
Mail.Subject = "Project Report for " & Format(DateAdd("m", -1, Date), "mmmm yyyy")
Insert next month in email subject
To auto-fill the next month, you also use the DateAdd function, this time adding 1 month to today's date.
- To include just the next month:
Mail.Subject = "Tasks and Milestones for " & Format(DateAdd("m", 1, Date), "mmmm") - To include the next month and year:
Mail.Subject = "Tasks and Milestones for " & Format(DateAdd("m", 1, Date), "mmmm yyyy")
Auto-fill date in email subject using shared Outlook templates
With Shared Email Templates, inserting a dynamic date in the subject line is quick and easy. No VBA script is required.
Unlike VBA code that is supported only in classic (old) Outlook, the Shared Email Templates add-in works across all Outlook apps: classic, new, and web.
Here are the steps to make an Outlook email template with the current date in the subject line:
- Create a shared email template.
- In the add-in's pane, create a new template as you normally would.
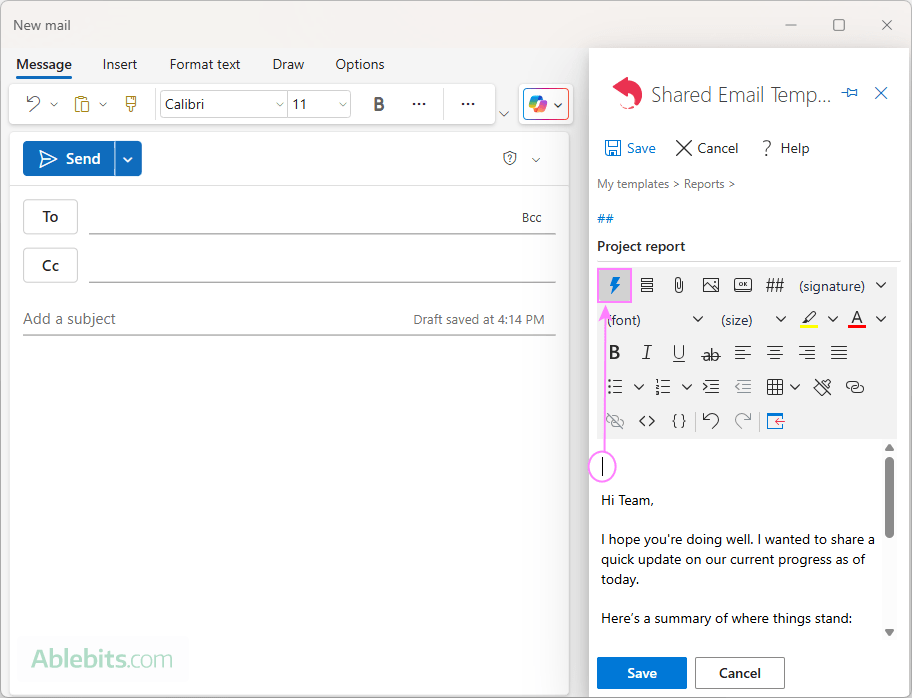
- In the template editor, place the cursor at the beginning or at the end of the template text.
- Click the Inset macro button in the toolbar.
- Add a macro to fill in the email subject.
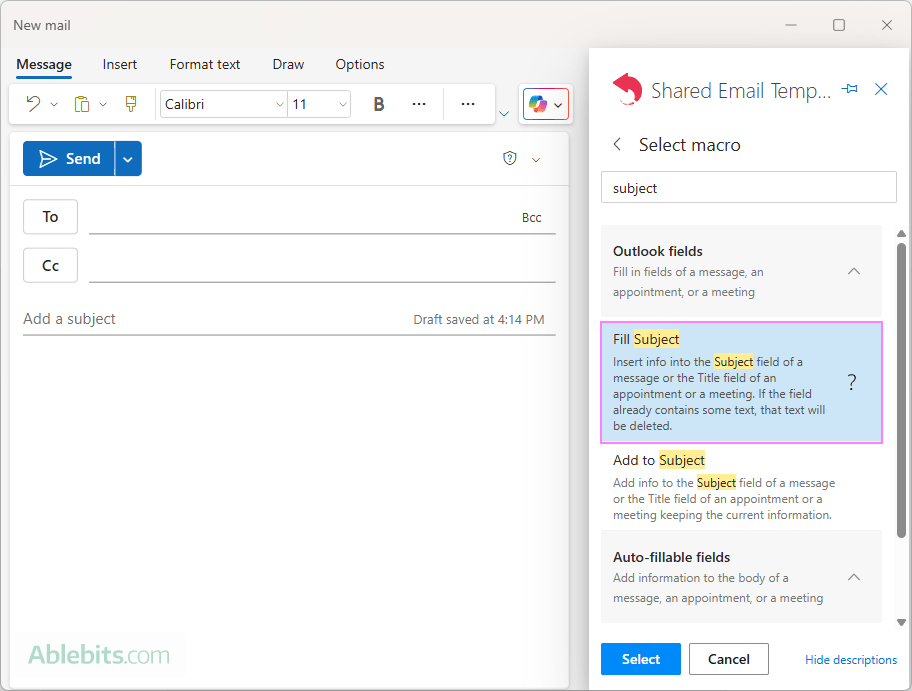
- In the search box, type "subject" to get a list of all available subject-related macros.
- Choose Fill Subject and click Select to add this macro to your template.
- Enter the subject text.
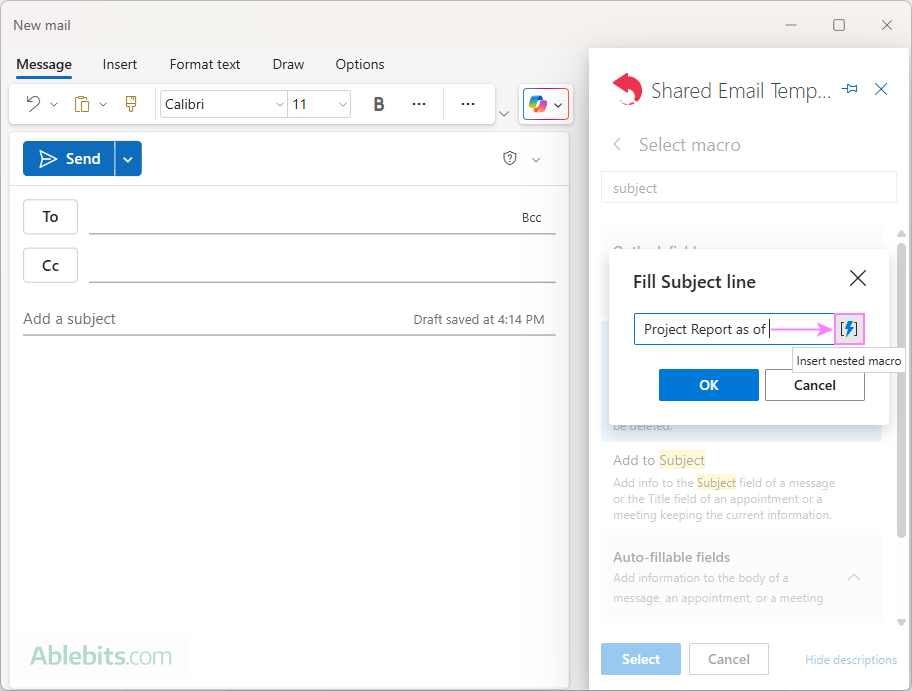
- In the Fill Subject line box, type the static part of your subject.
- Place the cursor where a date should appear.
- Click the Insert nested macro button.
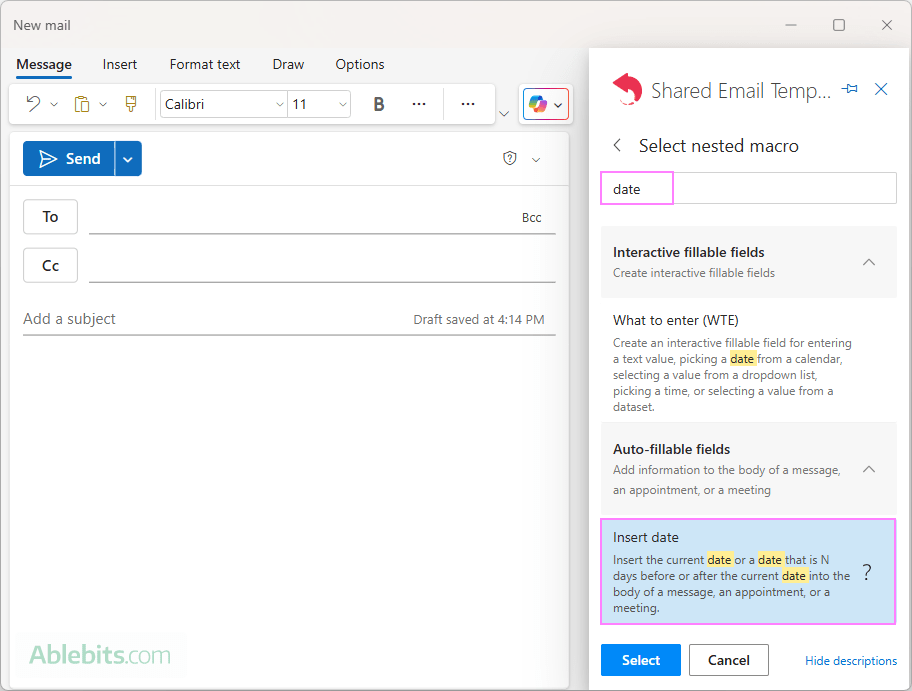
- Add the current date macro. In the list of inbuilt macros, choose Insert date.
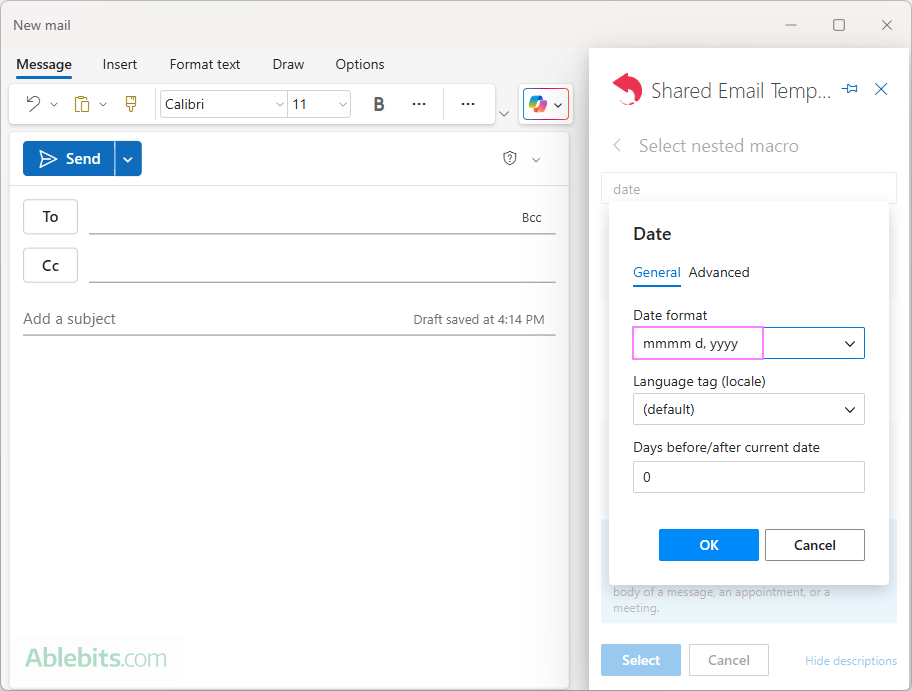
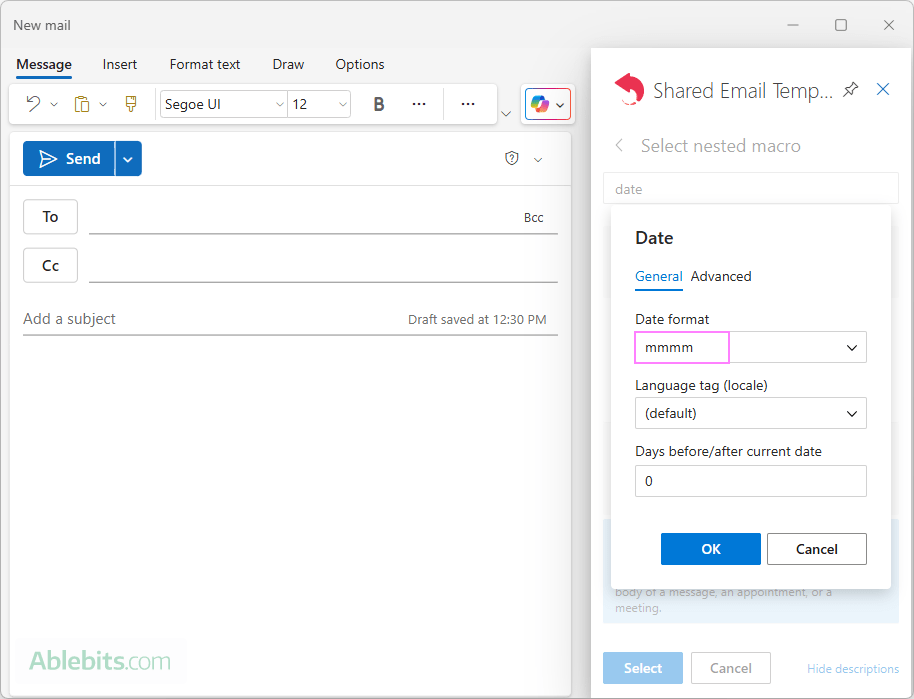
- Set the date format. Define how the date will appear in the subject line by choosing from preset formats or entering a custom one.
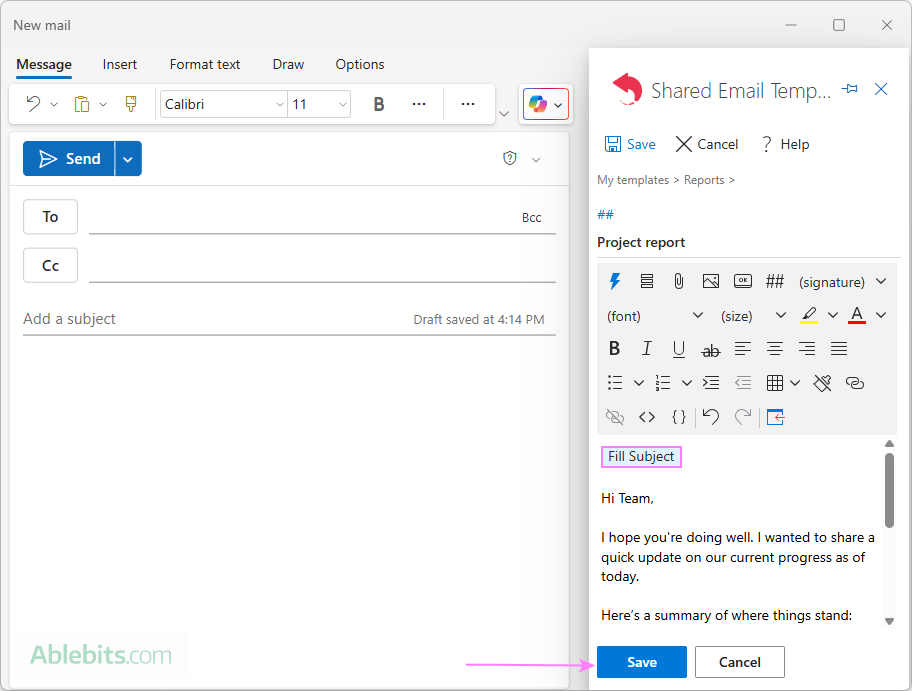
- Save the template. After adding the Fill Subject macro (with the nested dynamic date), its placeholder will appear in the template editor. Click Save to finish creating the template.
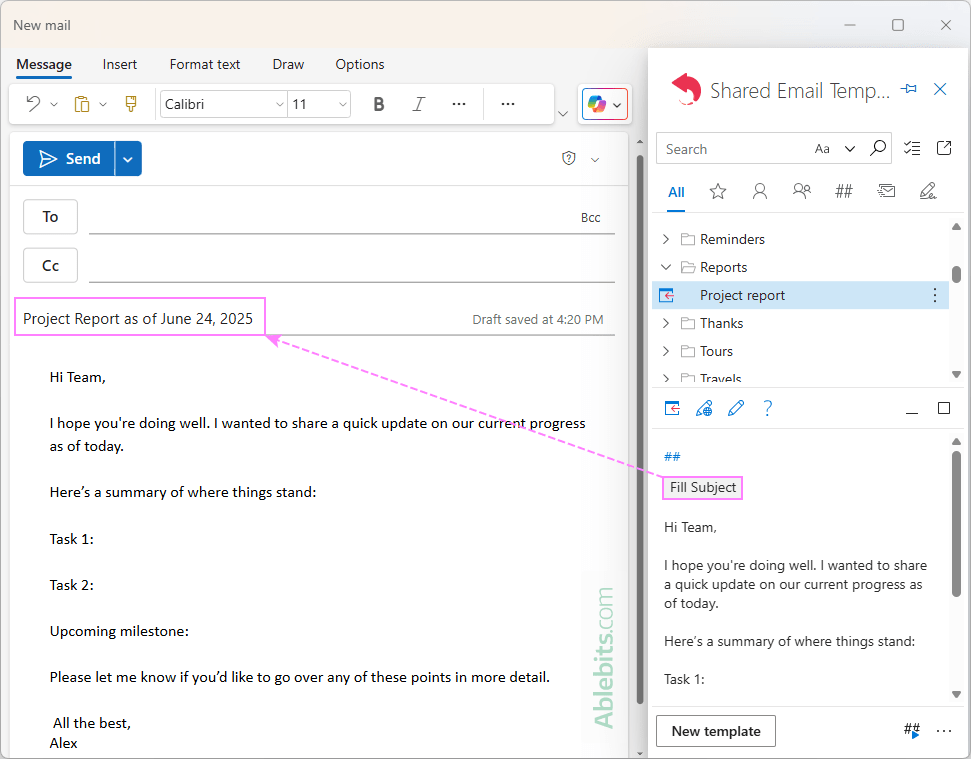
What happens when you use the template in Outlook?
When you apply this template in Outlook, it will do 2 things:
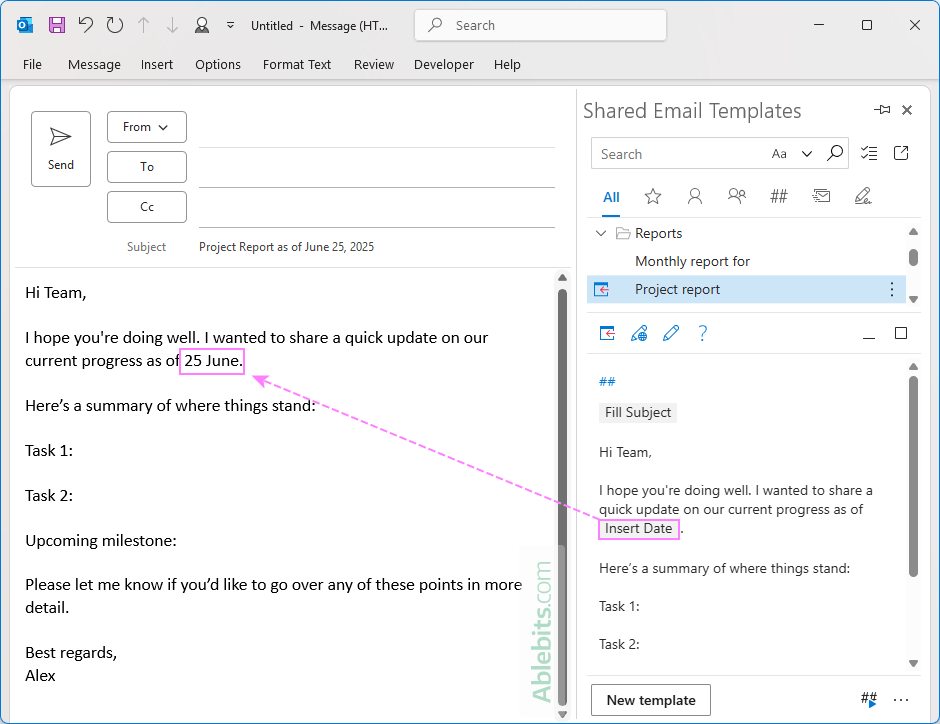
- Insert your prewritten content into the message body.
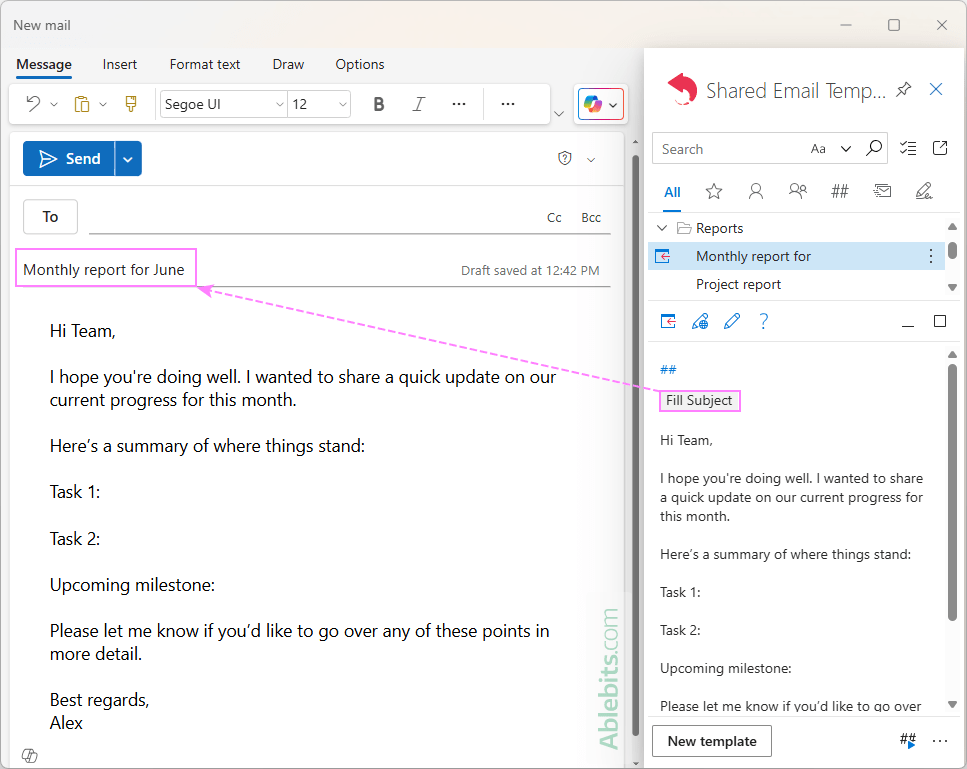
- Automatically fill the subject line with your custom text and today's date.
Tip. You can also use this method to insert other dynamic elements in the email subject, such as a day of the week, the current year, or the month number. Just specify an appropriate format for the Insert Date macro. For example:
- dddd - the full day name (e.g. Tuesday)
- yyyy - the current year (e.g. 2025)
- mm - the two-digit month (e.g. 06)
Auto insert month in subject line using shared Outlook template
If you've already followed the above steps for inserting a dynamic date in the subject of your Outlook template, you're almost there :)
To insert the current month in the subject line, the only change is in how you configure the date format in step 5.
Set the month format:
In the Date macro dialog box, enter one of the following custom formats in the corresponding field:
- mmmm – the full month name (e.g. July).
- "mmmm yyyy" - the month and year (e.g. July 2025).
When you use the template in Outlook, the current month will be automatically inserted into the subject line based on your system date.
Add dynamic date to body of Outlook email template
Shared Email Templates makes it easy to insert a dynamic date into any place of the template's body. The steps are similar to adding today's date to the subject line, so we'll briefly outline them:
- In the template editor, place the cursor where you want the date to appear.
- Click the Inset macro button in the toolbar.
- Select Insert date from the list.
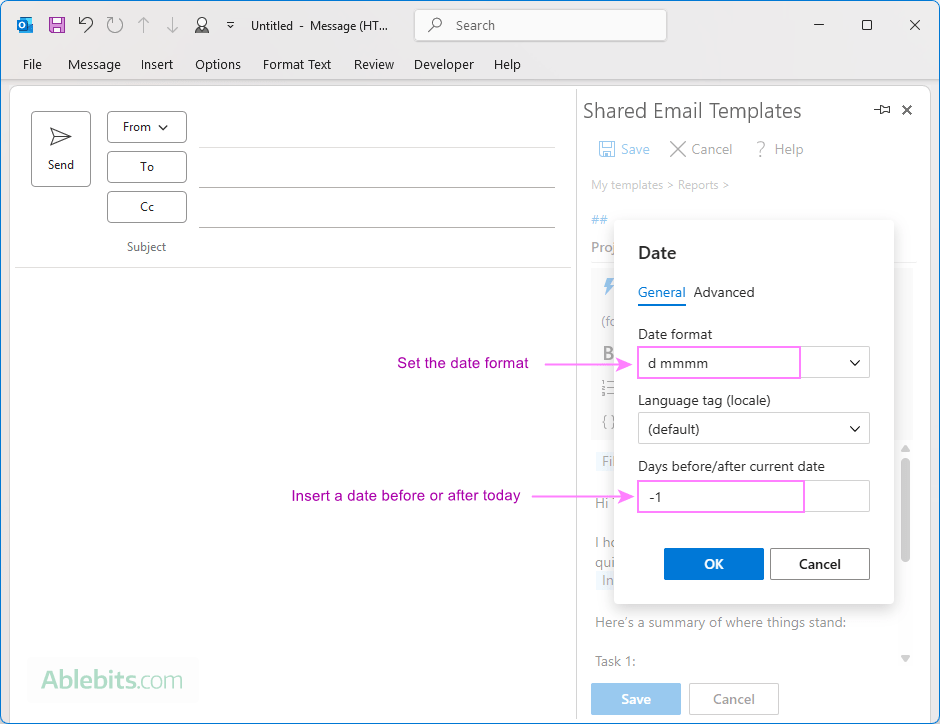
- Set the desired date format.
- To insert a date before or after today, enter a negative or positive number in the corresponding field (for example, -1 for yesterday, 1 for tomorrow). To insert the current date, leave the default 0.
- Click OK to insert the macro into your template.
That's it! Each time you use the template, the macro will automatically insert the correct date using the format you've defined.
Curious to try it out in your Outlook? You can explore this and many other useful features in a free version of Shared Email Templates, available from Microsoft Marketplace.
Now that you know how to add a dynamic date to your Outlook templates, you're one step closer to automating your routine emails and cutting down on manual edits. Give it a go and see how it works for you 😊
 by
by