Here's a comprehensive guide on how to export your Outlook emails, covering full mailbox backups, filtered exports, and Excel-ready data.
Exporting emails from Outlook can be helpful for a variety of tasks. No matter your reason – decluttering your inbox, archiving important communications, or preparing for a platform switch – Outlook gives you the tools to create complete backups, filter precisely what you need, and even transform your messages into a spreadsheet-friendly format for deeper analysis. This guide walks you through every step, tip and trick to make exporting straightforward and efficient.
Note. The option to export emails is only available in the classic Outlook desktop app. In the new Outlook and web version, this feature isn't currently supported.
How to export Outlook emails
To export emails, you'll need the classic Outlook desktop app. This feature is available in Outlook for Microsoft 365 and standalone versions including Outlook 2024, 2021, 2019, 2016, and older.
Follow these steps to export your Outlook messages to a .pst file:
- Click the File tab in the upper-left corner of the Outlook ribbon.
- Click Open & Export > Import/Export.
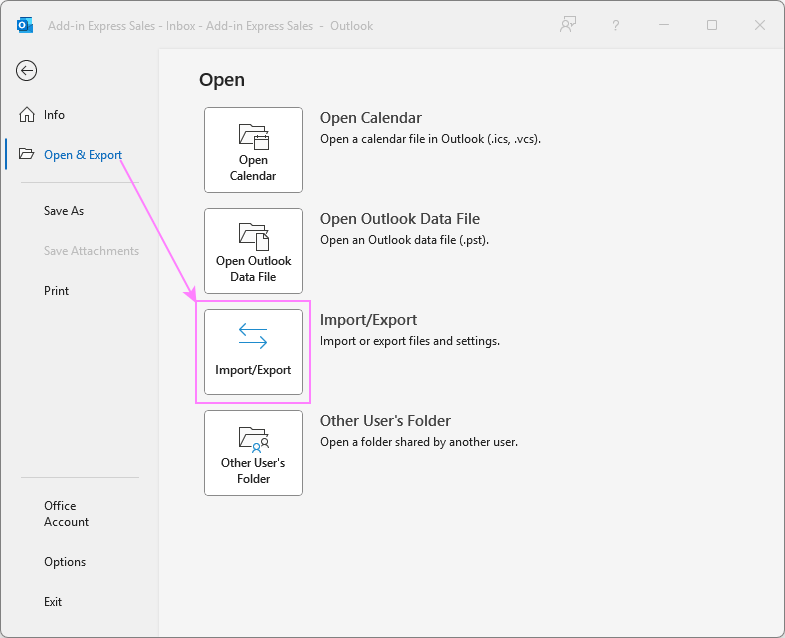
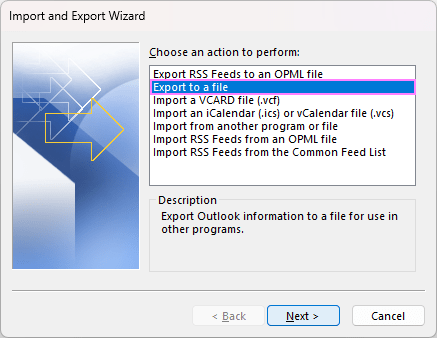
- Select Export to a file and click Next to continue.
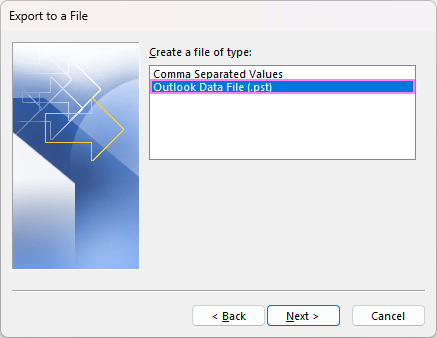
- Select the export format. Choose Outlook Data File (.pst) and click Next. This format preserves your folder structure, including subfolders.
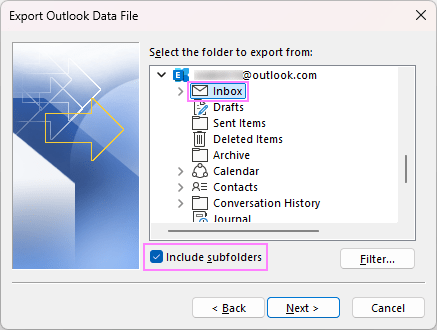
- Choose what to export:
- To export a specific mail folder like Inbox, first expand the target email account, then select the folder under that account. This ensures you're including the right content, especially if you have multiple accounts in Outlook.
- To export your entire mailbox, select the top-level folder for the account. This includes all built-in and custom email folders, plus your contacts, calendar, and tasks.
- Make sure Include subfolders is checked if you want a full backup of everything under that folder.
- Click Next when you're ready.
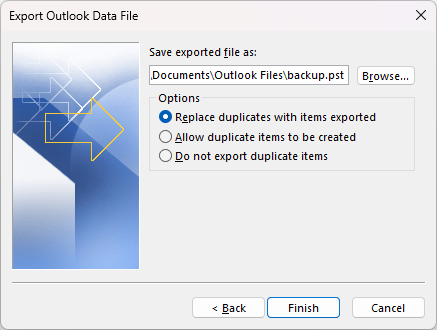
- Choose a save location. Click Browse to choose where to save the resulting file. You can rename it for easier reference. By default, Outlook suggests backup.pst and stores it in:
C:\Users\{UserName}\Documents\Outlook Files
If you're exporting to an existing file, use the Options area to decide how to handle duplicates:
- Replace duplicates with exported items
- Allow duplicate items to be created
- Do not transfer duplicate items
Once everything's set, click Finish.
- Set a password (optional). You can assign a password to protect the file. This step is optional – just leave the fields blank and click OK if you prefer not to set one.
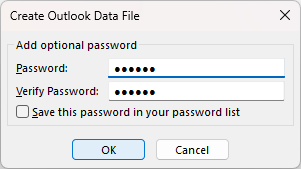
Outlook will begin creating the new .pst file. Depending on the size of your mailbox, this may take a few minutes. If you're exporting to a password-protected file, Outlook will prompt you to enter the password before starting.
Once finished, your emails are stored in a portable format. You can import this .pst file into Outlook on another device or use it as a secure backup.
Tip. Outlook allows exporting just one folder at a time. To include multiple folders in the same backup, export each folder individually into that same .pst file.
How to export all emails from Outlook
If you are using an Exchange-based account with Cached Exchange Mode enabled, only the items currently stored in your cache are exported. By default, the cache contains emails from the past 12 months. This means that unless you adjust this setting, your backup may only include the most recent messages.
To ensure all your emails are included in the export, do this:
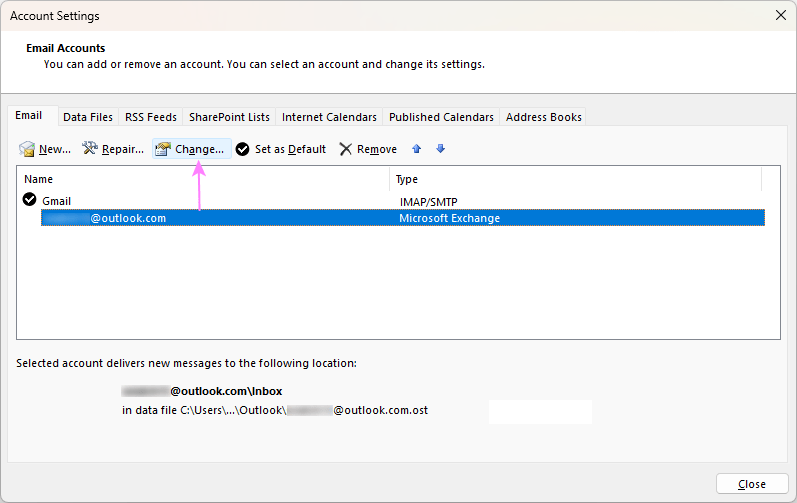
- Go to the File tab and click Account Settings > Account Settings.
- In the Email tab, select an appropriate account and click Change.
- In the Account Settings window, move the Download email for the past slider all the way to All.
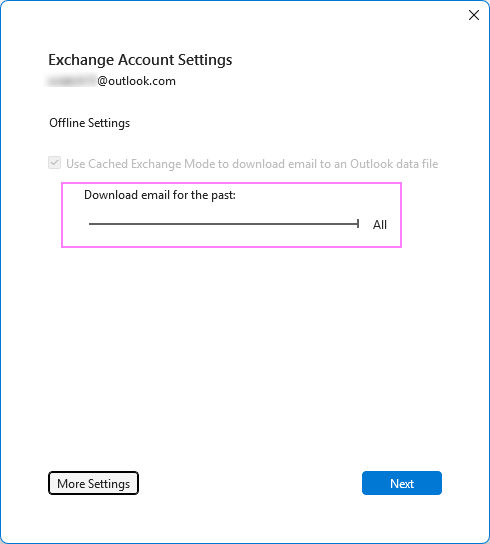
Outlook will begin syncing the rest of your mailbox. Depending on how much data there is, this process might take a while – wait until the sync is complete before starting the export.
Once everything is synced locally, you can export the complete mailbox to a .pst file with confidence that no emails are left behind.
How to export specific emails by criteria
To export only the emails that match certain conditions, you can use the advanced filtering options provided by Outlook. This helps you narrow down your export to just the messages you need.
Follow these steps:
- Start the process as described in the earlier section and proceed through steps 1 – 4 to export to Outlook Data File (.pst).
- After selecting the mailbox or a specific folder to export from, click the Filter button.
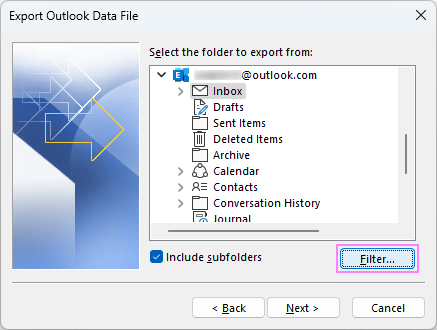
- In the Filter dialog box, explore the available tabs to define your criteria:
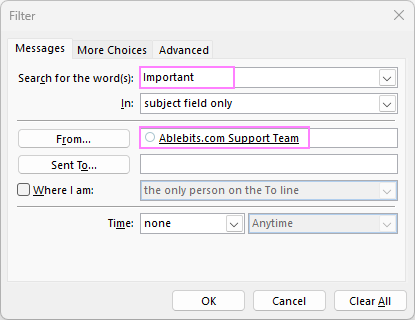
- Messages – filter emails by keywords in the subject or body, or specify senders/recipients.
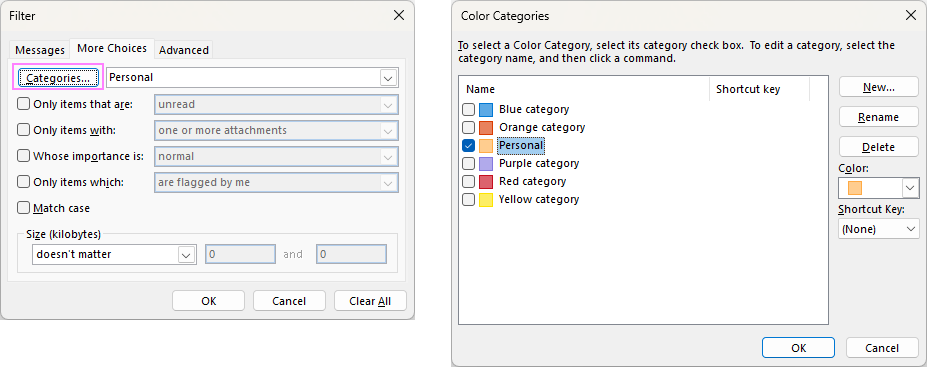
- More Choices tab – filter by category, attachment presence, importance level, flags, or size.
- Advanced tab – create custom filters using message fields. You can add multiple conditions for more precise control.
- Once your filter settings are in place, click OK to return to the main window.
- Click Next, choose your export location, and finish the process as usual.
Below are a few examples of common filtered exports.
Export emails with specific words or from a certain sender
On the Messages tab, enter keywords in the Search for the word(s) field. To filter by sender, click the From button and select a contact from your address book.
Export Outlook emails by category
To export messages within one or more color categories, go to the More Choices tab and click Categories to select one or more predefined category labels.
Export messages by date
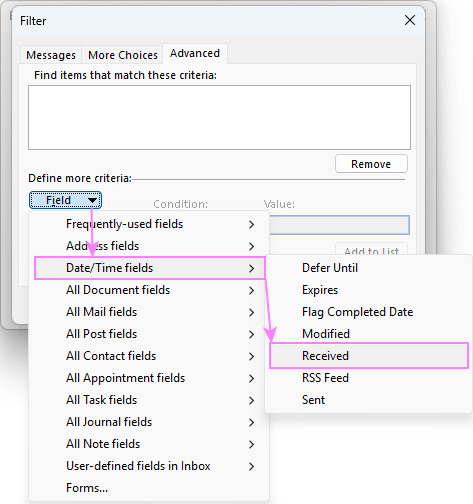
To export emails received before, after, or within a specific date range, use the Advanced tab of the Filter dialog:
- On the Advanced tab, click Field > Date/Time fields > Received.
- Choose a condition, such as on or after, on or before, or between, depending on your needs.
- Enter the relevant date(s) in the Value field. Be sure to use the default date format set in your Windows Regional settings. This should match the format shown in Outlook's Received column.
- Click OK to apply the filter.
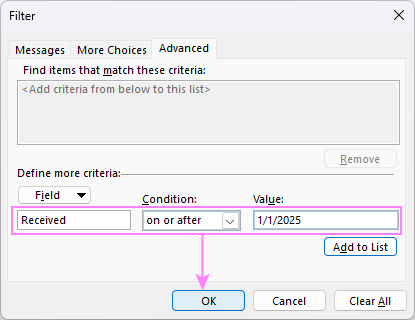
You can add more date conditions or combine them with other filters to narrow down your email export even further.
Export emails by multiple conditions
If you need to export messages that match several criteria, the Advanced tab in the Filter dialog gives you the flexibility to combine multiple conditions:
- Set your first condition and click Add to List.
- Continue adding more conditions the same way, each time clicking Add to List to include it.
- Once all your filters are added, click OK to apply them.
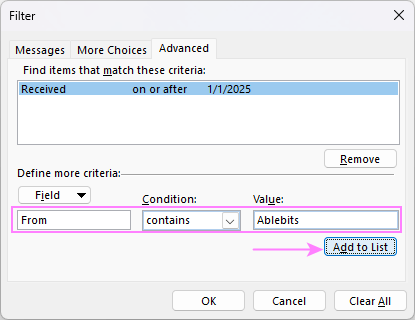
This method is especially useful when you need to pinpoint messages that meet a combination of factors, such as a particular category and a date range and a specific word in the subject.
How to export Outlook emails to Excel (.csv file)
If you need to transfer Outlook data to Excel for backup, reporting, or analysis, here's how you can do this:
- In Outlook, click File > Open & Export > Import/Export.
- Select Export to a file.
- Choose Comma Separated Values.
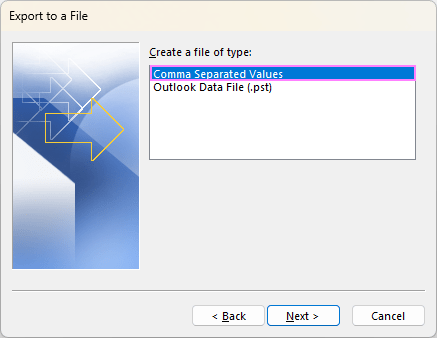
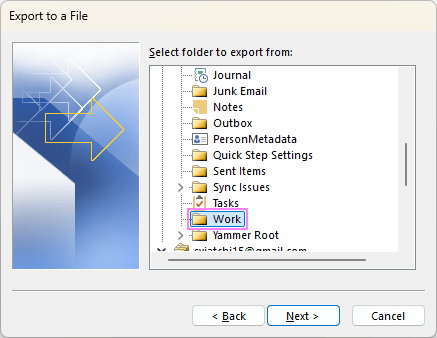
- Select the folder you want to export messages from and click Next.
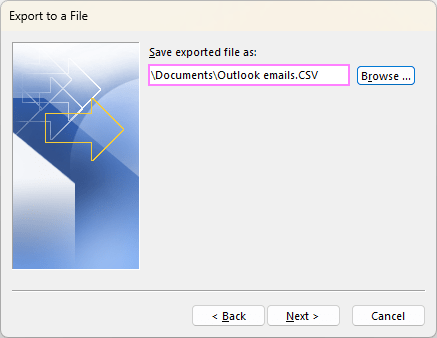
- Click Browse to choose a location where you want to save the file. Type a file name, click OK, and then Next. To save it to the default location, you can just type the file name.
- Map fields (optional). Click Map Custom Fields to adjust the data fields that will appear in Excel:
- Drag items from the left (source) to the right (destination) to include them.
- Drag fields from right to left to remove them.
- When finished, click OK.
If you're fine with the default settings, you can skip this step.
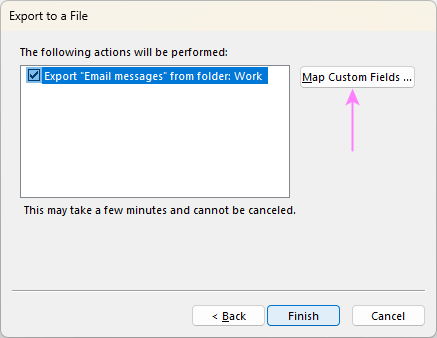
- Click Finish.
Once the export is complete, open the resulting .csv file in Excel. Each email will appear as a separate row, with columns for fields such as Subject, Body, From, To, and Cc. You can now sort, filter, or analyze the data as needed.
How to export emails from Outlook.com
If you're using Outlook in a web browser at Outlook.com, there's no built-in feature to export emails directly. However, there are a few workarounds that can help you save or back up your messages:
- Add an account to classic Outlook. To export emails from an Outlook.com mailbox, connect your account to the classic Outlook desktop app. Once added, you can follow the standard steps to save your messages to a .pst file.
- Use an email client that supports export. You can also connect your Outlook.com account to another desktop email program, such as Thunderbird. These apps typically include their own export options, which you can use to back up your email data.
- Save individual emails. If you only need to save a few messages, you can use the Save as PDF feature or Download as ELM or MSG to store a particular message on your computer.
At this time, Outlook.com does not support exporting mail directly through the web interface. If you need to back up or transfer your data, using the desktop Outlook app is the most reliable approach.
How to import emails into Outlook
To add the previously exported messages to Outlook, you can either open the .pst file directly or import it. Each method has its benefits depending on how you plan to work with the data.
Open .pst file in Outlook
This method lets you add the exported emails without merging them into your current mailbox.
- In Outlook, go to the File tab and select Open & Export > Open Outlook Data File.
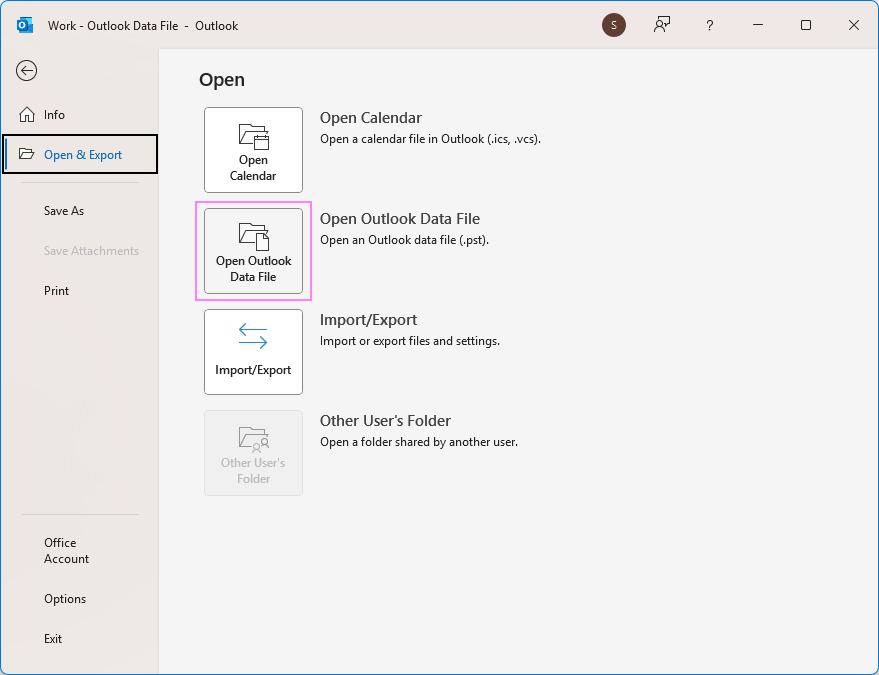
- Browse to the location of your .pst file, select it, and click Open.
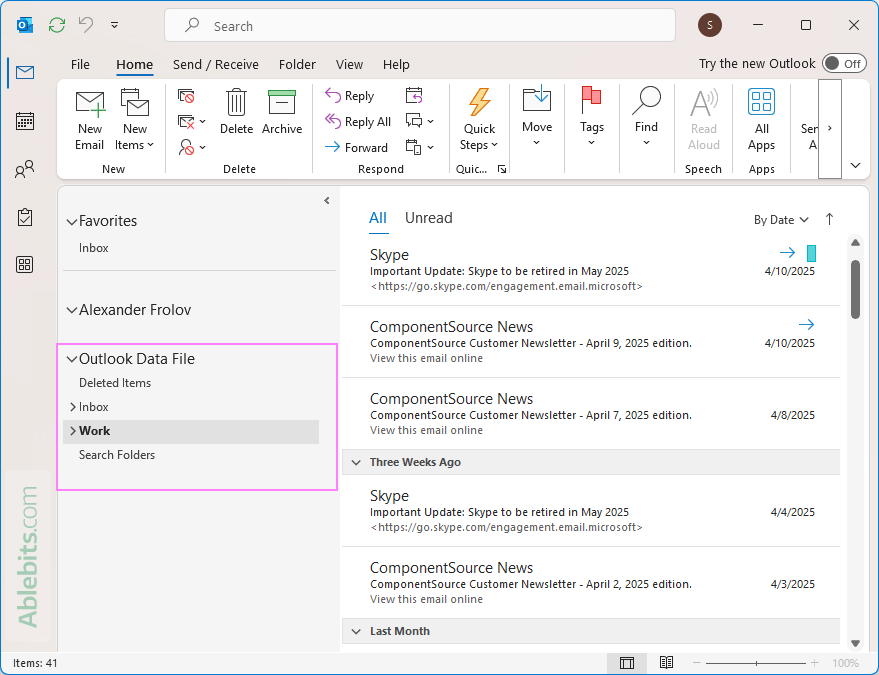
A new mailbox titled Outlook Data File will appear in your folder pane. You can access and read the imported emails there, but they stay separate from your main folders.
Pros: Quick and doesn't alter your main mailbox.
Cons: Limited options – can't control which folders are imported or where they appear.
Import .pst file into Outlook
Use this method if you want to merge the exported emails into your current mailbox.
- Go to the File tab and select Open & Export > Import/Export.
- Choose Import from another program or file and click Next.
- Select Outlook Data File (.pst) and click Next.
- Browse for your .pst file, then choose how you'd like to handle duplicates.
- Decide whether to import the entire data file or specific folders.
- Choose the account where the data should go.
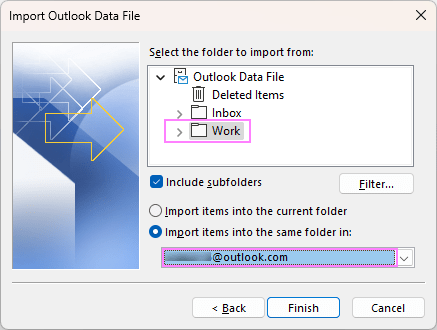
- Click Finish to begin the import.
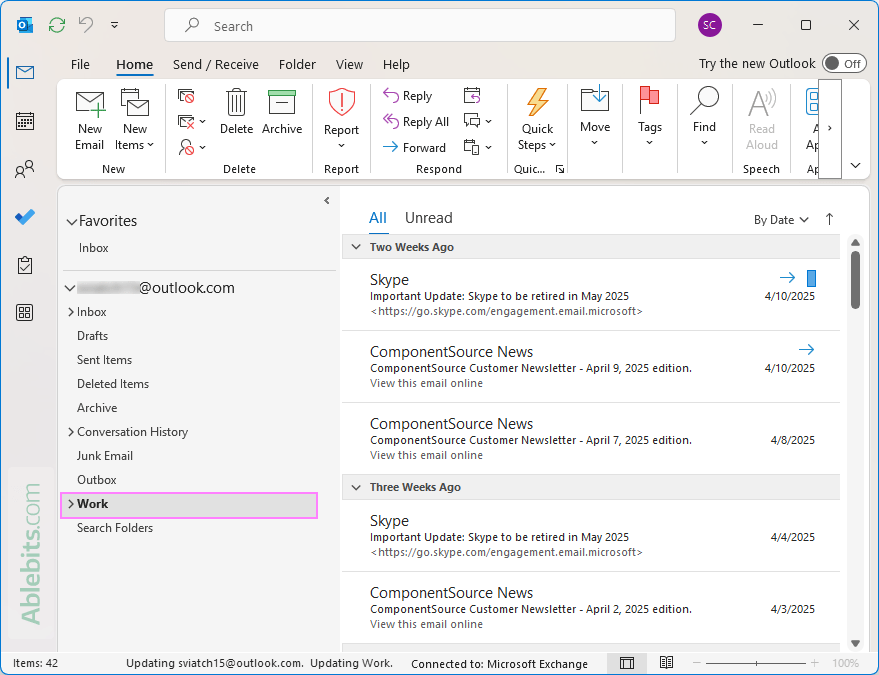
As a result, the selected folders from the .pst file will be added to your mailbox and appear alongside your existing folders, so you can access the imported messages as part of your regular Outlook view.
Pros: Flexible – lets you choose the destination account, which folders to import, and how to handle duplicates.
Cons: Involves more steps than simply opening the file.
What data is exported from Outlook and what is not?
When exporting your emails from Outlook, it's helpful to know exactly what gets saved and what doesn't. This ensures you have a clear picture of what your transferred data will include, especially if you're moving to a new setup or trying to preserve key information.
What is exported
Here's what gets included in the resulting .pst file:
- Folder structure within the selected mailbox or folder.
- Subfolders, if you enabled this option.
- All mail items along with any attachments.
- Calendar events, contacts, and tasks (if those folders are included in the export).
- Embedded images and formatting, which are preserved within message bodies.
- Read/unread status of emails.
- Flags and follow-up reminders applied to messages.
- Color categories assigned to messages, tasks, or calendar items (these remain visible when the .pst file is imported back into Outlook).
What is not exported
While the .pst file includes core data – such as emails, contacts, tasks, and calendar items – it does not carry over metadata and folder properties. These settings are not included in the export:
- Message rules
- Conditional formatting rules
- Custom views and custom forms
- Quick Steps
- AutoArchive settings and other folder-specific properties
- Junk Email lists: Safe Senders, Safe Recipients, and Blocked Senders
- Linked relationships between items (e.g. a contact linked to a task)
- AutoComplete cache (used when addressing emails)
- Send/Receive history for POP3 accounts
- Any settings saved by third-party add-ins within the .pst file
Understanding what gets included and what doesn't helps you plan better, especially if you're migrating to a new setup or creating a backup. If some of these excluded settings are important to your workflow, you may want to copy / paste the entire .pst file for a full backup, rather than recreating those elements manually after exporting.
Exporting Outlook emails – helpful tips
Before you start exporting your emails from Outlook, here are a few helpful tips to ensure the process goes smoothly and you get exactly what you need:
- Tidy up your mailbox first. Take a moment to delete outdated or unnecessary items that clutter your mailbox. A quick mailbox cleanup helps reduce the size of your export file and keeps your backup organized.
- Use clear filenames. Use descriptive filenames that include the date (for example, Outlook_Backup_April2025.pst) so you can quickly identify and locate specific backups later.
- Handle multiple accounts separately. If you manage multiple accounts in Outlook, repeat the export process for each one. Double-check that you've selected the correct account or folder to avoid including the wrong content or leaving something important behind.
- Choose a secure storage location. Save your .pst file to a local drive or external storage. However, avoid OneDrive, which blocks automatic syncing of Outlook .pst files.
- Export single emails when needed. To back up individual messages, you can save them in the .msg format or export emails to PDF to keep a copy for your records.
- Your data stays intact. Exporting creates a copy of your selected data. The original items remain in your mailbox, so nothing is deleted or moved during the export process.
Armed with these pointers, you'll avoid common pitfalls and maintain a tidy, secure record of your communications.
Why export Outlook mail?
Exporting your Outlook emails can be helpful in many situations. Here are some common reasons to consider:
- Backup important conversations. Creating a backup of your Outlook data ensures you have a copy of your communications in case something goes wrong such as data loss, account issues, or device failure. This is especially useful if your messages include sensitive or critical information.
- Transfer data to another device or email client. If you're setting up Outlook on a new computer or switching to a different email program, exporting your messages makes it easy to move your data without losing anything important.
- Free up space in your Outlook mailbox. Over time, your mailbox can fill up with old messages and large attachments. Exporting and then removing older content can help improve Outlook's performance and make your inbox easier to manage.
- Store messages outside of Outlook. Exported files can be saved on your computer, an external drive, or cloud storage for quick access. This is handy if you want to keep project-related emails in a shared folder or store records outside of Outlook for safekeeping.
- Meet compliance or legal requirements. In some industries, keeping records of communication is mandatory. Exporting emails provides a straightforward way to maintain archives that can be reviewed or submitted when needed.
- Keep a personal archive during account changes. If you're leaving a job, changing email providers, or deactivating an account, exporting your emails ensures you don't lose any personal or professional history stored in that inbox.
By understanding these benefits, you can decide when exporting is the right choice, helping you stay organized, protect your data, and prepare for future needs.
That's everything you need to confidently export, back up, and reimport your Outlook emails. With these steps and tips, you'll have the flexibility to manage your mail exactly as you need and the peace of mind that comes from knowing your data is secure, accessible, and ready for anything :)
 by
by
2 comments
my friend outlook mail , we do the upgrade the microsoft after we check the outlook mail last one week mail only have ,
before we start upgrade work we take the backup file have but who to import dont no , can you help me to the issue
Hi Suriya,
Please see this step-by-step tutorial: How to restore Outlook backup by importing .pst file.