This tutorial explains how to create HTML emails in Gmail using four different methods. It provides step-by-step instructions for both beginners and advanced users.
Integrating HTML can give your messages a professional polish and help capture the recipients’ attention. In the past, there was a built-in HTML editor in Gmail, but over the course of time it was replaced by the code-free WYSIWYG (What You See Is What You Get) editor. Even though the new editor is simpler in composing and editing emails, nothing really beats good-old HTML. But how to apply HTML in Gmail? Let me show you 😸.
How to write HTML code for emails
To create your HTML email, you need to write the code first. There are several options:
- Option 1. Write it yourself.
Use a simple code editor like Visual Studio Code, Sublime Text, or any free online editor such as CodePen to write your HTML. Personally, I like Visual Studio Code because it's free, provides hints while coding, and points out errors. By writing the code yourself, you can bring any design to life, but it demands a solid knowledge of HTML and CSS.
- Option 2. Get your HTML code from AI.
Ask ChatGPT or Gemini to generate HTML code from your description (you can even use an image of the email you want to get HTML for). But while AI will likely tell you that it has composed the perfect code, most of the time you will still have to fix some issues. Hence, basic HTML and CSS knowledge is still needed to fine-tune the results. In my next article, I’ll explain how to customize code from an AI. Hope you'll read it 😉.
- Option 3. Customize a pre-built template.
Download a pre-built template and tailor it using a code editor (you can use any editor from Option 1). Although it's faster than starting from scratch, a basic understanding of HTML and CSS is still required here. Be warned that some of the best templates are paid ones, though you buy them only once.
- Option 4. Use an HTML email template builder.
Choose any online editor, like Stripo, BeeFree, or Shared Email Templates & Signatures to create your template from scratch or edit their templates online. These tools let you design emails by dragging and dropping elements like text blocks, images, and buttons. When you're done, you can simply export the HTML code.
Note: You can find Canva among the proposed sources, but we do not recommend using this tool for creating HTML code for Gmail. Canva uses an <iframe> tag, which is blocked by almost all modern email clients. Instead, you can use Canva to design an image of your newsletter and send it as a picture, or give an AI a visual prompt to write the HTML code.
With this method, you don't need to write any code yourself, but the HTML export feature usually requires a paid subscription. The good news is that services like Stripo and BeeFree offer a limited number of free exports per month (4 and 6, respectively), which is often sufficient for the needs of a small business.
Note: These builders host your images on their servers. Because of this, some email clients may block images from loading automatically, and your recipients might have to click to see them.
How to insert HTML code in Gmail
Alright, you’ve written the HTML code and are ready to embed it into Gmail. But here’s the deal: if you just copy and paste the code, your email won’t magically transform into a perfectly structured message with fancy buttons and cool pictures 🤷.
Try to do so, and you’ll see that it still looks like code:
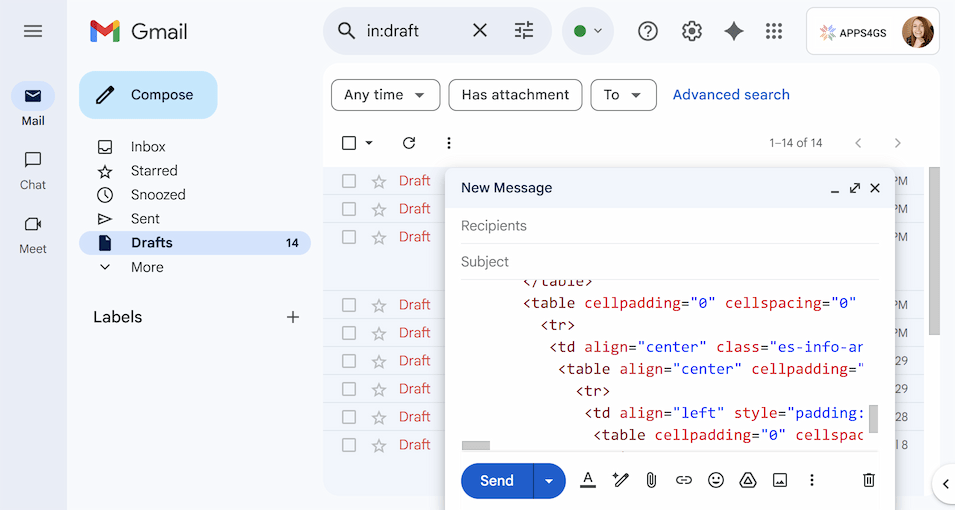
It happens because Gmail doesn’t have a built-in HTML editor to import your raw code directly. However, there are several workarounds to paste it: you can use your browser's developer tools or copy and paste the rendered visual page.
Use developer tools to insert the code as an email body
Creating HTML email templates for Gmail within Chrome’s Developer Tools is an effective method, but frankly speaking, not for beginners. But you never know what you can do till you try 💪.
To insert your HTML code into Gmail, you need to:
- Create and copy your HTML code. I’ve written mine in Visual Studio Code:
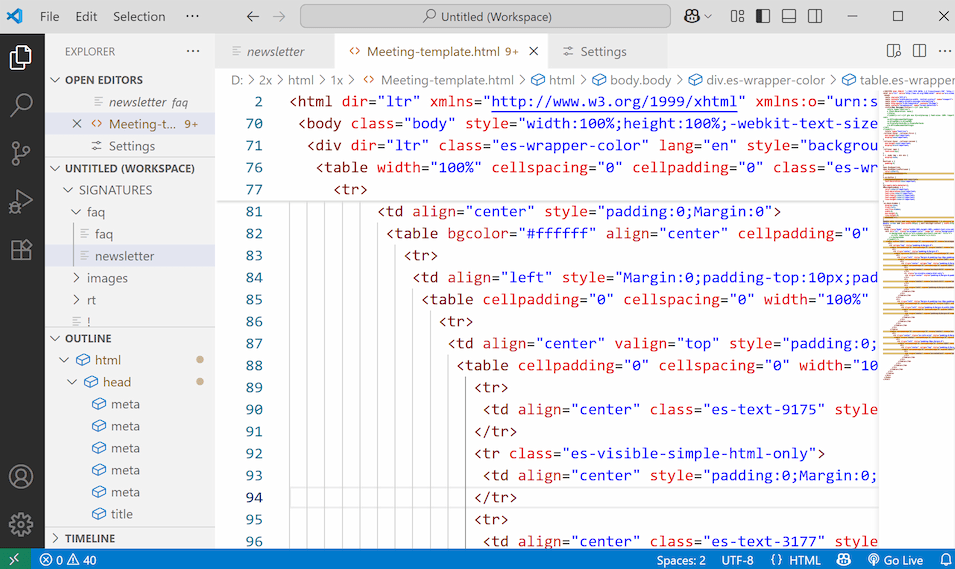
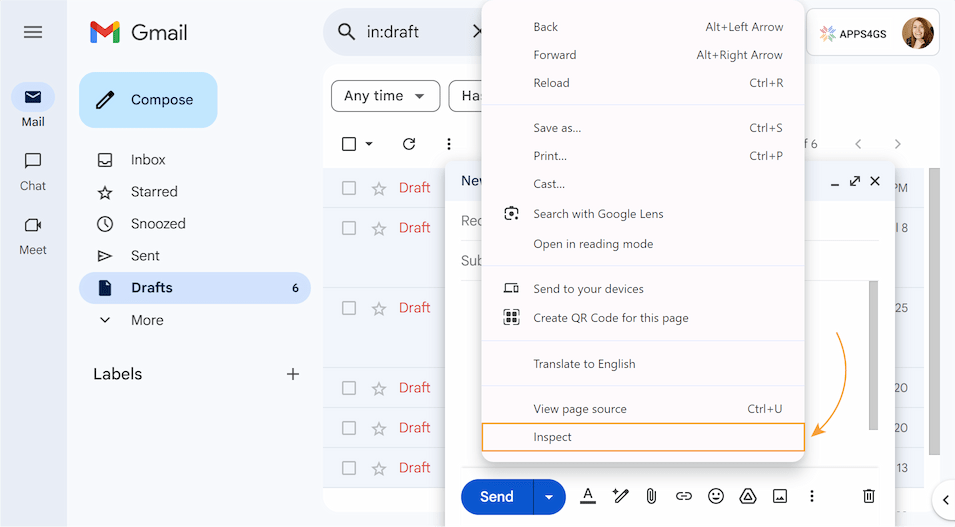
- Open a compose window in Gmail, right-click within it, and choose the Inspect option.
- Chrome’s Developer Tools open at the side. Click the arrow in the top left corner to select an element in the page and hover over your email body only.
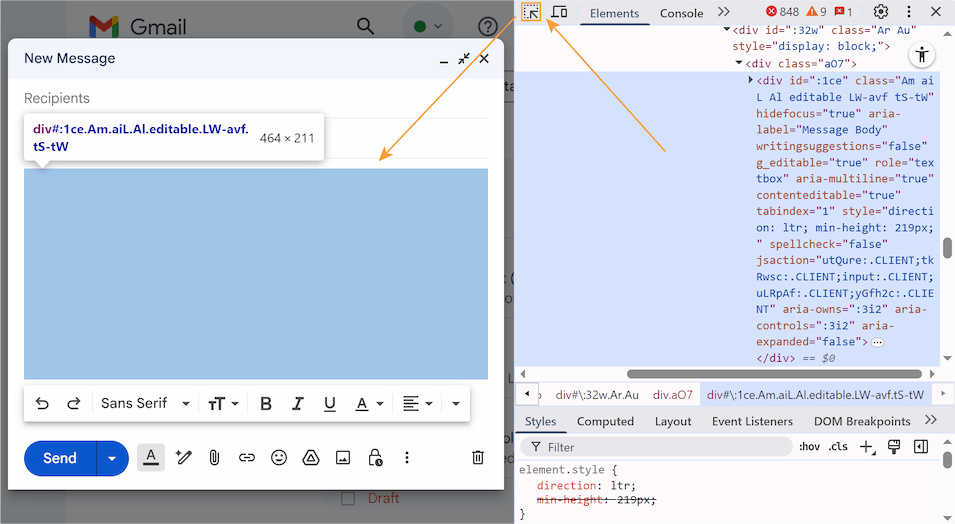
- The div element with the compose window code will be highlighted. Right-click it and select Edit as HTML.
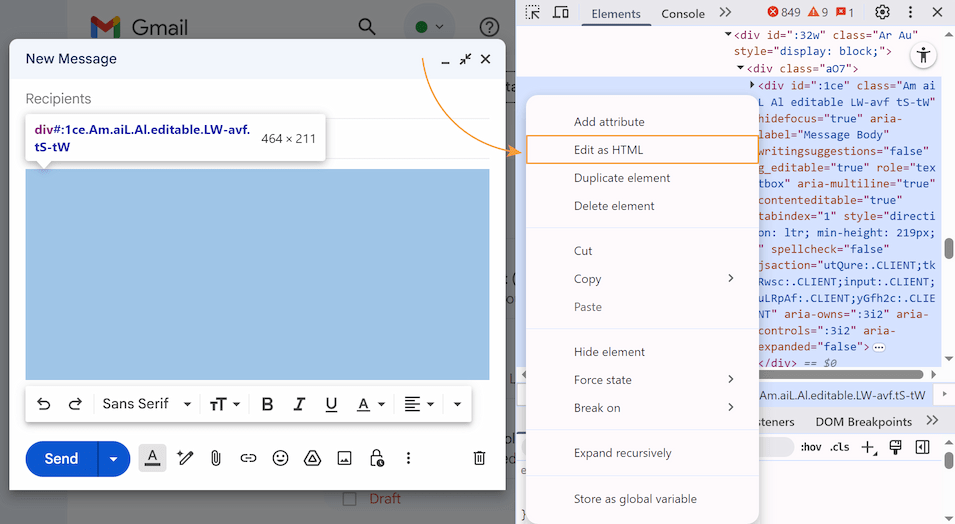
- Replace the content of the element with your HTML code.
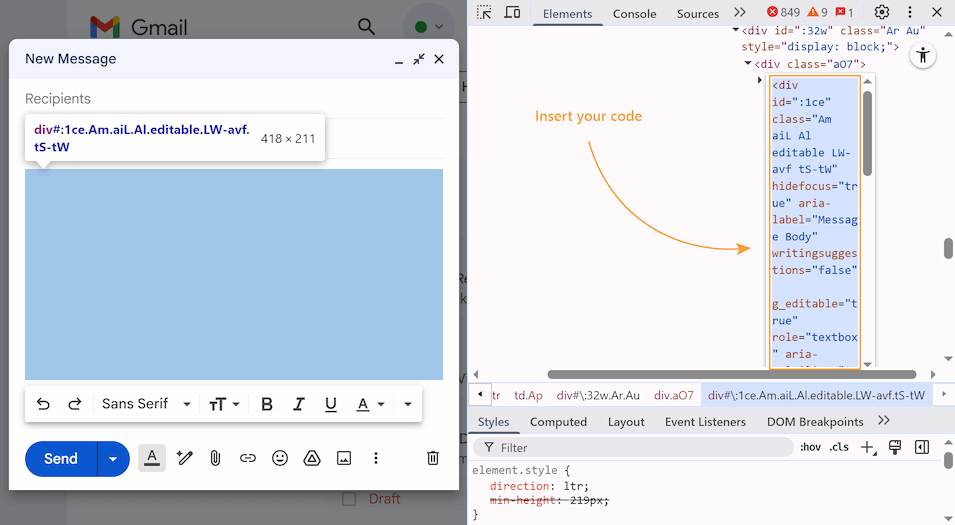
Note. Copy your code and wrap it in <div> </div>. Your code should only contain Gmail-supported tags.
- Click outside the Chrome’s Developer Tools window and close it. Your HTML email will appear in your draft.
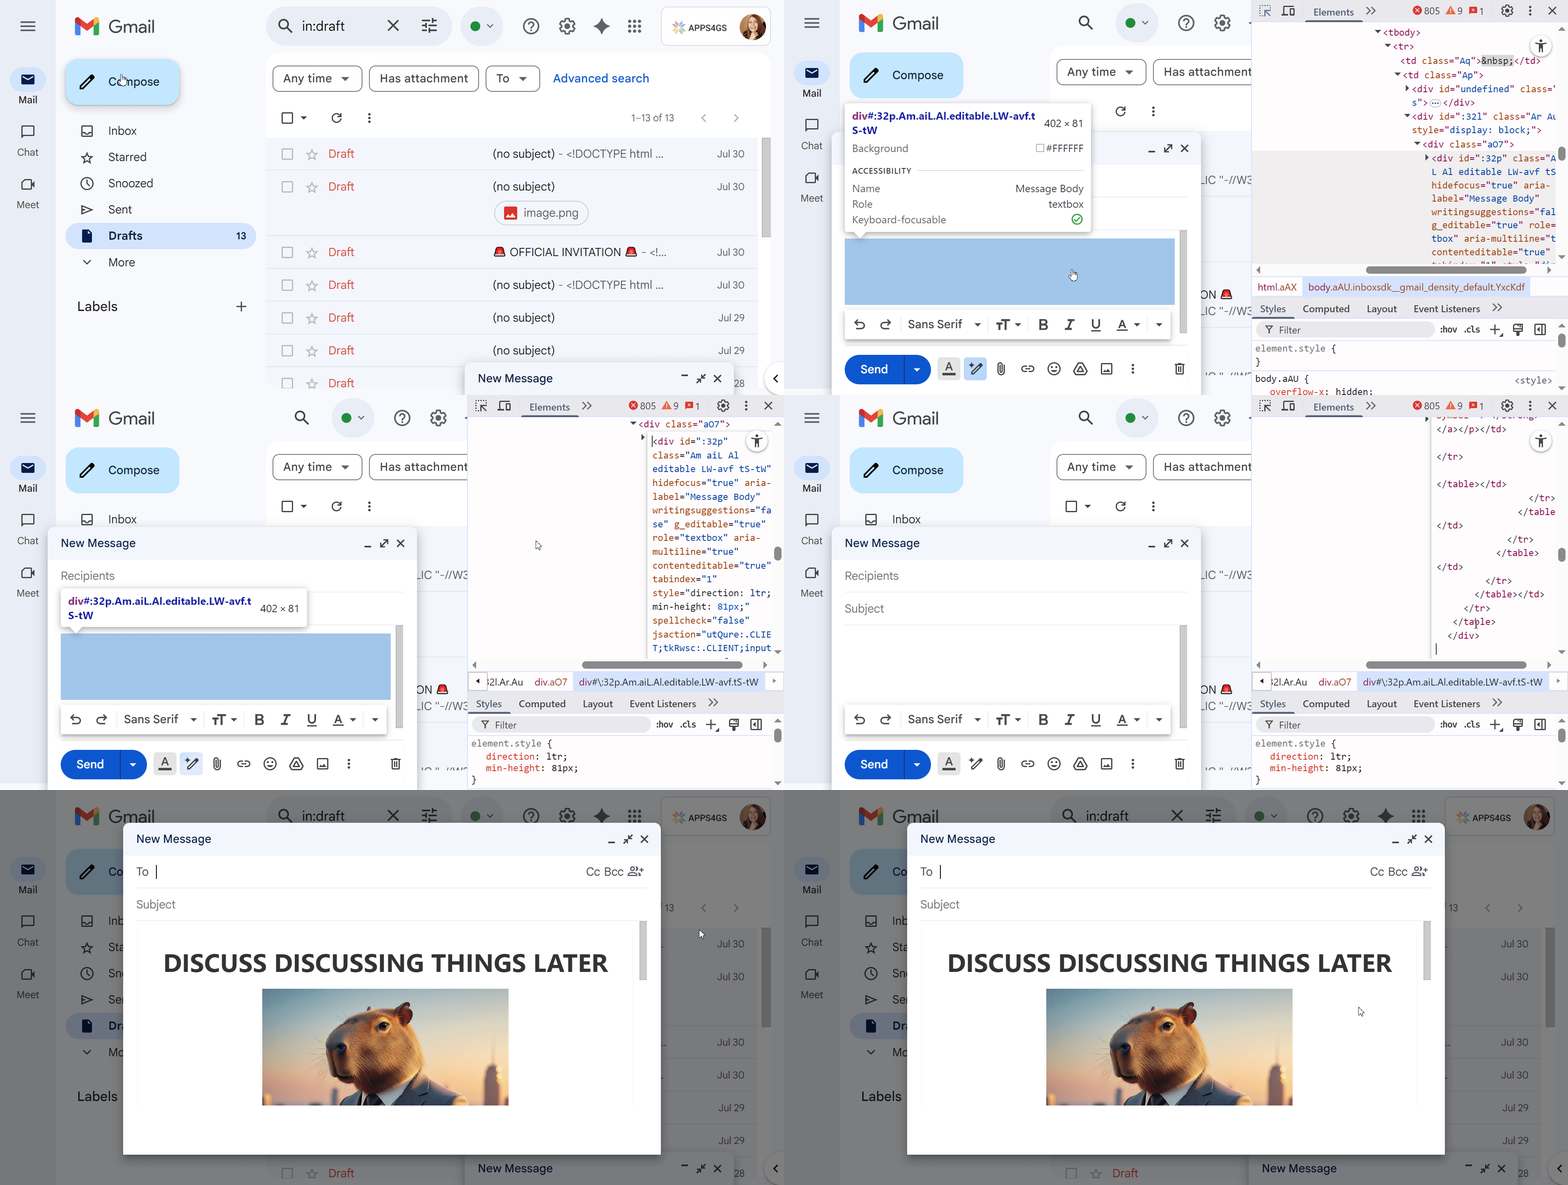
Too complicated? Let’s try another option.
Copy and paste the HTML code result instead
You can't copy-paste the code itself into the email body, but you can copy-paste the rendered visual page of the HTML email.
To copy and paste the HTML code result in Gmail, follow these steps:
- Save or export your previously created code as a .html file.
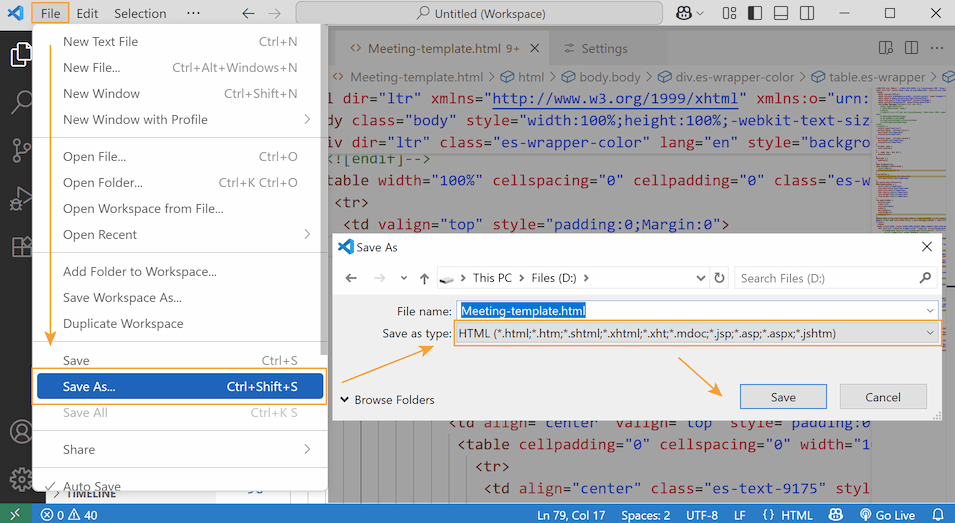
- Right-click the file and select Open with to view it in the selected web browser. Your email content will appear in a new tab.
Note. If anything looks off, review the code and confirm that the file was saved in the correct format.
- Select and copy the page contents.
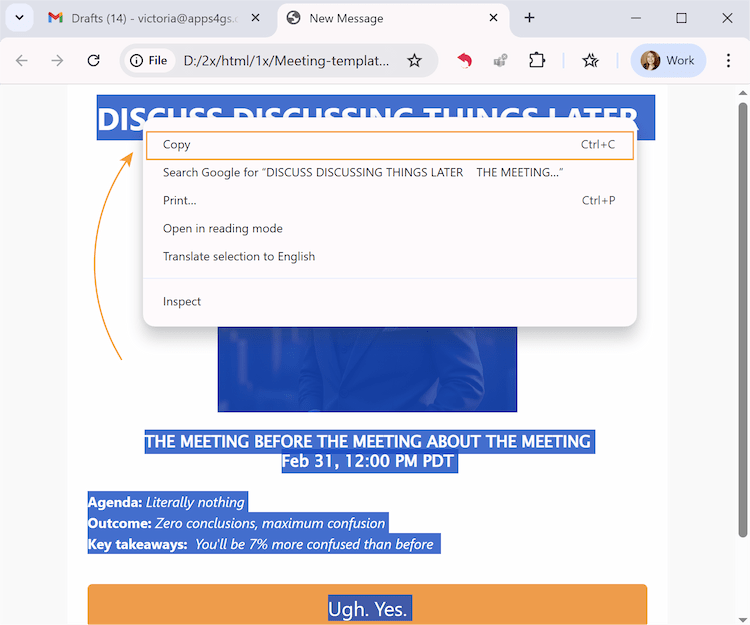
- Open Gmail, click Compose, and paste the copied contents into the new message window.
- Your HTML email is almost ready. Just add recipients, write a subject, and click Send. Or save it in Drafts for future email campaigns.
Tip. Send a test email to yourself or someone from your team before bulk sending to check its final appearance.
- Additionally, you can save your draft as a template. Click the three dots in the tools panel, hover over Templates > Save draft as template, and select Save as new template.
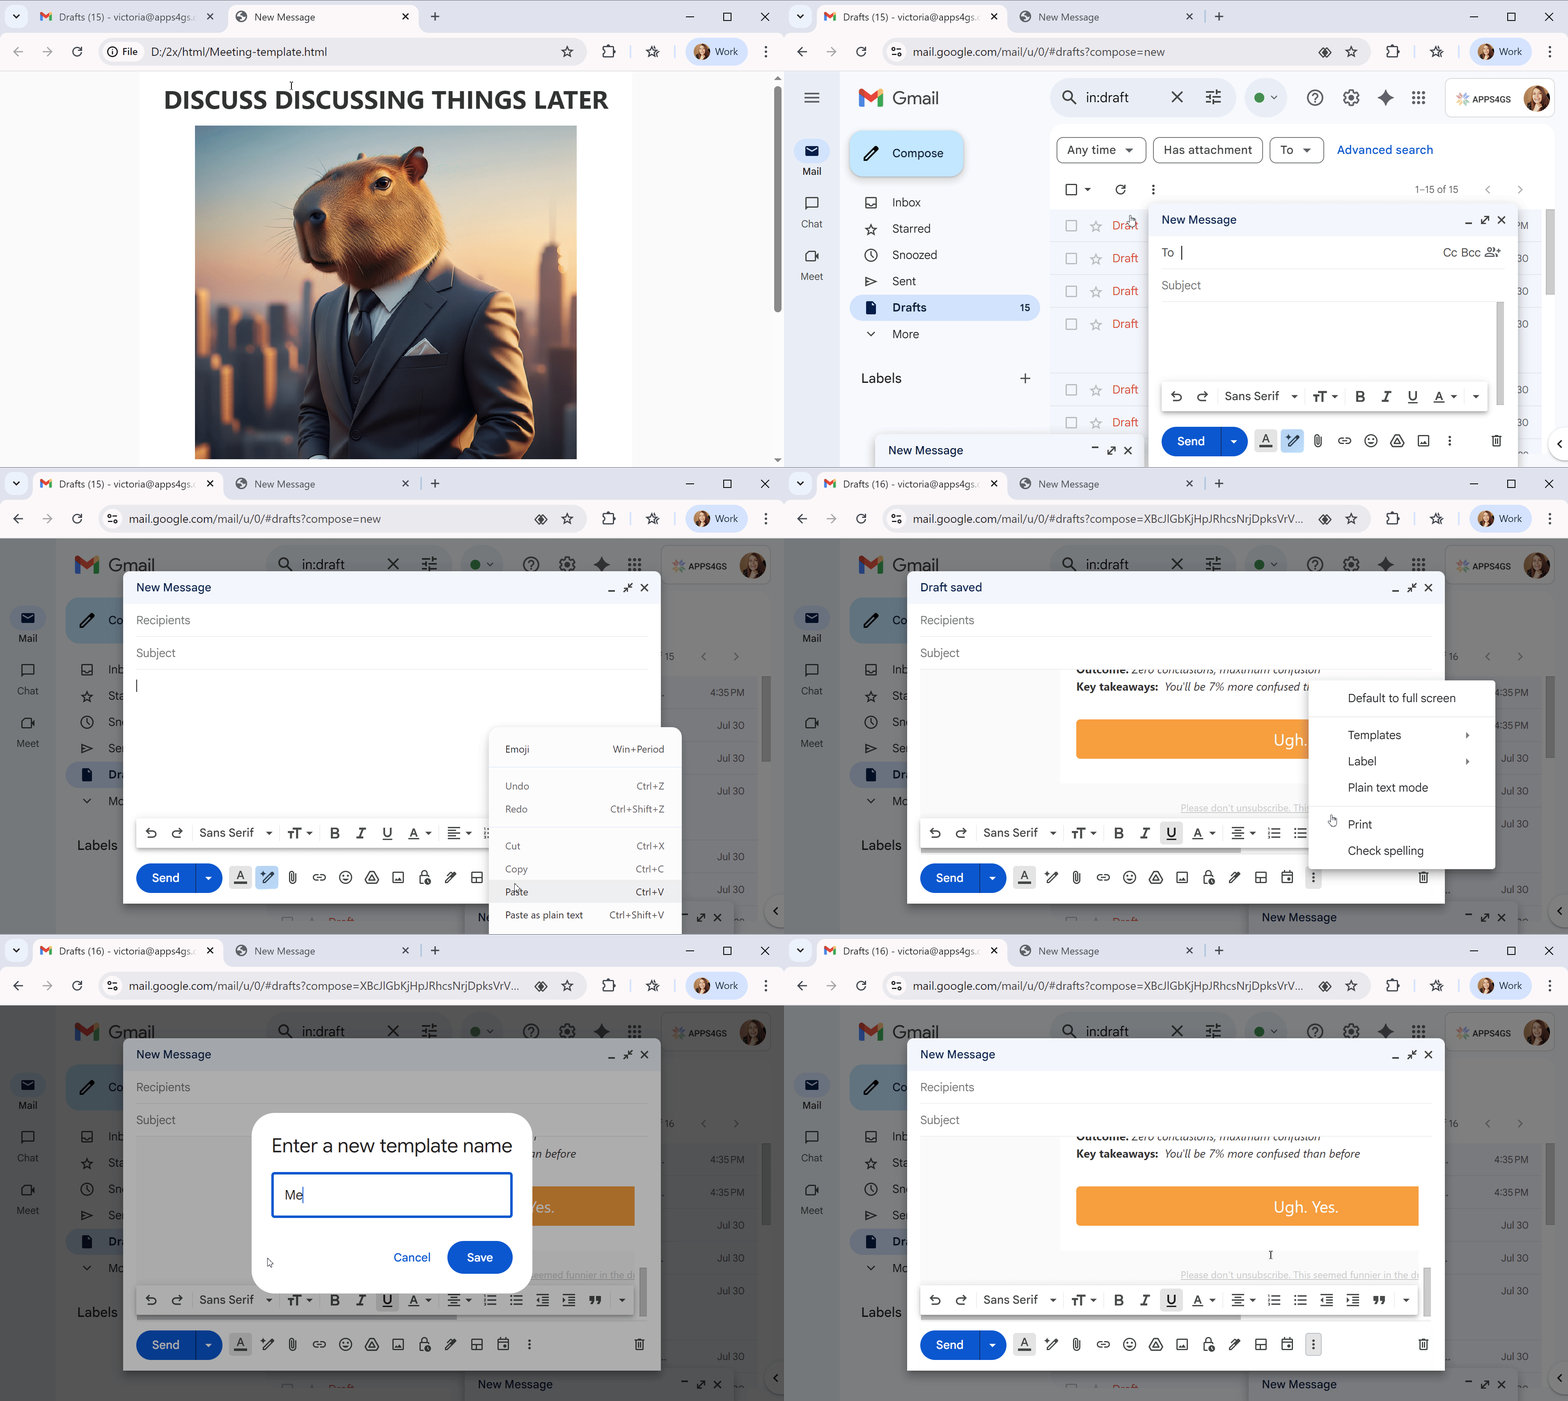
Tip. Don’t forget to enable Templates beforehand. Read this article to understand the process.
Install a Chrome extension as an HTML editor
Even though there’s no built-in HTML editor in Gmail, you can get it with special add-ons. Shared Email Templates & Signatures is one of the best options here. With it, you can easily create, edit and manage your HTML emails. Moreover, you’ll be able to save them as templates, share them with your team and control access levels, add signatures (even HTML ones) and so much more.
See how convenient email handling could be:
- Install the extension from the Chrome Web Store.
Tip. Click Add to Chrome and follow the on-screen steps to get started.
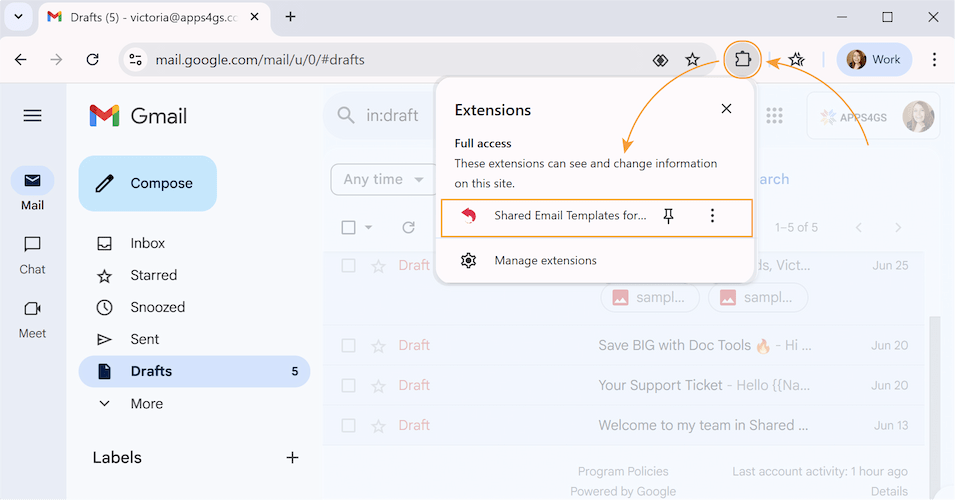
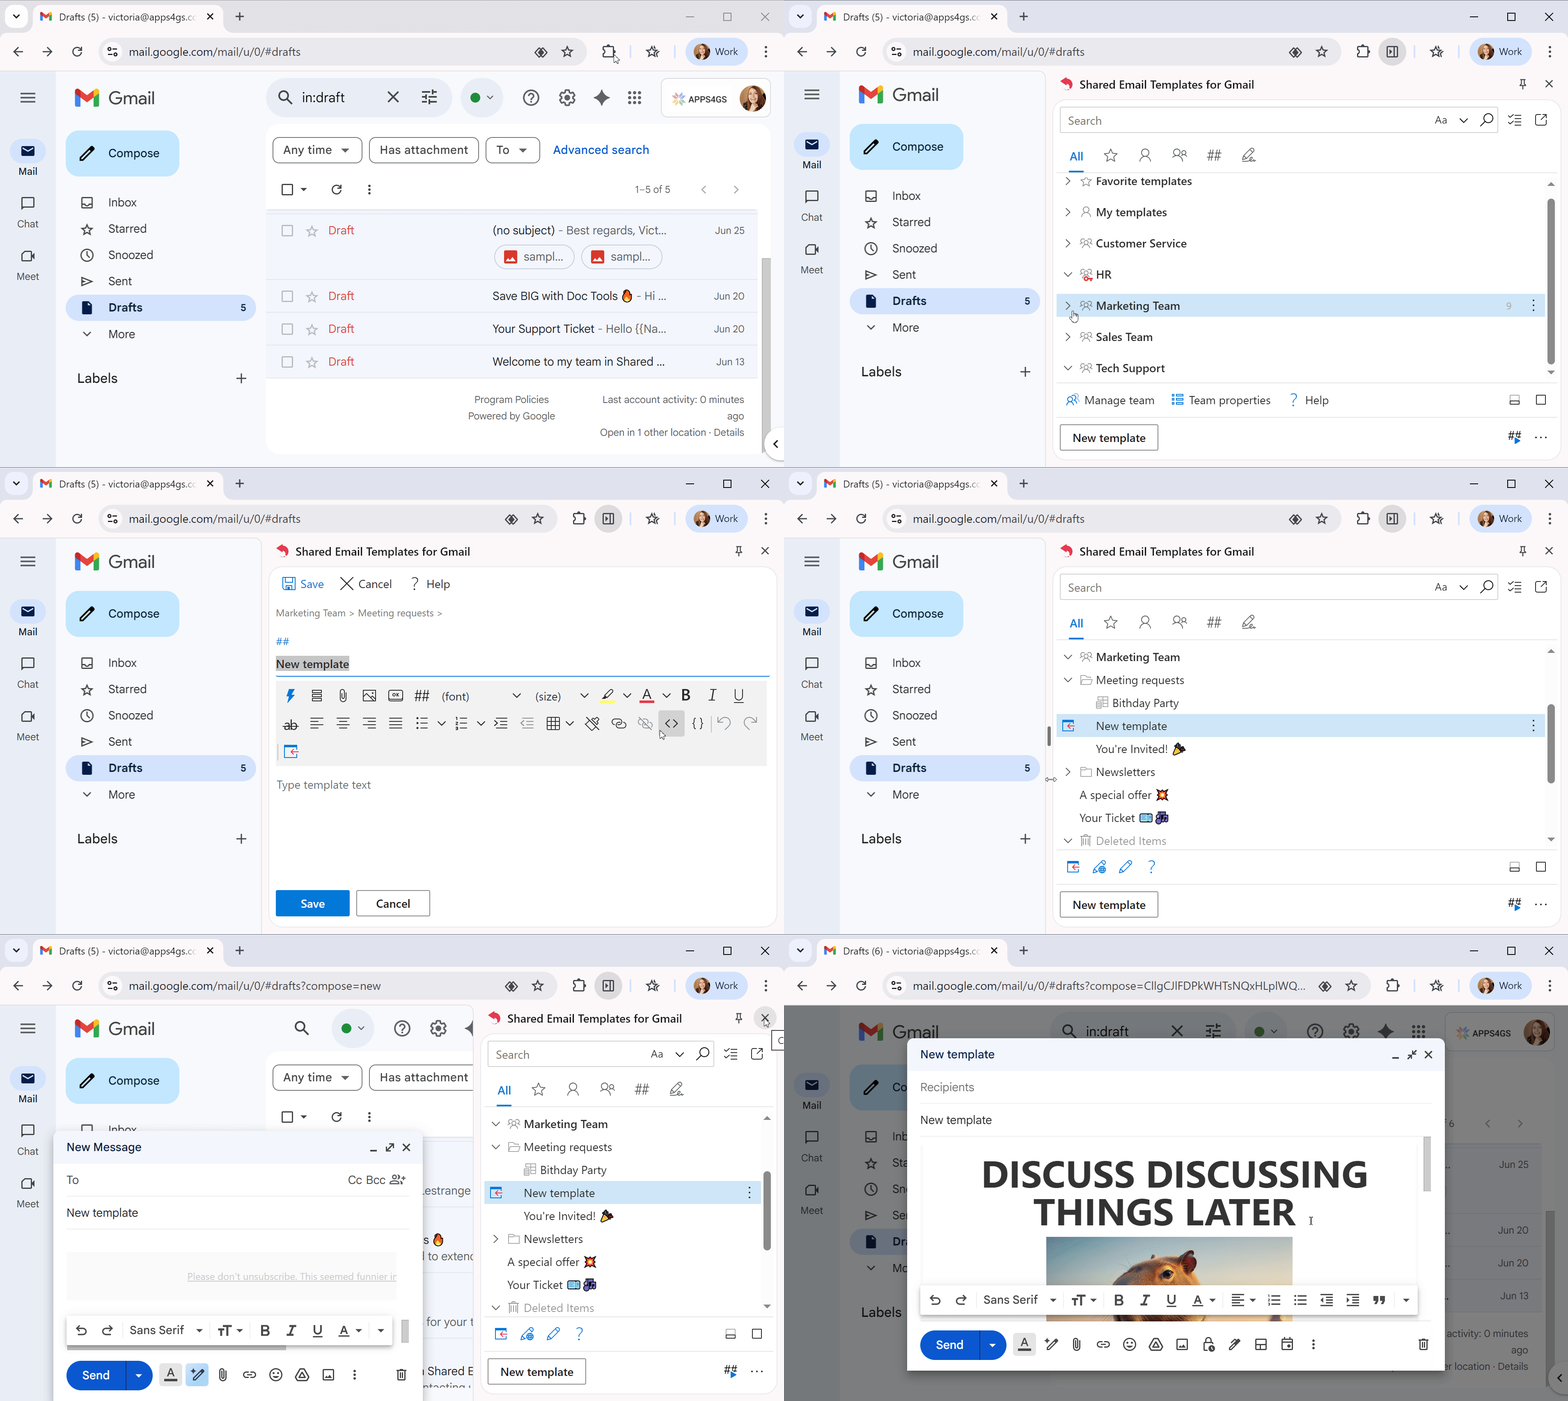
- Go to Gmail and run Shared Email Templates. To do so, just click its icon to the right of your browser address bar. If you don't see the app icon, click Extensions first and find Shared Email Templates in the list of your Chrome tools.
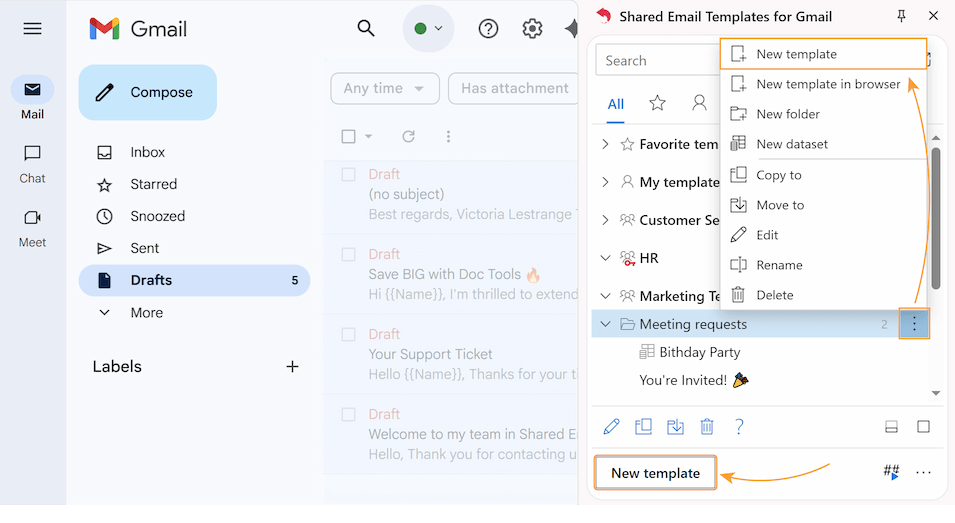
- Pick the folder where your template should be and click the three dots next to its name. Then select New template. (Or push the New template button at the bottom of the sidebar).
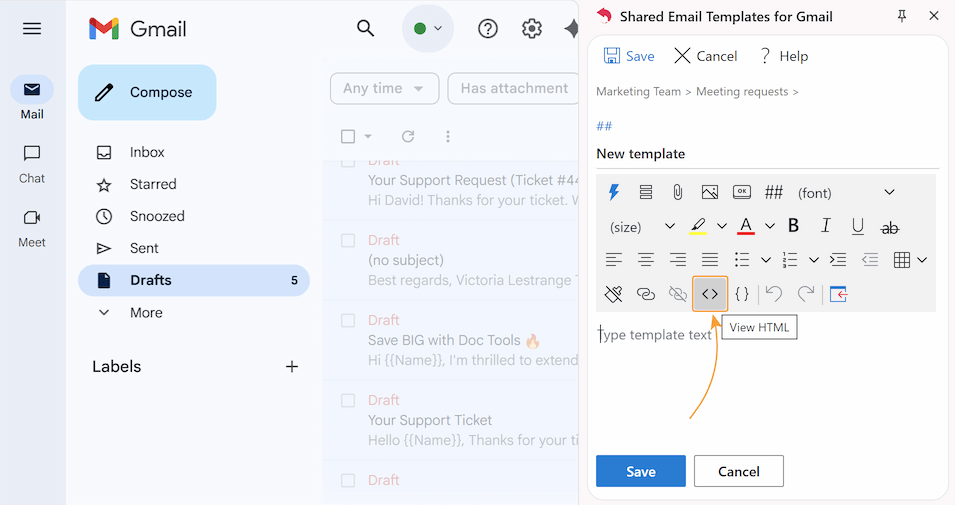
- In the template editor, click View HTML.
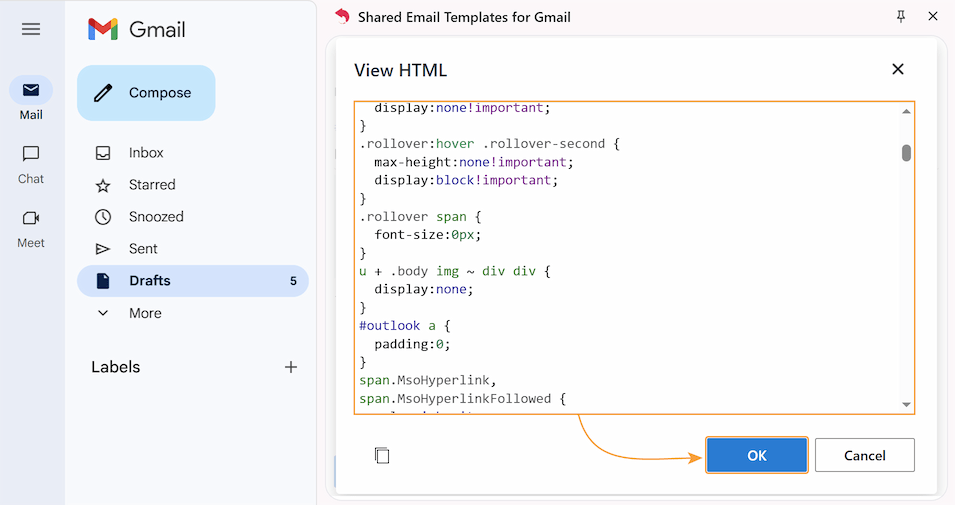
- The place for your HTML code will appear. You can write it right here or copy-paste the code from your preferred editor, click OK, and save the template.
- That’s really all it takes! Save it, and your perfect HTML email template is ready 😉. Preview your content directly in the extension's sidebar before adding it to an email.
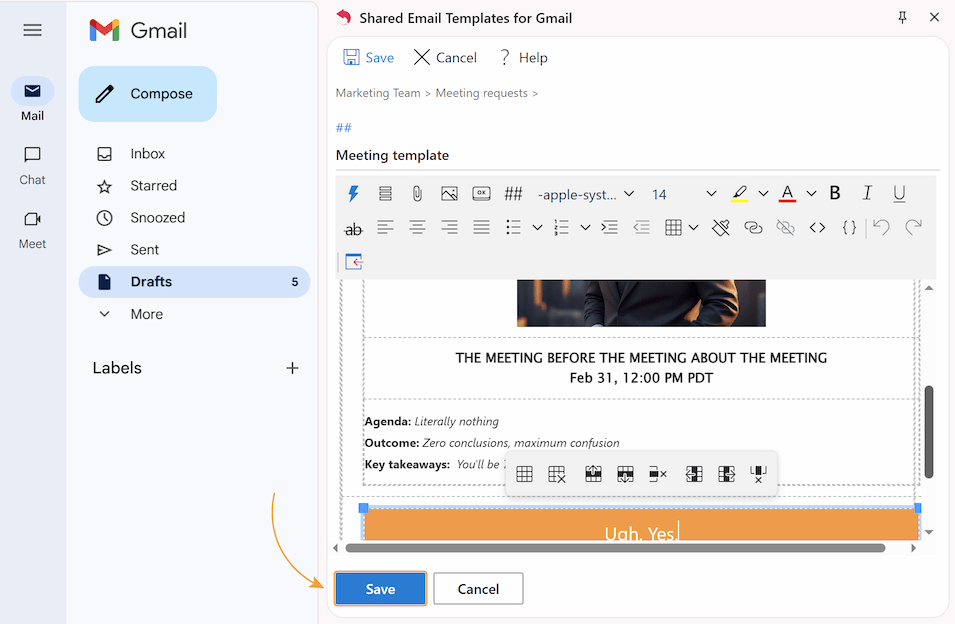
Tip. Click Edit in browser for a better view.
- To use your template, select it and click Insert. Its whole content will pop into your new email.
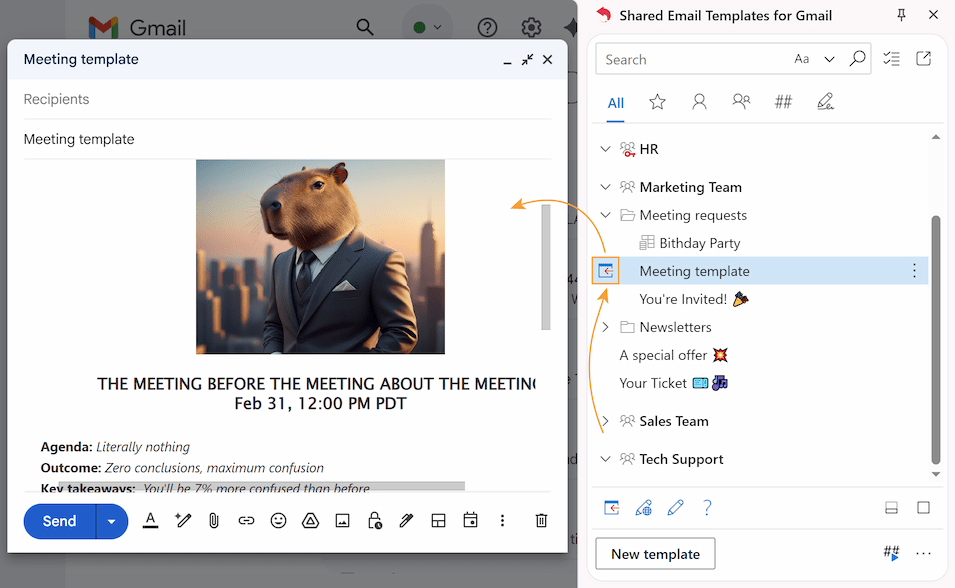
All your created templates will be saved in a centralized, organized, and easily searchable template hub.
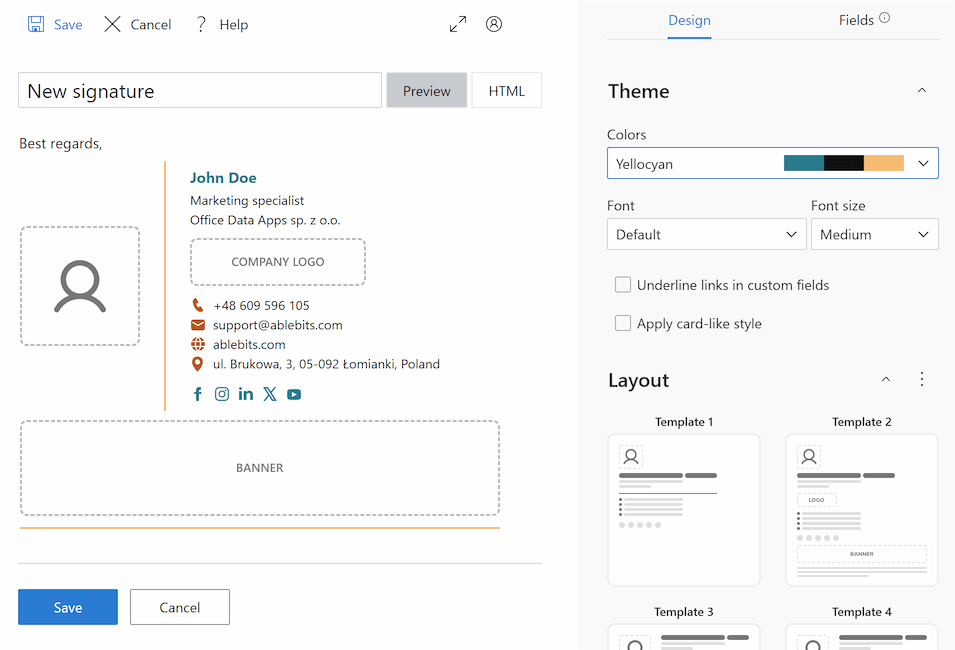
Tip. Additionally, you'll get a collection of professionally designed HTML-based signature templates to add the final touch to your emails.
Easy ways to create Gmail email templates without coding
Struggling with the methods above? I have some other options for you. Hope they will help you give your messages some flair ✨.
Edit built-in Gmail layout templates
Working with this method, you’ll be dealing with built-in Gmail layouts. There are not many of them, and you will be limited by the existing editor features, but you will get a custom HTML design without any advanced HTML knowledge.
Note that this feature is available only for personal accounts with Google Workspace Individual subscription (not free personal accounts) and for most Google Workspace plans. Let’s examine it closely (or move to the next chapter, if you don’t have a suitable subscription):
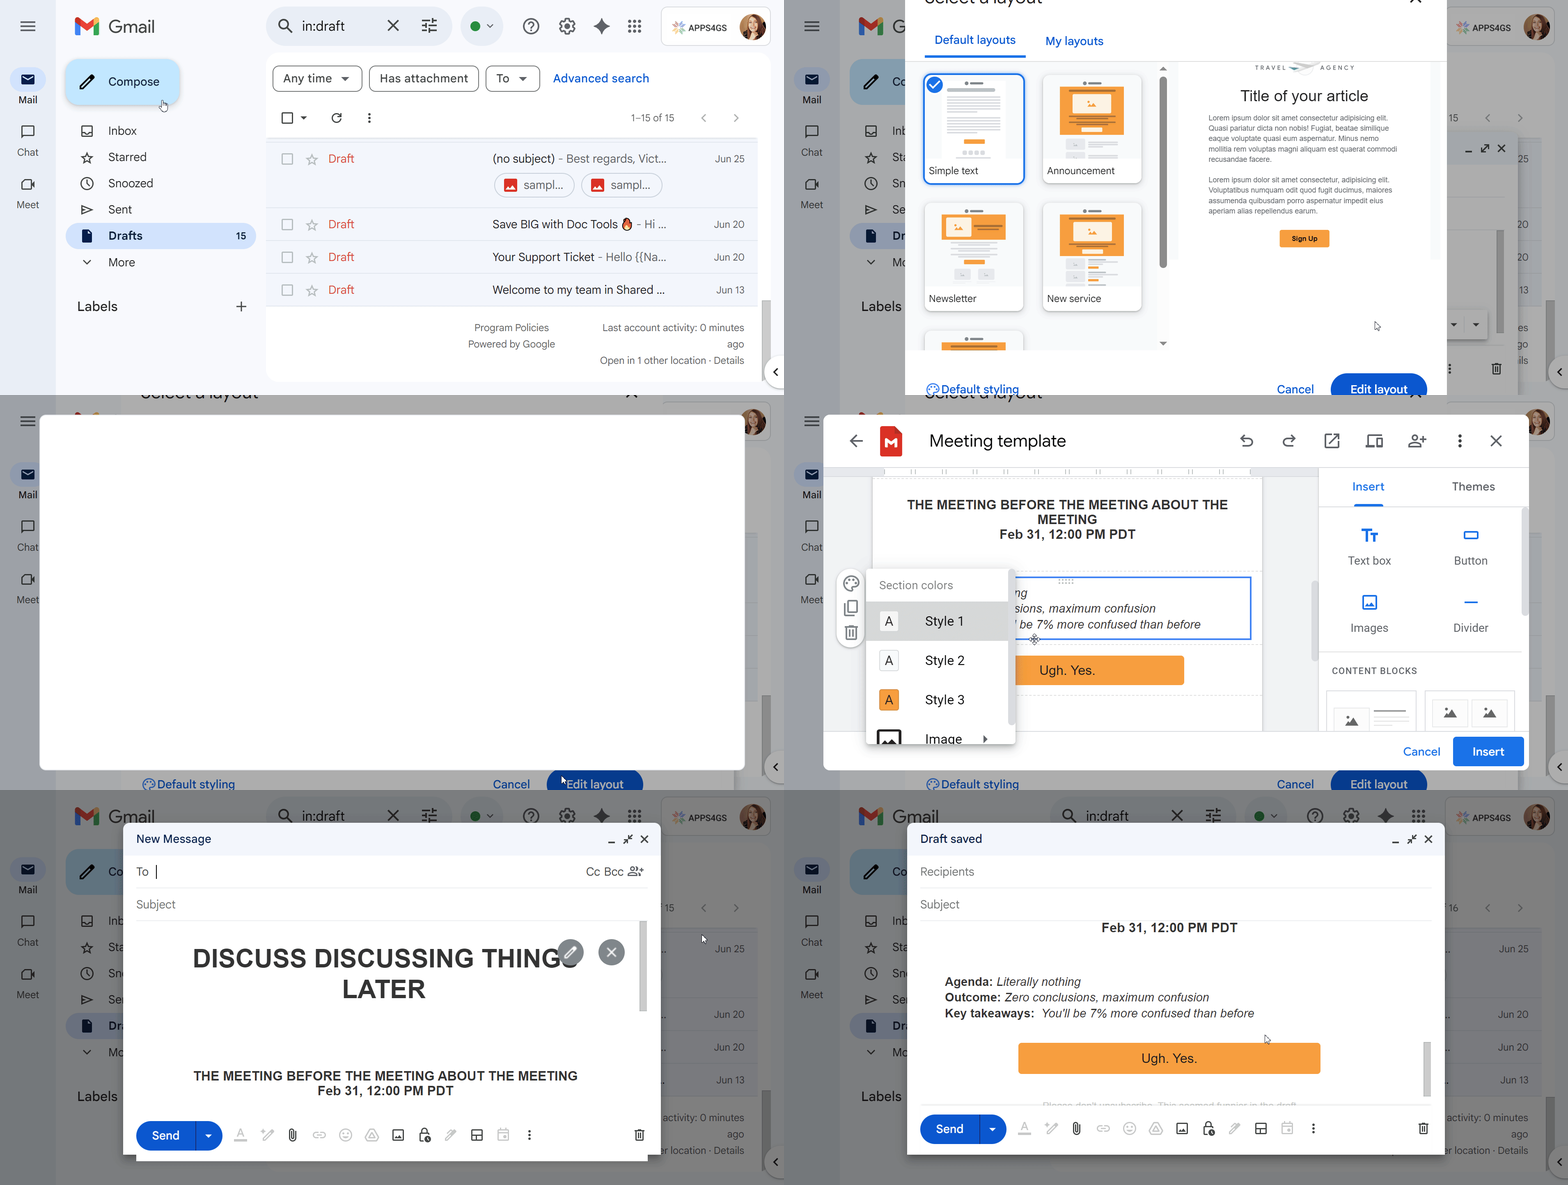
- Open your Google email and click Compose.
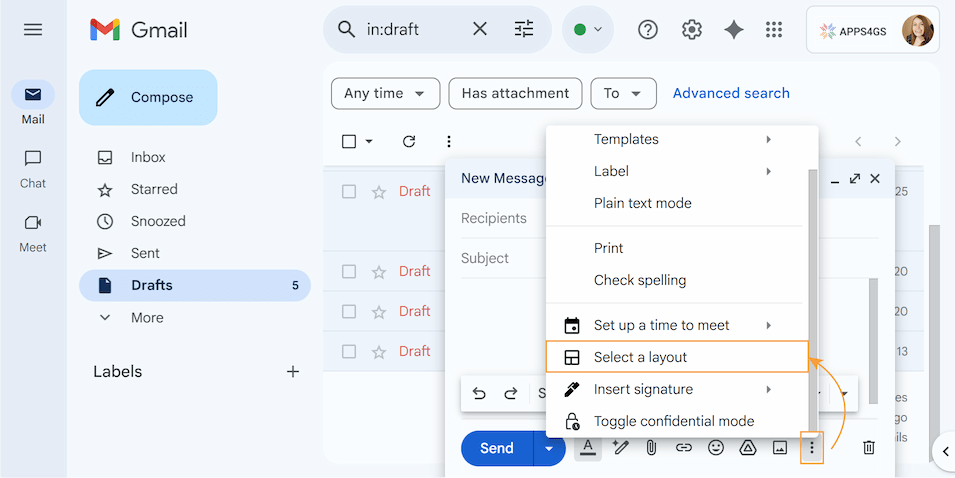
- Choose the Select a layout option in the toolbar.
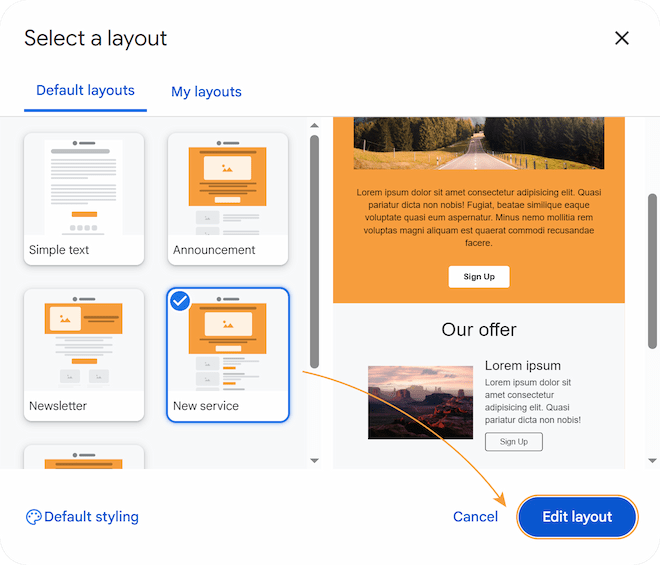
- A pop-up window with default layouts will appear. Select the most suitable layout and click Edit layout.
- Once the editor opens, click on any section you want to modify, and adjust as needed. You can also delete unnecessary sections or insert new ones.
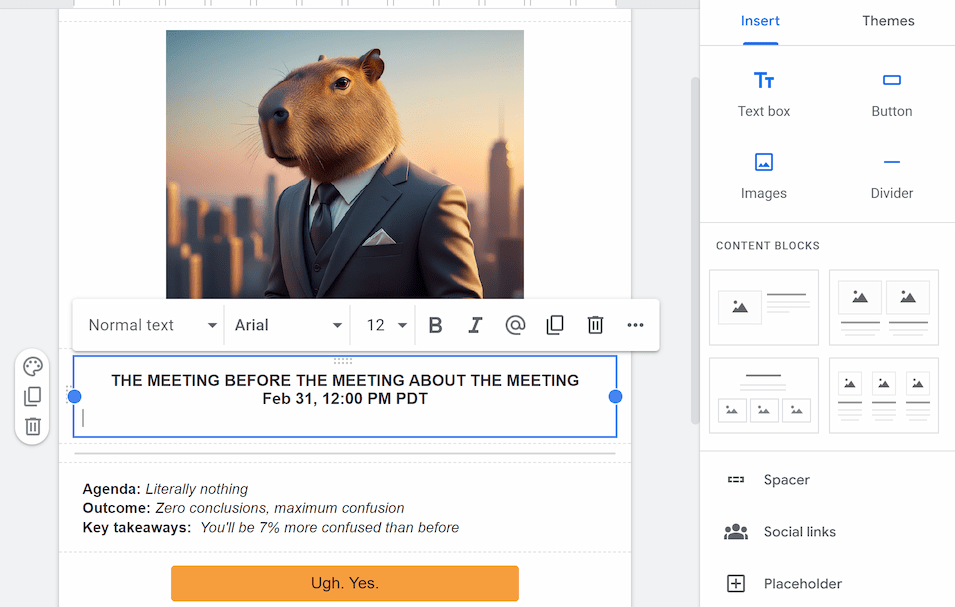
It’s also possible to go to My layouts and create your own layout from scratch using structural blocks. Moreover, you can explore more options by clicking Default styling in the lower left corner.
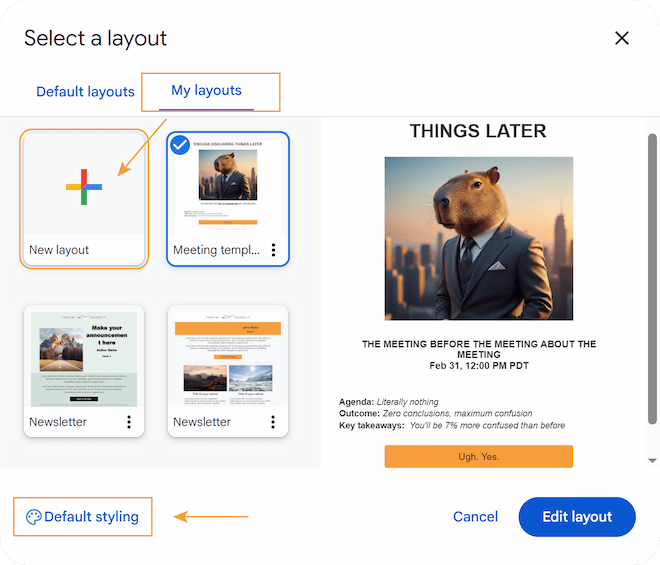
In the Default styling section, you can modify your logo, colors, fonts, footer details, and links.
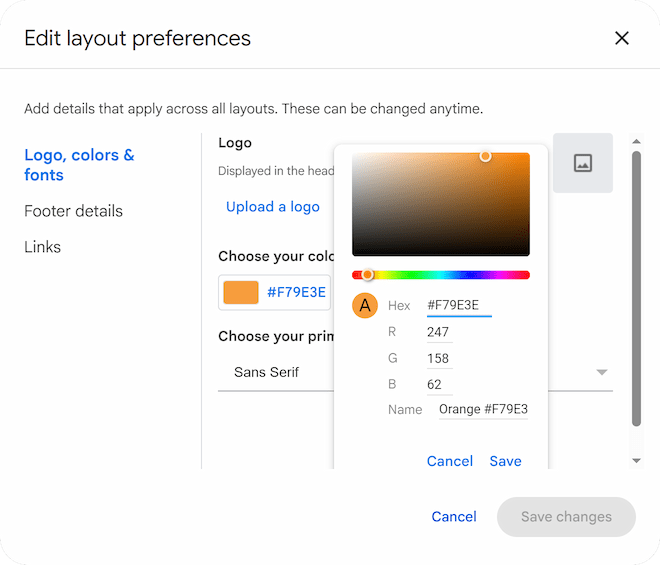
Tip. Don’t forget to update any existing links in the layout.
- When you are finished making changes, click Insert.
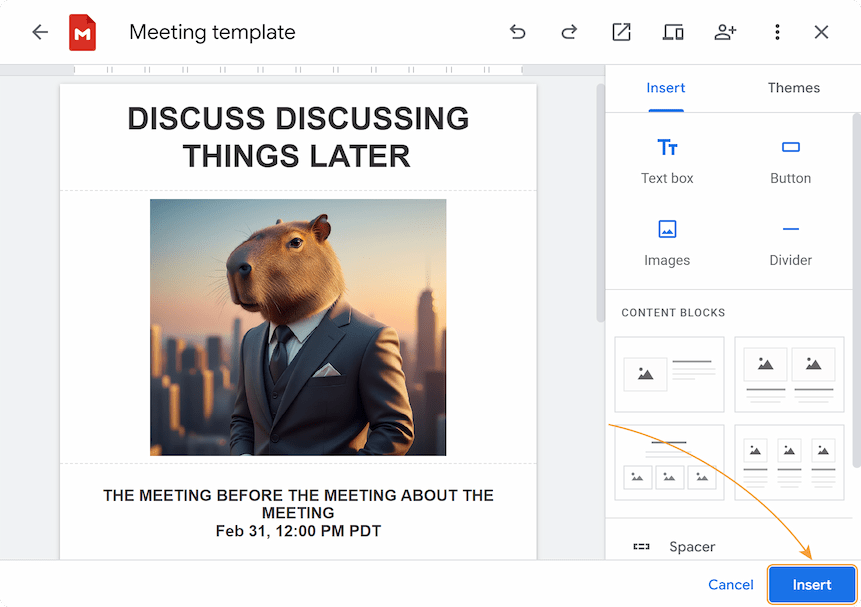
- Finalize your email with a subject line and recipients. Your layout will be saved in the My layouts tab to have it on hand.
Use Google Docs as the easiest way to create rich-text emails
Having trouble with HTML but comfortable using Docs? We have another cool tool for you: Easy Mail Merge. With Easy Mail Merge, you can prepare and send perfectly designed, personalized emails straight from Google Docs. It’s really a great no-code solution.
Note: Gmail defaults custom fonts to standard ones and can change spacing, form, and location of your pictures and buttons.
To create your Google Docs email, follow these steps:
- Open Google Docs and click on the Template gallery button at the top.
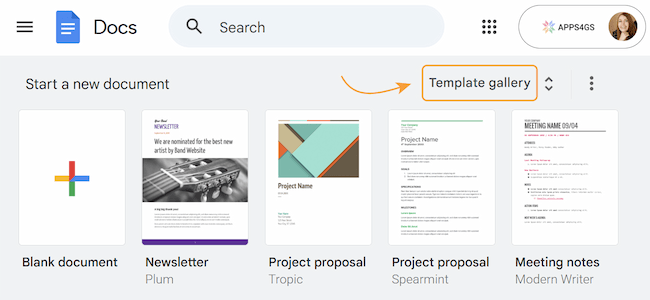
- You can select the most suitable template or start a new one by clicking Blank Document.
- Compose your email template.
The best way to prevent your email from stretching unattractively on wide screens is to structure it within a table:
- Go to Insert > Table and choose a simple structure, like a single column with a few rows.
- In the top cell, type your header text.
- To add a logo or any pictures to your email, click inside the target cell and go to Insert > Image > Upload from computer.
- Add your text into the appropriate cells. Use special placeholders to ensure each message is tailored to the recipient.
- To create buttons, type text into a cell, center it, insert a link, and use the Cell background color option to make it look like a button
- To make your frame invisible, select the table with your email and set the table border width to 0 pt.
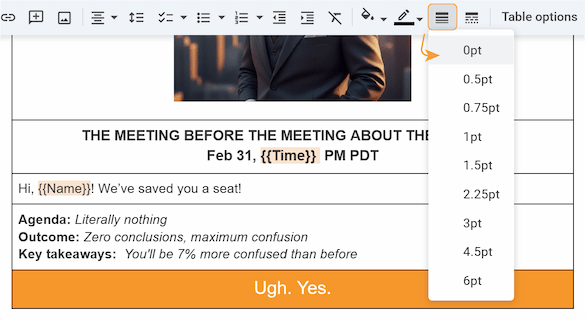
Your email is ready and you can save it. Need to send it? That’s where the perfect tool - Easy Mail Merge comes into play!
To bulk send from Google Docs, follow these steps:
- Install the add-on from the Google Workspace Marketplace.
- Prepare a mailing list in Google Sheets. Write down recipient email addresses and other info that will replace placeholders and personalize emails for each contact. Your column headers should match your placeholders.
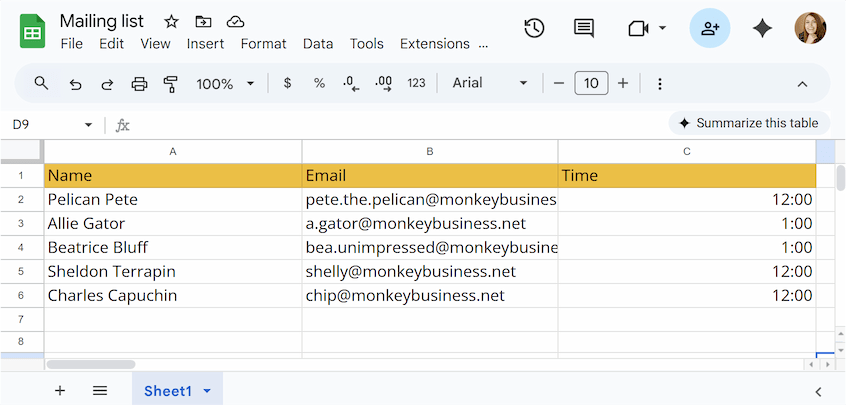
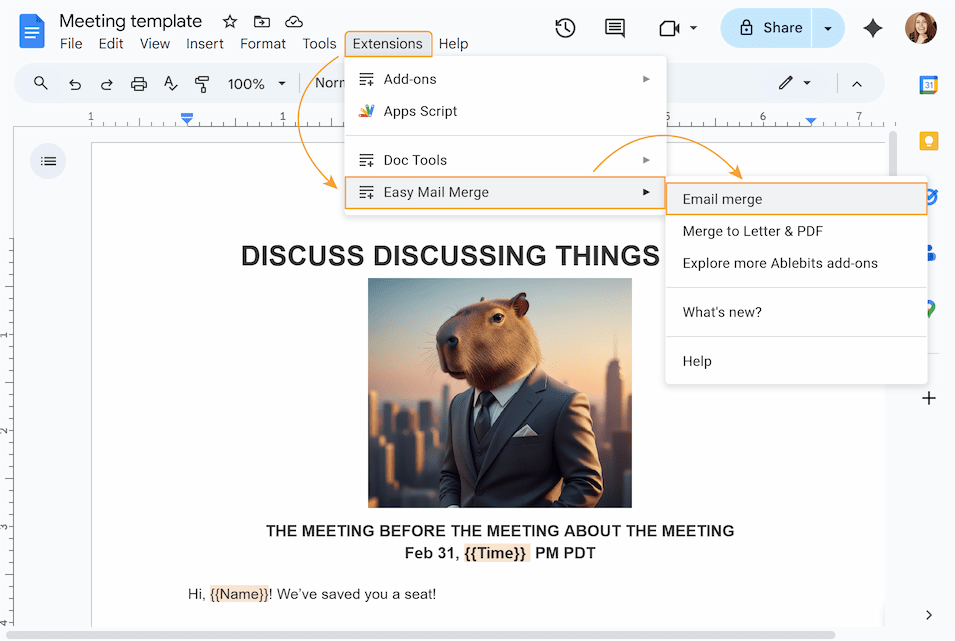
- Return to your email template and run the add-on. Go to Extensions > Easy Mail Merge > Email Merge (if you have a standalone extension) or Extensions > Doc Tools > Start (if you have this tool as part of the Doc Tools collection).
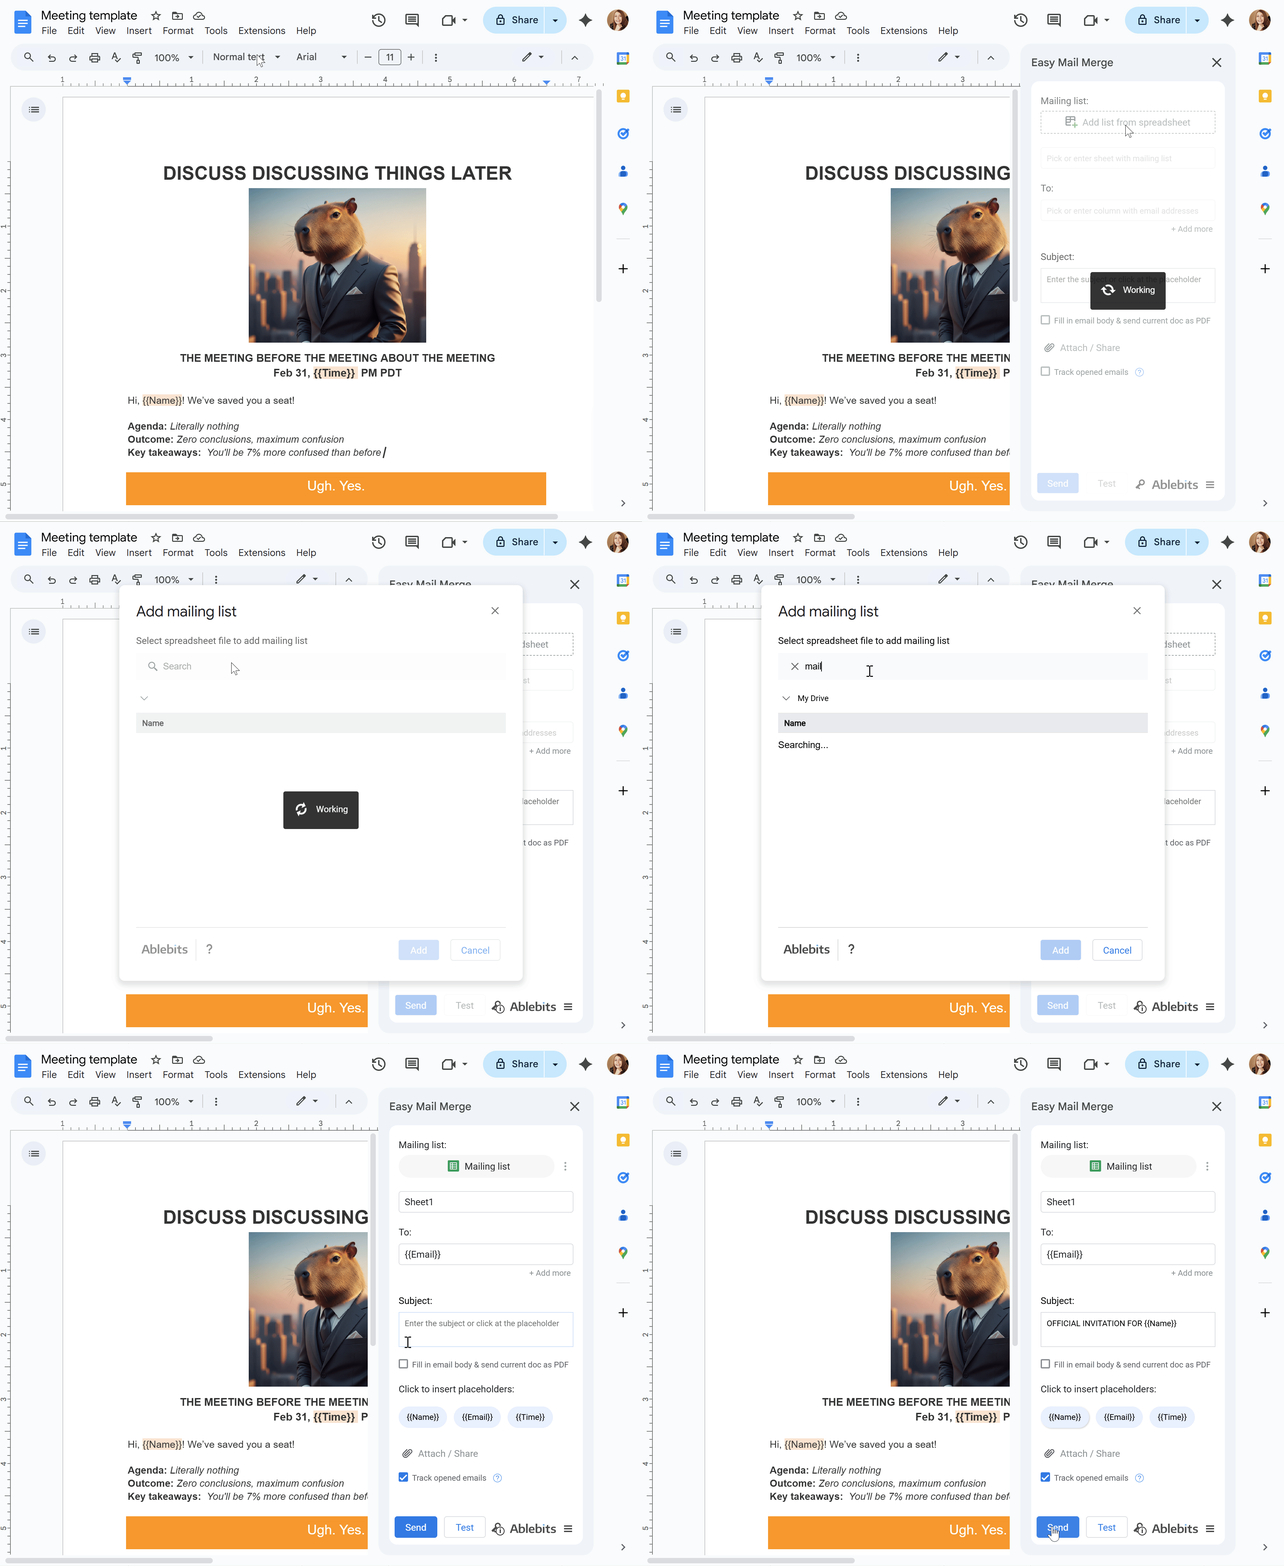
- Click Add list from spreadsheet, select the mailing list in the pop-up window and click Add to connect the mailing list to your template.
- Pick or enter a column from your mailing list that contains the email addresses of your future recipients.
- Write a subject line (if it’s not tailored for each recipient in the mailing list).
- Click the white Test button at the bottom to send a sample email to your inbox and see how it looks. If everything is okay, click Send to start your email campaign.
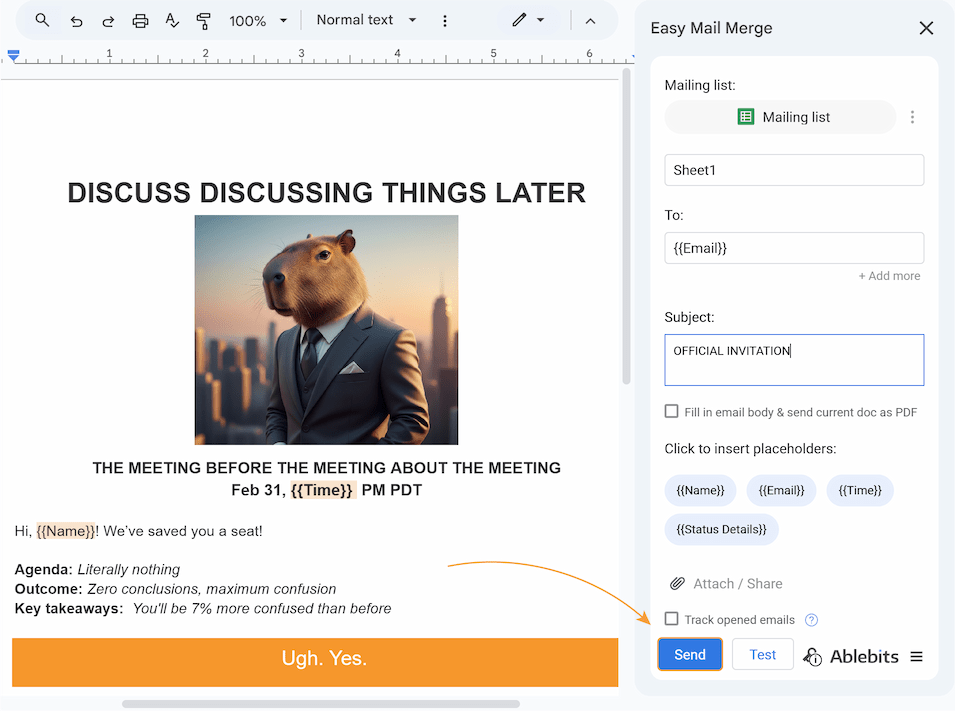
You can also send this document as a PDF file, attach other files, and track opened emails.
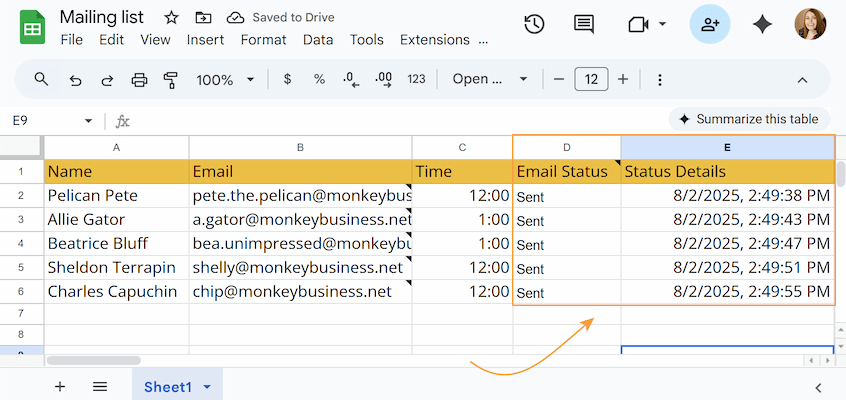
Note. The add-on automatically adds two columns to your mailing list to track the status and details of each sent email.
Best practices for Gmail HTML
For best results, I want to share with you some tips on creating and sending HTML emails:
- Follow legal obligations. Keep in mind that there are important anti-spam rules. To stay on the right side of the law, check out legal guidelines for the USA and EU.
- Host your images online with public access. When creating HTML email templates, all the images should be publicly available, otherwise they go missing on the recipient's end. Or you can use Shared Email Templates to be certain your email will stay intact.
- Don’t use external CSS. So that your emails appear exactly as designed on any device, use inline CSS instead of external stylesheets.
- Avoid custom fonts. As with styles, if you want your design to look the same in every inbox, you should stick to email-safe fonts like Arial or Verdana. Otherwise, your custom fonts would be replaced with Gmail default fonts at the recipients’ end.
- Simplify your code. Fancy code often breaks in different email clients, and too much HTML with little text might trigger spam filters.
- Use only supported HTML tags. Gmail doesn’t flag unsupported HTML tags with an error message. It will simply delete the code and your fancy button or cute layout will just disappear or be changed.
- Send a test email. Before you start your campaign, send a test email to yourself or a team member. This way you can recheck the message content. Also, make sure it’s actually delivered and doesn't get lost in the spam.
If the tech gods are kind, this article will help you create perfect HTML emails to win your recipients’ hearts 🧡.
 by
by