I'll walk you through several newsletter creation techniques in this guide. You'll learn how to modify Gmail layouts, create basic or sophisticated newsletters in Google Docs, create and embed HTML into Gmail, and use Canva for newsletters. I’ll also share tips for making your emails so user-friendly that people actually want to read them.
An excellent method of keeping in contact with your present or potential clients is through newsletters. However, creating newsletters without a designer and developer on hand isn't always simple. This guide will give you detailed instructions on how to make awesome newsletters on your own. Let's begin! 😊
Why use Gmail for newsletters? Pros & Cons
A newsletter is a great tool for anyone growing an audience. It isn't about direct selling, but about building trust and relationships, keeping your subscribers engaged and connected with the brand. Even if a subscriber isn't ready to buy today, seeing your name and logo in their inbox every now and then means they don't forget about you when they are finally ready.
With newsletters, you can:
- Strengthen your professional reputation. When you regularly send your subscribers helpful tips and insights, you naturally become their authority in the field.
- Increase brand recognition. Staying in touch with a regular newsletter is a simple way to make your brand more familiar and visible in the marketplace.
- Drive user engagement and generate traffic. Newsletters are perfect for offering a useful tip or a peek at a guide, then inviting readers to "read the full post on our blog" or "download the complete checklist", increasing traffic to your website or blog.
- Convert interest into income. While newsletters aren't for the hard sell, they're incredibly effective at boosting sales down the line. With them, you can demonstrate your value more precisely and give the final nudge to your subscribers to become customers.
Using Gmail for your newsletter can be a brilliant starting point, but it's crucial to understand both its advantages and limitations:
- Pros:
- You already know how to use Gmail and there is no need to master other platforms.
- If you use Google Workspace for business, newsletter features are already included in your subscription.
- When a subscriber replies to your newsletter, the message goes directly to your inbox, not a separate platform.
- For smaller email lists, providers often see your newsletter as a personal message and send it straight to the primary inbox.
- Cons:
- Gmail has strict daily sending limits of fewer than 500 contacts (or 2,000 with Google Workspace). Hitting these limits will trigger a spam filter and can get your account temporarily disabled.
- You risk decreasing your domain reputation if your newsletter is considered and reported as spam by your recipients.
- With Gmail, you have no deep analytics to measure your success or understand what content your audience truly values.
As you can see, Gmail is a great starting point for your newsletter campaign and a fantastic tool for freelancers and small businesses. However, as your audience grows, the very simplicity that made Gmail attractive may become its greatest limitation.
How to customize Gmail layout for newsletters
You might be surprised to learn that Gmail now offers built-in layouts and templates for newsletters, as it's a detail that's easy to miss. Before we continue, a quick heads-up: this layout feature is only available on paid Google Workspace plans (like Business or the Individual subscription). If you're using a standard, free account, jump to the next chapter.
To customize Gmail layouts in your account, simply follow these steps:
- Open a compose window in Gmail and click the Select a layout icon in the toolbar.
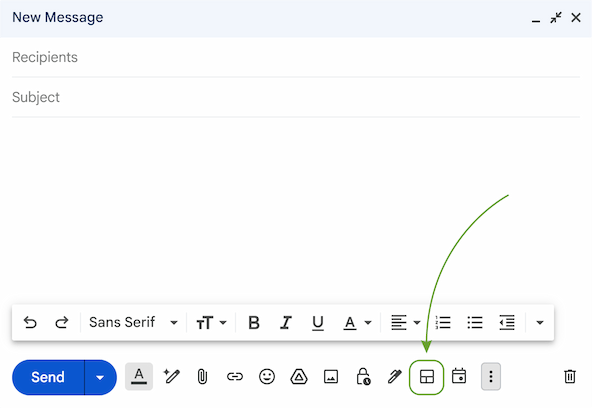
Note: Click the three-dots menu > Select a layout, if you're using a smaller window. In case you’re not seeing the icon here either, your plan likely doesn't include this feature.
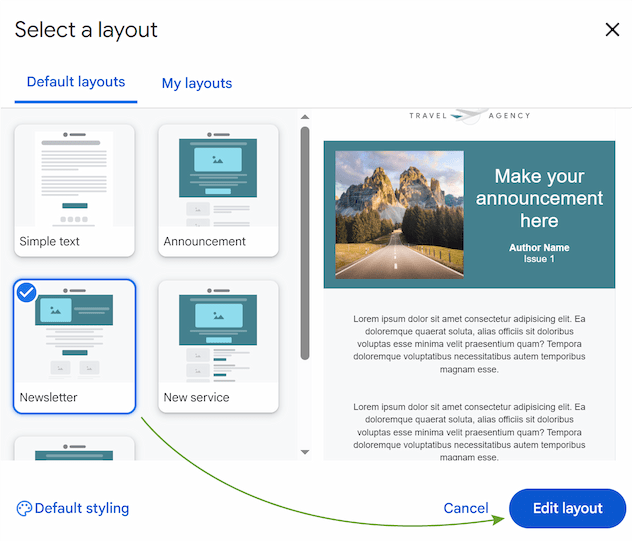
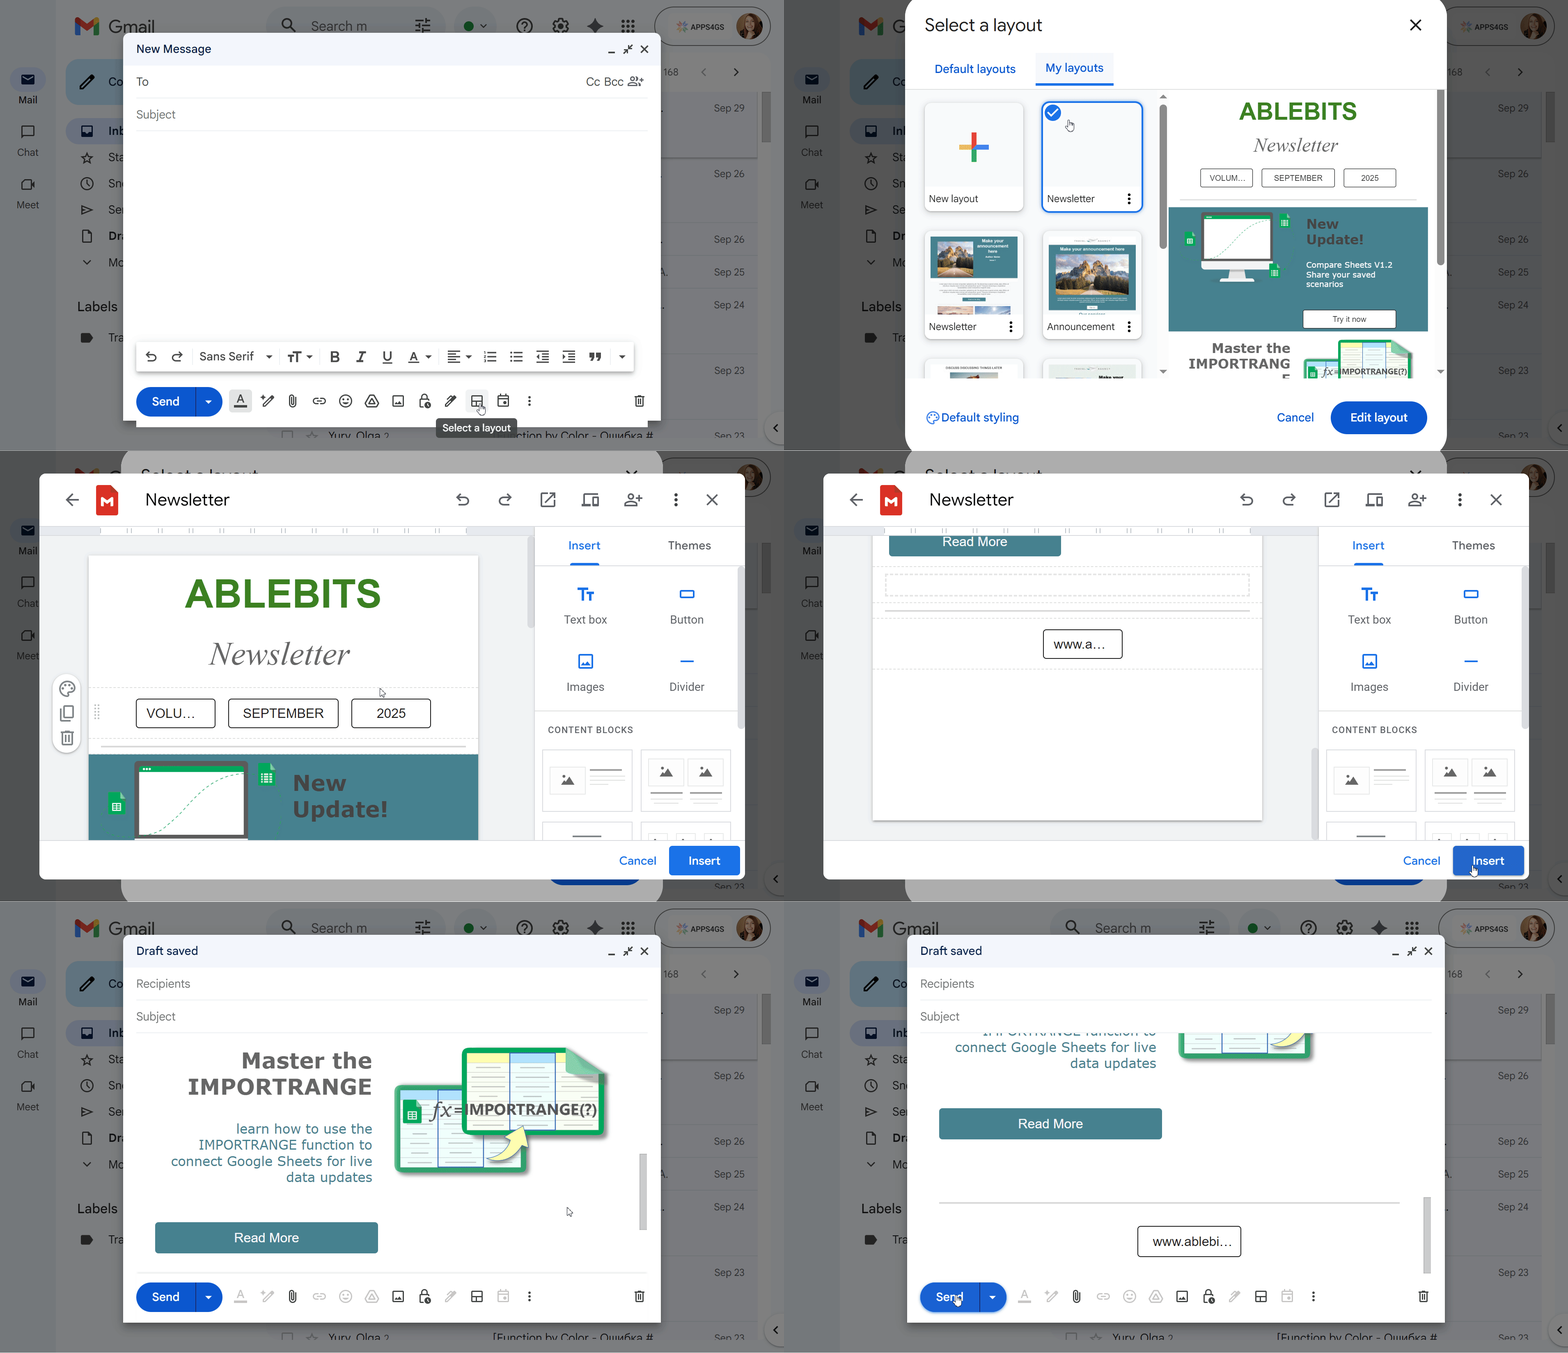
- Here you’ll see five templates, including a template for a newsletter. Select it and click Edit layout to customize the template as you wish.
- Find more detailed instructions on how to edit and save these layouts in one of the previous posts.
How to make Gmail newsletter templates on Google Docs layout
To create a newsletter on Google Docs, follow these steps:
- Open Google Docs and click on the Template gallery button at the top.
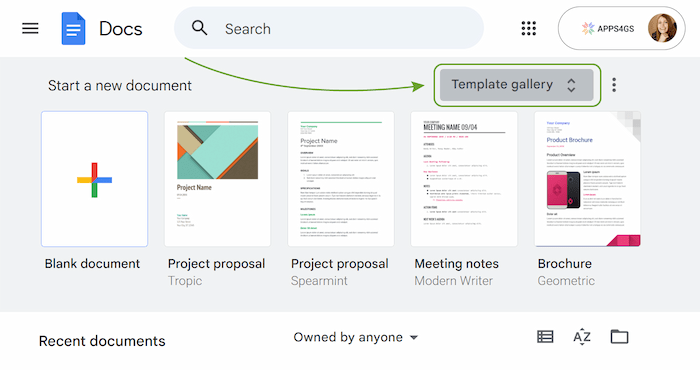
- There you’ll see all available templates. Select the most suitable one and click it.
- Design your future newsletter as you like.
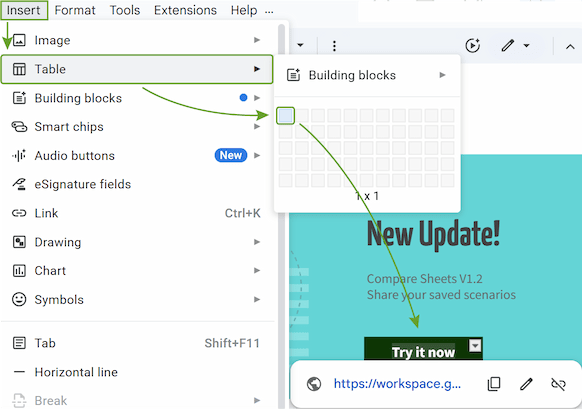
Tip: You can create a "button" by inserting a table. Go to Insert > Table > Choose 1x1 table. Then, set a cell background color, type your call-to-action text and attach a link.
Once your design is ready, the next step is moving it from Google Docs into Gmail. The method depends on the complexity of your layout.
How to compose a simple Gmail newsletter format in Google Docs
While I was writing this article, I designed a pretty good (maybe not super-duper, but I really tried hard) complex newsletter. And it was awfully frustrating when Gmail turned it into a scramble of pictures and words. It stripped out custom fonts, messed up spacing, and changed the location of pictures and buttons. Grrr! 😤
But every cloud has a silver lining - I have some tips for you:
- Before you waste your time searching for fonts, look at the fonts in Gmail. There are not many, but you have to stick to them, if you wish to avoid finding unexpected Comic Sans in your newsletter.
- If you want a picture to stay in its intended spot, don’t place it behind or in front of the text. The best option is to put it in line, so Gmail will keep it there.
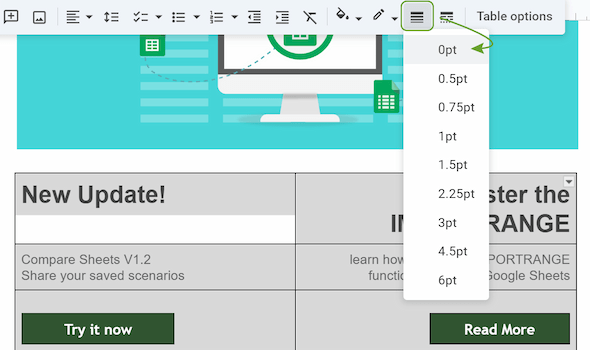
- It’s a good option to put your text, pictures, and buttons inside a table and then just make all borders invisible (0 pt width). This will ensure that Gmail will not kick your button into the middle of the text or mess up your paragraphs.
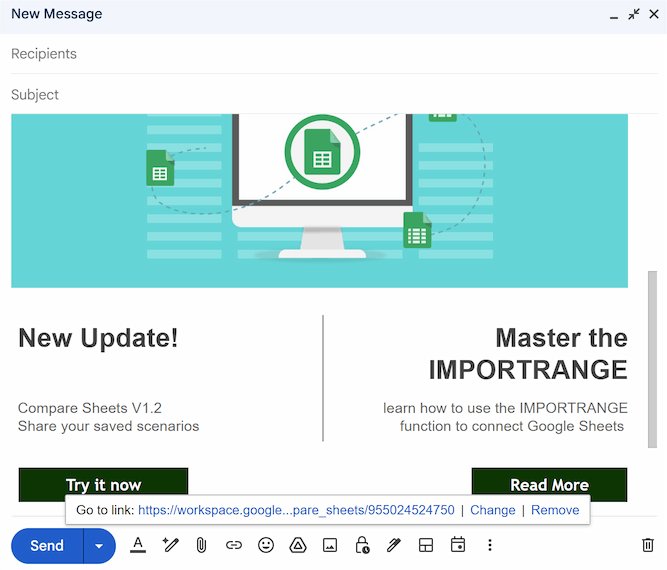
If you stick to these tips and make your design simple, open Gmail and copy and paste it into the compose window. This is the ideal method because it keeps your text "live" (selectable and searchable) and all your links will work perfectly.
Using Google Docs for advanced Gmail newsletter templates
But if, like me, you've let your inner designer run wild, found the perfect fonts, layered images, and maybe even added drawings, then you've probably already discovered the bad news. A simple copy-paste will completely break that beautiful layout when you move it to Gmail.
In this case, there’s no need to copy the text. To display a complex Google Docs newsletter in Gmail, export the document as a PDF and convert it to a high-quality PNG image. Then, just insert the image into your email and turn it into a link to the PDF, so when someone clicks the picture, the document opens.
Here’s how to do it:
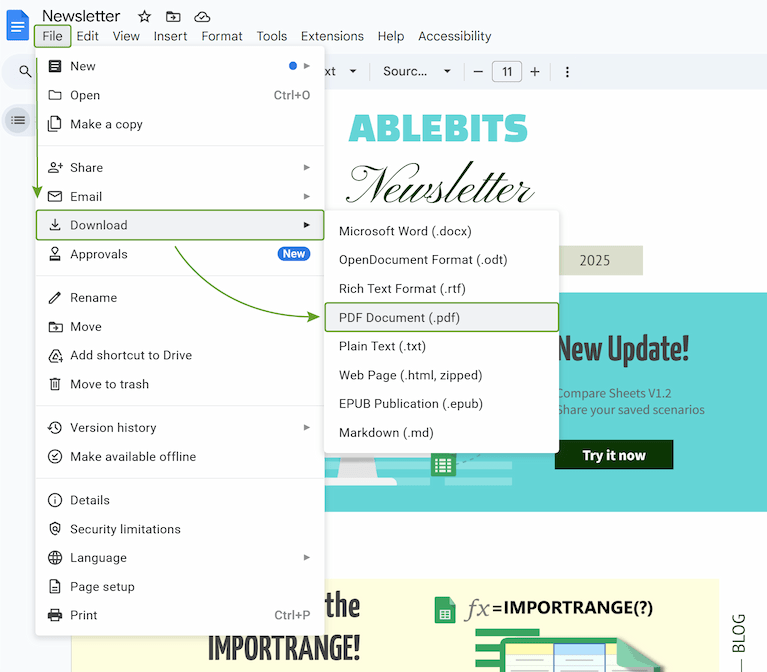
- Save your newsletter as PDF: File > Download > PDF Document.
- Upload your PDF newsletter to Google Drive.
- Convert your file into PNG with any online converter, or take a high-quality screenshot of the newsletter.
- Open a compose window in Gmail, and paste the picture by clicking Insert photo. Double-check that it's shown at the original size to preserve image quality.

- Select the image and press Ctrl + K (or Cmd + K on Mac), paste your PDF's shareable link into the URL field, and then click OK.
Your image is now a link. After clicking on the image, your PDF will automatically open in a separate tab, where your recipients can navigate (scroll, click on internal links) and view everything.
Note: Before you link your PDF, don't forget to change its sharing permissions. Set it to Anyone with the link and choose the Viewer role.
How to create an HTML newsletter in Gmail
Gmail's built-in layouts feature doesn’t give you full control, and you are limited by its structural items. Google Docs doesn’t have full integration and can break your newsletter structure. So what are the other options? To get full control in creating your perfect newsletter, you need to use HTML code.
The first step is to prepare your HTML code. You can get the code in one of three ways:
- Code yourself. It’s a free variant, but you should be an advanced user.
- Generate with the help of AI.
- Use an email builder. There are a lot of free and paid tools available, choose your option, create or modify the pre-built newsletter and export the design as HTML.
In my next article, I’ll explain how to generate and customize code from an AI, because it's quick, and you don't need to be a coding expert. For now, let's assume that you already have the code in your hands. But the problem is that Gmail doesn’t have an HTML editor to insert it. Nevertheless, you can use some tricks to paste it directly into Gmail.
How to embed HTML into Gmail
There are several ways to insert HTML into emails, which you can learn about in our previous article. Here I would like to describe the most popular way - using Developer Tools to embed code.
To insert HTML into Gmail, you'll need to:
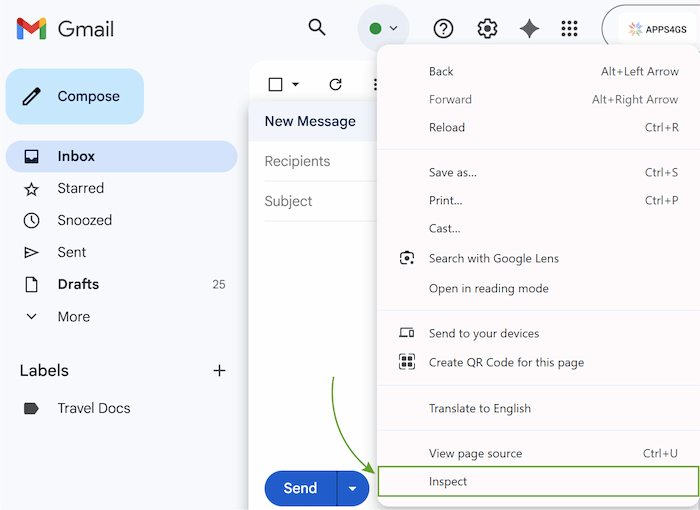
- Open a Gmail compose window, right-click it and select Inspect.
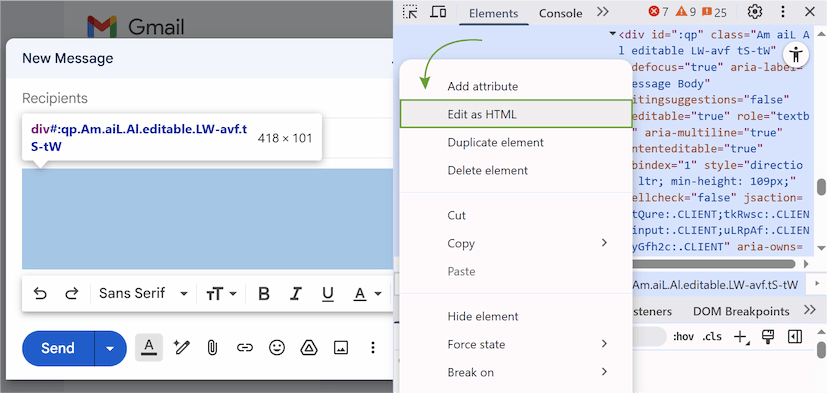
- The div element of the compose area will be highlighted and typically looks like this: <div id="..." class="Am aiL Al editable…">. Right-click it and select Edit as HTML.
Tip: Click the arrow in the top left corner of the developer panel to find the specific element of the email body only, if it’s not highlighted.

- A small editing box with code will appear. Delete everything between <div></div> in that box and paste your copied HTML newsletter code in its place.
- Click outside of the editing box or close the developer tools.
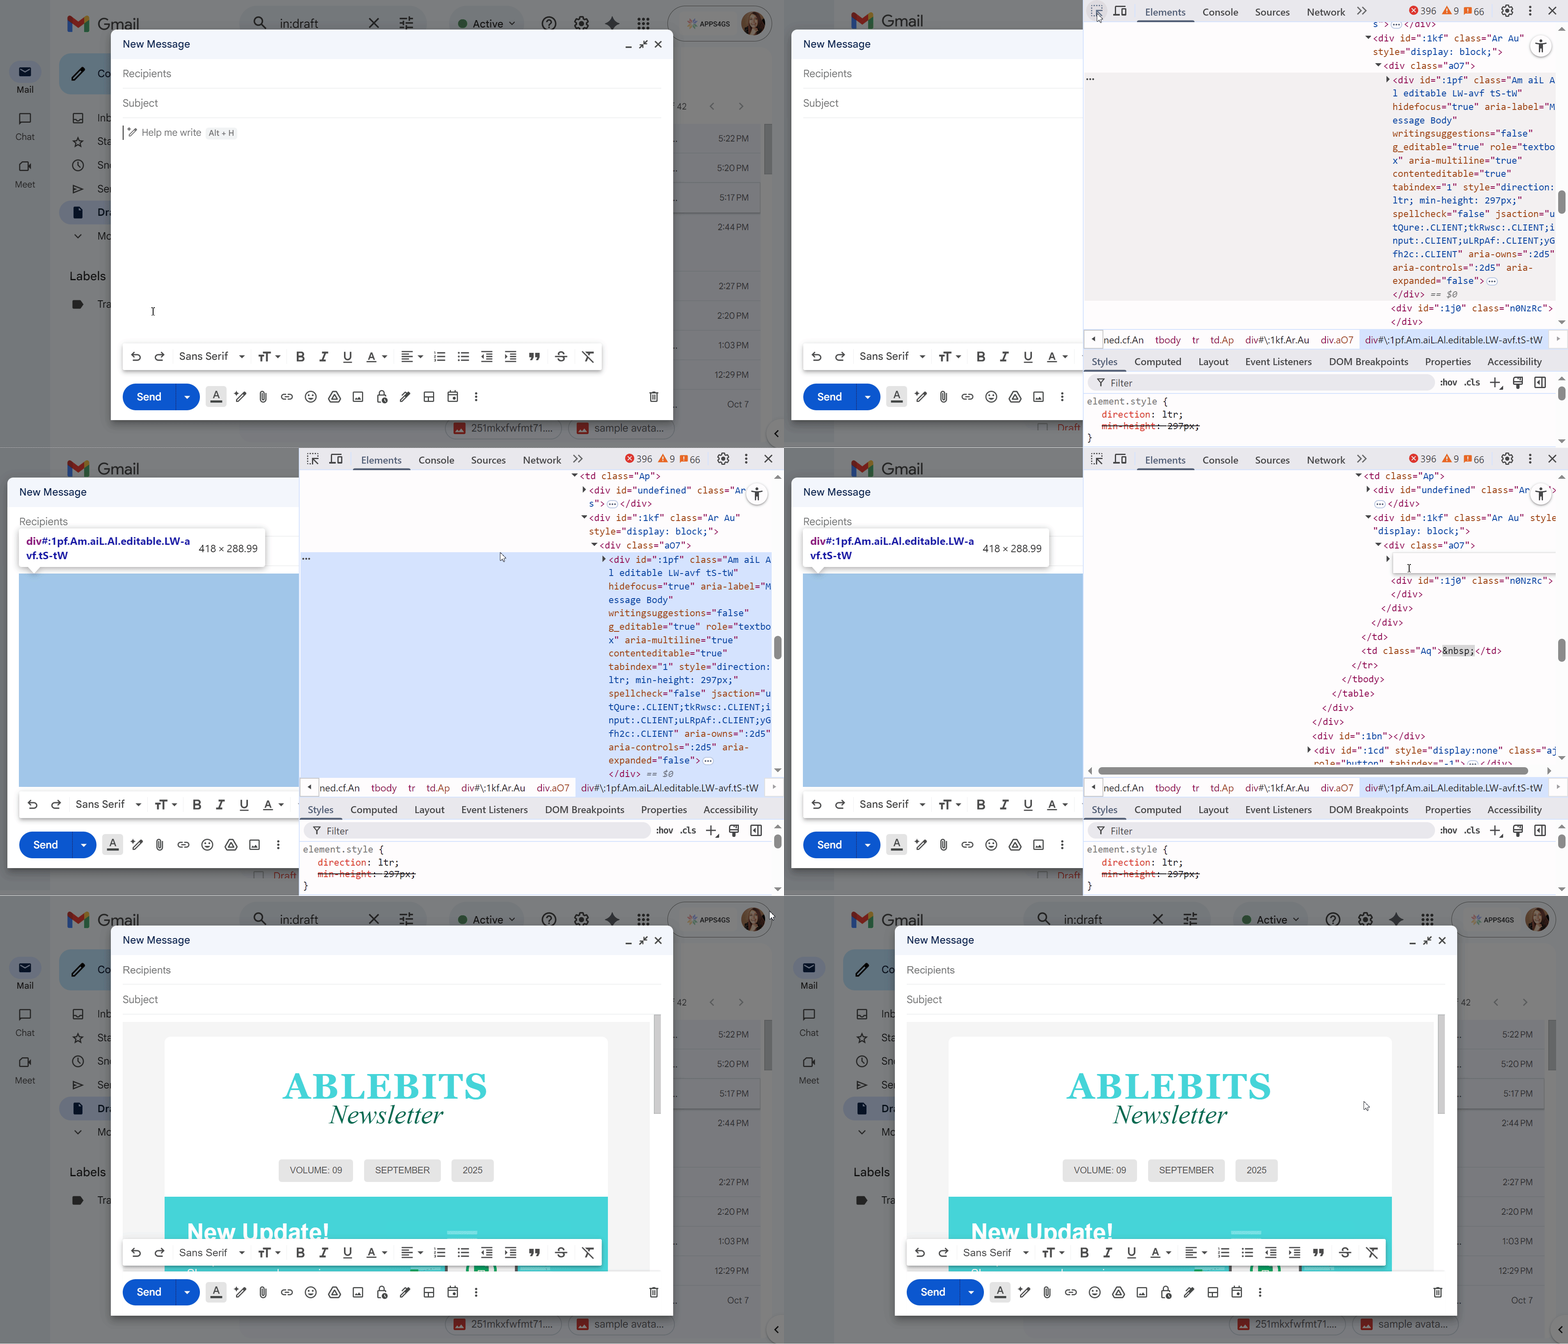
And just like that, your custom newsletter will now appear in Gmail.
Making newsletters in Gmail with Shared Email Templates
Alternatively, the simplest method is to use a Chrome extension like Shared Email Templates. This tool adds a proper HTML editor to Gmail, letting you paste your code directly and save your designs as reusable newsletter templates. This is perfect for newsletters, as you can create a library of designs, share them with teammates, and insert them into a new email with just a few clicks.
Using Shared Email Templates for your newsletter is simple:
- Install the extension from the Chrome Web Store.
- Open Gmail and click Compose.
- Open the Shared Email Templates extension.
- Click the New template button on the add-on's sidebar to create your newsletter.
- Create your newsletter in the Template editor as easily as in Google Docs.
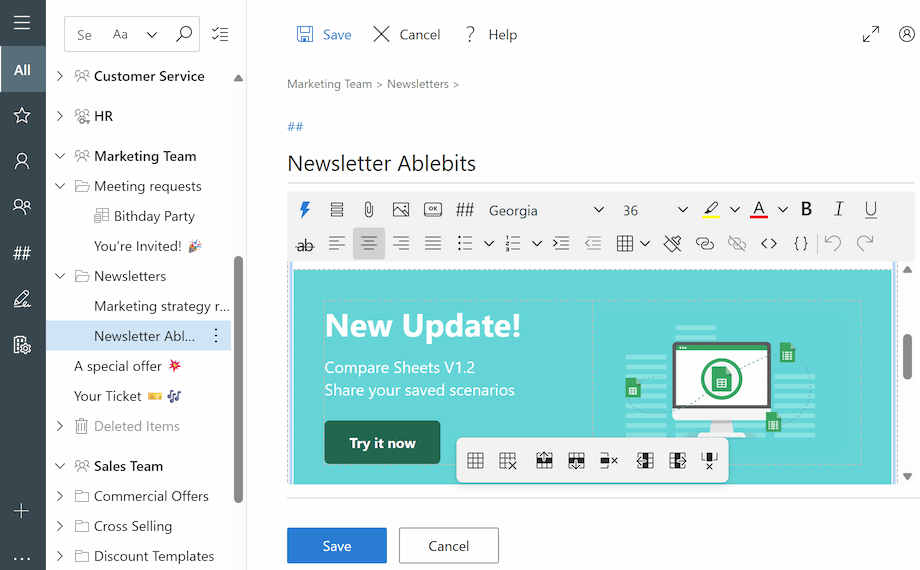
Tip: While you're editing, you can insert macros or shortcuts, add pictures and buttons, create a signature from professional layouts, change the formatting, add and remove hyperlinks, make tables, and attach any files you need.
- If you already have the code, click the View HTML button and paste your code.
- Insert your template by clicking Insert if you want to send it now. You can also give a name to your template and click Save for future use.
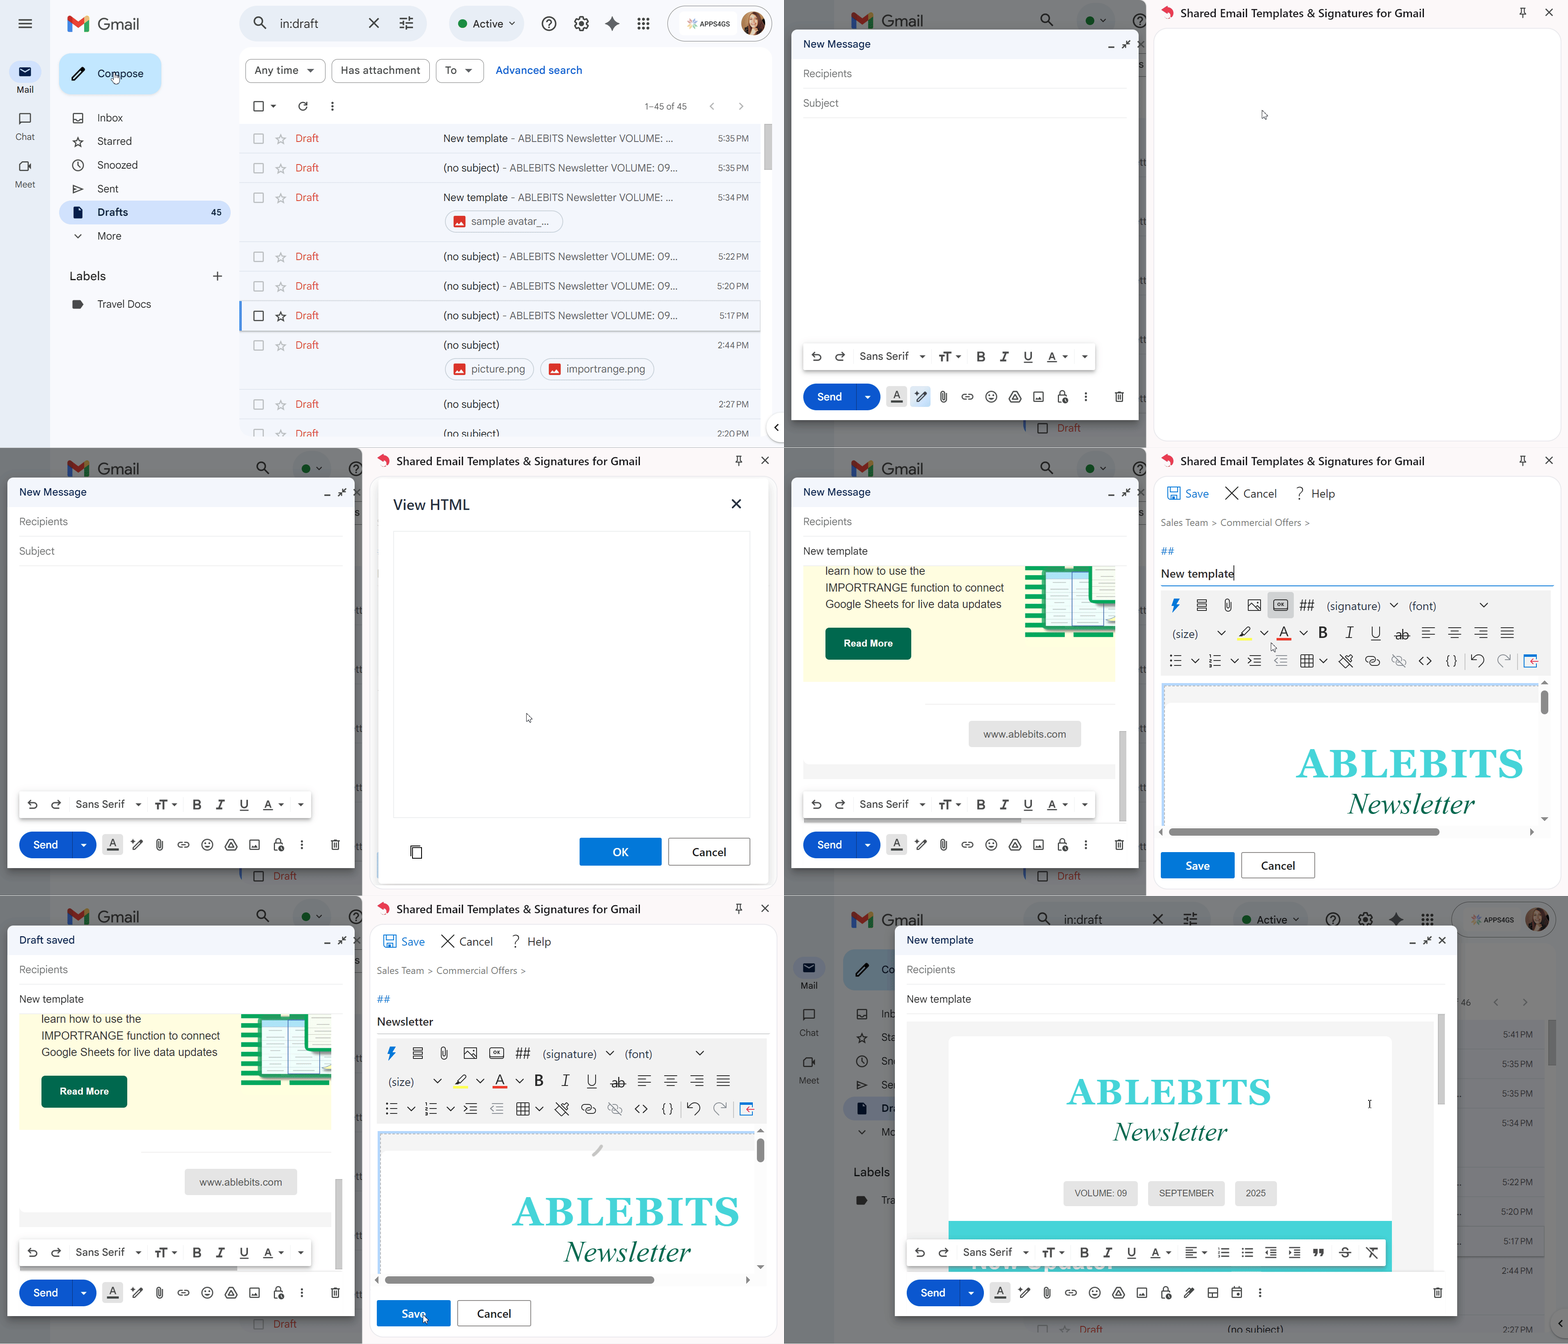
It is now stored in your library, shareable with your team, and ready to be inserted into any email without repeating the process.
How to embed a Canva newsletter in Gmail
And the last method that I want to describe in this article is to design a newsletter in Canva and integrate it into Gmail.
First, you need to prepare your design:
- Go to Canva, register or log in.
- Choose a template and customize your newsletter however you like. Add your title, choose fonts, replace images, and adjust the size and position.
The next step is to integrate your design into Gmail. You can easily embed your newsletter as a clickable image:
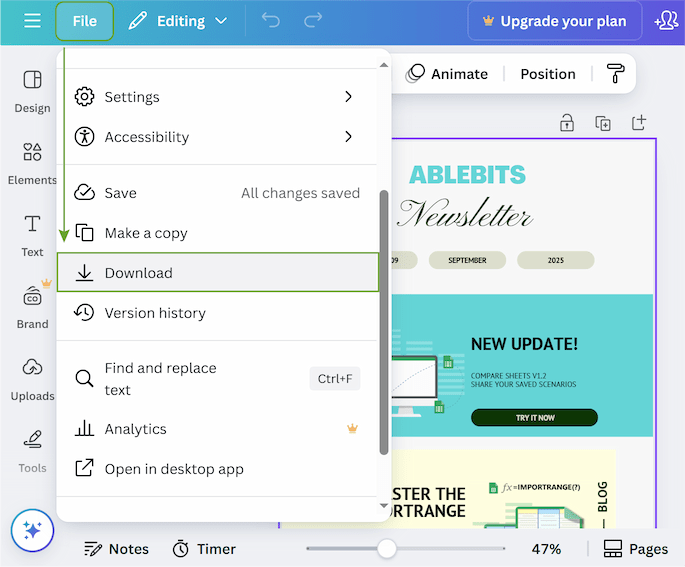
- In your Canva design, click File > Download > select PDF > Download. In the same way, save your PNG format: File > Download > select PNG > Download. You’ll get two files with your design - PNG and PDF.
- Upload your PDF to your Google Drive and get a link: open the file > click Share > Copy link.
Tip: Don’t forget about sharing permissions. Your recipients should have at least Viewer role. To set it, go to General access and select Anyone with the link > Viewer.
- As with complex Google Docs templates, you can embed your Canva design as an image linked to your PDF. Open Gmail, click Compose and upload your PNG into the email by clicking the Insert photo icon.
- Select the image, then press Ctrl + K (or Cmd + K on Mac). Paste the Google Drive PDF link you copied earlier. Click OK
After a recipient clicks on the image, the PDF newsletter will open in a new tab, giving readers an opportunity to scroll or use internal links. However, it’s better not to send an image-only newsletter, as it often gets flagged as spam. A good solution is to combine a real text introduction and footer in Gmail with your embedded Canva image.
Canva also allows you to get an HTML code for your design. All you need to do is to click Share > Embed within Canva.
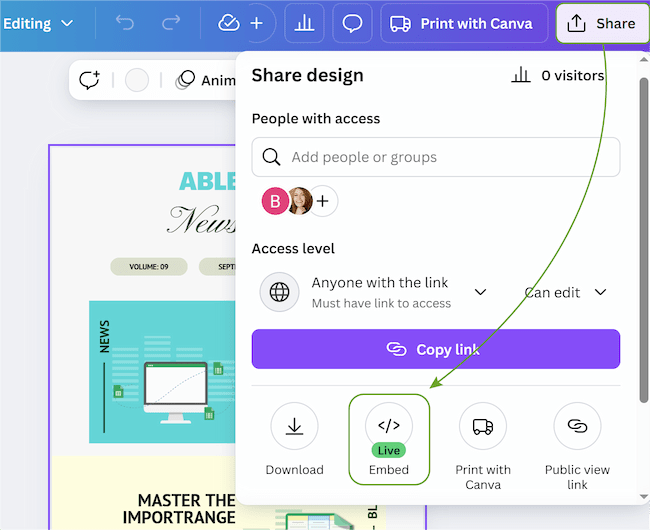
And it sounds cool, as after getting HTML you could use the Edit as HTML method in your browser's developer tools to insert that code directly into the Gmail compose window. And it even works:
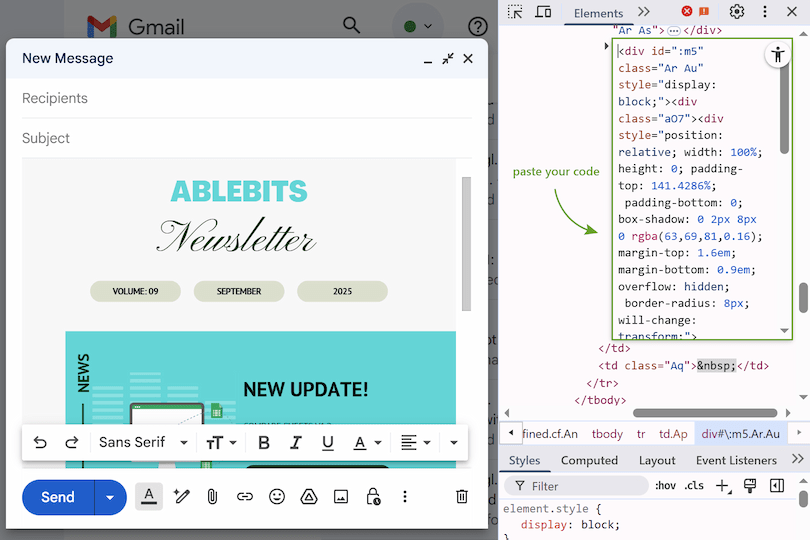
But unfortunately, that's where the good news ends. This method is designed for websites, not for email newsletters. The code uses an <iframe> tag, which is blocked by almost all modern email clients (including Gmail) for security reasons. If you try to send such a newsletter, your recipients will most likely see a blank space instead of your beautiful design 😔.
But you can generate suitable Gmail HTML code with the help of AI. Upload your image and ask an AI to write the HTML code. Then you’ll need to customize it a bit - change links, insert the correct URLs to the pictures. Read how to do it in one of my next articles.
How to make a newsletter in Gmail user-friendly: Pro tips
To create a newsletter that your audience actually enjoys reading, consider the following tips:
- Review successful examples. Look at well-executed newsletters to see what works in practice. After you check and analyze a certain number of newsletters, you will develop a keen eye and an understanding of how it should be done.
- Choose the focus. You can focus on educational or promotional content. Try to keep the balance at about 90% useful information and 10% promotion. This way, you build trust and keep the readers engaged. You might adjust this proportion once you know your audience better.
- Value the time. Keep your newsletter concise. If your newsletter is vague and lacks key points, it will most likely be ignored. Try to use short paragraphs and clear headings so subscribers can scan the content fast.
- Be creative with a subject. It’s natural for us to be drawn to what sparks our curiosity. Keep your readers interested with a creative subject line to increase open rates.
- Add text to images. Don't send your newsletter as one single image. If you do so, most likely your newsletter will bypass the Inbox and end up in spam. Always include a real text introduction and footer around your image. This approach also helps to make your newsletter more personal.
- Check links. It's easy to forget to replace placeholder links, as they are somewhat hidden. This point is especially relevant if you use pre-made layouts. Confirm that every link is updated before sending.
- Send a test email. We all make mistakes, but it's especially tough when you make one in front of hundreds of readers. Therefore, I highly recommend you send a test version to yourself before sending to your full list. It would be even better to open your email on both a desktop computer and a mobile phone to check for any formatting errors.
- Save as templates. If you create a design you love, you can save it as a template to easily reuse it later. To take this a step further for teams, a Shared Email Templates add-on lets you create a central library of approved designs. This is the best way to ensure everyone in your organization is using approved layouts for every send.
I hope you found this guide helpful for creating your newsletter! If you did, then you might also enjoy my next article. It covers how to send your campaigns, organize contacts into groups, and use Mail Merge to send in bulk 😉.
 by
by