The tutorial shows a few quick ways to change the default font and adjust the font size in various parts of the Outlook app, including the message list, reading pane and mail compose window.
Like any other email application, Outlook has a standard font for reading and composing messages. If you find the default text too small or hard to read, you don't have to struggle with it. Simply, adjust font size and style to suit your preferences.
Default Outlook font and font size
The default font for composing emails in Outlook is Aptos with font size set to 12 points. This standard applies to all modern versions, including Outlook 365, Outlook 2024 - 2013, the new Outlook and web app.
How to change default font in Outlook messages
If you are not happy with Outlook's default font or the text size is too small for your eyes, you can change it permanently and consistently for all new messages, replies, and forwards. The steps vary depending on the Outlook version you are using.
Adjust message font and size in classic Outlook
To change the font and its size for emails you are composing in the classic desktop Outlook application, follow these steps:
- Go to File > Options.
- In the left pane, choose Mail.
- Click the Stationery and Fonts button.
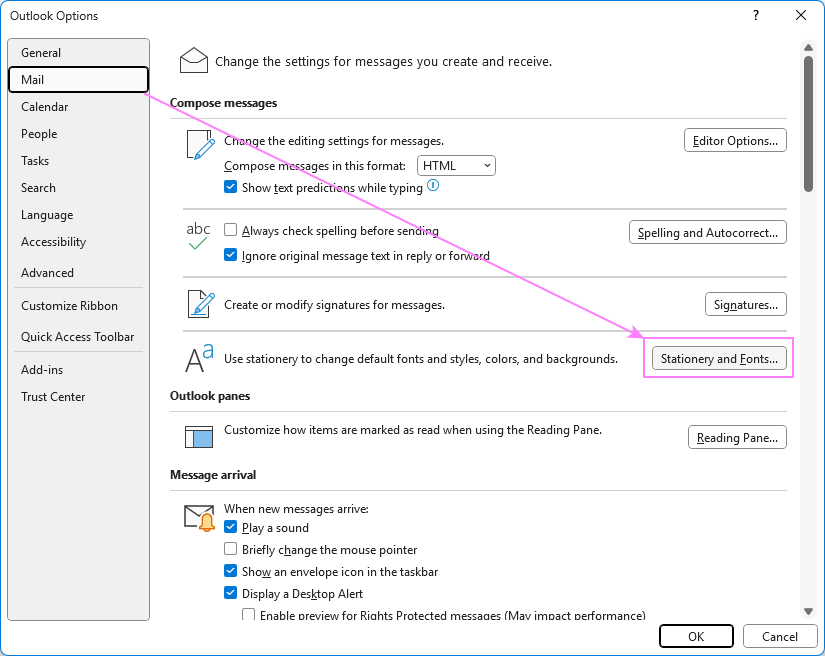
- On the Personal Stationery tab, you'll see three font settings for:
- New mail messages – sets the font and text size for writing new emails.
- Replying or forwarding messages – controls the font in replies and forwards.
- Composing and reading plain text messages – affects plain text emails.
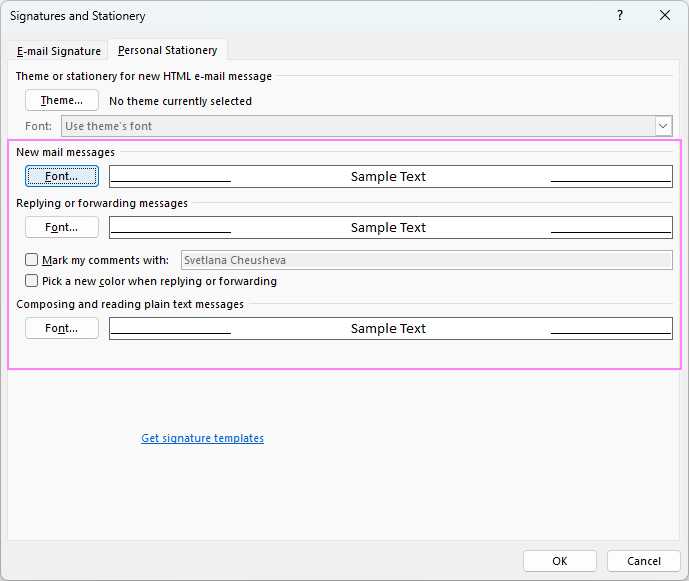
- Click the Font button under each section, choose your preferred font and size, and click OK.
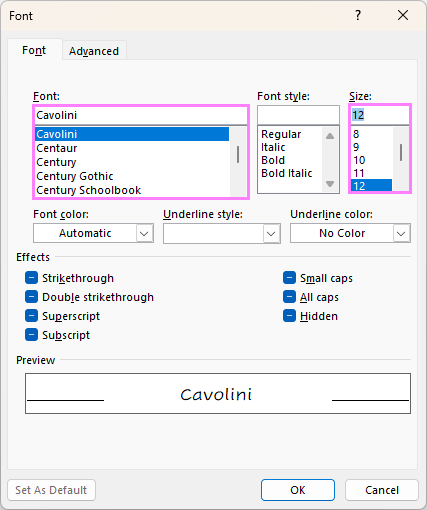
- Click OK again to apply your changes and close the window.
That's it. From now on, your selected font style and size will apply automatically when composing, replying to, or forwarding messages in Outlook.
Change default font and font size in new Outlook and web
In the new Outlook and web app, changing the default font and text size is done in this way:
- In the top right corner of the Outlook window, click the Settings gear icon.
- In the left pane, select Mail > Compose and reply.
- Under Message format, choose the desired font and size.
- Click Save to keep your changes.
After making the adjustments, Outlook will show a preview of how your emails will look with the new font settings.
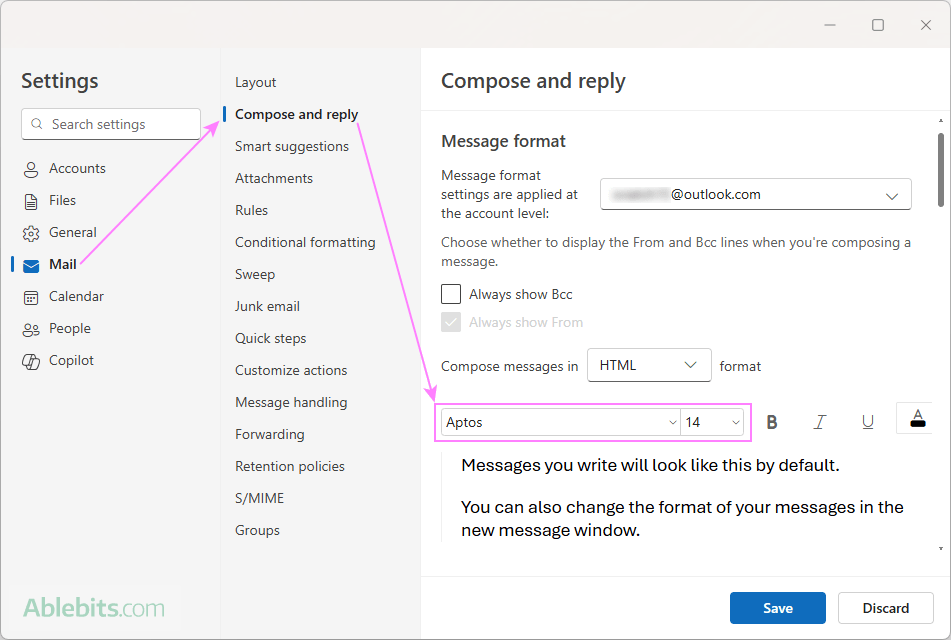
Note. In the new Outlook, message format settings are applied at the account level. If you have multiple accounts, then choose the one you want to update at the top of the Compose and reply section before customizing the font. If needed, repeat the process for each account.
Change font and increase font size for specific message
To write a particular email using a certain font, you can adjust it directly in the message window. If needed, you can also enlarge the text size for the email you're currently composing.
- In the email you are writing, go to the Message tab (default).
- Choose any font you like from the Font dropdown.
- To change the size of your text, select it from the Font Size dropdown, or type the number directly into the box.
To customize the font and its size of a specific part of your message:
- Highlight the text in the message body.
- Use the Font and Font Size dropdowns to set your preferences.
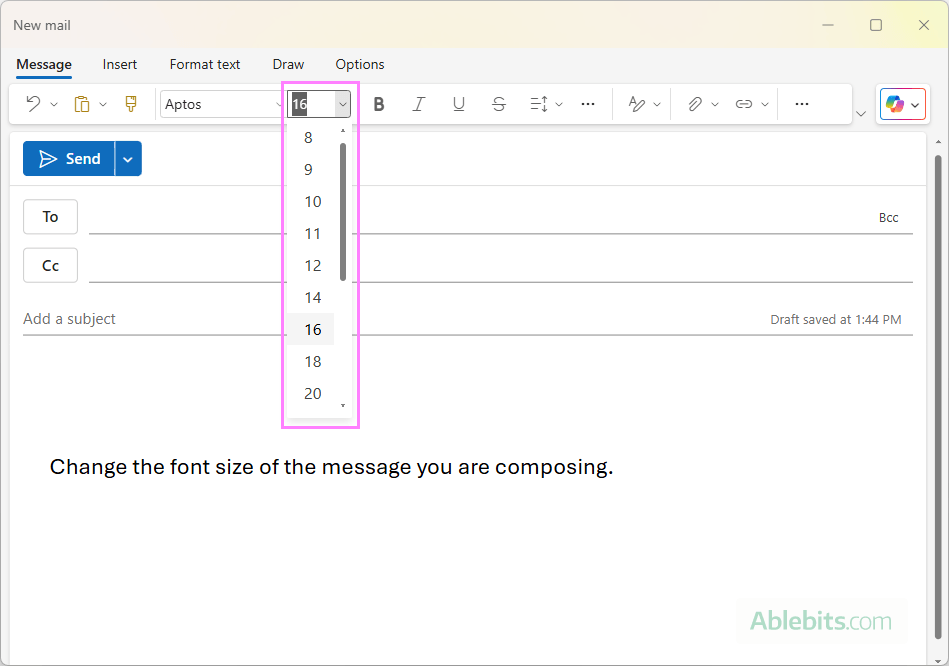
This option is available in all Outlook versions and apps, including classic, new, and web.
Tips: When composing an email, there are a couple more quick ways to adjust the text size:
- Hold Ctrl and scroll your mouse wheel up or down to make the text larger or smaller.
- In the new Outlook and web, you can also use Ctrl + Plus (+) to increase the text size and Ctrl + Minus (-) to reduce it.
How to increase font size when reading Outlook emails
To make Outlook emails easier to read, you can enlarge the text size using the Zoom feature.
Change font size for Reading pane in classic Outlook
The classic desktop Outlook application lets you adjust the text size for individual messages or set a preferred zoom level for all messages in the Reading Pane.
To enlarge the text size for a single message, the steps are:
- Select the email you want to read from your message list.
- In the lower-right corner of the Reading Pane, use the Zoom slider to adjust the text size. As you move the slider, the text gets larger or smaller instantly.
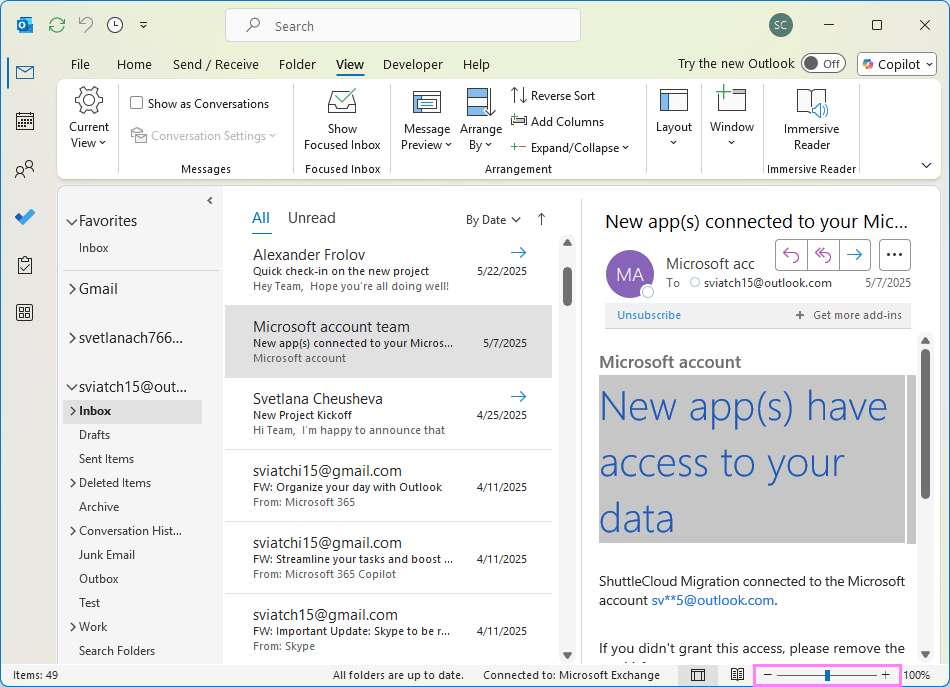
Permanently change font size in Outlook reading pane
To set the desired zoom level permanently for all messages that you preview in the classic Outlook reading pane:
- Click the percentage (%) displayed to the right of the Zoom slider.
- In the Zoom window that appears, choose one of the preset zoom levels, or type a custom number in the Percent box.
- Select the Remember my preference check box.
- Click OK.
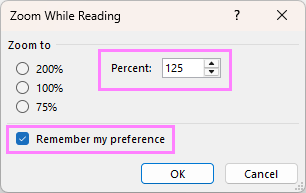
Now, the specified zoom level will apply to all messages in the reading pane.
Adjust font size for reading messages in new Outlook and web
To change the zoom level while reading an email in the new Outlook or the web app, do this:
- Open the message by selecting it from your Inbox or another folder.
- Switch to the View tab.
- Click Zoom.
- Use the plus (+) button to increase text size or the minus (-) button to decrease it.
- To get back to the default zoom (100%), click Reset.
The same Zoom option also changes the font size in the reading pane.
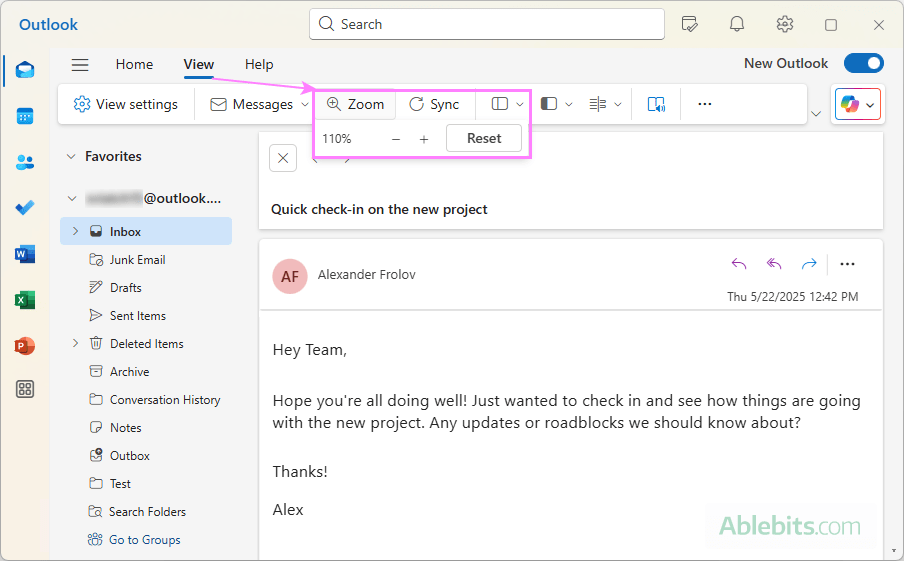
Unlike the classic desktop app that lets you zoom in and out temporarily, the new Outlook and Outlook on the web will remember your zoom setting and apply it to all messages you will read.
Tip. When reading messages in Outlook.com or Outlook on the web, you can also use the Zoom function in your browser to make the text larger or smaller.
Change zoom level using keyboard and mouse
Another quick way to adjust the zoom level when reading emails in Outlook is by using your keyboard and mouse:
- Open a message in the reading pane or in a separate window.
- Hold down the Ctrl key on your keyboard and scroll your mouse wheel up to increase the font size or down to decrease it.
This method works in all Outlook apps, but there is an important difference:
- In classic Outlook, this only affects the message you're currently viewing.
- In the new Outlook, your zoom setting is remembered and automatically applied to other messages that you will read.
For more customization options, check out Outlook reading pane: change font, show calendar, move or hide.
How to adjust font size in Outlook message list
In addition to changing the default Outlook font in emails you are reading and composing, you can also control how messages appear in your Inbox, Drafts, Sent Items and other folders.
Change font and font size for email list in classic Outlook
In the classic (old) Outlook desktop app, you can change the font and its size for column headers, subject lines, and preview text individually. Here is how:
- Open the folder you want to customize, e.g. Inbox.
- On the View tab, in the Current view group, click View Settings.
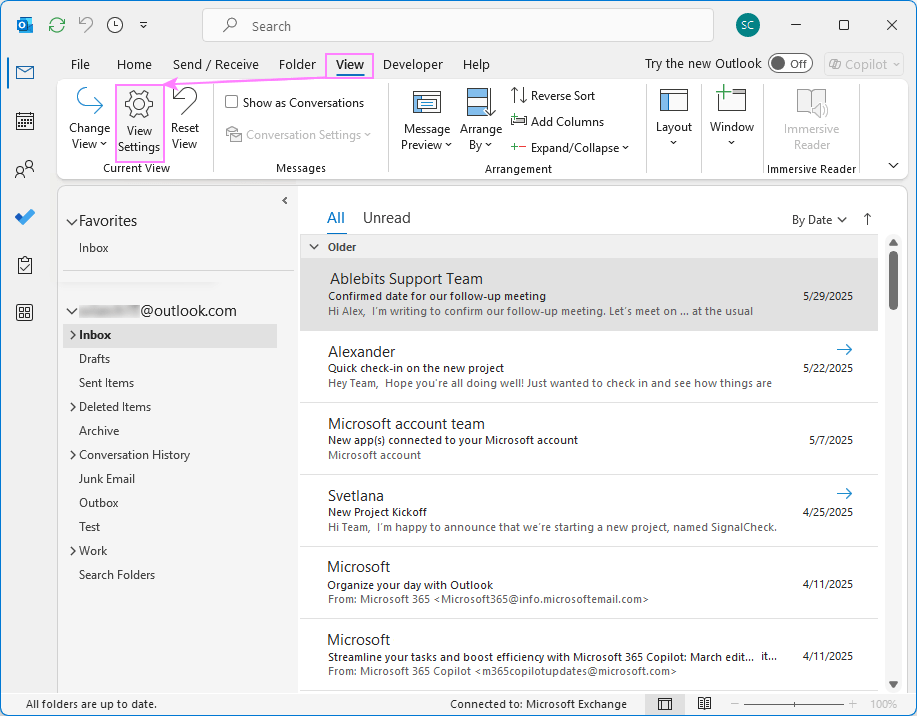
- In the Advanced View Settings dialog window that opens, select Other Settings.
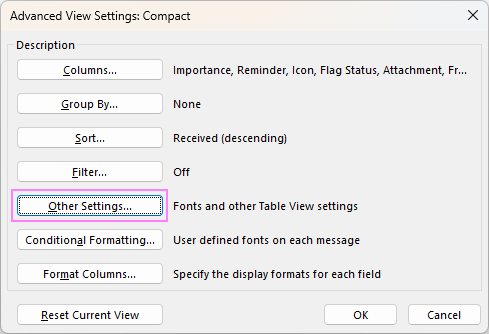
- In the Other Settings dialog window, do any of the following customizations:
- Column Font – set the font for column headers like From, Subject, and Received.
- Row Font – change the font for subject lines.
- Font under the Message Preview section – change font and adjust the text size for the message preview line (the short snippet shown below the subject).
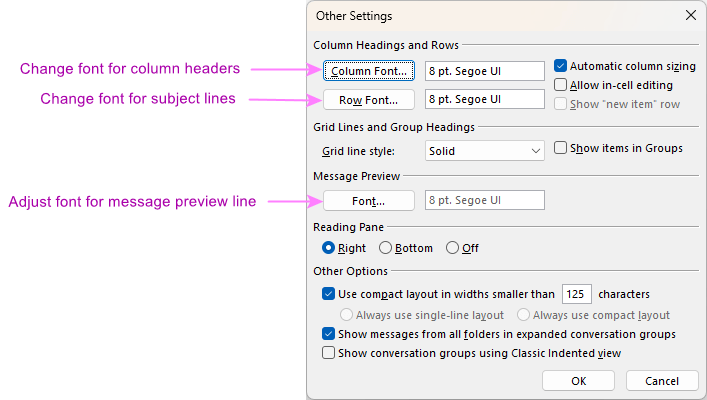
- Click OK twice to save the changes and close both dialogs.
Note. These font settings apply only to the current view in the currently selected folder. Other mail folders will continue to use the default or custom settings you've previously configured for them.
To set the same font size in other folders, repeat the steps for each one individually. Or you can apply the current view to all folders using the Change View > Apply Current View to Other Mail Folders option.
Increase font size in new Outlook message list and web
In the new Outlook and Outlook on the web, font settings for the message list are simplified. You can access and customize them in this way:
- Click the Settings gear icon in the top right corner.
- In the left pane, navigate to Mail > Layout.
- Under Text size and spacing, choose the font size that works best for you: small, medium (default), or large.
- Select Save to apply the changes.
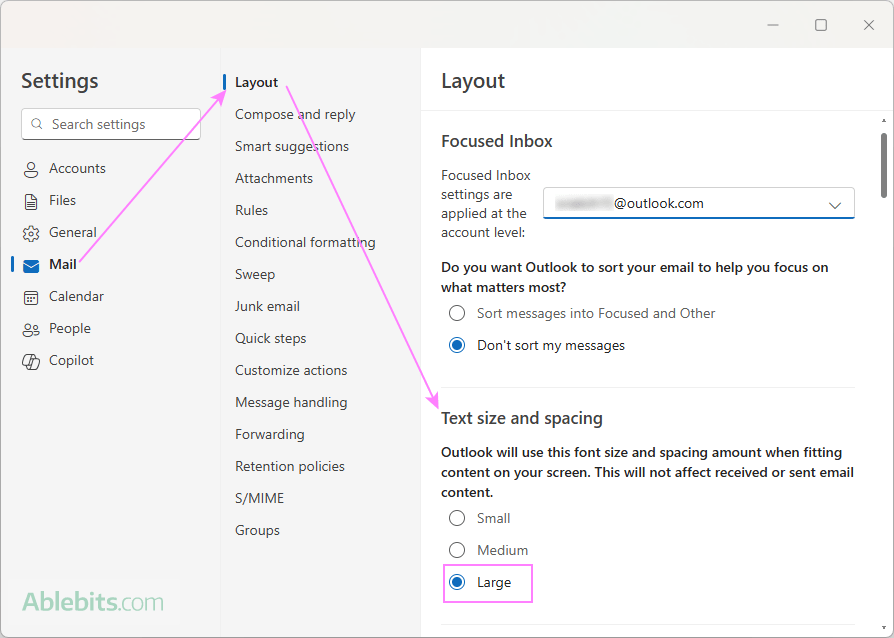
Note. Remember that in the new Outlook, the text size settings are applied per account. If you have multiple email accounts, be sure to adjust the setting for each one separately.
Now that you know how to change the font size in Outlook, you're in control of how your emails look and feel. If the text is too small, don't strain your eyes to read it! You've got the tools to adjust it to your comfort 😊
 by
by
7 comments
Super helpful, thank you!
Thank you, very helpful!
I use legacy Outlook. All your suggestions and MS instructions relate to new Outlook. Even the terms they use cannot be found in classic Outlook.
Hello Sal,
Each section of this tutorial includes steps for both classic (legacy) Outlook and the new Outlook app. Tip: to quickly find the classic Outlook instructions, try searching your browser for the word "classic" on this page :)
Brilliant information, thanks.
Thanks for your help changing message fonts but I do not seem to beable to change the font on my address book. It is still tiny and hard to read. Thanks
Nancy,
Try going to "display settings" on your computer (you can right click on your desktop) and then find "scale & layout." You can choose a scale like 125% or 150% which will increase font size of all applications, including outlook address book and calendar.