This guide shows how to automatically insert the recipient's name in an Outlook message or add a complete greeting line based on the pattern you specified. You will also learn how to auto-fill all recipient names from the To field into email body based on their display names.
To make your Outlook emails feel more personal, one of the easiest things you can do is add an individual greeting. While Microsoft Outlook doesn't offer a built-in option to insert contact names into the message body, you can automate this task with a VBA macro or Shared Email Templates.
Add recipient name to Outlook email automatically with VBA
To automatically address an email recipient(s) by name in Outlook, you can use a VBA macro.
Note. This method works only in the classic desktop version of Outlook. Macros are not supported in the new Outlook and web app.
Step 1. Add VBA code to Outlook
First, you add the macro's code to your Outlook:
- Launch the classic desktop Outlook app.
- Press Alt + F11 to open the Microsoft Visual Basic for Applications editor.
- In the top menu, click Insert > Module.
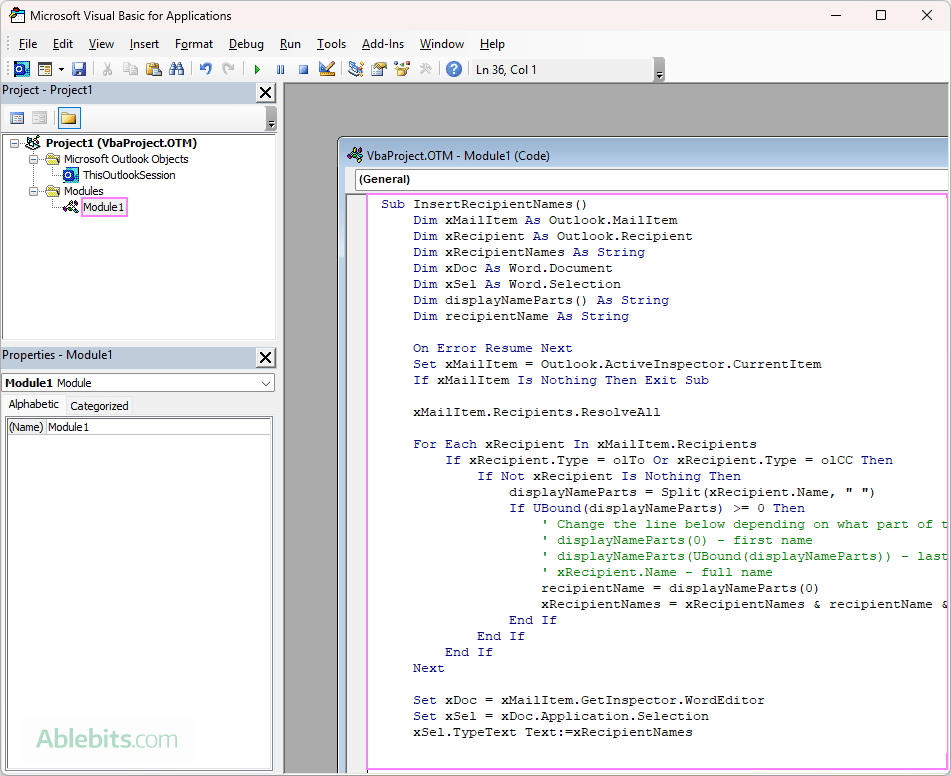
- In the module window that opens, paste one of these codes:
Code 1 – the macro named InsertRecipientNames inserts the names of the contacts in the To and Cc (optional) fields into the message body.
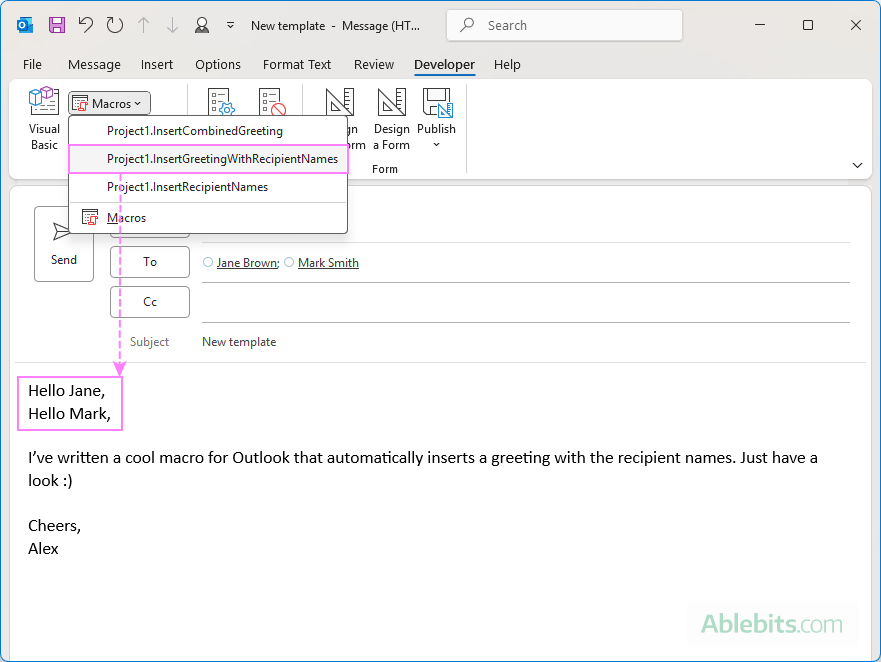
Code 2 – the macro named InsertGreetingWithRecipientNames automatically creates a greeting with each name on a separate line.
Code 3 – the macro named InsertCombinedGreeting generates a one-line greeting that includes all recipient names.
Step 2. Turn on Microsoft Word Object Library
For the macro to work correctly, Outlook needs permission to use Word's editing tools.
- While still in the VBA editor, go to Tools > References.
- In the window that appears, find and check Microsoft Word 16.0 Object Library (or the version that matches your Office installation).
- Click OK.
- Press Ctrl + S to save your changes.
- Press Alt + Q to close the editor.
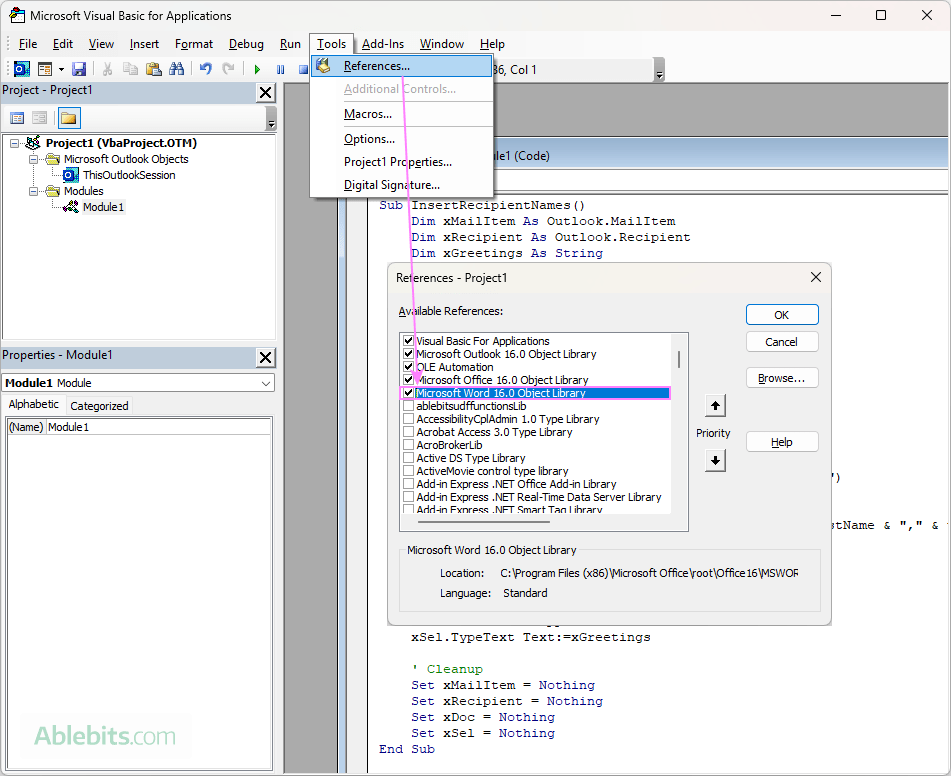
Once added, the macro is ready to run from the Developer tab under Macros.
Step 3. Add macro to email ribbon or Quick Access Toolbar
To make your macro easier to reach, you can add it to the email ribbon or the Quick Access Toolbar, so it's just one click away when writing an email.
Add the macro button to the email ribbon
To add the macro to the Outlook email ribbon, carry out these steps:
- Create a new email. This is important because the message compose window has its own ribbon different from the main window.
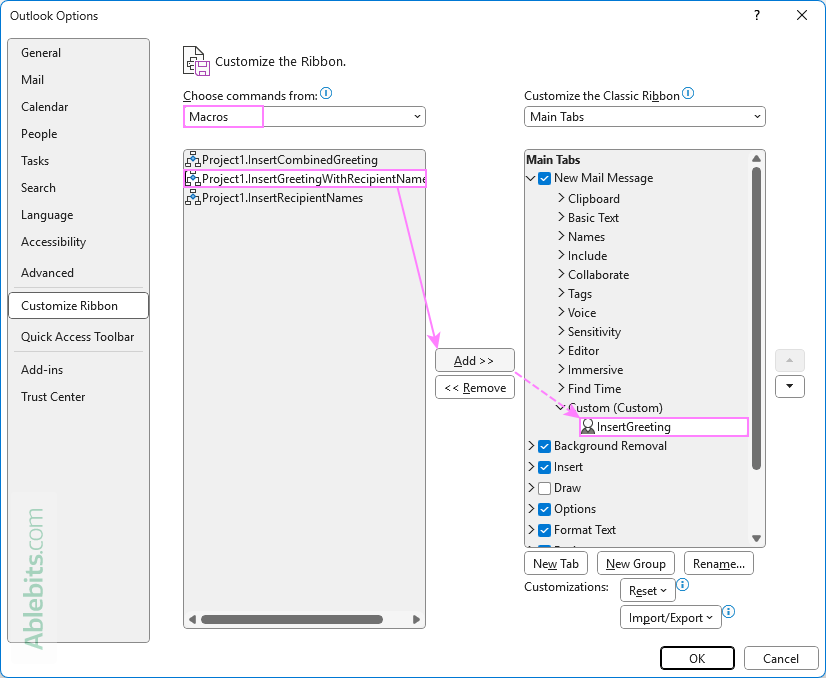
- Right-click anywhere on the ribbon and choose Customize the Ribbon…
- In the Outlook Options window:
- In the right box, select the tab where you want to place the macro, for example New Mail Message or Insert.
- Create a new or select an existing custom group within that tab.
- From the Choose commands from dropdown on the left, select Macros.
- In the left-hand box, choose the macro and click Add.
- Optionally, use the Rename button to change the label or assign a different icon to the macro button.
- Click OK to apply the changes.
Add the macro to the email Quick Access Toolbar
If you prefer using the Quick Access Toolbar (QAT), you can add the macro to it in this way:
- In the new message window, click the small dropdown arrow in the QAT and choose More Commands.
- In the Outlook Options window:
- Under Choose commands from, pick Macros.
- Select the macro on the left and click Add.
- Highlight added macro in the right box and click Modify… to select an icon and/or give it a short user-friendly name.
- Click OK to confirm and close the window.
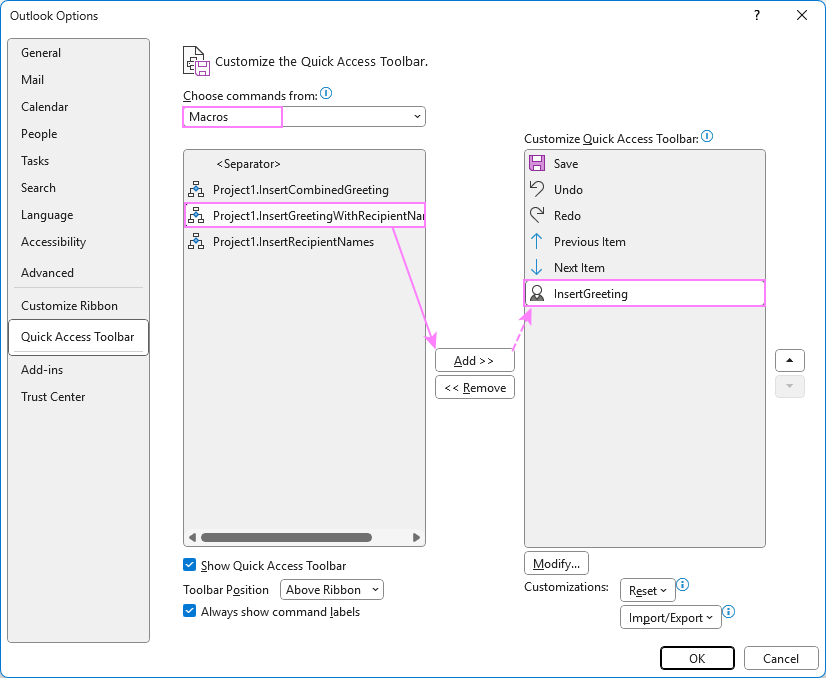
For the detailed steps, see How to add a command to Outlook QAT.
Now, when composing a message in Outlook, you can click the macro button in the ribbon or QAT and have the recipient names or the entire greeting line auto-inserted in the email body.
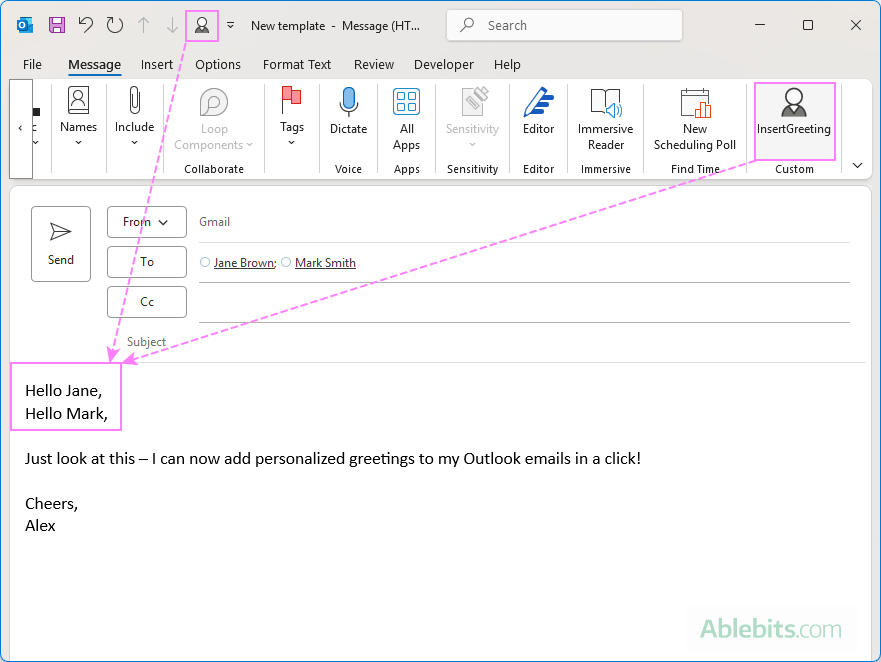
VBA code to auto populate recipient names into body of Outlook email
Depending on whether you want to add only the names of your contacts or automatically create a greeting phrase such as "Dear Name" or "Hello First Name", use one of the codes below.
Code 1. Insert recipient names: first, last or full name
This code adds the names of all the recipients listed in the To and Cc fields at the position of the cursor in the email body. Each name is added on a separate line. The code can be adjusted to auto-fill the first name, last name or full name.
What the macro does:
Here's a quick overview of what this VBA macro does:
- It collects the display names of all recipients in the To and Cc fields. Bcc recipients are not included since their names aren't visible to others.
- From each display name, it extracts the first, last, or full name, depending on what is specified in your code.
- The names are inserted at the current position of the cursor in your email.
- Each name is placed on its own line.
How to customize the name format:
To control which part of the contact's name is inserted into a message, adjust the following line in the code:
- To add the first name:
recipientName = displayNameParts(0) - To add the last name:
recipientName = displayNameParts(UBound(displayNameParts)) - To add the full name:
recipientName = xRecipient.Name
Add recipient names from To field only:
If you want to auto-populate only names from the To field, ignoring Cc, then remove the olCC part from this code line:
If xRecipient.Type = olTo Or xRecipient.Type = olCC Then
So, it reads:
If xRecipient.Type = olTo Then
With this adjustment, only the names of the primary recipients will be added to the greeting line or wherever you need in the email body.
Code 2. Automatically create greeting like "Hello Name" for each recipient
Instead of adding just names, this version builds a full greeting line for each contact in the To and Cc fields, such as "Dear Name," or "Hello Name," and auto-inserts them on separate lines.
How to customize the greeting:
You can modify the greeting phrase by changing "Hello " in the below code line to "Hi " , "Dear " or whatever you like:
xGreetings = xGreetings & "Hello " & firstName & "," & vbCrLf
Code 3. Personalized one-line greeting for all recipients
If you are looking for a way to address every recipient in your message by name, combining them into one compact greeting line such as "Hello John, Mary, and Jane", then use this code:
Examples of automatically created greetings:
Depending on how many people you are sending a message to, one of these greetings will be automatically inserted into the email:
- For 1 name: Hello John,
- For 2 names: Hello John and Mary,
- For 3+ names: Hello John, Mary, and Alex,
Only names from the To and Cc fields are included; Bcc recipients are skipped.
Note. The VBA scripts above extract information from the display name(s) in the To and Cc fields. If the display name of a certain recipient is not available, the macro will auto-fill his/her email address. And if both To and Cc lines are empty, a greeting line won't be generated.
Auto insert recipient name in Outlook email using templates
With Shared Email Templates, you can easily personalize your Outlook emails without using any VBA scripts. Simply, use an inbuilt macro with the desired name format. Unlike the VBA method, the Shared Email Templates add-in works in all Outlook versions: classic desktop, new Outlook, and Outlook on the web.
Here's how to do it:
- Start your greeting.
- In the email template editor, type Hi or Hello, and add a space to separate that word from the recipient's name that will follow.
- In the Shared Email Templates toolbar, click Inset macro. Make sure the cursor is placed in the correct spot in the editor, as the macro will be inserted exactly where the cursor currently is.
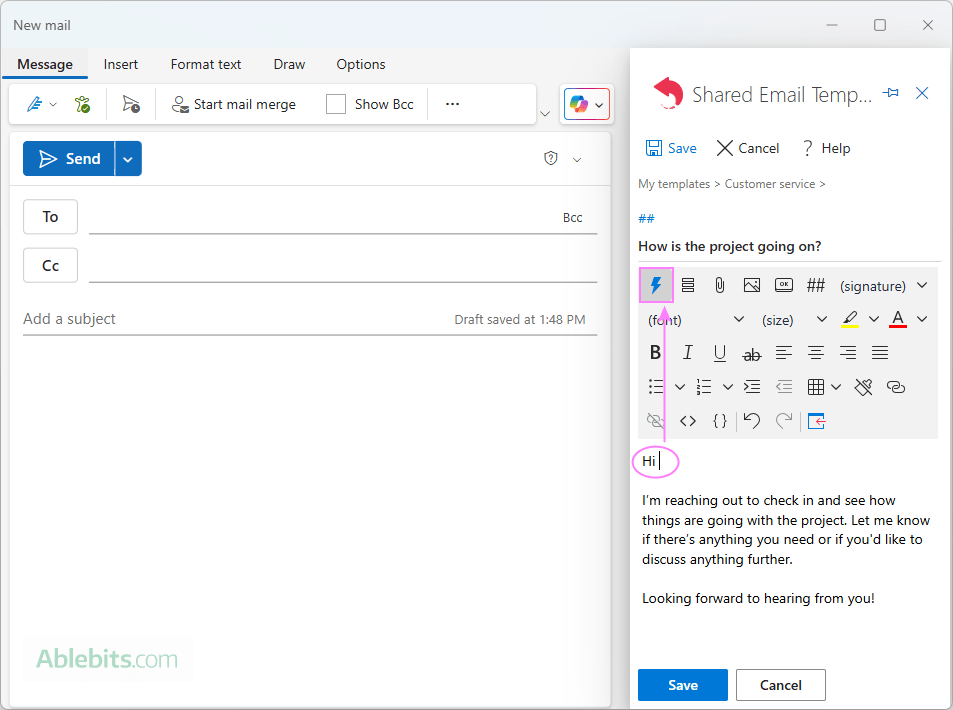
- Add a macro to auto-fill the recipient's name:
- In the search box, type "name" to quickly find all available name-related macros.
- From the displayed list, choose the preferred format: first name, last name or full name.
- Click Select to add the chosen macro to your email template.
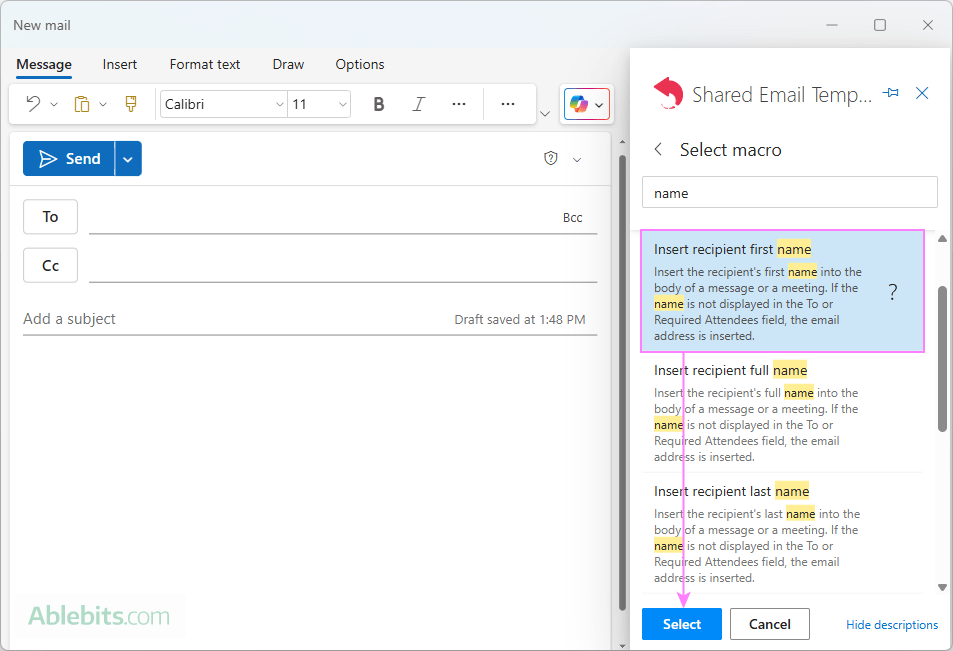
- Finalize and save the template.
- After the macro, type a comma to complete the greeting.
- Save the template as usual.
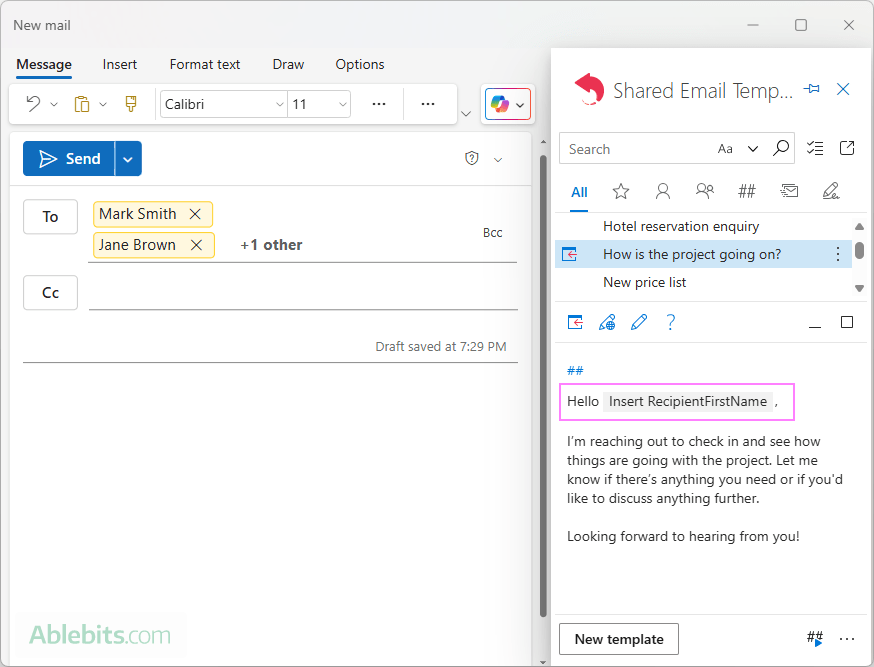
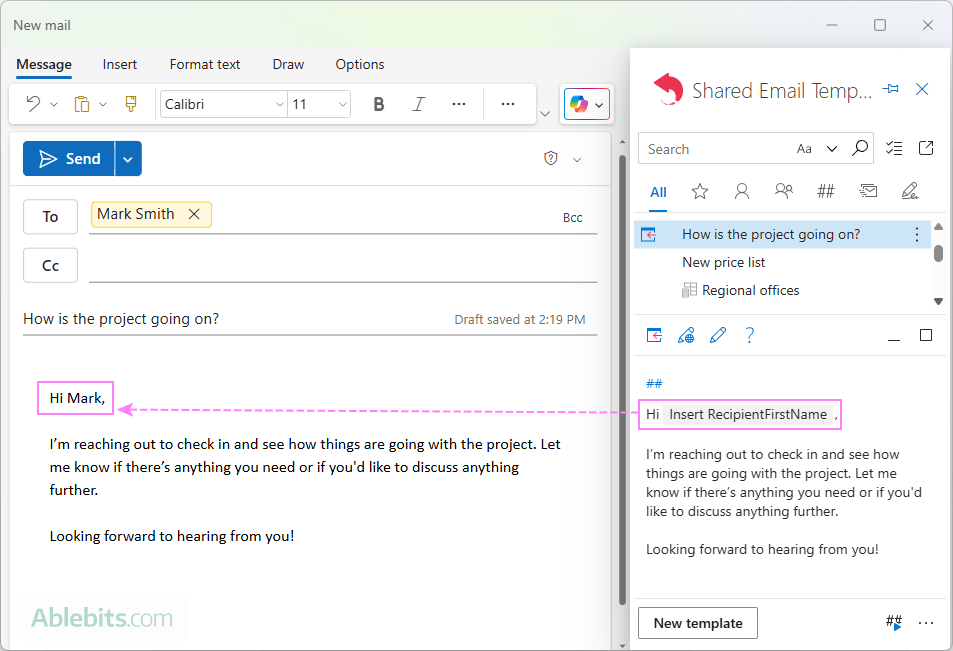
When you use this email template in Outlook, it will automatically pull the recipient's name from the To field and insert it in the email greeting line or wherever you placed the macro in your template.
This 1-minute video shows how to set up an email template with a personalized greeting step-by-step.
Auto address all email recipients by name using personalized greeting
When creating Outlook email templates, you cannot know if an actual email will go to one person or a group. With Shared Email Templates, you can easily configure an appropriate greeting for each case.
- In the email template editor, place the cursor where the greeting should appear.
- Click Inset macro in the toolbar.
- From the list of macros, select Insert Greeting.
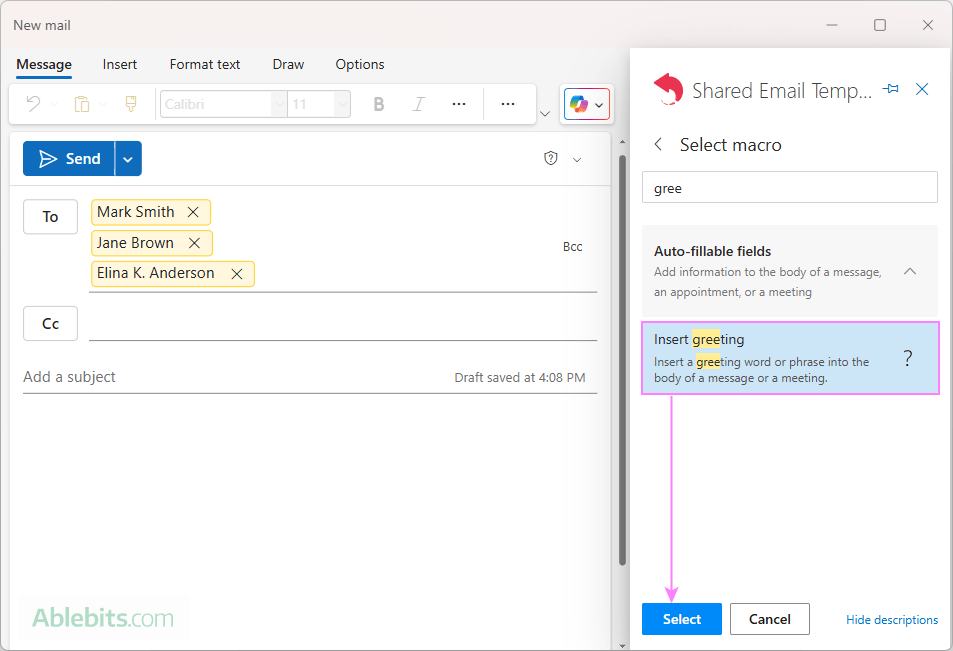
- Set up a dynamic greeting line for one and multiple recipients.
- For a single recipient, the greeting is preconfigured as Hello [RecipientFirstName], which works nicely in most situations. You are free to change it as you see fit.
- For multiple recipients, you can use "Hello Team" or "Dear All" or anything else you like.
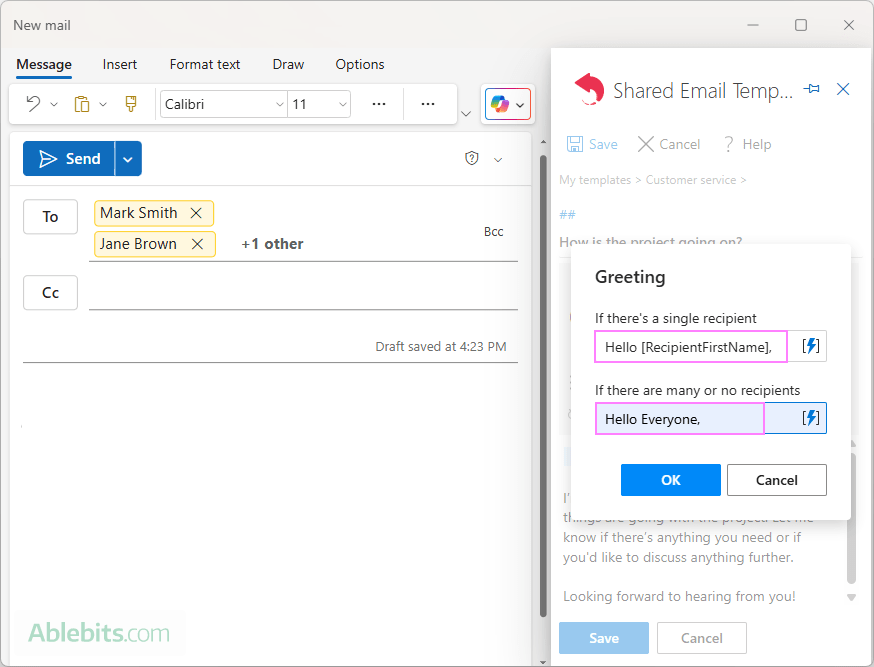
- If you'd like to auto-address every email recipient by their name, then click the Insert nested macro button next to the Many or no recipients box, and then choose the Insert recipient first name macro.
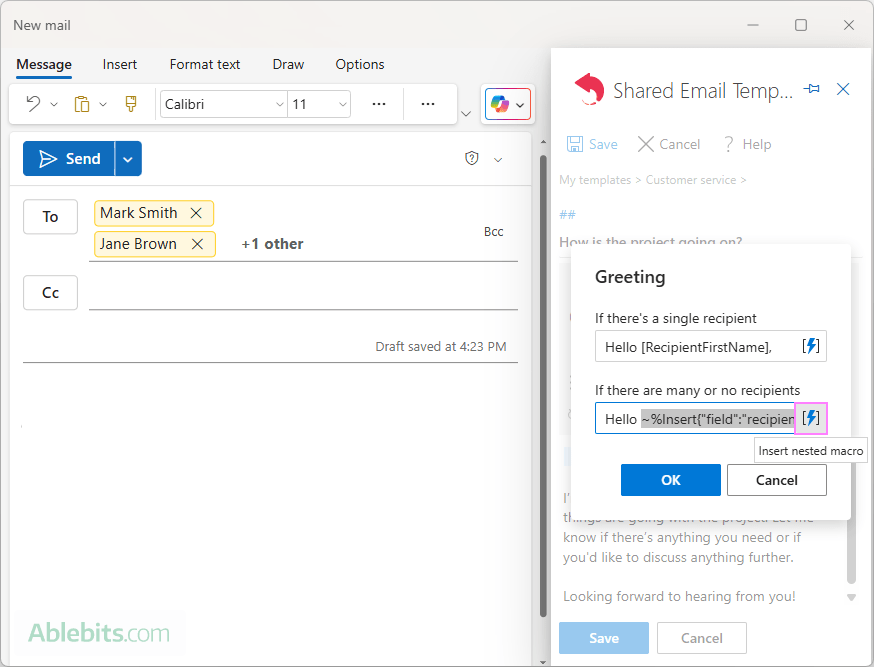
The template will automatically adapt based on the number of addresses in the To field. Depending on your macro configuration, it will:
- Insert a personalized greeting for one contact (e.g. Hi Jane) and a general greeting for a group (e.g. Hello Team).
- Greet each recipient individually by name, regardless of how many people the message is sent to (e.g. Hello John, Jane, Alex).
- Only the names from the To line are included; Cc and Bcc names are ignored.
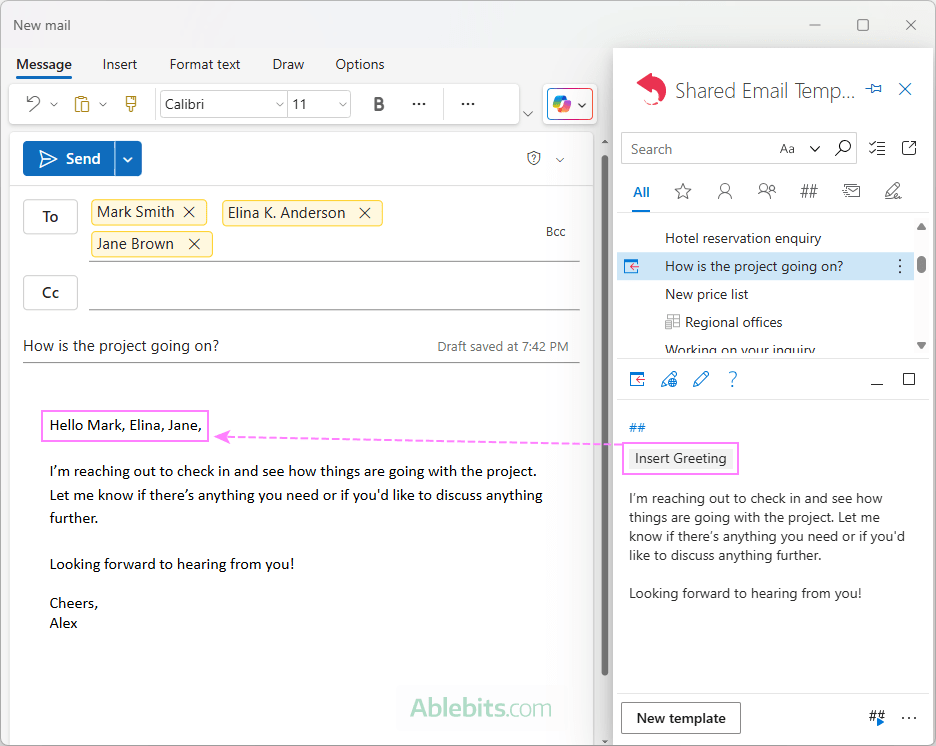
To catch every detail, check out a short demo below:
Curious to try it in your Outlook emails? You are welcome to download the free version of Shared Email Templates from Microsoft Marketplace.
That's how you can automatically create personalized greetings in your emails and auto-fill recipient names in the message body where needed. Thank you for reading!
 by
by