Automatically BCC your Outlook emails
Using simple rules
Invest a few minutes in creating a rule and from now on you will never forget to add a CC or BCC address to your outgoing email. Automatic copies will be sent for all your outgoing messages whether it is a new email, a reply, or a forwarded letter.
Free download- For desktop Outlook included in Microsoft 365
and Outlook 2021 – 2016 - 14-day free trial. No credit card required.
For Microsoft Outlook 365, 2021 - 2016
With Auto BCC for Outlook you will
Copy your outgoing e-mails automatically
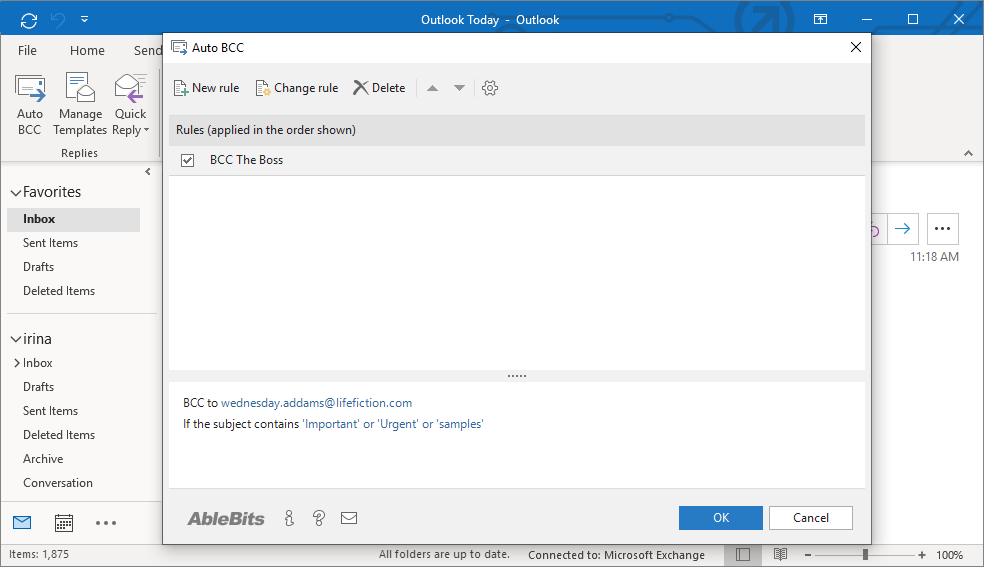
Set up a BCC rule in Outlook for all your outgoing messages.
Create rules for different profiles and accounts
Send BCC from certain Outlook accounts when specified conditions are met.
Auto BCC yourself
Keep track of all your communication by having a copy of every email you send in your own inbox.
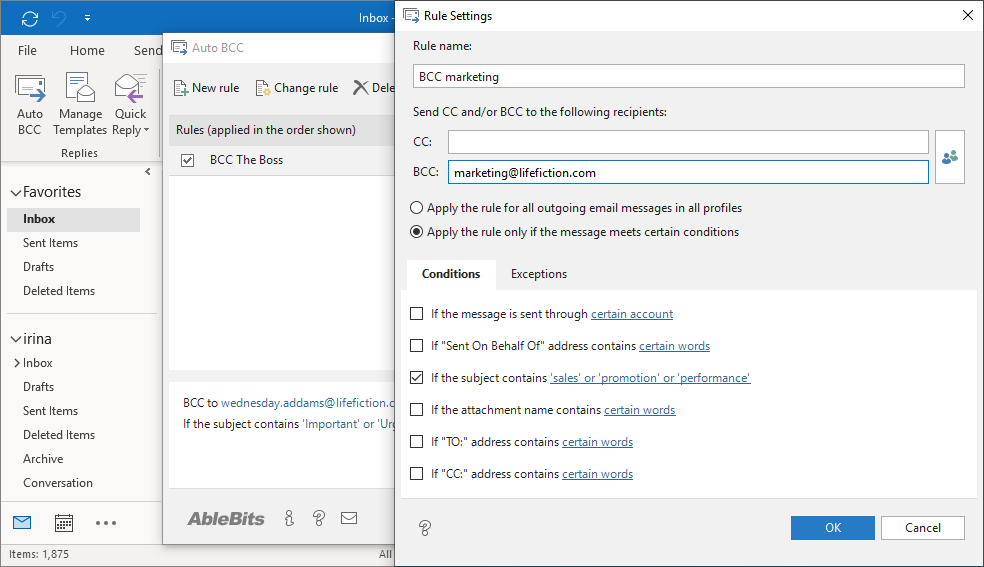
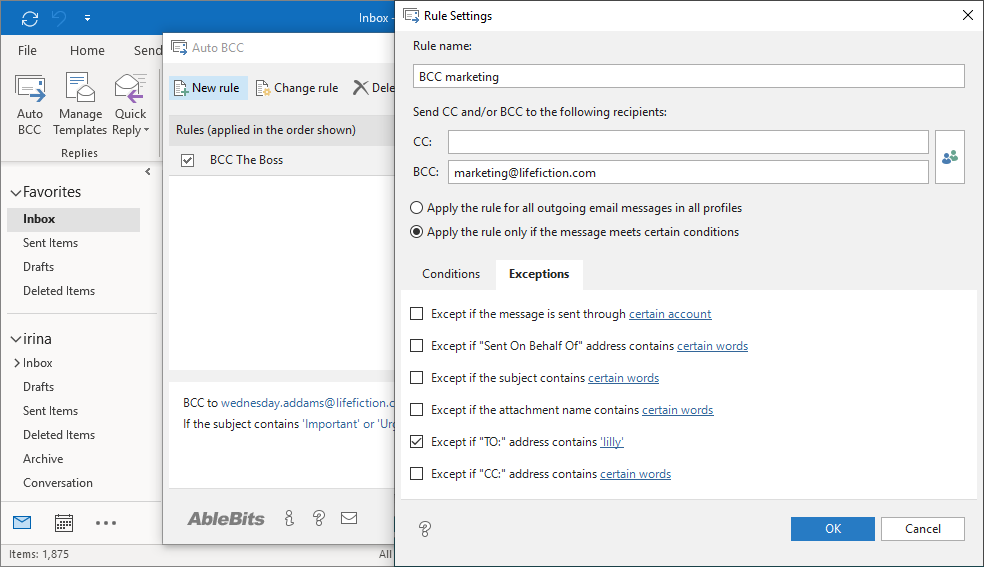
Use key phrases for each condition
Set key phrases and add exceptions to your BCC or CC rules.
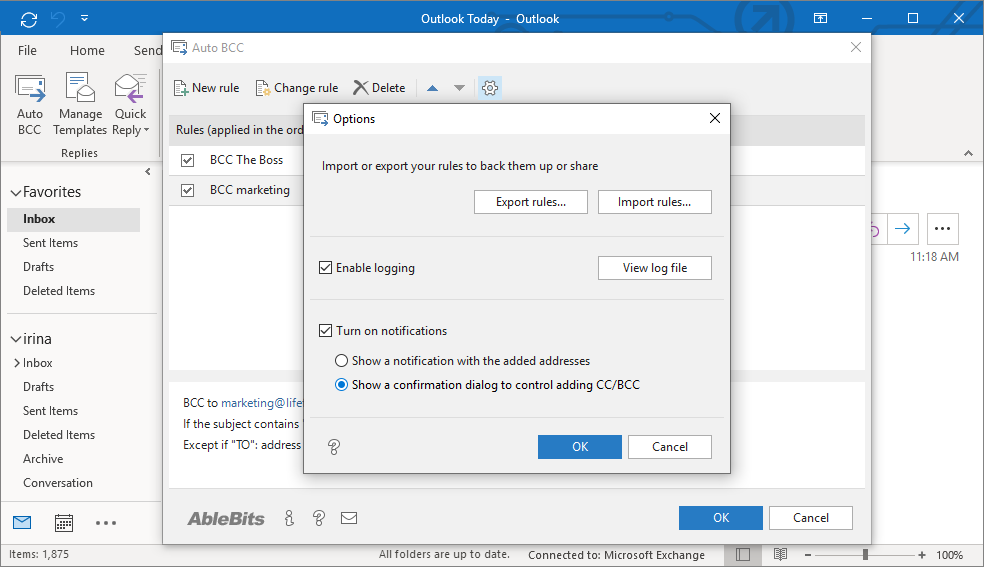
Control adding CC/BCC
Turn on notifications to be informed when CC or BCC address has been added.
How to automatically send BCC in Outlook

Frequently asked questions
What is Auto Bcc for Outlook?
Auto BCC is an easy to understand and convenient to work with plug-in for Outlook. You just create a CC or BCC rule and the add-in does the whole job itself. A well-thought-out system of conditions and exceptions allows you to have a blind copy or CC address inserted automatically for:
- All outgoing emails from all your e-mail accounts.
- E-mails sent from one of your Microsoft Outlook profiles or accounts.
- Messages sent to the specified addresses only.
- Outgoing messages with particular words or phrases in the subject line or in the attachment name.
How to create a new Auto BCC rule in Outlook?
There are 5 easy steps:
- Click on the add-in's icon to open it on the Ablebits.com tab.
- Click the New rule button.
- Select one of the options:
- Apply the rule for all outgoing e-mail messages in all profiles.
- Apply the rule only if the message meets certain conditions.
- If you select the latter, set up your conditions and exceptions.
- Click OK and let Auto BCC take care of your Outlook email CC or Blind Carbon Copies.
Please find more information here.
Can I use flexible conditions to create my Outlook Auto BCC rule?
Sure. You can take advantage of the following Conditions for BCC/CC that let your rules get even more flexibility:
- If Account is automatically adds BCC recipient for those Outlook messages that are sent from the selected e-mail account.
- If the subject line contains is the rule for emails with the specified keywords in the subject.
- If attachment name contains sends CC or BCC based on key words in the attachment name.
- With If To: contains use the recipient's email address or its part as a condition for sending BCC copy automatically.
- If CC: contains adds a blind copy if the email address or its part in the CC field coincides with the one you enter as a condition.
Is it possible to use several key phrases for each condition?
Yes! You can add BCC based not only on the Outlook Account, but also on key words in the subject. Thus, you can add phrases like "special offer", "special price", "discounts" to the "if Subject contains" condition, and have a BCC address added automatically for all messages that have them in the subject: "Special price for our customers", "Summer discounts", etc.
What about exceptions to BCC/CC rules, how does it work?
Let's say you've created a rule to BCC all outgoing messages sent from one of your Outlook accounts. But you don't want this rule to be applied to one particular address, yourfriend@domain.com. You take your Auto BCC rule in Outlook, open the Exceptions tab and add this address to the corresponding field. You can also create rule exceptions based on the Account Name, Subject, Attached file names as well as To and CC fields.
Can I see when CC/BCC addresses are added?
Yes, for this use the Turn on notifications option. You can choose either to see a desktop message with the CC/BCC added each time you send an email, or even manage adding blind carbon copies.
Get your Auto BCC license
| Business edition | |
| License for | Single user |
| One-time purchase
You pay only once and can use the purchased version as long as you need. |
✓ |
| Unconditional 60-day money back guarantee
If you are not 100% happy with the product, you can cancel an order and get your money back with no questions asked. |
✓ |
Volume discounts
|
✓ |
| Support for Outlook 365, 2021 – 2016
All Outlook versions 2021 – 2016 are supported, both 32- and 64-bit. Also, all desktop Outlook versions included in Microsoft 365 subscriptions. |
✓ |
| Free upgrades for 2 years
During 2 years after the purchase you get all minor updates and major upgrades for free. |
✓ |
| Technical support service
Our support team is always happy to help you via email, live chat, or phone no matter how long ago you purchased your license. |
✓ |
| Platform | For Windows only |
$2995
Buy now
|
Your order will be processed by MyCommerce (Digital River GmbH)
We use the e-commerce service provider MyCommerce (Digital River GmbH) to process your order and collect payment.
Get a formal quote
Place a Purchase Order (PO)
Purchasing FAQ
50% discount for educational and nonprofit organizations
For educational organizations and nonprofit organizations with a recognized legal status equivalent to IRC 501(c)(3), we offer a 50% discount from the regular price. To get your discount, please contact us using your organization's e-mail address.
Supported versions
- Outlook included in Microsoft 365
- Outlook 2021
- Outlook 2019
- Outlook 2016
- Note! Office Insider is not supported
- Windows 11
- Windows 10
- Note! Windows Insider is not supported
- Note! Windows X (on ARM processors) is not supported